
Looking for a yarn?


Comments / Questions (6)
![]() Claudia Carolina wrote:
Claudia Carolina wrote:
.... volevo dire - - - per la talia "M" - - -
07.07.2019 - 11:40
![]() Claudia Carolina wrote:
Claudia Carolina wrote:
Spett.le Drops... non mi trovo con i conteggi, nel aumentare, dove dice: """Sull’ultimo giro di A.3 distribuire 0-4-2 aumenti in modo uniforme sul giro = 108-114-120 maglie""" non mi sono trovata con gli aumenti per la taglia S... perché avendo 112 maglie se aumento 4 non ottengo 114 bensì 116 e ho tenuto 114 per avere il multiplo di 6 per seguire lo schema A2. grazie mille.
07.07.2019 - 11:38DROPS Design answered:
Buongiorno Claudia Carolina. Abbiamo corretto il testo: gli aumenti sono 4-2-0 maglie. È quindi corretto avere 114 maglie. Buon lavoro!
07.07.2019 - 13:04
![]() Claudia Carolina wrote:
Claudia Carolina wrote:
Spett.le Drops, grazie mille per tutti i modelli e per il modo in cui ci seguite mentre knittiamo e crochettiamo. Vorrei sapere quanti centimetri devo misurare dal inizio (avvio delle maglie) fino al giro in cui si dividono il davanti e il dietro. Grazie mille. Claudia
07.07.2019 - 11:29DROPS Design answered:
Buongiorno Claudia Carolina. Deve arrivare a 10-11-12 cm e lavorare altri 6 ferri, quindi aggiungere poco meno di 3 cm. Buon lavoro!
07.07.2019 - 13:10
![]() Sue Mellgren wrote:
Sue Mellgren wrote:
Neck warmer. After back piece is 5\" and I end on a P row, do my first row of 4 K, *K1P2* until last 5, then K5. what do I do when I flip to the wrong side? Exact same stitches? I tried that and it doesn\'t seem to make any sort of a pattern after the 1\".
11.08.2018 - 20:04DROPS Design answered:
Dear Sue, when the piece measures 5", you have to work a purl row in which you increase 12 sts inside the 4 edge sts at each side. Then, you have to change needle and work: 4 edge stitches in garter stitch, * knit 1, purl 2 *, repeat from *-* until there are 5 stitches left on the row, knit 1 and finish with 4 edge stitches in garter stitch. Then, continue like this for 1". Happy knitting!
12.08.2018 - 17:22
![]() Carole wrote:
Carole wrote:
Bonjour J'ai un problème avec les augmentations pour les mitaines. Je fais les jetés tel que décrit mais les trous sont encore trop apparent. Est-ce que je peux faire d'autres sortes d'augmentations pour être certaine de ne plus avoir ces trous? Merci beaucoup de votre aide.
17.10.2017 - 03:15DROPS Design answered:
Bonjour Carole, vous pouvez tout à fait utiliser la technique que vous souhaitez pour augmenter. Bon tricot!
17.10.2017 - 09:32
![]() Ann-Mari Lageholm wrote:
Ann-Mari Lageholm wrote:
Hittar inte själva stickbeskrivningen, endast garnåtgång och diagram???
26.09.2017 - 20:16DROPS Design answered:
Hei Ann-Mari. Her var det lagt dobbelt, men det er nå ordnet og oppskriften ligger nå under bildet. Takk for at du gjorde oss oppmerksom på dette. God Fornøyelse med å strikke dette flotte settet.
27.09.2017 - 09:12
|
|||||||||||||
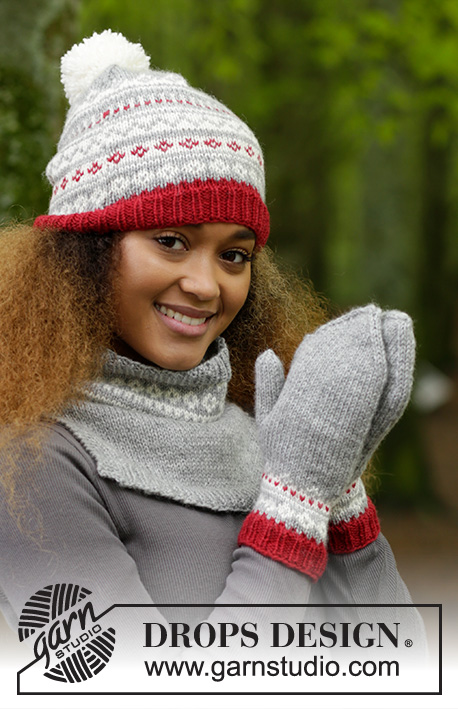
Narvik Set#narvikset |
|||||||||||||
 |
 |
||||||||||||
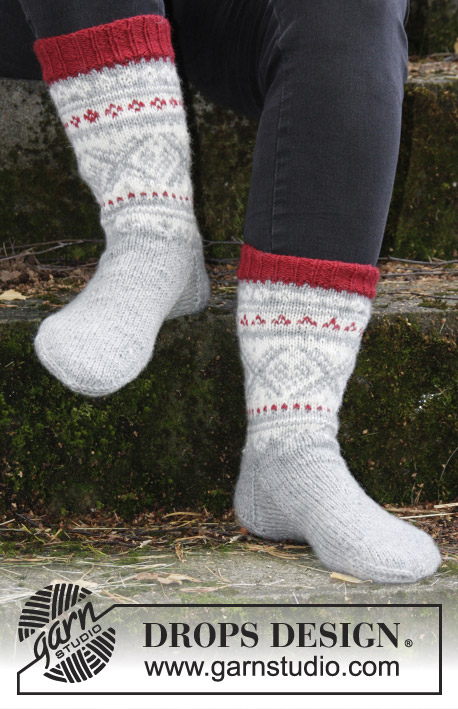
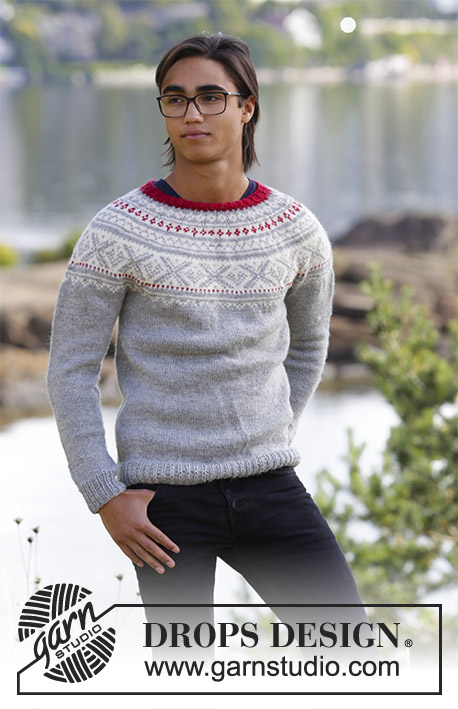
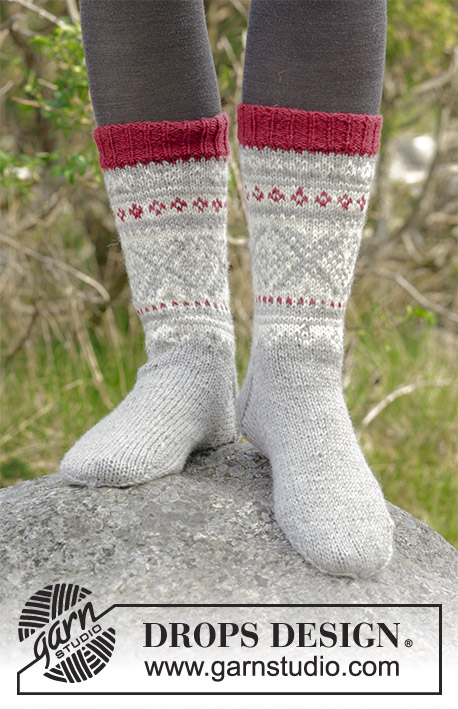
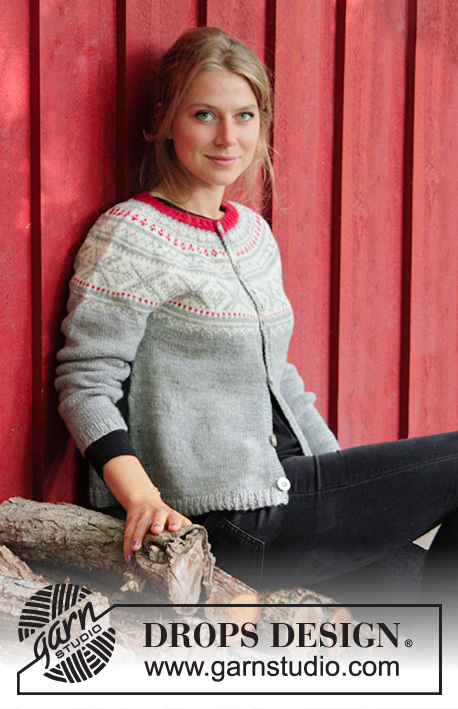
The set consists of: Knitted hat, neck warmer and mittens with multi-colored Nordic pattern. The set is worked in DROPS Karisma.
DROPS 183-3 |
|||||||||||||
|
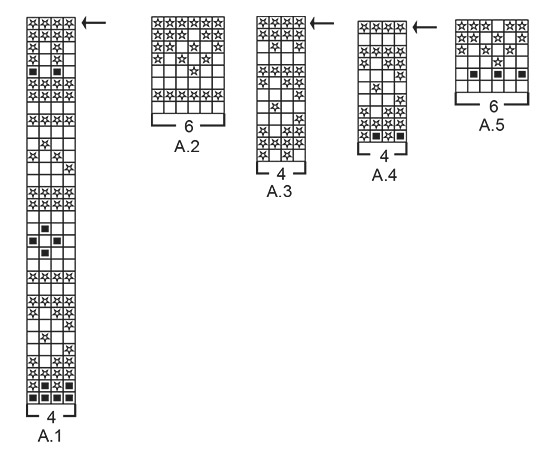
INFORMATION FOR THE PATTERN: RIDGE/GARTER STITCH (worked back and forth): 1 ridge = Knit 2 rows. RIDGE/GARTER STITCH (worked in the round): 1 ridge = 2 rounds. Knit 1 round and purl 1 round. DECREASE/INCREASE TIP: To work out how to decrease/increase evenly, count the total number of stitches on the needle (e.g. 111 stitches) and divide by the number of decreases/increases to be made (e.g. 7) = 15.9. In this example, knit approx. every 15th and 16th stitch together when decreasing. If you are increasing, make 1 yarn over after approx. every 16th stitch, on the next round/row work the yarn overs twisted to prevent holes. PATTERN: Hat: See diagrams A.1 and A.2. Neck warmer: See diagrams A.2 and A.3. Mittens: See diagrams A.4 and A.5. The whole pattern is worked in stockinette stitch. INCREASE TIP (for thumb gusset on mitten): Work up to the stitch with the marker, make 1 yarn over, knit 1 (= stitch with marker), make 1 yarn over (= 2 stitches increased). On the next round knit the yarn overs twisted to prevent holes. Next time you increase, work as follows: Work until there is 1 stitch left before the stitch with the marker, make 1 yarn over, knit 3, make 1 yarn over (= 2 stitches increased). Continue the increases in this way every 2nd round, i.e. you always increase on the outside of the increased stitches. DECREASE TIP (for mitten): Start 3 stitches before the marker thread, knit 2 together, knit 2 (the marker thread sits in the middle of these 2 stitches), slip 1 stitch as if to knit, knit 1, pass the slipped stitch over the knitted stitch (= 2 stitches decreased). ---------------------------------------------------------- HAT: The piece is worked in the round with circular needle, bottom up. Change to double pointed needles when necessary. Cast on 111-117-123 stitches with circular needle size 3 mm / US 2.5 and wine red. Knit 1 round. Then work rib (= knit 1 / purl 2) for 3-4-4 cm / 1"-1½"-1½". Knit 1 round where you decrease 3-5-7 stitches evenly on round – read DECREASE/INCREASE TIP = 108-112-116 stitches. Change to circular needle size 3.5 mm / US 4 and work A.1 (= 27-28-29 repeats of 4 stitches). REMEMBER THE GAUGE! On the last round of A.1 decrease 0-4-2 stitches evenly on round = 108-108-114 stitches. Then work A.2 in the round (= 18-18-19 repeats of 6 stitches). When A.2 has been completed, the piece measures approx. 16-17-17 cm / 6¼"-6¾"-6¾". Continue with stockinette stitch and light gray. When the piece measures 18-19-20 cm / 7"-7½"-8" insert 6 marker threads in the piece with 18-18-19 stitches between each marker thread. On the next round decrease 1 stitch after each marker thread by knitting 2 stitches together (= 6 stitches decreased). Decrease in this way every 2nd round a total of 6-6-7 times and then every round a total of 10 times in all sizes = 12 stitches remaining in all sizes. Cut the strand, pull it through the remaining stitches, tighten and fasten well. The hat measures approx. 25-26-28 cm / 9¾"-10¼"-11" from the top down. POM POM: Make a pom pom of approx. 8 cm / 3⅛" in diameter with off white. Sew the pom pom to the top of the hat. ---------------------------------------------------------- NECK WARMER: The piece is worked in the round with circular needle, top down until the top of the neck warmer is finished. Then the piece is divided at the sides and the front and back pieces are continued separately, back and forth on circular needle. Cast on 111-117-126 stitches with circular needle size 3 mm / US 2.5 and light gray. Knit 1 round. Then work rib (= knit 1 / purl 2) for 3 cm / 1". Knit 1 round where you decrease 7-5-6 stitches evenly on round – read DECREASE/INCREASE TIP = 104-112-120 stitches. Change to circular needle size 4 mm / US 6 and work A.3 (= 26-28-30 repeats of 4 stitches). REMEMBER THE GAUGE! On the last round of A.3 increase 4-2-0 stitches evenly on round = 108-114-120 stitches. Continue working A.2 in the round (= 18-19-20 repeats of 6 stitches). When A.2 has been completed, continue with light gray to finished length. When the piece measures 10-11-12 cm / 4"-4½"-4¾" insert 1 marker thread at the beginning of the round and 1 marker thread after 54-57-60 stitches (= 1 marker thread in each side). Now work 3 RIDGES – see description above, over 8 stitches in each side (the marker threads sit in the middle of these 8 stitches – the other stitches are worked in stockinette stitch). When you have worked 3 ridges in height in each side, divide the piece at both marker threads and finish the front and back pieces separately. THE PIECE IS NOW MEASURED FROM HERE! BACK PIECE: = 54-57-60 stitches. Work stockinette stitch back and forth, with 4 edge stitches in GARTER STITCH – see description above, in each side. When the piece measures 12-13-14 cm / 4¾"-5"-5½" from the separation, purl 1 row from the wrong side where you increase 12 stitches evenly on row in all sizes (the 4 edge stitches in each side are continued in garter stitch and you do not increase over these 4 stitches) = 66-69-72 stitches. Change to circular needle size 3 mm / US 2.5 and work the next row as follows from the right side: 4 edge stitches in garter stitch, * knit 1, purl 2 *, repeat from *-* until there are 5 stitches left on the row, knit 1 and finish with 4 edge stitches in garter stitch (the yarn overs from the previous row are worked twisted to prevent holes). Continue rib in this way for 3 cm / 1". Then bind off with garter stitch over garter stitch, knit over knit and purl over purl, but to avoid the bind-off edge being tight, make 1 yarn over after every 6th stitch at the same time as you bind off (yarn overs bind off as normal stitches). The neck warmer measures approx. 26-28-30 cm / 10¼"-11"-11¾" from the cast-on edge down. FRONT PIECE: = 54-57-60 stitches. Work in the same way as the back piece. ---------------------------------------------------------- RIGHT MITTEN: The piece is worked in the round with double pointed needles. Cast on 42-45-51 stitches with double pointed needles size 3 mm / US 2.5 and wine red. Knit 1 round. Then work rib (= knit 1 / purl 2) for 3 cm / 1". Knit 1 round where you decrease 6-5-3 evenly on round – read DECREASE/INCREASE TIP = 36-40-48 stitches. Change to double pointed needles size 3.5 mm / US 4 and work A.4 (= 9-10-12 repeats of 4 stitches). REMEMBER THE GAUGE! On the last round of A.4 increase 0-2-0 stitches evenly on round = 36-42-48 stitches. Continue working A.5 (= 6-7-8 repeats of 6 stitches). When A.5 has been completed the piece measures approx. 8 cm / 3⅛". Continue with light gray to finished length. AT THE SAME TIME on the first round after A.5 insert 1 marker in the first stitch on the round. Now increase to thumb gusset by increasing 1 stitch on each side of the stitch with the marker – read INCREASE TIP! Increase in this way every 2nd round a total of 6-7-8 times = 48-56-64 stitches. Continue working until the piece measures 12-13-14 cm / 4¾"-5"-5½". On the next round place the 13-15-17 thumb-gusset stitches on a thread, continue in the round with light gray and at the same time cast on 1 new stitch on the needle over the stitches on the thread = 36-42-48 stitches. Continue working the mitten until it measures 21-22-23 cm / 8¼"-8¾"-9" (there are now approx. ca 4 cm / 1½" left before finished length, you can try the mitten on and continue working to desired length). Insert 1 marker thread at the beginning of the round and 1 marker thread after 18-21-24 stitches. On the next round decrease 1 stitch on each side of both marker threads – read DECREASE TIP (= 4 stitches decreased). Decrease in this way every 2nd round a total of 5-4-3 times and then every round a total of 3-5-7 times = 4-6-8 stitches left on the needles. Cut the strand, pull it through the remaining stitches, tighten and fasten well. THUMB: Place the 13-15-17 thumb-gusset stitches from the thread back on double pointed needles size 3.5 mm / US 4 and knit up 2 stitches behind the thumb with light gray = 15-17-19 stitches. Work stockinette stitch in the round until the thumb measures approx. 5-5½-6 cm / 2"-2¼"-2½" (you can try the mitten on, there is now approx. ½ cm / ¼" before finished length). Knit 2 rounds where you knit the stitches together, two and two on both rounds = 4-5-5 stitches left on the needles. Cut the strand, pull it through the remaining stitches, tighten and fasten well. LEFT MITTEN: Cast on and work in the same way as the right mitten, but when the increases for the thumb gusset start, work as follows: Increase for the thumb by increasing 1 stitch on each side of the last stitch on the round. The rest of the mitten is worked in the same way as the right mitten. |
|||||||||||||
Diagram explanations |
|||||||||||||
|
|||||||||||||
|
|||||||||||||
Have you finished this pattern?Tag your pictures with #dropspattern #narvikset or submit them to the #dropsfan gallery. Do you need help with this pattern?You'll find 32 tutorial videos, a Comments/Questions area and more by visiting the pattern on garnstudio.com. © 1982-2025 DROPS Design A/S. We reserve all rights. This document, including all its sub-sections, has copyrights. Read more about what you can do with our patterns at the bottom of each pattern on our site. |
|||||||||||||


With over 40 years in knitting and crochet design, DROPS Design offers one of the most extensive collections of free patterns on the internet - translated to 17 languages. As of today we count 314 catalogs and 11821 patterns - 11811 of which are translated into English (US/in).
We work hard to bring you the best knitting and crochet have to offer, inspiration and advice as well as great quality yarns at incredible prices! Would you like to use our patterns for other than personal use? You can read what you are allowed to do in the Copyright text at the bottom of all our patterns. Happy crafting!
Post a comment to pattern DROPS 183-3
We would love to hear what you have to say about this pattern!
If you want to leave a question, please make sure you select the correct category in the form below, to speed up the answering process. Required fields are marked *.