
Oblíbené kategorie
Hledáte přízi?


|
|||||||||||||
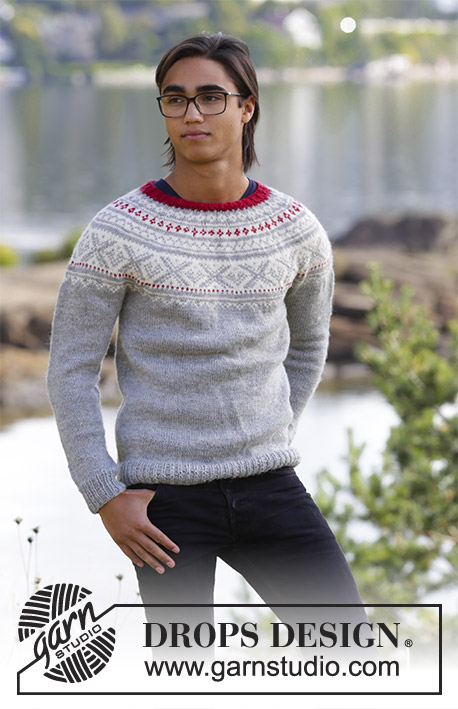
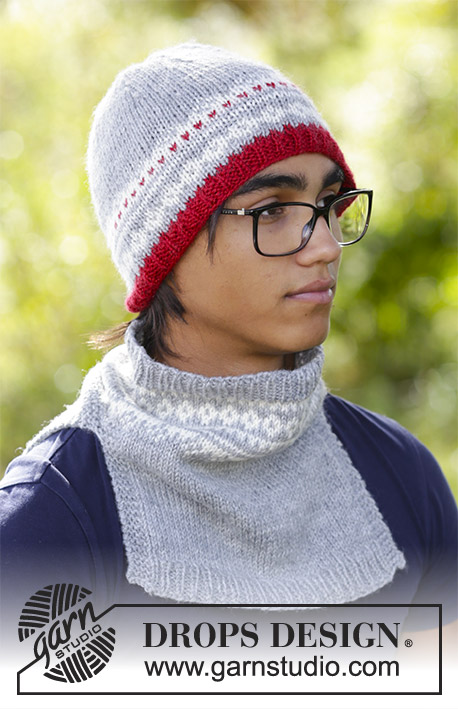
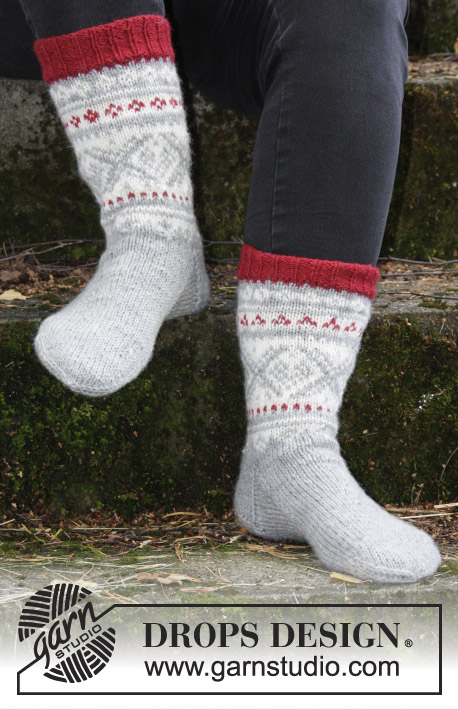
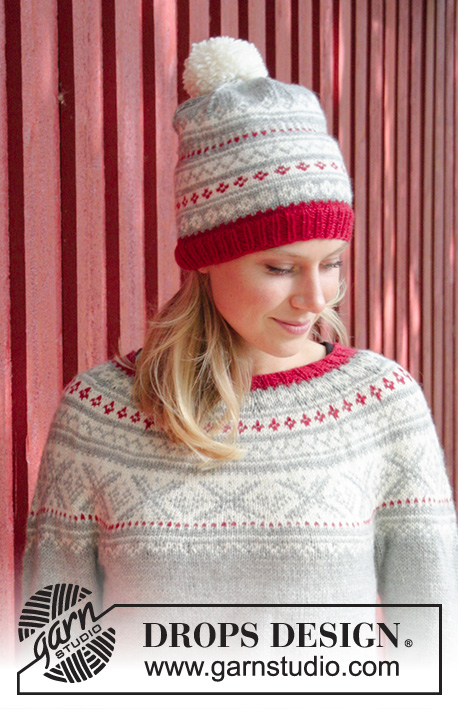
Narvik Set |
|||||||||||||
 |
 |
||||||||||||
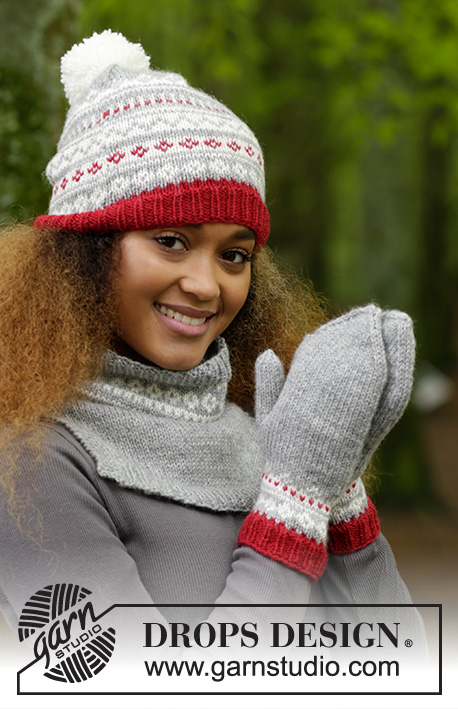
Souprava: čepice – kulich s bambulí a norským vzorem, nákrčník a rukavice – palčáky s norským vzorem pletené z příze DROPS Karisma.
DROPS 183-3 |
|||||||||||||
|
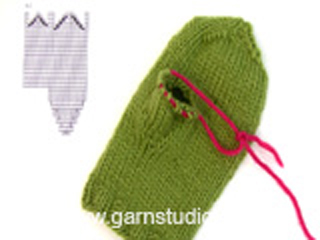
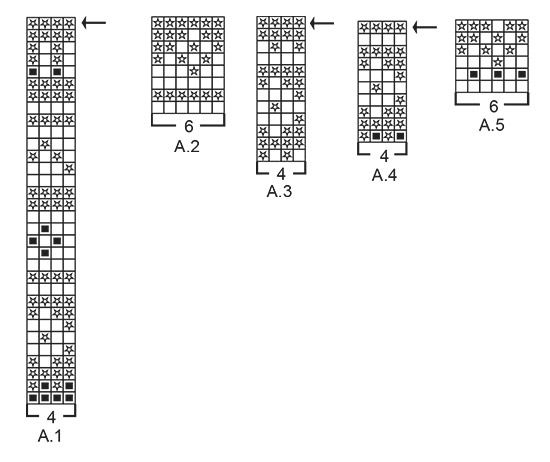
VROUBKOVÝ VZOR: V řadách: 1 vroubek = 2 řady hladce. Pleteme stále hladce, lícové i rubové řady. V kruhových řadách: 1 vroubek = 2 kruhové řady. Pleteme střídavě 1 kruhovou řadu hladce, 1 obrace. TIP – UJÍMÁNÍ/PŘIDÁVÁNÍ: Abychom vypočítali, jak často musíme ujímat/přidávat, vydělíme celkový počet ok v kruhové řadě (např. 111 ok) počtem ok, která potřebujeme ujmout/přidat (např. 7), takže 111:7 = 15,9. V tomto případě tedy splétáme hladce dohromady každé zhruba 15. a 16. oko. Pokud přidáváme, pak za každým zhruba 16. okem 1x nahodíme; v následující kruhové řadě/řadě pleteme nahození za zadní nit, aby se v pletenině netvořily dírky. VZOR: Čepice: viz schémata A.1 a A.2. Nákrčník: viz schémata A.2 a A.3. Rukavice: viz schémata A.4 a A.5. Celý vzor pleteme lícovým žerzejem. TIP - PŘIDÁVÁNÍ (rukavice - palec): Pleteme až k označenému oku, 1x nahodíme, 1 oko upleteme hladce (= označené oko), 1x nahodíme (= přidali jsme 2 oka). V následující kruhové řadě pleteme nahození za zadní nit, aby se v pletenině netvořily dírky. Při následujícím přidávání postupujeme takto: pleteme po poslední 1 oko před označeným okem, 1x nahodíme, 3 oka upleteme hladce, 1x nahodíme (= přidali jsme 2 oka). Takto pokračujeme v přidávání v každé 2. kruhové řadě, tj. přidáváme vždy na vnějších stranách vznikajícího klínu. TIP - UJÍMÁNÍ (rukavice): Začínáme 3 oka před značkou: 2 oka spleteme hladce, 2 upleteme hladce (značka leží mezi nimi), 1 oko sejmeme hladce, 1 upleteme hladce a sejmuté přes ně přetáhneme (= ujmuli jsme 2 oka). ---------------------------------------------------------- ČEPICE: Pleteme v kruhových řadách na kruhové jehlici, zdola nahoru. Podle potřeby převedeme pleteninu na ponožkové jehlice. Na kruhovou jehlici č.3 nahodíme vínovou přízí 111-117-123 ok a upleteme 1 kruhovou řadu hladce. Pokračujeme pružným vzorem 1/2 (tj. střídáme 1 oko hladce, 2 obrace). Ve výši 3-4-4 cm pleteme 1 kruhovou řadu hladce a SOUČASNĚ ujmeme rovnoměrně 3-5-7 ok – viz TIP – UJÍMÁNÍ/PŘIDÁVÁNÍ = 108-112-116 ok. Pleteninu převedeme na kruhovou jehlici č.3,5 a pleteme vzor A.1 (= 27-28-29 sekvencí vzoru po 4 okách). V poslední kruhové řadě vzoru A.1 ujmeme rovnoměrně 0-4-2 oka = 108-108-114 ok. Pokračujeme vzorem A.2 (= 18-18-19 sekvencí vzoru po 6 okách). Po dokončení 1 celé sekvence vzoru A.2 (na výšku) měří díl asi 16-17-17 cm. Pleteme lícovým žerzejem, světle šedou přízí. Ve výši 18-19-20 cm vložíme do pleteniny 6 značek, vždy po 18-18-19 okách. V následující kruhové řadě ujmeme za každou značkou 1 oko – ujímáme spletením 2 ok hladce (= ujmeme 6 ok). Takto ujímáme v každé 2. kruhové řadě, celkem 6-6-7x, pak ještě v každé kruhové řadě, celkem 10x – platí pro všechny velikosti = zbývá 12 ok – platí pro všechny velikosti. Přízi odstřihneme, protáhneme zbylými oky, stáhneme a zapošijeme. Čepice je vysoká asi 25-26-28 cm. BAMBULE: Ze smetanové příze vyrobíme bambuli o průměru asi 8 cm a přišijeme ji na vrcholek čepice. ---------------------------------------------------------- NÁKRČNÍK: Pleteme v kruhových řadách na kruhové jehlici, shora dolů. Po dokončení horní části rozdělíme pleteninu na bocích a dokončíme přední a zadní díl v řadách odděleně. Na kruhovou jehlici č.3 nahodíme světle šedou přízí 111-117-126 ok a upleteme 1 kruhovou řadu hladce. Pokračujeme pružným vzorem 1/2 (tj. střídáme 1 oko hladce, 2 obrace). Ve výši 3 cm pleteme 1 kruhovou řadu hladce a SOUČASNĚ ujmeme rovnoměrně 7-5-6 ok – viz TIP – UJÍMÁNÍ/PŘIDÁVÁNÍ = 104-112-120 ok. Pleteninu převedeme na kruhovou jehlici č.4 a pleteme vzor A.3 (= 26-28-30 sekvencí vzoru po 4 okách). V poslední kruhové řadě vzoru A.3 přidáme rovnoměrně 4-2-0 oka = 108-114-120 ok. Pokračujeme vzorem A.2 (= 18-19-20 sekvencí vzoru po 6 okách). Po dokončení celé sekvence vzoru A.2 (na výšku) dokončíme nákrčník světle šedou přízí. Ve výši 10-11-12 cm si označíme začátek kruhové řady a druhou značku vložíme za 54.-57.-60. oko (= boky). Nyní upleteme nad 8 oky na každém boku 3 VROUBKY – viz výše (značka leží vždy uprostřed těchto 8 ok – ostatní oka v kruhové řadě pleteme lícovým žerzejem). Když máme na každém boku upletené 3 vroubky, rozdělíme pleteninu u značek na přední a zadní díl a ty dokončíme odděleně v řadách. NYNÍ MĚŘÍME DÍL OD TOHOTO MÍSTA! ZADNÍ DÍL: = 54-57-60 ok. Pleteme v řadách lícovým žerzejem se 4 krajními oky na každé straně VROUBKOVÝM VZOREM – viz výše. Ve výši 12-13-14 cm od rozdělení upleteme 1 rubovou řadu obrace a SOUČASNĚ přidáme rovnoměrně 12 ok – platí pro všechny velikosti (4 krajní oka na každé straně dílu pleteme dál vroubkovým vzorem – nad těmito krajními oky nebudeme přidávat) = 66-69-72 ok. Pleteninu převedeme na kruhovou jehlici č.3 a následující (lícovou) řadu pleteme takto: 4 krajní oka vroubkovým vzorem, *1 oko hladce, 2 obrace*, *-* opakujeme až po posledních 5 ok v řadě, 1 oko upleteme hladce a krajní oka vroubkovým vzorem (nahození z předchozí řady pleteme za zadní nit, aby se v pletenině netvořily dírky). Tímto pružným vzorem upleteme 3 cm výšky. Pak všechna oka dle vzoru uzavřeme (tj. vroubková oka uzavřeme vroubkovým vzorem, hladká hladce, obrácená obrace); abychom neměli uzavřený okraj moc stažený, tak během uzavírání 1x nahodíme za každým 6. okem – nahození hned uzavřeme jako běžné oko. Nákrčník měří asi 26-28-30 cm. PŘEDNÍ DÍL: = 54-57-60 ok. Pleteme stejně jako zadní díl. ---------------------------------------------------------- RUKAVICE PRAVÁ RUKAVICE: Pleteme v kruhových řadách na ponožkových jehlicích. Na ponožkové jehlice č.3 nahodíme vínovou přízí 42-45-51 ok a upleteme 1 kruhovou řadu hladce. Pokračujeme pružným vzorem 1/2 (tj. střídáme 1 oko hladce, 2 obrace). Ve výši 3 cm pleteme 1 kruhovou řadu hladce a SOUČASNĚ ujmeme rovnoměrně 6-5-3 ok – viz TIP – UJÍMÁNÍ/PŘIDÁVÁNÍ = 36-40-48 ok. Pleteninu převedeme na ponožkové jehlice č.3,5 a pleteme vzor A.4 (= 9-10-12 sekvencí vzoru po 4 okách). V poslední kruhové řadě vzoru A.4 přidáme rovnoměrně 0-2-0 = 36-42-48 ok. Pokračujeme vzorem A.5 (= 6-7-8 sekvencí vzoru po 6 okách). Po dokončení celé sekvence vzoru A.5 (na výšku) měří díl asi 8 cm. Rukavici dopleteme světle šedou přízí. SOUČASNĚ si v 1. kruhové řadě po vzoru A.5 označíme 1. oko. Nyní začneme tvarovat klínek pro palec: přidáváme 1 oko na každé straně označeného oka – viz TIP - PŘIDÁVÁNÍ! Toto přidávání opakujeme v každé 2. kruhové řadě, celkem 6-7-8x = 48-56-64 ok. Pleteme dál až do výše 12-13-14 cm. V následující kruhové řadě odložíme 13-15-17 ok palce na pomocnou jehlici. Dál pleteme v kruhových řadách světle šedou přízí a SOUČASNĚ nahodíme za odloženými oky 1 oko nové = 36-42-48 ok. Pleteme do výše 21-22-23 cm (do výsledných rozměrů teď zbývá doplést asi 4 cm výšky, rukavici si můžeme vyzkoušet a naměřit odpovídající délku). Označíme si začátek kruhové řady a druhou značku vložíme za 18.-21.-24. oko. V následující kruhové řadě ujmeme 1 oko na obou stranách obou značek – viz TIP - UJÍMÁNÍ (= ujmeme 4 oka). Takto ujímáme v každé 2. kruhové řadě, celkem 5-4-3x, pak ještě v každé kruhové řadě, celkem 3-5-7x = na jehlicích zbývá 4-6-8 ok. Přízi odstřihneme, protáhneme zbylými oky, stáhneme a zapošijeme. PALEC: Odložených 13-15-17 ok palce vrátíme z pomocné jehlice zpět na ponožkové jehlice č.3,5 a z okraje za palcem nabereme světle šedou přízí 2 oka = 15-17-19 ok. Pleteme lícovým žerzejem v kruhových řadách až do výše asi 5-5,5-6 cm (rukavici si můžeme vyzkoušet, do výsledných rozměrů zbývá asi 0,5 cm). V každé z následujících 2 kruhových řad spleteme každá 2 oka hladce = na jehlicích zbývá 4-5-5 ok. Přízi odstřihneme, protáhneme zbylými oky, stáhneme a zapošijeme. LEVÁ RUKAVICE: Nahodíme a pleteme stejně jako pravou rukavici, jen zrcadlově převrácenou, tj. pro kínek palce začneme přidávat takto: přidáváme 1 oko na každé straně posledního oka v kruhové řadě. |
|||||||||||||
Vysvětlivky ke schématu |
|||||||||||||
|
|||||||||||||
|
|||||||||||||
|
Vyrobili jste si tento nebo nějaký jiný z našich modelů? Přidejte ke svým fotkám na sociálních sítích tag #dropsdesign - díky tomu je uvidíme i my! Potřebujete s tímto návodem poradit?Otevřete-li si návod na stránce garnstudio.com, najdete tam výukových video-ukázek, Komentáře/Dotazy a další užitečné informace. © 1982-2024 DROPS Design A/S. Vyhrazujeme si veškerá práva. Tento dokument, včetně všech jeho dílčích částí, podléhá autorským právům. Podrobnější komentář k možnostem užití našich návodů najdete dole pod každým návodem na našich stránkách. |
|||||||||||||


V oblasti pletené a háčkované módy působí DROPS Design více než 40 let. Díky tomu vám můžeme nabídnout jednu z nejrozsáhlejších kolekcí modelů s bezplatnými návody dostupnými na internetu - navíc v 17 jazycích. K dnešnímu dni máme na 304 katalogů a 11422 návodů celkem - z nich je už 6283 dostupných v češtině.
Komentáře / Otázky (6)
.... volevo dire - - - per la talia "M" - - -
07.07.2019 - 11:40Spett.le Drops... non mi trovo con i conteggi, nel aumentare, dove dice: """Sull’ultimo giro di A.3 distribuire 0-4-2 aumenti in modo uniforme sul giro = 108-114-120 maglie""" non mi sono trovata con gli aumenti per la taglia S... perché avendo 112 maglie se aumento 4 non ottengo 114 bensì 116 e ho tenuto 114 per avere il multiplo di 6 per seguire lo schema A2. grazie mille.
07.07.2019 - 11:38DROPS Design answered:
Buongiorno Claudia Carolina. Abbiamo corretto il testo: gli aumenti sono 4-2-0 maglie. È quindi corretto avere 114 maglie. Buon lavoro!
07.07.2019 - 13:04Spett.le Drops, grazie mille per tutti i modelli e per il modo in cui ci seguite mentre knittiamo e crochettiamo. Vorrei sapere quanti centimetri devo misurare dal inizio (avvio delle maglie) fino al giro in cui si dividono il davanti e il dietro. Grazie mille. Claudia
07.07.2019 - 11:29DROPS Design answered:
Buongiorno Claudia Carolina. Deve arrivare a 10-11-12 cm e lavorare altri 6 ferri, quindi aggiungere poco meno di 3 cm. Buon lavoro!
07.07.2019 - 13:10Neck warmer. After back piece is 5\" and I end on a P row, do my first row of 4 K, *K1P2* until last 5, then K5. what do I do when I flip to the wrong side? Exact same stitches? I tried that and it doesn\'t seem to make any sort of a pattern after the 1\".
11.08.2018 - 20:04DROPS Design answered:
Dear Sue, when the piece measures 5", you have to work a purl row in which you increase 12 sts inside the 4 edge sts at each side. Then, you have to change needle and work: 4 edge stitches in garter stitch, * knit 1, purl 2 *, repeat from *-* until there are 5 stitches left on the row, knit 1 and finish with 4 edge stitches in garter stitch. Then, continue like this for 1". Happy knitting!
12.08.2018 - 17:22Bonjour J'ai un problème avec les augmentations pour les mitaines. Je fais les jetés tel que décrit mais les trous sont encore trop apparent. Est-ce que je peux faire d'autres sortes d'augmentations pour être certaine de ne plus avoir ces trous? Merci beaucoup de votre aide.
17.10.2017 - 03:15DROPS Design answered:
Bonjour Carole, vous pouvez tout à fait utiliser la technique que vous souhaitez pour augmenter. Bon tricot!
17.10.2017 - 09:32Hittar inte själva stickbeskrivningen, endast garnåtgång och diagram???
26.09.2017 - 20:16DROPS Design answered:
Hei Ann-Mari. Her var det lagt dobbelt, men det er nå ordnet og oppskriften ligger nå under bildet. Takk for at du gjorde oss oppmerksom på dette. God Fornøyelse med å strikke dette flotte settet.
27.09.2017 - 09:12