Junior by DROPS Design

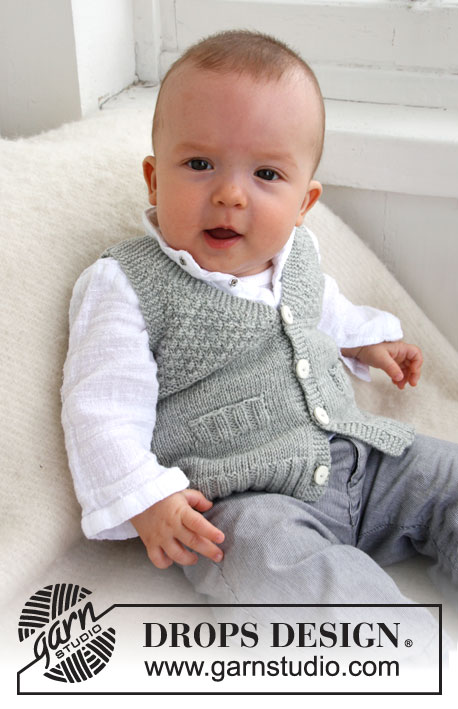
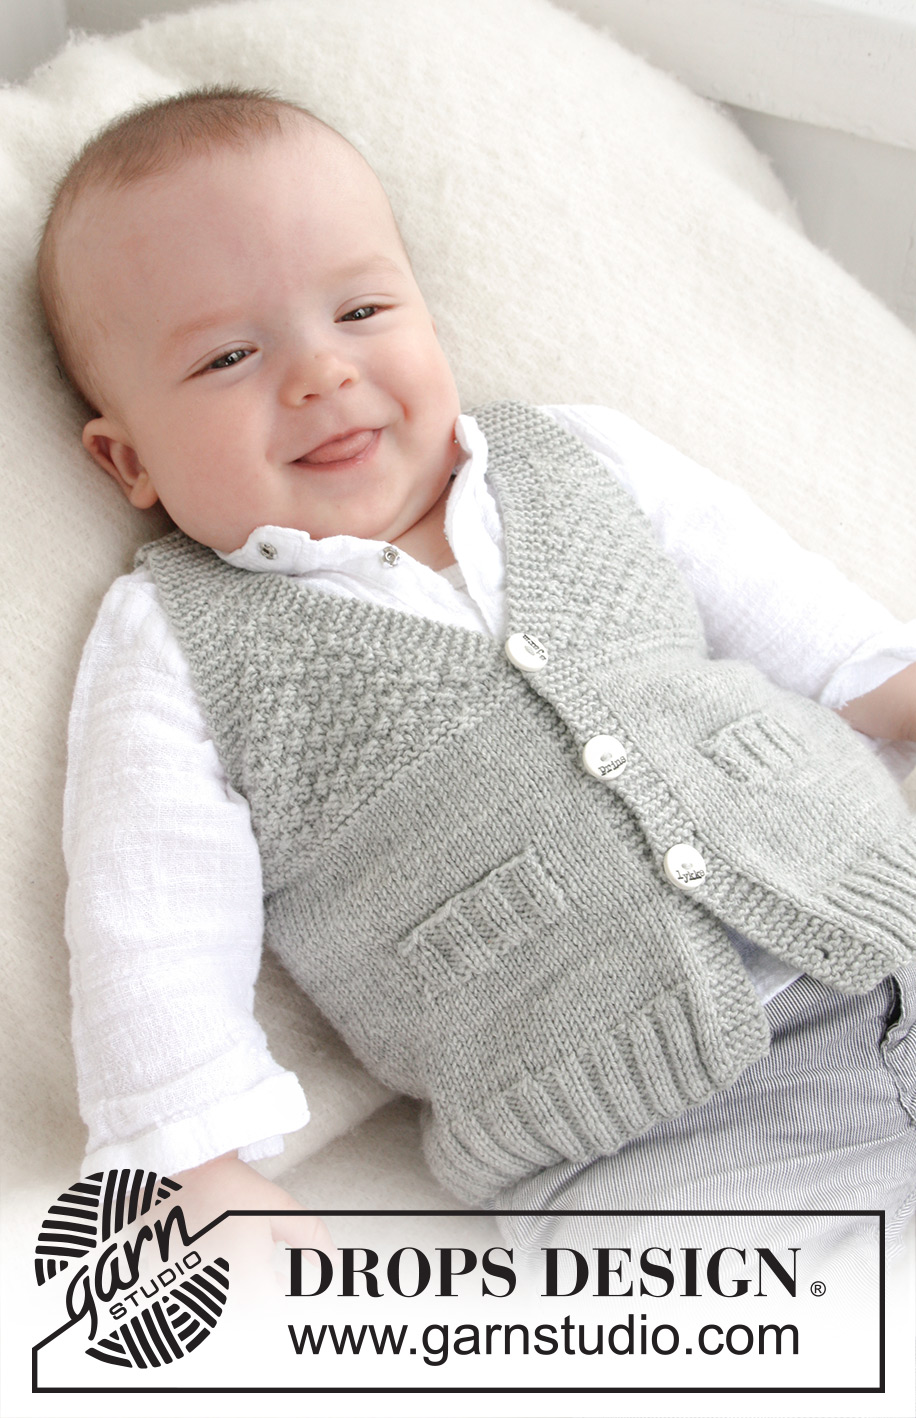
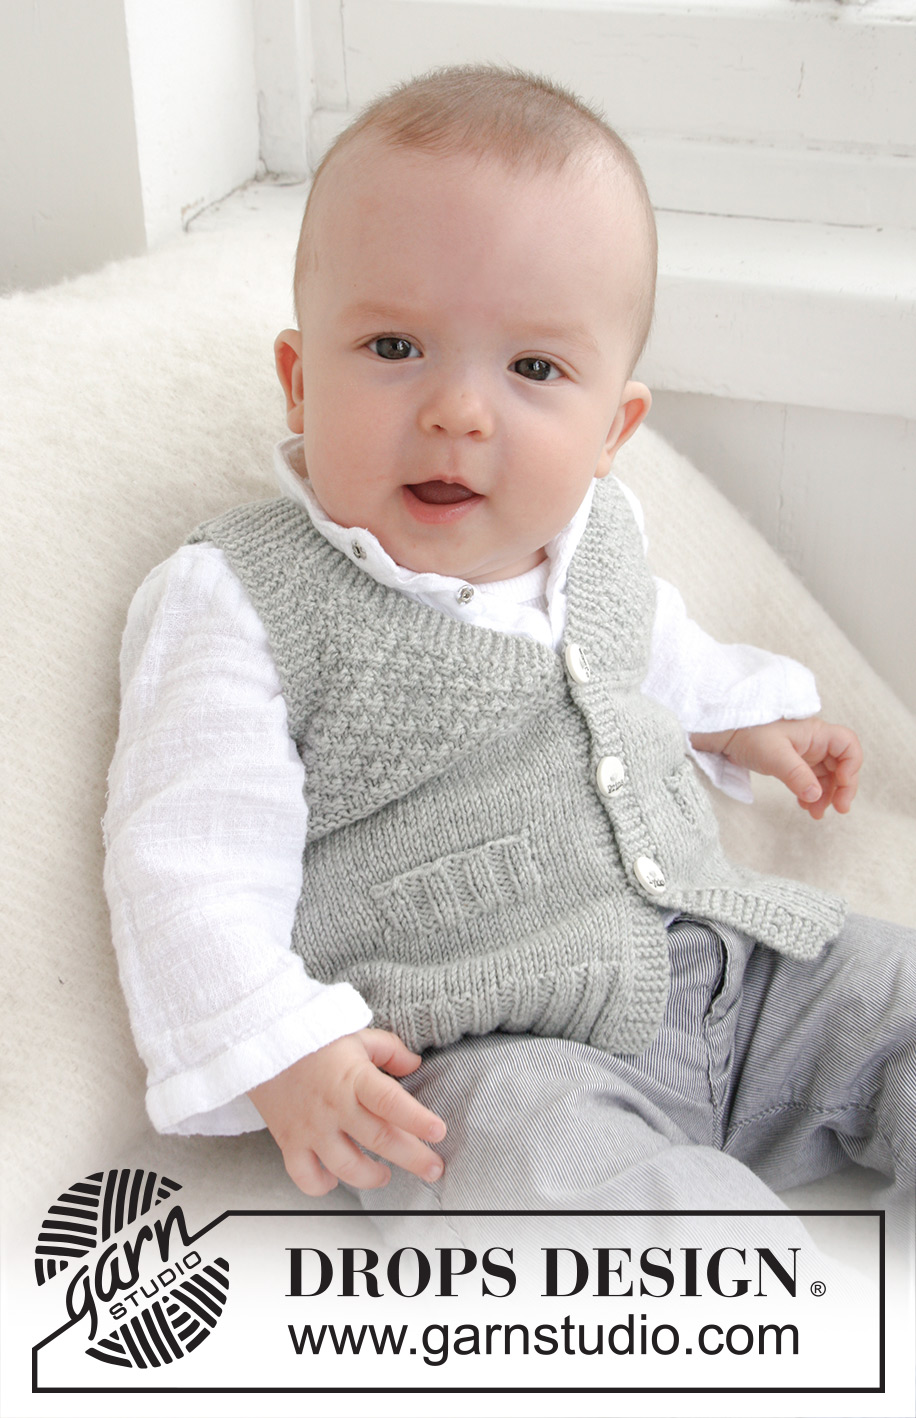
DROPS Baby 21-8 Kötött mellény V nyakkivágással, struktúra mintával, kisbabáknak és gyerekeknek, DROPS BabyMerino vagy DROPS Baby Alpaca Silk fonalból

DROPS Baby 21-8
DROPS design: BM-036-by jelű minta
A fonalcsoport
--------------------------------------------------------
Méret: 1/3 - 6/9 - 12/2 - 3/4 éveseknek.
A méret cm-ben: 56/62 - 68/74 - 80/86 (86/92 - 98/104)

Alapanyagok: DROPS BABY MERINO a Garnstudiótól
100-100-100 (100-150) gramm a 19 sz. szürke színből

Vagy használjunk
DROPS BABY ALPACA SILK fonal a Garnstudiótól
100-100-100 (150-150) gramm a 8465 sz. középszürke színből

DROPS KÖRKÖTŐTŰ, 3 mm vastag, (0 vagy 80 cm hosszú) vagy olyan vastagságú, amellyel 24 szem X 32 sor= 10 X 10 cm próbadarabot tudunk készíteni harisnyakötéssel.
DROPS körkötőtű (80 cm hosszú), 2,5 mm vastag, a bordás mintához.

DROPS GYÖNGYHÁZ GOMB 521-ES SZÁMÚ 4 darab

-------------------------------------------------------

Kötéspróba – Nézze meg hogyan és miért kell megmárni ITT
Választható más fonalak – Nézze meg hogyan helyettesítheti be a fonalat ITT.
A_F fonalcsoportok – Használja ugyanazt a mintát és helyettesítse be a fonalat ITT.
Fonalhasználat más, behelyettesített fonalnál – Hazsnálja a fonalátváltónkat.

-------------------------------------------------------


100% gyapjú
minimum 1071.00 Ft /50g
DROPS Baby Merino uni colour DROPS Baby Merino uni colour 1071.00 Ft /50g
Nordfonal.hu
Rendelés
DROPS Baby Merino mix DROPS Baby Merino mix 1071.00 Ft /50g
Nordfonal.hu
Rendelés
needles Kötőtűk & Horgolótűk Rendelés
Ehhez a darabhoz, megvásárolhatja a fonalat már 2142Ft. Olvasson tovább.

Mintaleírás

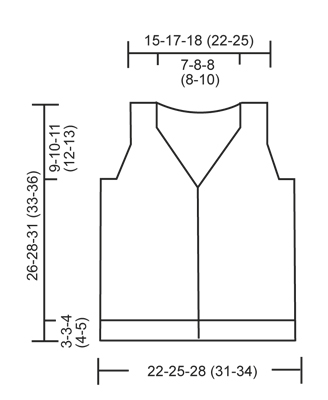
LUSTAKÖTÉS (a kötőtűn oda-vissza): Minden sorban sima szemekkel kötünk.

Dupla rizsminta:
1. sor: * 2 sima, 2 fordított. * Ismételjük a *-* közötti részt
2. sor: Folytassuk a kötést, a sima szemeket simán, a fordított szemeket fordítottan kötjük.
3. sor: A sima szemeket F, a fordított szemeket S kötjük.
3. sor:
4. sor: Mint a 2. sort / kört.
Ismételjük a 1- 4. sort / kört.

GOMBLYUKAK:
A gomblyukakat a jobboldali gomboláspánton készítjük el: 1 gomblyuk= kössük össze a 2.és a 3. szemet az eleje közepénél, majd 1RH. A gomblyukakat akkor készítjük, amikor a darabunk
1/3 hónapos babákra való méretnél: 2, 6, 10 és 14 cm.
6/9 hónapos babákra való méretnél: 2, 7, 11 és 16 cm.
12/18 hónapos babákra való méretnél: 2, 7, 12 és 17 cm.
2 éveseknek való méretnél: 2, 8, 13 és 19 cm.
3/4 éveseknek való méretnél: 2, 8, 14 és 20 cm.

Fogyasztás a V nyakkivágáshoz a dupla rizsmintában.
Minden fogyasztást a színe oldal felől készítünk.
A gomb. pánt + ujja szegélye előtt a következő módon készítjük a fogyasztásokat:
Amikor az utolsó szem S szem: 2 szemet simán összekötünk.
Amikor az utolsó szem F szem: 2 szemet fordítottan összekötünk.
A gomb. pánt + ujja szegélye után a következő módon készítjük a fogyasztásokat:
Amikor az 1 szem S szem: Egy szemet simán leemelünk, egy sima, és a leemelt szemet az lekötött szemen áthúzzuk
Amikor az 1 szem F szem: 2 szemet csavart-F összekötünk (vagyis a szemek hátsó "lábába" öltünk az első helyett).
--------------------------------------------------------
--------------------------------------------------------

TESTRÉSZ:
Körkötőtűn kötjük, oda-vissza az eleje közepétől kezdve.
A kezdéshez szedjünk fel 148-168-184 (204-224) szemet a 2,5 mm-es körkötőtűre, a Baby Merino fonalból. A következő színe oldali sorban így kössük 5 szem lustakötéssel (= gomb pánt) - lásd a fenti magyarázatot. * 2 S / 2 F bordás minta. * Ism a *-* közötti részt, amíg 7 szem marad, 2 S 5 szem lustakötéssel (= gomb pánt) fejezzük be a sort. Folytassuk a bord mintával a fentiek szerint, 5-5 szem lustakötéssel a darab mindkét oldalán, amíg a darabunk 3-3-4 (4-5) cm-es lesz. Ne felejtsük elkészíteni a GOMBLYUKAKAT a jobboldali gomboláspánton- lásd a fenti magyarázatot! Váltsunk az 3 mm vastag körkötőtűre, és folytassuk harisnyakötéssel (a gomb pánt szemeit a korábbiaknak megfelelően lustakötéssel kötjük tovább): UGYANAKKOR, a bord minta utáni 1. sorban egyenletesen elosztva fogy 32-36-40 (44-52) szemet = 116-132-144 (160-172) szem. Tegyünk 1 jelölőt a darabba, mindkét oldaltól 31-35-39 (43-45) szemnyire =54-44-62-66 (74-82) szem marad a két jelölő között a hátához). NE FELEDKEZZÜNK MEG A MEGFELELŐ KÖTÉSPRÓBA BETARTÁSÁRÓL! Amikor a darabunk 7-7½-8 (9-10) cm-es, a következő színe oldali sorban így haladjunk: 5 szem lustakötéssel, 21-21-27 (27-31) szem harisnyakötéssel, csúsztassuk az utolsó 16-16-20 (20-24) lekötött szemet szemtartóra a zseb hasítékához, kössünk, amíg 10-10-12 (12-12) szem marad a kötőtűn. Csúsztassuk az utolsó lekötött 16-16-20 (20-24 szemet szemtartóra a zseb hasítékához, kössünk 5-5-7 (7-7) szemet harisnyakötéssel, és a sort 5 lustakötéses szélszemmel fejezzük be. A következő sorban szedjünk fel 16-16-20 (20-24) új szemet a 2 szemtartóra tett szemek felett = 116-132-144 (160-172) szem. Folytassuk harisnyakötéssel, és lustakötéssel, amíg a darabunk 13-14-16 (16-18) cm-es lesz. Most kössünk 4 sort sima szemekkel minden szemen (= 2 bordányit, lustakötéssel). Most folyt a dupla rizsmintával - olvassuk el a fenti magyarázatot- és a gomb pántokon a lustakötéses szemekkel a korábbiaknak megfelelően folytatjuk a munkát. MIELŐTT FOLYTATNÁNK A MUNKÁT OLVASSUK EL A TELJES HÁTRA LÉVŐ RÉSZT: Amikor a darabunk 15-17-18 (20-21) cm-es, kössünk 2 sort lustakötéssel a kötőtűn levő első 5 szemen (a többi szemet nem kötjük le), majd kössünk 1 sort minden szemen. Kössünk 2 sort lustakötéssel az első 5 szemen, a darab másik oldalán (így a V nyakkivágás szebben áll majd. Ezután fogyasszunk a V nyakkivágás kialakításához - lásd a fenti magyarázatot! 1 SZEMET fogy minden 2. sorban (vagyis minden SZO felőli sorban) összesen 12-13-16 (16-16) alkalommal. UGYANANKOR, Amikor a darabunk 16-17-19 (3720-22) cm-es kössünk 4 bordányit lustakötéssel a középső 18-20-20 (20-20) szemen mindkét oldalon (vagyis mindkét jelölő mindkét oldalán 9-10-10 (10-10) szemen). a TÖBBI SZEMEN A KORÁBBIAKNAK MEGFELELŐEN FOLYTATJUK A MUNKÁT. A köv sorban mindkét oldalon láncoljuk le a középső 8-10-10 (10-10) szemet a karöltő kialakításához, és az elejét és a hátát külön-külön fejezzük be.

HÁTA:
= 46-52-56 (64-72) szem. Folytassuk a dupla rizsmintával, és 5 lustakötéses szemmel a két szélén (= az ujja széle).). UGYANAKKOR fogyasszunk a karöltők kialakításához - OLVASSUK EL A FENTI LEÍRÁST. 1 szemet fogy minden 2. sorban (vagyis minden SZO sorban) összesen 5-6-6 (6-6) alkalommal = 36-40-44 (52-60) szemünk marad a kötőtűn a sorban. Folytassuk a dupla rizsmintával, és a lustakötéssel, amíg a darabunk 24-26-29 (31-34) cm-es lesz. Majd lustakötéssel folytatjuk minden szemen, a teljes méretig. UGYANAKKOR, mikor a darabunk kb 25-27-30 (32-35) cm-es láncoljuk le a középső 16-18-20 (20-24) szemet a nyakkivágáshoz = 10-11-12 (16-18) szem marad a kötőtűn mindkét vállhoz. Most a két vállrészt külön-külön fejezzük be. Folytassuk lustakötéssel, amíg a darabunk 26-28-3133-36-78 cm-es lesz, majd láncoljuk le a szemeket.

BAL ELEJE:
Folytassuk a dupla rizsmintával, és a lustakötéssel, miközben UGYANAKKOR, a karöltő kialakításához, az oldalán szemeket fogyasztunk a hátához hasonló módon, és folyt a fogyasztást a V nyakkivágás kialakításához a korábbiak szerint. Miután minden fogyasztást elkészítettünk 10-11-12 (16-18) szem marad a kötőtűn. Kössünk lustakötéssel minden szemen, amíg a darabunk 26-28-31 (33-36) cm-es lesz. Láncoljuk le a szemeket

JOBB ELEJE:
Ugyanúgy készítjük, mint a bal eleje darabot, de annak tükörképeként.

A ZSEB HASÍTÉKA:
Csúsztassuk a szemtartóra félretett 16-16-20 (20-24) szemet az egyik elején vissza a 2,5 mm-es körkötőtűre. Kössünk a bordás mintával (2 S 6 2 F), oda-vissza haladva, 1 lustakötéses szemmel, és 2 S szemmel mindkét oldalon (a SZO felől nézve). Amikor a zseb hasítéka kb 2½-2½-3 (3-3) cm-es lazán láncoljuk le a szemeket, a S szemeket simán, a F szemeket fordítottan. Varrjuk a zseb hasítékát mindkét oldalon az elejére. Varrjuk a zseb nyílását a zseb hasítékának aljéra (ahol a szemeket a szemtartóra tettük) a háta darabot. A másik elején ugyanilyen módon készítsünk egy másik zsebet.

ÖSSZEÁLLÍTÁS:
Varrjuk össze a vállvarrásokat. Varrjuk fel a gombokat.

Diagram

diagram measurements

Segítségre van szüksége a mintával kapcsolatban?

Köszönjük, hogy a DROPS Design mintáját választotta! Sokat dolgozunk azért, hogy mintáink könnyen érthetőek és hibamentesek legyenek. Minden mintát Norvégból fordítunk, és a méreteket, számításokat mindig ellenőrizheti az eredeti mintán (DROPS Baby 21-8) .

Gondja van a minta követésével? Az alábbiakban talál egy listát, olyan helyekről, amik segíthetenek abban, hogy a projektet hamr befjezze, vagy akár - miért ne?- tanuljon valami újat.

signature-image signature

Gondja van a minta követésével? Az alábbiakban talál egy listát, olyan helyekről, amik segíthetenek abban, hogy a projektet hamr befjezze, vagy akár - miért ne?- tanuljon valami újat.

Minden mintánkhoz tartoznak oktató-videók, amik segítenek.

Vannak olyan útmutatóink is, amelyek lépésről lépésre mutatják meg a különféle technikákat, ezeket itt találhatják meg.

1) Why is the knitting/crochet tension so important?

Knitting tension is what determines the final measurements of your work, and is usually measured per 10 x 10 cm. It is provided like so: number of stitches in width x number of rows in height - eg: 19 stitches x 26 rows = 10 x 10 cm.

The knitting tension is very individual; some people knit/crochet loosely while others work tightly. You adjust the knitting tension with the needle size, which is why the suggested needle size only serve as a guide! You need to adjust this (up or down) to ensure that YOUR knitting tension matches the knitting tension provided in the pattern. If you work with a different knitting tension than provided you will have a different yarn consumption, and your work will have different measurements than what the pattern suggests.

The knitting tension also determines which yarns can replace each other. As long as you achieve the same knitting tension you can replace one yarn with another.

See DROPS lesson: How to measure your tension/gauge

See DROPS video: How to make a gauge tension swatch

fel

2) Fonalcsoportok - Mik ezek, és hogyan használjuk őket?

A fonalakat vastagságuk, és a velük elérhető kötéspróba szerint csoportokba rendeztük, így könnyebben találhat mintát a kedvenc fonalához. Vagy könnyebben találhat egy mintához fonal-alternatívákat. Az ugyanabban a fonalcsoportban levő fonalak hasonló kötéspróbát adnak, így egymással behelyettesíthetőek. Azonban, ettől függetlenül a minőségük, a struktúrájuk eltérő, így az elkészült darab különleges és egyedi lesz. Az egyes fonalcsoportok áttekintéséhez kattintson ide!.

A fonalcsoport = a csoporton belül minden fonallal 26 -23 szemet tudunk 10 cm-en kötni.

B fonalcsoport = a csoporton belül minden fonallal 22 -20 szemet tudunk 10 cm-en kötni.

C fonalcsoport = a csoporton belül minden fonallal 19 -16 szemet tudunk 10 cm-en kötni.

D fonalcsoport = a csoporton belül minden fonallal 15 -12 szemet tudunk 10 cm-en kötni.

E fonalcsoport = a csoporton belül minden fonallal 11 -9 szemet tudunk 10 cm-en kötni.

E fonalcsoport = a csoporton belül minden fonallal 8 -5,5 szemet tudunk 10 cm-en kötni.

Amennyiben több szál fonalat összefogva szeretne dolgozni, ehhez a következőket érdemes tudni: A C fonalcsoport 1 szálával hasonló kötéspróbát tudunk készíteni, mint az A. fonalcsoport 2 szálát összefogva, Az A fonalcsoportból tehát bármely fonalból 2 szálat, vagy bármely 2 fonalból 1-1 szálat összefogva megfelel a C fonal 1-1 szálának, ezt a mintákban így jeleztük: A + A = C.

Az alábbiakban áttekintjük, hogyan működnek a fonalaink, ha 1 szálnál többel dolgozunk:

2 szál az A fonalcsoportból megfelel a C fonalcsoport 1 szálának. Ezt a mintában így jeleztük: A + A = C

3 szál az A fonalcsoportból megfelel a D fonalcsoport 1 szálának. Ezt a mintában így jeleztük: A+A+A = D

4 szál az A fonalcsoportból megfelel az E fonalcsoport 1 szálának. Ezt a mintában így jeleztük: A + A+A+A = D

8 szál az A fonalcsoportból megfelel az F fonalcsoport 1 szálának. Ezt a mintában így jeleztük: A+A+A+A +A+A+A+A = F

2 szál az B fonalcsoportból megfelel a D fonalcsoport 1 szálának. Ezt a mintában így jeleztük: B+B =D

2 szál a C fonalcsoportból megfelel az E fonalcsoport 1 szálának. Ezt a mintában így jeleztük: C+C = E

4 szál a C fonalcsoportból megfelel az F fonalcsoport 1 szálának. Ezt a mintában így jeleztük: C+C+C+C = F

2 szál az E fonalcsoportból megfelel az F fonalcsoport 1 szálának. Ezt a mintában így jeleztük: E+E= F

A fonalak ilyen cseréjével új minőségeket, új struktúrákat érhetünk el, a választott kombinációktól függően. Kifejlesztettünk egy fonal-kalkulátort, amivel kiszámolhatja, mennyi fonalra van szüksége, ha 1 szál fonal helyett 2 vagy több szál kombinációját választja. A kalkulátorhoz a linket minden minta oldalán megtalálja. Ne feledje, hogy a megadott kötéspróba határozza meg, melyik fonalakat használhatjuk. Feltétlenül készítsünk próbadarabot a választott fonalkombinációval, és ellenőrizzük, hogy be tudjuk-e tartani a megfelelő kötéspróbát.

fel

3) Can I use a different yarn than what the pattern suggests?

The important thing when changing from one yarn to another is that the knitting/crochet tension remains the same. This is so that the measurements of the finished piece will be the same as on the sketch provided. It is easier to achieve the same knitting tension using yarns from the same yarn group. It is also possible to work with multiple strands of a thinner yarn to achieve the knitting tension of a thicker one. Please try our yarn converter. We recommend you to always work a test swatch.

Please NOTE: when changing yarn the garment might have a different look and feel to the garment in the photo, due to individual properties and qualities of each yarn.

See DROPS lesson: Can I use a different yarn than the one mentioned in the pattern?

fel

4) How do I use the yarn converter?

At the top of all our patterns you’ll find a link to our yarn converter, which is a helpful tool should you wish to use a different yarn than suggested. By filling in the yarn quality you wish to replace, the amount (in your size) and number of strands, the converter will present good alternative yarns with the same knitting tension. Additionally it will tell you how much you’ll require in the new qualities and whether you’ll need to work with multiple strands. Most skeins are 50g (some are 25g or 100g).

If the pattern is worked with multiple colours, every colour will have to be converted separately. Similarly, if the pattern is worked with several strands of different yarns (for example 1 strand Alpaca and 1 strand Kid-Silk) you will have to find alternatives for each, individually.

Click here to see our yarn converter

fel

5) Why do I get the wrong knitting tension with the suggested needle size?

The needle size provided in the pattern serves only as a guide, the important thing is to follow the knitting tension. And since knitting tension is very individual, you will have to adjust the needle size to ensure that YOUR tension is the same as in the pattern – maybe you’ll have to adjust 1, or even 2 needle sizes, up or down to achieve the correct tension. For this, we recommend that you work test swatches.

Should you work with a different knitting tension than the one provided, the measurements of the finished garment might deviate from the measurement sketch.

See DROPS lesson: How to measure your tension/gauge

See DROPS video: How to make a gauge tension swatch

fel

6) Why is the pattern worked top-down?

Working a garment top-down provides more flexibility and room for personal adjustment. For example it is easier to try the garment on while working, as well as making adjustments to length of yoke and shoulder caps.

The instructions are carefully explaining every step, in the correct order. Diagrams are adjusted to the knitting direction and are worked as usual.

fel

7) Why are the sleeves shorter in larger sizes?

The total width of the garment (from wrist-to-wrist) will be larger in the larger sizes, despite the actual sleeves being shorter. The larger sizes have longer sleeve caps and wider shoulders, so there will be a good fit in all sizes.

fel

8) What is a repeat?

Diagrams are often repeated on the round or in height. 1 repeat is the diagram the way it appears in the pattern. If it says to work 5 repeats of A.1 in the round, then you work A.1 a total of 5 times after/next to each other in the round. If it says to work 2 repeats of A.1 vertically/in height you work the entire diagram once, then begin again at the start and work the entire diagram one more time.

fel

9) How do I work according to a knitting diagram?

The diagram depicts all rows/rounds, and every stitch seen from the right side. It is read from bottom to top, from right to left. 1 square = 1 stitch.

When working back and forth, every other row is worked from the right side and every other row is worked from the wrong side. When working from the wrong side, the diagram will have to be worked reversed: from left to right, knit stitches are purled, purl stitches are knit etc.

When working in the round every round is worked from the right side and the diagram are worked from right to left on all rounds.

See DROPS lesson: How to read knitting diagrams

fel

10) How do I work according to a crochet diagram?

The diagram depicts all rows/rounds, and every stitch seen from the right side. It is worked from bottom to top, from right to left.

When working back and forth every other row is worked from the right side: from right to left and every other row is worked from the wrong side: from left to right.

When working in the round, every row in the diagram are worked from the right side, from right to left.

When working a circular diagram you start in the middle and work your way outwards, counter clockwise, row by row.

The rows usually start with a given number of chain stitches (equivalent to the height of the following stitch), this will either be depicted in the diagram or explained in the pattern.

See DROPS lesson: How to read crochet diagrams

fel

11) How do I work several diagrams simultaneously on the same row/round?

Instructions for working several diagrams after each other on the same row/round, will often be written like so: “work A.1, A.2, A.3 a total of 0-0-2-3-4 times". This means you work A.1 once, then A.2 is worked once, and A.3 is repeated (in width) the number of times provided for your size – in this case like so: S = 0 times, M = 0 times, L=2 times, XL= 3 times and XXL = 4 times.

The diagrams are worked as usual: begin with the first row in A.1, then work the first row in A.2 etc.

See DROPS lesson: How to read knitting diagrams

See DROPS lesson: How to read crochet diagrams

fel

12) Why does the piece start with more chain stitches than it’s worked with?

Chain stitches are slightly narrower than other stitches and to avoid working the cast-on edge too tight, we simply chain more stitches to begin with. The stitch count will be adjusted on the following row to fit the pattern and measurement sketch.

fel

13) Why increase before the rib edge when the piece is worked top-down?

The rib edge is more elastic and will contract slightly compared to, for example, stocking stitch. By increasing before the rib edge, you avoid a visible difference in width between the rib edge and the rest of the body.

fel

14) Why increase in the cast-off edge?

It’s very easy to cast off too tightly, and by making yarn overs while casting off (and simultaneously casting these off) you avoid a too tight cast off edge.

See DROPS video: How to bind off with yarn overs (yo)

fel

15) How do I increase/decrease on every 3rd and 4th row/round alternately?

To achieve an even increase (or decrease) you can increase on, for example: every 3rd and 4th row alternately, like so: work 2 rows and increase on the 3rd row, work 3 rows and increase on the 4th. Repeat this until the increase is complete.

See DROPS lesson: Increase or decrease 1 st on every 3rd and 4th row alternately

fel

16) Why is the pattern slightly different than what I see in the photo?

Pattern repeats can vary slightly in the different sizes, in order to get the correct proportions. If you’re not working the exact same size as the garment in the photo, yours might deviate slightly. This has been carefully developed and adjusted so that the complete impression of the garment is the same in all sizes.

Make sure to follow instructions and diagrams for your size!

fel

17) How can I work a jacket in the round instead of back and forth?

Should you prefer to work in the round instead of back and forth, you may of course adjust the pattern. You’ll need to add steeks mid-front (usually 5 stitches), and follow the instructions. When you would normally turn and work from the wrong side, simply work across the steek and continue in the round. At the end you’ll cut the piece open, pick up stitches to work bands, and cover the cut edges.

See DROPS video: How to knit steeks and cut open

fel

18) Can I work a jumper back and forth instead of in the round?

Should you prefer to work back and forth instead of in the round, you may of course adjust the pattern so you work the pieces separately and then assemble them at the end. Divide the stitches for the body in 2, add 1 edge stitch in each side (for sewing) and work the front and back pieces separately.

See DROPS lesson: Can I adapt a pattern for circular needles into straight needles?

fel

19) Why do you show discontinued yarns in the patterns?

Since different yarns have different qualities and textures we have chosen to keep the original yarn in our patterns. However, you can easily find options among our available qualities by using our yarn converter, or simply pick a yarn from the same yarn group.

It is possible that some retailers still have discontinued yarns in stock, or that someone has a few skeins at home that they would like to find patterns for.

The yarn converter will provide both alternative yarn as well as required amount in the new quality.

fel

20) How do I make a women’s size garment into a men’s size one?

If you have found a pattern you like which is available in women’s size it’s not very difficult to convert it to men’s size. The biggest difference will be the length of sleeves and body. Start working on the women size that you think would fit across the chest. The additional length will be worked right before you cast off for the armhole/sleeve cap. If the pattern is worked top-down you can add the length right after the armhole or before the first decrease on sleeve.

Regarding additional yarn amount, this will depend on how much length you add, but it is better with a skein too many than too few.

fel

21) How do I prevent a hairy garment from shedding?

All yarns will have excess fibres (from production) that might come off as lint or shedding. Brushed yarns (ie hairier yarns) have more of these loose, excess fibres, causing more shedding.

Shedding also depends on what is worn under or over the garment, and whether this pulls at the yarn fibres. It’s therefore not possible to guarantee that there will be no shedding

Below are some tips on how to get the best result when working with hairier yarns:

1. When the garment is finished (before you wash it) shake it vigorously so the looser hairs come off. NOTE: do NOT use a lint roller, brush or any method that pulls at the yarn.

2. Place the garment in a plastic bag and put it in your freezer - the temperature will cause the fibres to become less attached to each other, and excess fibres will come off easier.

3. Leave in the freezer for a few hours before taking it out and shaking it again.

4. Wash the garment according to the instructions on the yarn label.

fel

22) Where on the garment is the length measured?

The measurement sketch/schematic drawing provides information regarding the full length of the garment. If it’s a jumper or a jacket the length is measured from the highest point on the shoulder closest to the neckline, and straight down to the bottom of the garment. It is NOT measured from the tip of shoulder. Similarly, the length of yoke is measured from the highest point on the shoulder and down to where yoke is split into body and sleeves.

On a jacket measures are never taken along bands, unless specifically stated. Always measure inside band stitches when measuring the length.

See DROPS lesson: How to read a schematic drawing

fel

23) How do I know how many balls of yarn I need?

The required amount of yarn is provided in grams, eg: 450 g. To calculate how many balls you’ll need you first need to know how many grams are in 1 ball (25g, 50g or 100g). This information is available if you click on the individual yarn quality on our pages. Divide the amount required with the amount of each ball. For example, if each ball is 50g (the most common amount), the calculation will be as follows: 450 / 50 = 9 balls.

fel

DROPS fonalat vásárolt a minta elkészítéséhez? akkor, abban a boltban, ahol a fonalat vásárolta, joga van segítséget kérni és kapni. A DROPS üzletek listáját ITT találja!
Még mindig nem találta meg a választ, amire szüksége van? Görgessen lejjebb, és tegye fel kérdését, és szakembereink megpróbálnak segíteni. Ez általában 5-10 munkanapon beül megtörténik.. Addig is elolvashatja a korábban, mások által feltett kérdéseket és a válaszokat, vagy csatlakozhat a Facebook-on a DROPS Workshophoz, hogy kézimunkázó társaitól kaphasson segítséget.

Megjegyzések / Kérdések (194)

country flag Apeksha Rathod wrote:

From your previous reply, I understood that I have to reduce 16 sts on each side of the neck & 6 sts on each armhole in the front. So I will have 28 sts on each shoulder in the front (50-16-6=28). But in the back, I have 18 sts left on each shoulder. Clearly, I am wrong somewhere. Pls, guide me. Also if you could make it clear if I have to start reducing the neck & the armhole at the same time, that'll be great!

24.06.2023 - 07:14

DROPS Design answered:

Dear Apeksha, when the piece measures 21 cm, you will start decreasing: decrease 1 st for the neck on each side on every RS row for the next 16 RS rows. When the piece measures 22 cm, continue with the neck decreases and work the garter stitch rows and cast off the middle sts for each armhole; after this you will continue each piece separately. Now you are still decreasing for the neck and you will start to decrease for the armholes: 1 st on each side of the back piece on every RS row for the next 6 RS rows (=12 sts decreased), or 1 st on the side of each front piece on every RS row for the next 6 RS rows (= 6 sts decreased). Happy knitting!

25.06.2023 kl. 16:32

country flag Apeksha Rathod wrote:

Hello! I have been following the "Knitted vest with V-neck and a textured pattern for baby and children in DROPS BabyMerino or DROPS BabyAlpaca Silk". I have 172 sts on my needle. Now I have to start reducing sts for the neck. Can you pls tell me how many sts I have to reduce in total? Both on the right & left side?

23.06.2023 - 13:23

DROPS Design answered:

Dear Mrs Rathod, in the largest size, you will decrease 1 stitch 16 times on each right and left front piece. Happy knitting!

23.06.2023 kl. 15:53

country flag Inger Nielsen wrote:

Forstykke 45 m + bakstk 82 m + forstk 45 m = 172 m på største størrelse. Fell 10 m på hver side av merke (+). Da får jeg 62 m igjen til bakstk. I oppskriften står 72 m. Noe er feil her?

21.05.2023 - 13:40

DROPS Design answered:

Hej Inger 5 af de 10 masker du lukker af i hver side tilhører forstykkerne.

23.05.2023 kl. 11:26

country flag Spørgsmål wrote:

Er fuldstændig vild med denne vest. Men kan man ikke få samme opskrift men på rundpinde. Jeg skal strikke en str 1.1/2 år . Jeg er lidt handicappet i højre hånden pga operation. Så jeg kan ikke så godt bruge min tommelfinger , Men har lettere ved det på en rundpind 🙂 vh connie palsgreen

19.03.2023 - 20:43

DROPS Design answered:

Hei Connie. Dette er en vest med knapper i midten og det må da strikkes frem og tilbake. Men du strikker med rundpinne, slik det står i oppskriften. mvh DROPS Design

20.03.2023 kl. 13:44

country flag Susan Dilly wrote:

I am just about to start the front pieces. The picture shows rib on the arm hole edge as well as the v neck. The pattern doesn’t tell me to do a five stitch garter section on the arm hole edge do I just assume that I need to do this?

06.03.2023 - 18:35

DROPS Design answered:

Dear Mrs Dilly, you worked 18 or 20 stitches (see size) in garter stitch on each side then cast off 4 or 5 stitches for armhole = 5 stitches garter stitch remain; when working front piece, continue working stitches as before, including these 5 stitches in garter stitch towards armhole. Happy knitting!

07.03.2023 kl. 10:11

country flag Cathleen Black wrote:

Hi, I'm wondering if you can help me understand this pattern where is says "When the piece measures 15cm work 2 rows in garter st over the first 5 sts on the needle (do not work the other sts on needle). I'm not quite understanding how to go forward here? Can you help me, Cathleen

07.02.2023 - 00:29

DROPS Design answered:

Hi Cathleen, This means you work 2 knitted rows over the band stitches to help the bands to sit nicely on the jacket. So you knit 5 stitches, turn and knit back. Then work the full row as before. Happy knitting!

07.02.2023 kl. 06:51

country flag Mai-Britt Vejsager wrote:

Jeg kan ikke se, hvordan jeg skal lave en afslutning på rygstykket ved nakken.

08.12.2022 - 10:23

DROPS Design answered:

Hei Mai-Britt. Strikk dobbel perlestrikk og retstrik til bakstykket måler 24-26-29 (31-34) cm. Deretter strikkes det retstrik over alle maskene til ferdig mål, men SAMTIDIG når bakstykket måler 25-27-30 (32-35) cm felles de midterste 16-18-20 (20-24) maskene av til hals = 10-11-12 (16-18) masker tilbake på hver skulder. Strikk hver skulder ferdig for seg. Fortsett med retstrik over den ene skulderen frem og tilbake i 1 cm, fell av og klipp tråden. Strikk den andre skulderen på samme måte. mvh DROPS Design

12.12.2022 kl. 11:05

country flag Eliana wrote:

Buongiorno, non riesco a capire questo passaggio me lo potereste spiegare meglio?grazie mille Quando il lavoro misura 15-17-18 (20-21) cm, lavorare 2 f. a m. legaccio sulle prime 5 m. sul ferro (non lavorare le altre m. sul ferro), poi lavorare 1 f. su tutte le m. prima di lavorare 2 f. a m. legaccio sulle prime 5 m. sul f. dall’altro lato del lavoro (per fare in modo che il collo a V sia carino). eliana

10.11.2022 - 14:38

DROPS Design answered:

Buonasera Eliana, in questo punto deve lavorare a ferri accorciati, cioè su una parte delle maglie sul ferro come indicato. Buon lavoro!

15.11.2022 kl. 22:16

country flag EVANGELIA SYNODINOU wrote:

[RS: 5 sts in garter st, 21-21-27 (27-31) sts in stockinette st, slip the last 16-16-20 (20-24) sts that were worked on a stitch holder for pocket slit, work until 10-10-12 (12-12) sts remain on needle, slip the last 16-16-20 (20-24) sts that were worked on a stitch holder for pocket slit, work 5-5-7 (7-7) sts in stockinette st and finish with 5 sts in garter st. } I can't understand this.

12.10.2022 - 19:52

DROPS Design answered:

Hi Evangelia, You are placing the pocket stitches on threads to be worked later. To avoid cutting the strand by each pocket, these stitches are worked first then placed on the threads before finishing the row. Hope this helps and happy knitting!

13.10.2022 kl. 06:57

country flag Margret wrote:

Habe Markierungen gesetzt ( Vorder u Rückenteil). - Wieso auf der rechten Nadel….ich stricke doch mit Rundnadel. - …bis nach (noch?) 10 M übrig sind. Wo? Und danach soll ich 16 M stilllegen? Merci für Antwort!

09.10.2022 - 17:20

DROPS Design answered:

Liebe Margret, die Maschen für die Taschen werden zuerst gestrickt, dann stillgelegt, dh Sie stricken zuerst die ersten 5 M krausrippe, dann die nächsten 21 Maschen glatt und die 10 letzten gestrickten Maschen legen Sie still (es sind noch 11 Maschen glatt rechts auf der Nadel), dann Reihe bis 10 Maschen übrig sind und wieder die 10 letzten gestrickten Maschen stillleggen. Viel Spaß beim stricken!

10.10.2022 kl. 09:22

Post a comment to pattern DROPS Baby 21-8

Szívesen vesszük, ha megosztja velünk gondolatait erről a mintáról.

Ha kérdést szeretne feltenni, ügyeljen arra, hogy a megfelelő kategóriát válassza ki, így fegyorsíthatja a válaszadás folyamatát. Það verður að merkja við svæði merktri með *.