
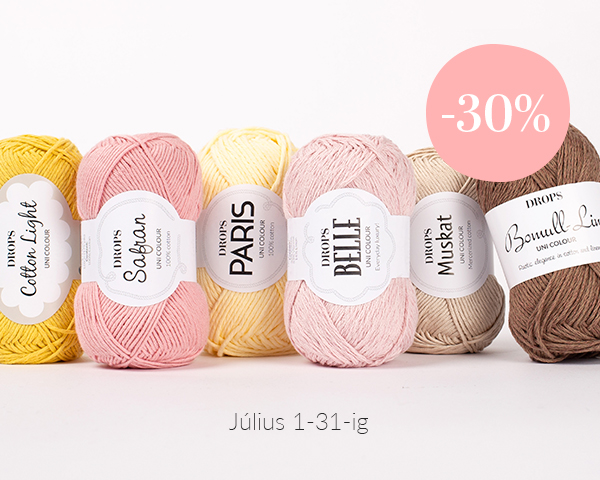
Looking for a yarn?


Megjegyzések / Kérdések (75)
![]() Nancy Mulder írta:
Nancy Mulder írta:
Kan het kloppen dat ik niet hoef te minderen bij de mouwen na 35 cm als ik maat S haak?
20.09.2023 - 08:55A DROPS Design válasza:
Dag Nancy,
Je moet wel minderen in maat S, namelijk 1 x 4 stk, 3 x 2 stk en dan nog eens steeds 2 stk aan iedere kant tot het werk ongeveer 41 cm meet.
20.09.2023 - 19:34
![]() Engelina Eggenhuizen írta:
Engelina Eggenhuizen írta:
Ik ben op zoek naar het telpatroon / omschrijving van M-1. De strepen dienen namelijk met patroon M-1 te worden gehaakt. Kunt u mij helpen? Alvast reuze bedankt!
24.10.2022 - 12:40A DROPS Design válasza:
Dag Engelina,
Bovenaan bij de beschrijving van het patroon staat hoe je de strepen breit. Telpatroon M.1 vindt je rechts onder de maattekening, onderaan de bescrhijving.
26.10.2022 - 09:09
![]() Zablocki írta:
Zablocki írta:
Nach 8 cm beidseitig jedes Markierungsfadens je 1 Stb abn. (= 4 Abnahmen pro Reihe), die Abnahmen alle 2 cm insgesamt 7 Mal arbeiten - TIPP ZUM ABNEHMEN-1 lesen = 121-137-149-165-189-209 Stb. Diesen Part verstehe ich nicht…eine Reihe an beiden Seiten des Markierungsfaden 1 Stäbchen abnehmen? Und die nächste Reihe auf beiden Seiten des Markierungsfaden alle 2cm ca. alle 4 Maschen 1 Stäbchen abnehmen?
24.07.2021 - 14:16A DROPS Design válasza:
Liebe Frau Zablocki, Sie haben Markierung auf beiden Seiten eingesetzt (= 37-41-44-48-54-59 M für jedes Vorderteil und 75-83-89-97-109-119M für das Rückenteil) - jetzt sollen Sie beidseitig von jeder Markierung 1 Masche abnehmen (= 2 Abnahmen bei jeder Markierung = 4 Abnahmen pro Runde), und nach 26 cm werden Sie jetzt beideiseitig von jeder Markierung 1 M zunehmen (= 2 M bei jeder Markierung = 4Zunahmen pro Reihe). Kann es Ihnen helfen?
26.07.2021 - 08:29
![]() Grainne írta:
Grainne írta:
Lovely design. Very difficult to sift out free patterns from those trying to sell or make you agree to ???. Hopefully this one is free. I have dk wool of high quality.
30.09.2020 - 23:05
![]() Nadia TROUILLET írta:
Nadia TROUILLET írta:
Bonjour, en taille 1 nous avons séparé le travail. Vous indiquez 31m pour devant droit, 31m pour devant gauche et 63 m pour dos. Cela ne me parait pas possible car avant la séparation vous indiquez 137m. 31+31+63=125 m Est-ce une erreur dans le texte ou moi qui n'ai pas compris. Merci d'avance Nadia
18.09.2020 - 17:42A DROPS Design válasza:
Bonjour Mme Trouillet, les mailles "manquantes" sont celles des emmanchures, vous crochetez les devants sur les 31 m de chaque côté et le dos sur les 63 mailles centrales = 6 mailles sur chacun des côtés (= entre le dos et chacun des devants) ne seront pas travaillées et correspondent aux emmanchures. Bon crochet!
21.09.2020 - 08:12
![]() Anne írta:
Anne írta:
Hej, förstår inte avmaskningen för ärmarna. Ska det göras sm både på varv med fasta maskor och stolpar? Mvh Anne
21.04.2020 - 14:16A DROPS Design válasza:
Hej Anne, menar du avmaskning för ärmhål, se AVMTIPS: Maska av så här i början på v: Ersätt 1 st med 1 sm. Maska av så här i slutet på v: Vänd arb när det återstår det antal st som ska avm och virka tillbaka. Lycka till :)
28.04.2020 - 11:35
![]() Ria Agterberg írta:
Ria Agterberg írta:
Bedankt voor al die geweldige patronen. Alleen nogmaals mijn tip om de mensen te leren de 1e toer de steken hakend op te zetten. Volgens het patroon moet ik met 443 lossen beginnen en houd daar in de eerste toer stokjes 353 stokjes van over. Het was voor mij een verademing dat je door de 1e toer de stokjes hakend op te zetten het veel prettiger was met het tellen van de steken. En zeker zo goed dat op deze manier de eerste toer niet te strak of te los is, maar je een goed begin hebt.
12.02.2020 - 08:03
![]() Josie írta:
Josie írta:
Bonjour le modele 118-28,comment puis je faire pour croiser les différents fils de couleur surtout dans les diminutions des emmanchures ,j'ai essayé de couper et faire des noeuds, mais ce n'était pas joli ? . Merci d'avance.bonne journée. Josie
29.07.2019 - 10:53
![]() Hery írta:
Hery írta:
Rerebonjour Désolée, vous m'avez dit :je repond tout de suite, mais y a comme un problème, à moins que vous aussi vous souffriez de la canicule. Ce n est pas grave, j'ai commencé les rayures, je crois avoir compris. Bon courage et bonne journée. Josie hery
24.07.2019 - 11:00A DROPS Design válasza:
Bonjour Mme Hery, j'ai repondu a votre email le 23.07.2019 kl. 17:43. Voila la reponse: "Bonjour! Vous realisez les rayures sur toute la longueur de la veste. Bon crochet!". Bon crochet!
24.07.2019 - 11:33
![]() Hery írta:
Hery írta:
Rebonjour Je réalise la veste 118-28,je n'ai pas de réponses, est ce que vous avez bien reçu ma question, svp ?
23.07.2019 - 16:24A DROPS Design válasza:
Bonjour Mme Hery! Je reponds tout de suite.
23.07.2019 - 17:42
|
||||||||||
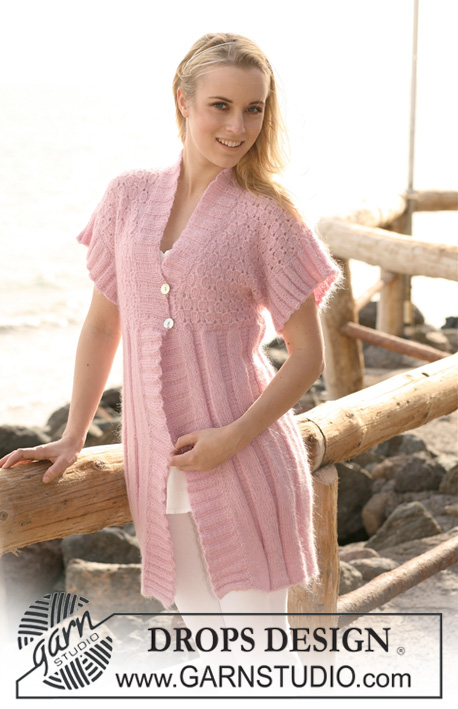
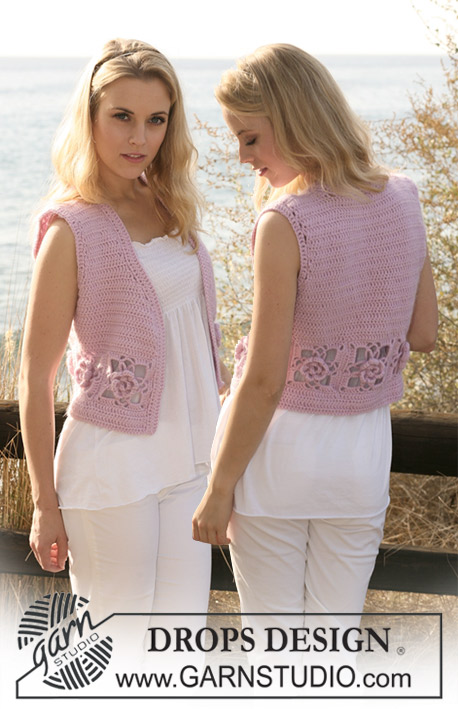
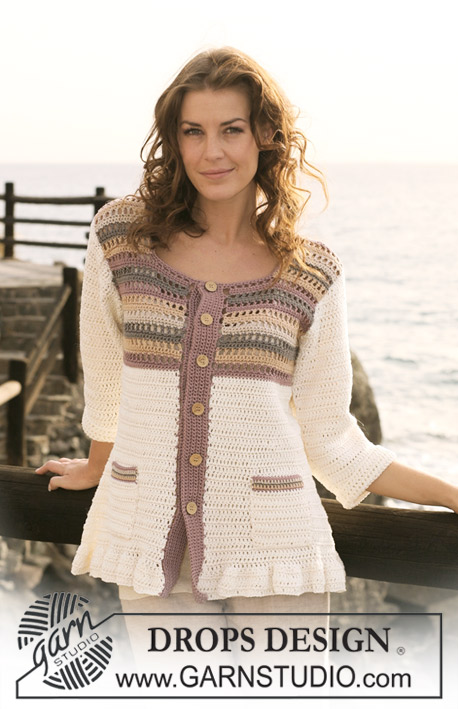
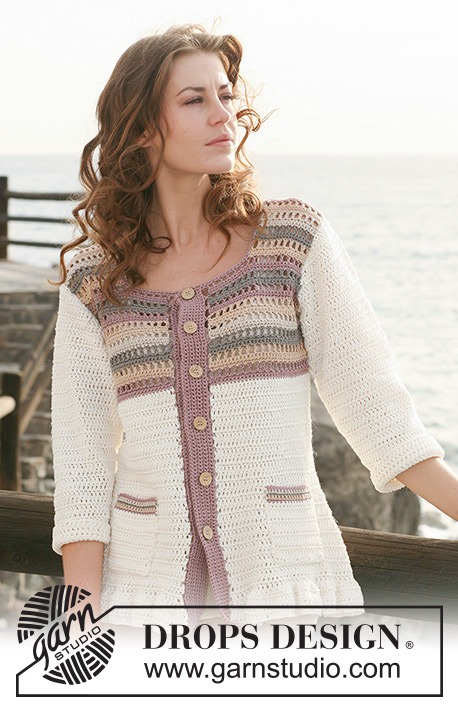
Lady of the Cliffs#ladyofthecliffscardigan |
||||||||||
 |
 |
|||||||||
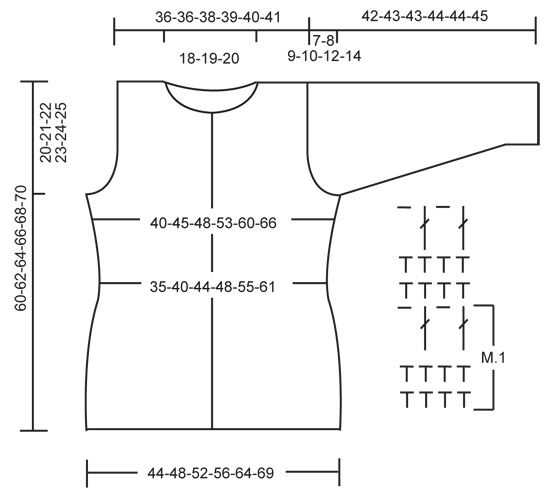
Horgolt DROPS kardigán csíkokkal, DROPS Muskat fonalból. S - XXXL méretekben. DROPS design: r-569 jelű minta
DROPS 118-28 |
||||||||||
|
MINTA: Lásd az M.1-es diagramot. TANÁCS A HORGOLÁSHOZ: A sorban az 1. fp-t 3 lsz-mel, a rp-t 1 lsz-mel helyettesítjük. Minden rp sort az előző sor kezdetének 1. lsz-ébe öltött fp-val fejezzük be. Minden erp sort az előző lsz-ébe öltött erp-val fejezünk be. 1-es tanács a fogyasztáshoz: 2 erp-t a következő módon dolgozunk össze: 1 erp-t horgolunk, de, amikor 2 hurok van a horg tűn, kezdjük el horgolni a köb erp-t, majd húzzuk át a fonalat a horg tűn lévő mind a 3 szálon. 2-es tanács a fogyasztáshoz: A sor elején a köv módon fogy: 1 erp-t 1 ksz-mel helyettesítünk. A sor végén a köv módon fogy: Fordítsuk meg a munkát, amikor annyi szem van hátra a sorból, ahány szemet fogyasztanunk kell. CSÍKOK: A csíkokat a következő módon készítjük: *1 im az M.1 jelű minta soraiból a világos barna fonallal. 1 ism az M.1 jelű minta soraiból a bézs színű fonallal. 1 ism az M.1 jelű minta soraiból a középszürke színű fonallal. 1 im az M.1 jelű minta soraiból a világos bézs színű fonallal. 1 ism az M.1 jelű minta soraiból a bézs színű fonallal. 1 im az M.1 jelű minta soraiból a világos barna fonallal. 1 ism az M.1 jelű minta soraiból a középszürke színű fonallal. * Ism a *-* közötti részt. -------------------------------------------------------- -------------------------------------------------------- KARDIGÁN: Oda vissza készítjük, az eleje közepénél kezdve. OLVASSUK EL A FENTI HORGOLÁSI TANÁCSOT! A 4 mm-es horgolótűvel készítsünk 373-413-443-483-543-593 lsz-ből álló láncsort (a 3 fordulószemmel együtt) a törtfehér színű fonalból, a 3,5 mm vastag horgolótűvel. Az 1. sorban így haladjunk: 1 erp a horg tűtől A 4. szembe. * Hagyjunk ki 1 lsz-t, 1 erp a köv 4 lsz mindegyikébe.* Ism a *-* közötti részt, hagyjunk ki 1 lsz-t, majd az utolsó 2 lsz-be 1-1 erp = 297-329-353-385-433-473 erp. Horgoljunk 2 sort, mindene rp-ba 1 erp-t horgolba. majd a sorban kettesével horgoljuk össze a szemeket - olvassuk el a fenti 1-ES tanácsot a fogyasztáshoz = 149-165-177-193-217-237 erp. Fordítsuk meg a darabot. Tegyünk 1 jelölőt a darabba, mindkét oldaltól 37-41-44-48-54-59 szemnyire (= 75-83-89-97-109-119 szem marad a két jelölő között a hátához). Folytassuk minden erp-be 1erp horgolásával. NE FELEDKEZZÜNK MEG A MEGFELELŐ HORGOLÁSPRÓBA BETARTÁSÁRÓL! Ugyanakkor, amikor a darabunk 8 cm-es mindkét jelölő mindkét oldalán fogyasszunk 1-1 erp-t. Ismételjük meg a fogyasztást 2 cm-ként, összesen 7 alkalommal. OLVASSUK EL A FENTI 1-ES TANÁCSOT A FOGYASZTÁSHOZ = 121-137-149-165-189-209 szem. Amikor a darabunk 26 cm-es mindkét jelölő mindkét oldalán szap 1-1 erpt. Ismételjük meg a szap-t 3-3-4-4-5-5 cm-ként, összesen 4 alkalommal (a szaporításhoz, 1 erp-ba 2 erp-t horgolunk)= 137-153-165-181-205-225 szem. UGYANAKKOR, amikor a darabunk 34-35-36-37-38-39 cm-es folytassuk a M.1 jelű mintát és a csíkokat- lásd a fenti magyarázatot! Amikor a darabunk 40-41-42-43-44-45 cm-es (és az M.1 jelű minta 1. sora után járunk) a köv módon osszuk szét a szemeket: JOBB ELEJE: Horgoljuk az M.1 jelű minta 2. sorát (= 1 rp minden rp-ba), az első 31-35-38-42-48-53 rp-n a sorban, fordítsuk meg a mintát, és folyt az M.1 jelű minta szerint. Most minden sor végén, mindkét oldalon fogy a karöltő kialakításához - olvassuk el a fenti, 2-es tanácsot a fogyasztáshoz. 2 szemet 0-1-2-3-5-6 alkalommal, 1 szemet 0-2-2-3-4-6 alkalommal = 31-31-32-33-34-35 szem. Amikor a darabunk 52-54-56-58-60-62 cm-es, folyt csak az oldalánál lévő szélső 18 szemen, az eleje közepe felé eső 13-13-14-15-16-17 szemen. Amikor a darabunk 60-62-64-66-68-70 cm-es, vágjuk el a fonalat, és rögzítsük a szálat. . BAL ELEJE Horgoljunk a sor utolsó 31-34-38-42-48-53 rp-ján (a másik oldalon), fordítsuk meg a munkát, és folytassuk a jobb elejénél leírt módon, HÁTA: Horgoljunk rp-kat csak a háta darab középső 63-71-77-85-97-107 rp-ján. Láncoljunk le szemeket a karöltőhöz az elejéhez hasonló módon = 63-63-65-67-69-71 erp. Amikor a darabunk 58-60-62-64-66-68 cm-es (2 sor maradt hátra a mintából), horgoljunk 1 sort csak a külső 18 szemen, mindkét oldalon (a középső 26-26-28-30-32-34 szem = a nyakkivágás). Horgoljunk még 1 sort a 18 szemen, és vágjuk el a fonalat. A darabunk kb 60-62-64-66-68-70 cm-es. ÖSSZEÁLLÍTÁS A darabot oda-vissza készítjük. A 4 mm-es horgolótűvel készítsünk 57-59-62-64-67-69 lsz-ből álló láncsort (a 3 fordulószemmel együtt) a törtfehér színű fonalból. Az 1. sorban így haladjunk: 1 erp a horg tűtől a 4. szembe. * Hagyjunk ki 1 lsz-t, 1 erp a köv 4 lsz mindegyikébe.* Ismételjük meg a *-* közötti részt, hagyjunk ki 1 lsz-t, majd az utolsó 1-3-1-3-1-3 lsz mindegyikébe 1-1 erp = 44-46-48-50-52-54 erp. Fordítsuk meg a darabot. Horgoljunk 1 erp minden erp-ba. Amikor a darabunk5 cm -es, mindkét oldalon szaporítsunk 1 lsz szemet az ut előtti erp-ban, mindkét oldalon. Ismételjük meg a szaporításokat 3.5-3-2.5-2-2-1.5 cm-ként, összesen 8-9-10-12-13-14 alkalommal = 60-64-68-74-78-82 erp. Amikor a darabunk 35-35-34-34-32-31 cm-es (MEGJEGYZÉS: A nagyobb méreteknél az ujja a szélesebb vállak miatt rövidebb) az ujja felső ívének kialakításához láncoljuk le a szemeket a következő módon (OLVASSUK EL A FENTI 2-ES TANÁCSOT A FOGYASZTÁSHOZ): 4 szemet 1 alkalommal, 2 szemet 3 alkalommal, 1 szemet 0-0-1-2-4-6 alkalommal, majd 2 szemet mindkét oldalon, amíg a darabunk 41-42-42-43-43-44 cm-es. Fogy le 4 szemet mindkét oldalon 1 alkalommal, majd vágjuk el a fonalat, és rögzítsük a szemet. ÖSSZEÁLLÍTÁS: A széleket egymás mellé illesztve, apró öltésekkel, varrjuk össze az oldalvarrásokat. Varrjuk be a két ujját. Varrjuk össze az ujjak alsó varrását. ELEJE PÁNT: A világos barna fonallal, a jobb eleje szélen a köv módon horgoljunk: * 1 rp, 3 lsz, körülbelül 1.5-2 cm-t kihagyunk.* ismételjük meg a *-* közötti részt az, majd 1 rp-val be a sort. Fordítsuk meg a darabot. A következő sorban így haladjunk: 1 rp minden rp-be, és 3 rp minden lsz-ívbe = kb 85 -100 rp. Horgoljunk minden rp-ba 1 rp-t, amíg az eleje gomb pánt 2 cm-es lesz. Most készítsünk 6-6-6-7-7-7 gomblyukat, egyenletesen elosztva - a felső gomblyukat a nyakkivágás szélétől kb 1 cm-re tegyük, a legalsót az alsó szélétől kb 15 cm-re. 1 gomblyuk: 1 rp-t 1 lsz-mel helyettesítünk. Folytassuk, minden rp-ba 1 rp-t öltve, amíg a pánt körülbelül 4 cm-es lesz. Vágjuk el a fonalat, és rögzítsük a szálat. Ism a bal eleje szélén, úgy, mint a jobboldali gomb pántot, de itt nem készítünk gomblyukat, Végül horgoljunk 1 sort rp-kal a nyakkivágás körül (az eleje gomb pántok felső szélén is) a világos barna fonallal. ZSEB: Készítsünk 23 lsz-t (3 lsz-el együtt a forduláshoz), a 4 mm-es horgolótűvel és a törtfehér színű fonallal. Az 1. sorban így haladjunk: 1 erp a horg tűtől A 4. szembe. * Hagyjunk ki 1 lsz-t, 1 erp a köv 4 lsz mindegyikébe.* Ismételjük meg a *-* közötti részt, hagyjunk ki 1 lsz-t, majd az utolsó 2 lsz-be 1-1 erp = 17 erp. Horgoljunk 1 erp-t minden erp-ba, amíg a zseb kb 10 cm-es, majd horgoljunk 1 rp-t, minden erp-ba, majd 1 rp-t minden rp-ba a köv módon: 1 sort a világos barna fonallal, 1 sort a bézs színű fonallal, 1 sort a középszürke színű fonallal, 1 sort a világos bézs színű fonallal, 1 sort a világosbarna színű fonallal. Vágjuk el a fonalat, és dolgozzuk el a szálat. Összesen 2 zsebet készítsünk. Varrjuk fel a zsebfedőket az eleje darabra, kb 8 cm-re az alsó szélétől. |
||||||||||
Diagram magyarázatok |
||||||||||
|
||||||||||
|
||||||||||
Elkészítette ezt a mintát?Akkor adja a képeihez a #dropspattern #ladyofthecliffscardigan tageket, vagy küldje be a képet a #dropsfan galériába. Segítségre van szüksége a modell elkészítéséhez? 4 tutorial videót találhat, és egy kérdés/felelek részt, és még többet, ha a mintát megkeresi a garnstudio.com oldalán. © 1982-2025 DROPS Design A/S. Minden jog fenntartca. Ez a documentim, az összes részével védelem alatt áll. A weboldalunkon többet olvashat arról, hogy mit tehet és mit nem a mintáinkkal. |
||||||||||


Több mint 40 év tapasztalattal a kötés és horgolásminták tervezésében a DROPS Design az ingyenes minták egyik legszélesebb körű gyűjtemnyét kínálja az Interneten, 17 nyelvre fordítva. A mai nappal 314 katalógust 11822 mintát tudunk számon tartani a mintákból 11804 -t fordítottunk le magyarra (európai mértékegységekkel).
keményen dolgozunk azon, hogy a kötés és a horgolás világából a legjobbat hozzuk el, remek fonalakkal, hihetetlen árakon. Ha mintáinkat nemcsak személyes használatra szeretné használni, minden minta alján a Copyright szövegben olvashat arról, mit tehet s mit nem. Sikeres kézimunkázást!
Post a comment to pattern DROPS 118-28
Szívesen vesszük, ha megosztja velünk gondolatait erről a mintáról.
Ha kérdést szeretne feltenni, ügyeljen arra, hogy a megfelelő kategóriát válassza ki, így fegyorsíthatja a válaszadás folyamatát. Það verður að merkja við svæði merktri með *.