
Looking for a yarn?


Megjegyzések / Kérdések (91)
![]() Dumet írta:
Dumet írta:
Bonjour pour ce modèle en taille m pouvez-vous me dire combien je dois commander de pelotes. Je vous remercie
25.06.2025 - 20:50A DROPS Design válasza:
Bonjour Mme Dumet, vous trouverez toujours la quantité requise pour chaque taille en haut de page, dans l'onglet "Explications", il faut ainsi en taille M 400 g DROPS Air/50 g la pelote Air = il vous faudra ainsi 8 pelotes DROPS Air pour ce pull en taille M. Bon tricot!
26.06.2025 - 08:43
![]() Inge írta:
Inge írta:
De stekenverhouding is 17 stkn = 10cm. Na de pas, als het meerderen klaar is, komen we op een totaal van 288 steken (m) Dat betekent 288:17=169cm. Is dat niet enorm groot? Het lijf zelf wordt immers 2x55cm?
24.06.2025 - 19:01A DROPS Design válasza:
Dag Inge,
Als de pas klaar is, staan de steken voor de mouwen en het lijf samen op de naald. Na het splitsen van het werk voor de mouwen en het lijf heb je 200 steken voor het lijf.
26.06.2025 - 20:10
![]() Jacqueline írta:
Jacqueline írta:
Waarom word iets van boven naar beneden gebreid? Ik brei liever alle panden apart maar kom er dan zo niet uit
12.06.2025 - 19:56A DROPS Design válasza:
Dag Jacqueline,
Een voordeel hiervan is dat je tijdens het breien het kledingstuk kunt passen en op de juiste lengte maken. Verder zie je het vaak (hoewel bij dit patroon niet van toepassing) in Scandinavische patronen met ingebreide motieven in een ronde pas. Dit is lastiger als je losse panden heen en weer breit. Via deze link vind je meer informatie.
13.06.2025 - 22:23
![]() Inge Umans írta:
Inge Umans írta:
Waarom worden eerst biezen gebreid en wat wordt daar mee gedaan?
01.06.2025 - 19:22A DROPS Design válasza:
Dag Inge,
De 2 biezen de eerst worden gebreid worden aan het einde tegen elkaar genaaid en dan aan de achterkant aan de halslijn genaaid. Op die manier lopen de biezen door over de schouder en heb je alleen midden achter een naad in de bies.
01.06.2025 - 20:42
![]() Miruna írta:
Miruna írta:
Hello. Can you simplify a little the increases in raglan? I don't seem to quite understand when to increase. And the increases for v-neck are separated from the thread marks? Thank you for your time!
26.04.2025 - 23:49A DROPS Design válasza:
Dear Miruna, the V-neck increases are worked in the bands (so you don't use the markers for these increases). The raglan increases are worked on each side of the markers. Each marker is located between 2 stocking stitch stitches that represent the transition between the sleeves and back/front pieces. So you increase before and after the stitches next to the marker as follows: 1 yarn over, 1 stitch in stocking stitch, marker, 1 stitch in stocking stitch, 1 yarn over. After increasing like this 6 times you will then increase alternately on each side or only on the side of the front/back piece (before marker 1, after marker 2, before marker 3, after marker 4). Happy knitting!
27.04.2025 - 12:46
![]() Kateryna írta:
Kateryna írta:
What does it mean “increase inside the bands” (the v-neck part)? Where exactly should it be? Right after garter stitches?
20.03.2025 - 19:11A DROPS Design válasza:
Dar Kateryna, you will increase at the beginning of a row from RS after the first 7 stitches, ie after the front band stitches; and you will increase at the end of a row from RS before the last 7 stitches, ie before the front band stitches. Happy knitting!
21.03.2025 - 08:00
![]() Daniela írta:
Daniela írta:
Nesedí mi u tohoto návodu počet ok u rukávu vel.Xxxl, počátek 20+6x2+15×2=52, na oddělení v podpaží je třeba 62 ok. Kde je vzít? Děkuji za odpověď, Daniela
06.03.2025 - 08:25A DROPS Design válasza:
Milá Danielo, vždyť vy tam ta oka máte :-) - váš výpočet je naprosto správný (20 + 12 + 30)! Hodně zdaru, Hana
29.03.2025 - 10:59
![]() Britt Caroline Soffie Kaae írta:
Britt Caroline Soffie Kaae írta:
Jeg vil gerne høre om jeg bare kan bytte garnet i opskriften til "no nonsens cardigan", ud med Drops brushed alpaca silk? Jeg tænker bare at den måske bliver lidt "slasket"
05.03.2025 - 10:18A DROPS Design válasza:
Hej Britt. Ja du kan byta ut garnet till Brushed Alpaca Silk eftersom de garnen tillhör samma garngrupp/har samma stickfasthet. Det är en annan typ av garn så det kommer få ett annat uttryck, men det kommer an på vad du själv önskar (se gärna på bilder på plagg i Brushed Alpaca Silk för att få en uppfattning av hur det kommer se ut). Mvh DROPS Design
07.03.2025 - 08:47
![]() Sylvia Dreiser Farnsworth írta:
Sylvia Dreiser Farnsworth írta:
Ich habe gerade die re und die li Blende gestrickt (17 cm) und diese beiden mit 68 Maschen verbunden. Danach heisst es, “weiterstricken und die 7 ersten und letzten Maschen weiter kraus stricken - diese krausen, sind das die Fortsetzung der Blenden? Ich verstehe nicht, was mit den 17 cm Blenden passiert, wenn ich nun weiter Blende - Rückteil - Blende im V-Ausschnitt stricke. Wo kommen die 17 cm Blenden denn hin?
06.02.2025 - 20:35A DROPS Design válasza:
Liebe Frau Dreiser Farnsworth, man wird jetzt beide Blenden krausrechts und dazwischen Glattrechts stricken; die ersten 17 cm von den beiden Blenden werden danach am Halsausschnitt genäht (und die Anschlagskante beide Blende zusammengenäht) - siehe z.B. dieses Video als Beispiel. Viel Spaß beim Stricken!
07.02.2025 - 08:25
![]() Chrissy írta:
Chrissy írta:
Hello! Should the yarn over increases be mirrored, and if so, how? I've been trying to figure out if I have to do one YO and one reverse YO for example for each pair of increases, or use some other pattern for symmetry. Also, do I start the V neck increases on a right side or wrong side row? Thank you.
18.01.2025 - 16:03A DROPS Design válasza:
Dear Chrissy, you can knit the yarnovers mirrored, if you like. Since you have to knit the stitch twisted anyway, you can adjust the stitch (by slipping and replacing it) so either the left or the right leg crosses the other on the front. Happy Knitting!
19.01.2025 - 14:28
|
|
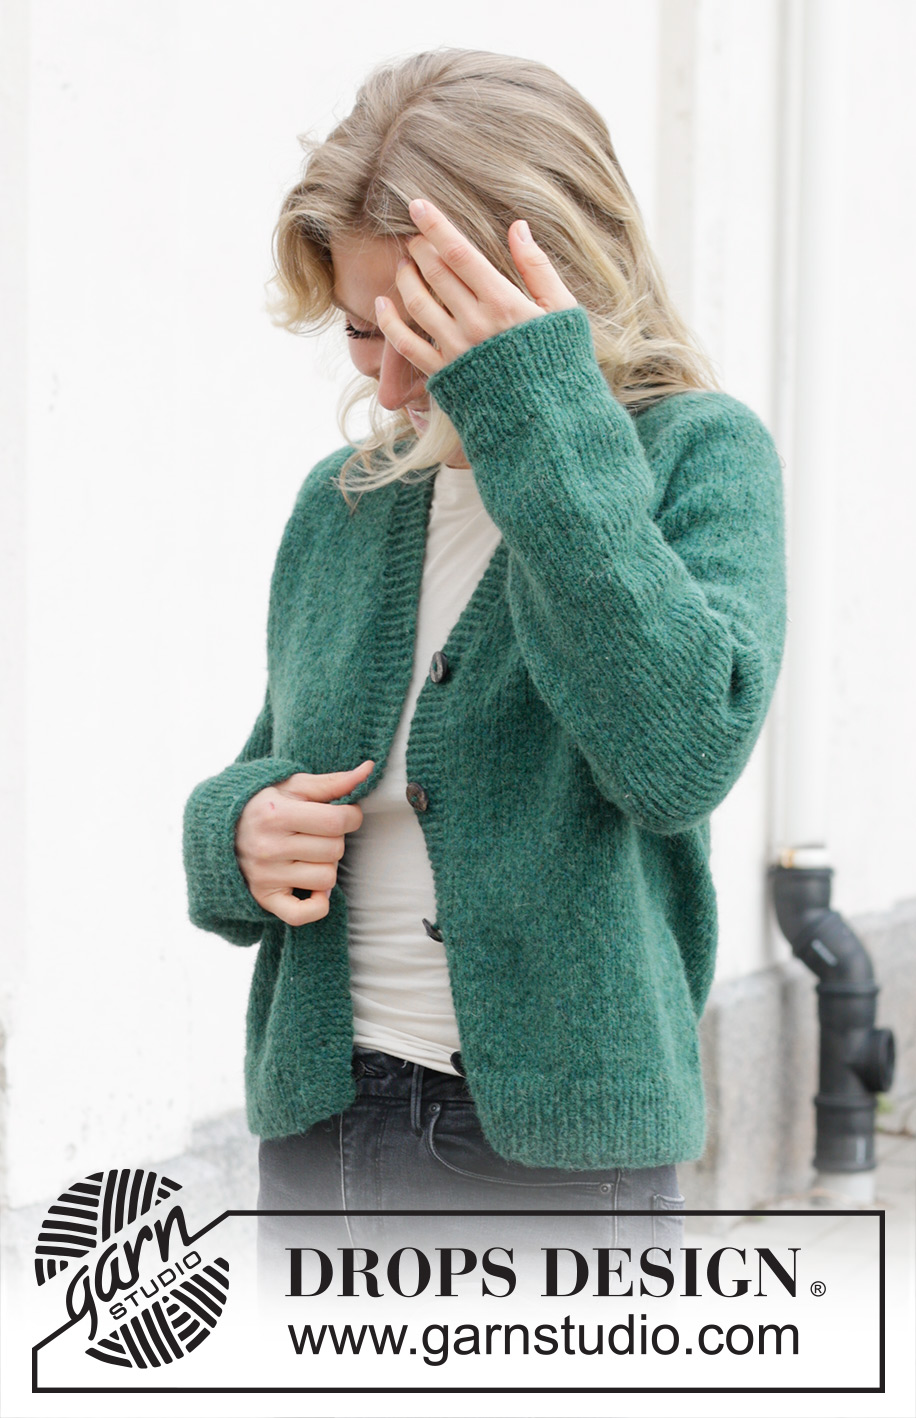
No Nonsense Cardigan#nononsensecardigan |
|
 |
 |
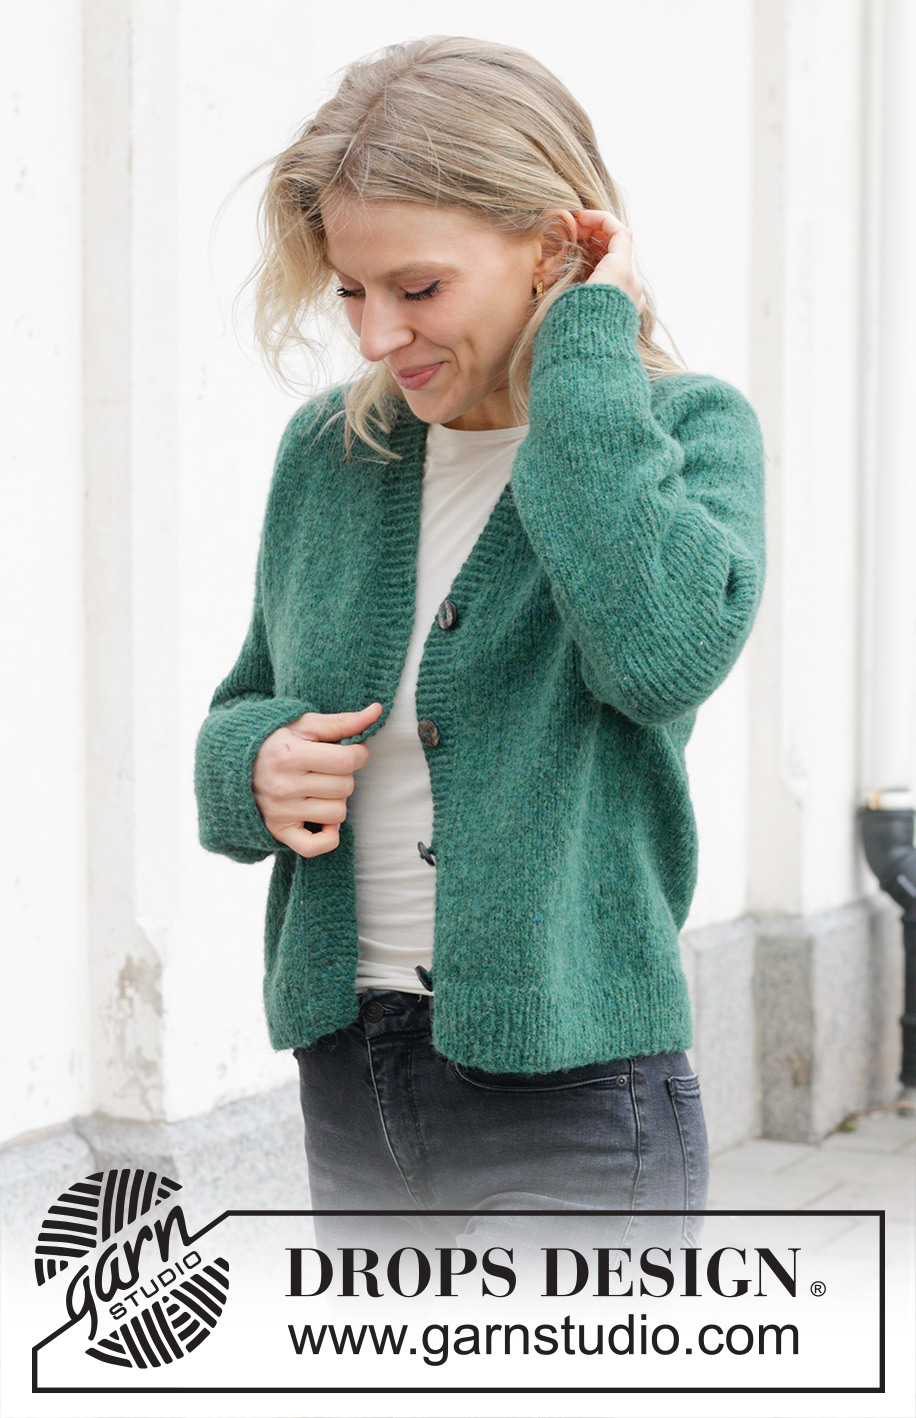
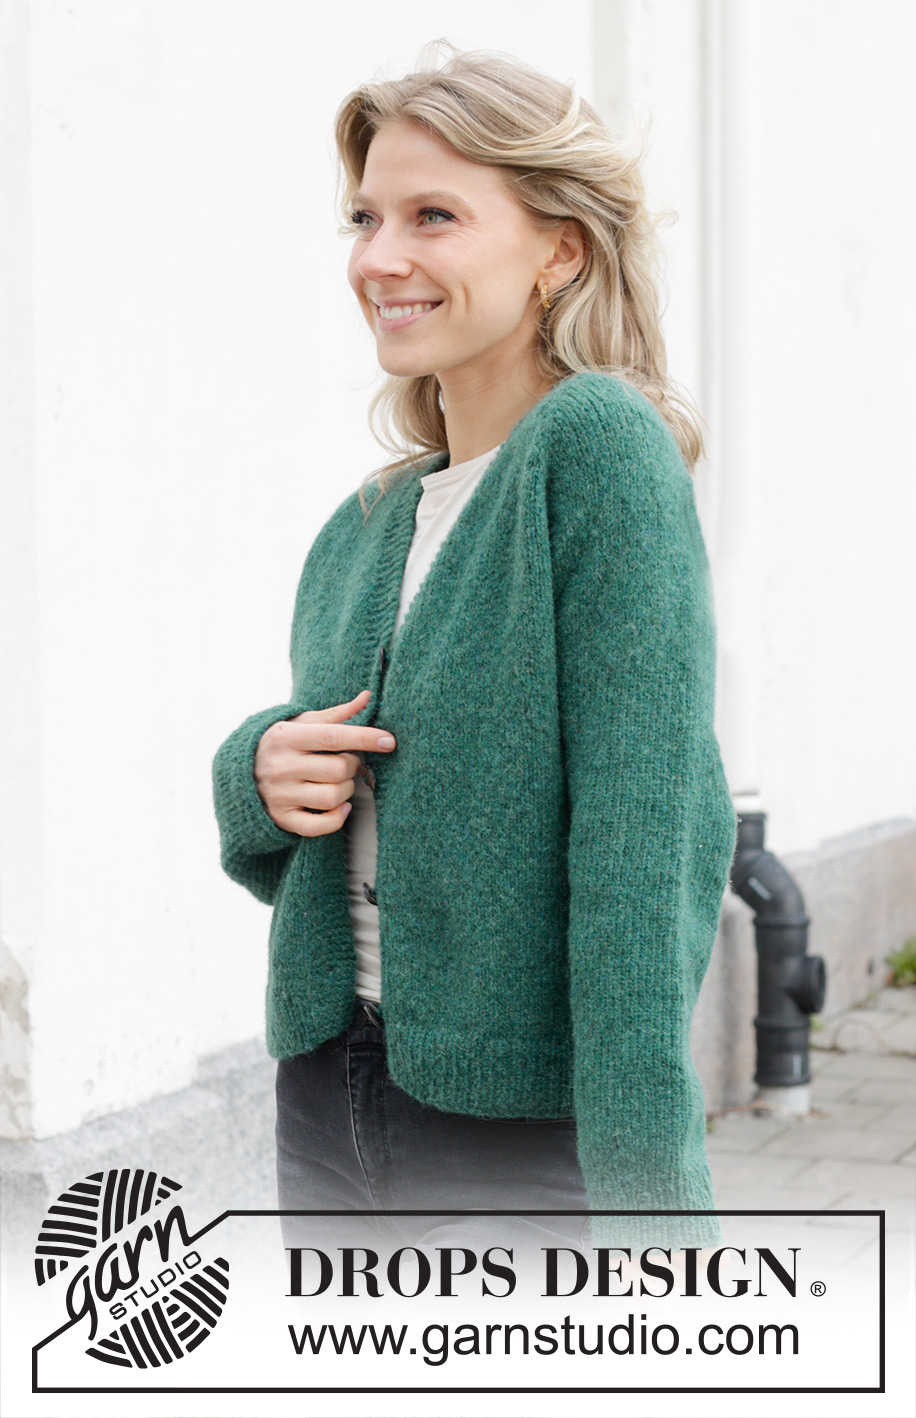
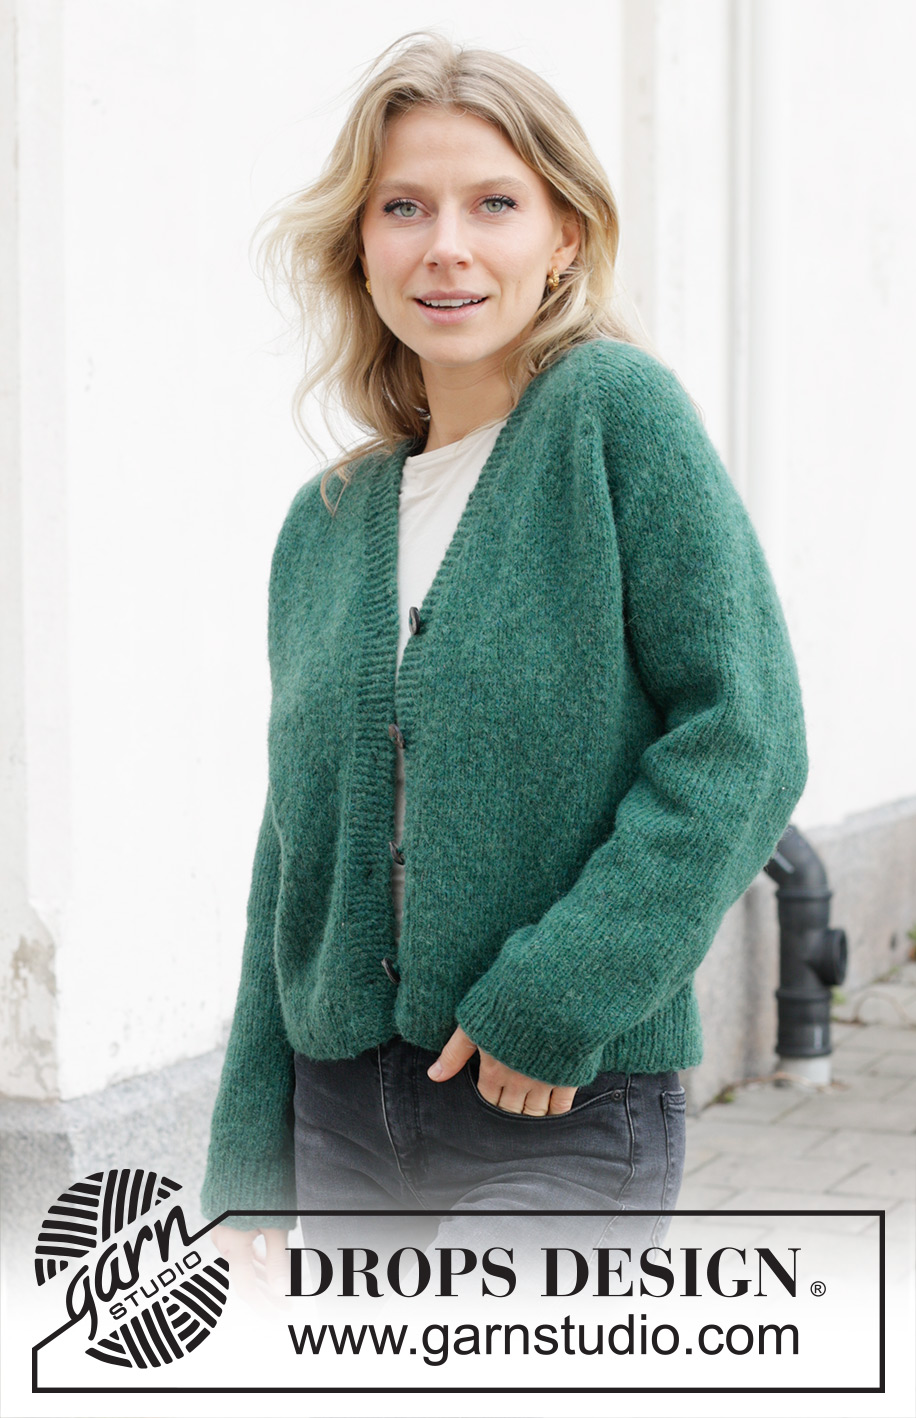
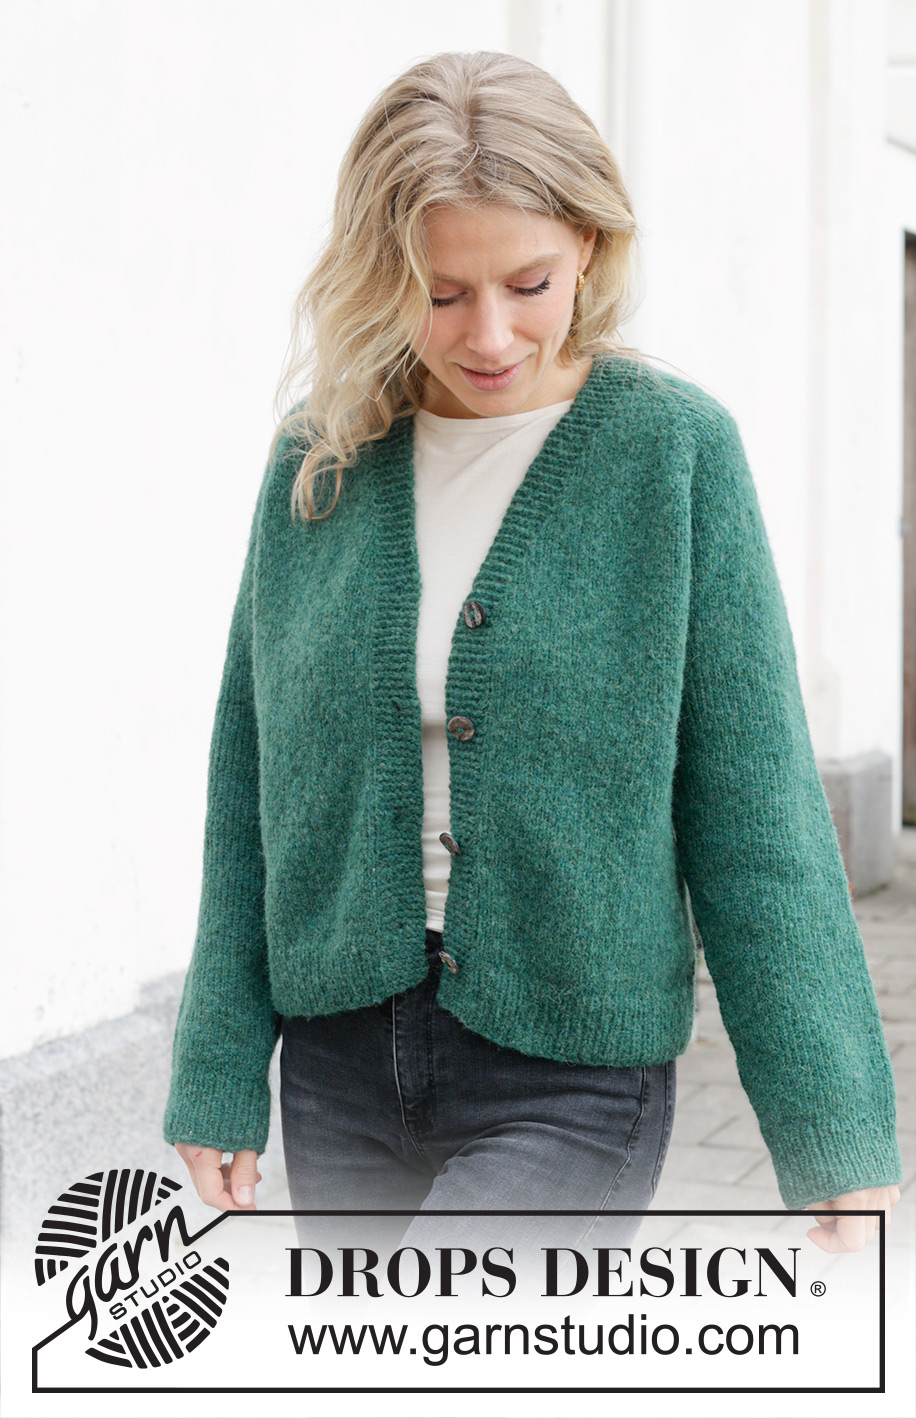
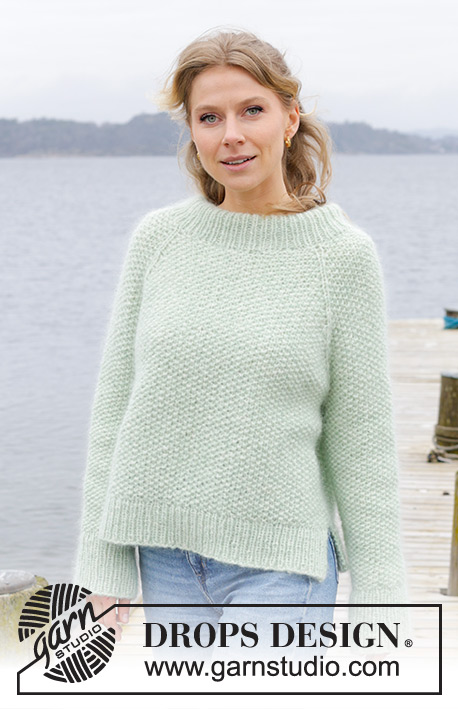
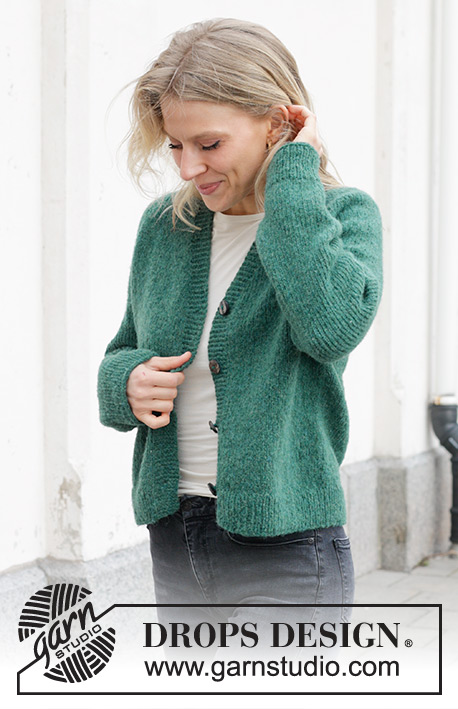
Kötött kardigán DROPS Air fonalból. A darabot fentről lefelé irányban készítjük, raglán szabásvonallal, és V nyakkivágással. S - XXXL méretekben.
DROPS 244-8 |
|
|
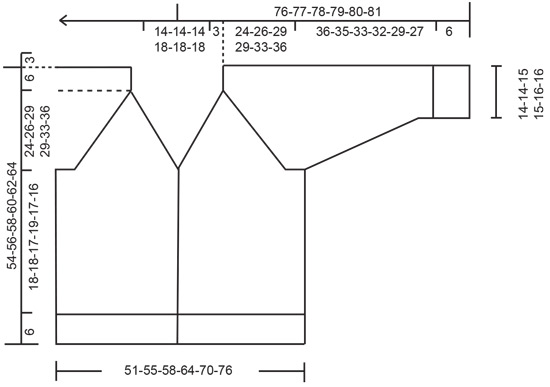
---------------------------------------------------------- TANÁCSOK A MINTA ELKÉSZÍTÉSÉHEZ: ---------------------------------------------------------- BORDA / LUSTAKÖTÉS (oda-vissza haladva - síkban - kötve). Minden sorban sima szemekkel kötünk. 1 borda = 2 sima szemekkel kötött sor. RAGLÁN: Szaporítsunk 1 szemet a testrészek és az ujjak közötti mind a 4 átmenetnél levő 2 szem előtt és után - a jelölő a 2 szem között van. 1 szem szaporításához 1 rh-t készítünk, a következő körben / sorban ezeket a ráhajtásokat csavartan kötjük le, így nem keletkeznek lyukak. A szaporított szemeket harisnyakötéssel kötjük tovább. GOMBLYUKAK: A gomblyukakat a jobboldali gomb pánton készítjük el (a kardigánt felvéve.) A SZO felől készítjük a gomblyukat, amikor 4 szem maradt a sorból, a következő módon: 1 rh, a következő 2 szemet S összekötjük, és 2 S szemet kötünk. A következő sorban (= FO) a ráhajtást fordítottan (nem csavartan!) kötjük, így a helyükön lyuk keletkezik. Az 1. gomblyuka a V nyakkivágáshoz készített utolsó szaporítás után 1 cm-rel készítjük, a többi 3 gomblyukat pedig egymástól kb 7-8-8½-7½-8-9 cm-re. TANÁCS A FOGYASZTÁSHOZ (az ujjánál): 3 szemmel a jelölő előtt kezdjük, 2 szemet simán összekötünk, 2 sima szemet kötünk (a jelölő a két szem között van), 1 szemet simán leemelünk, 1 sima, majd a leemelt szemet a lekötött szemen átemeljük (= 2 szemet fogyasztottunk). ---------------------------------------------------------- A MINTALEÍRÁS ITT KEZDŐDIK: ---------------------------------------------------------- KARDIGÁN: RÖVID ÖSSZEFOGLALÓ A kardigánt oda-vissza haladva készítjük, fentről lefelé. Először 2 pántot készítünk lustakötéssel. A 2 pánt között szemeket szedünk fel a vállakhoz, a hátához és a nyakkivágás kialakításához, majd a vállrészt körkötőtűvel folytatjuk, az eleje közepétől oda-vissza haladva. Szemeket szaporítunk a raglánvonal és a V nyakkivágás kialakításához. Utána a vállrész szemeit szétosztjuk a testrész és az ujjak szemeire, és a darabot kötőtűn-vissza haladva készítjük tovább. A két ujját körben kötjük, a rövidebb körkötőtűvel, és/vagy kéthegyű kötőtűkkel. JOBB GOMB PÁNT (a darabot felvéve): A kezdéshez szedjünk fel 7 szemet az 5 mm vastag körkötőtűre az DROPS Air fonalból. Kössünk lustakötéssel - olvassuk el a fenti magyarázatot, amíg a gomb pánt kb 17-17-17-19-19-19 cm-es lesz, és egy FO sor után járunk. Tegyük félre a darabot. BALOLDALI GOMBOLÁSPÁNT: A kezdéshez szedjünk fel 7 szemet az 5 mm vastag körkötőtűre az DROPS Air fonalból. Folytassuk tovább lustakötéssel, amíg a pánt 17-17-17-19-19-19 cm-es lesz, és egy SZO sor után járunk. A fonalat ne vágjuk el. Ezután szedjünk fel 68-68-68-74-74-74 új szemet ennek a sornak a végén = 82-82-82-88-88-88 szem. Kössünk 1 sort lustakötéssel, mindkét pánt szemein, és a kezdőszemeket F szemekkel kössük. Tegyünk 4 jelölőt a szemek közé (a jelölőket a raglánvonalak szaporításaihoz használjuk majd), az alábbi magyarázat szerint (a szemeket most még nem kötjük le); minden jelölőt 2 szem közé rakjunk: Számoljunk ki 9 szemet, tegyük az 1. jelölőt a szemek közé, számoljunk ki 20 szemet, tegyük a 2. jelölőt a szemek közé, számoljunk ki 24-24-24-30-30-30 szemet, tegyük ide a 3. jelölőt a szemek közé. számoljunk ki 20 szemet, tegyük itt a 4. jelölőt a szemek közé. ) szem maradt a sorban. VÁLLRÉSZ: NE FELEDKEZZÜNK MEG A MEGFELELŐ KÖTÉSPRÓBA BETARTÁSÁRÓL! Folytassuk a kötést, oda-vissza haladva, harisnyakötéssel és lustakötéssel mindkét pánton. UGYANAKKOR, szaporítsunk a V nyakkivágás és a karöltők kialakításához az alábbi magyarázat szerint: Mielőtt tovább haladnánk a kötéssel, olvassuk el a teljes hátralévő szakaszt. A SZO felől, az eleje közepénél kezdjük. A V NYAKKIVÁGÁS: Szaporítsunk a nyakkivágás kialakításához, a gomb pántokon belül, minden 4. sorban, 11-11-11-14-14-14 alkalommal. A szaporításhoz 1 rh-t készítünk, amit a köv sorban csavartan kötünk le, a helyükön nem keletkezik lyuk. A nyakkivágáshoz készített utolsó szaporítás után 1 cm-rel kezdjük el elkészíteni a GOMBLYUKAKAT, olvassuk el a fenti magyarázatot. RAGLÁN: Az eleje/háta darabok és az ujjak közötti minden átmenetnél, a 2 harisnyakötéssel kötött szem mindkét oldalán szaporítsunk, minden 2. sorban (minden SZO sorban = 8 szemet szaporítottunk) 6 alkalommal - olvassuk el a fenti magyarázatot. Folytassuk a szaporításokat a raglánconalak kialakításához, minden 2. körben, de minden 2. szaporítást csak az eleje és a háta darabokon készítünk (ezekben a körökben 4 szemet szaporítunk), vagyis a az eleje és háta darabokon minden 2. sorban szaporítunk (minden SZO sorban, a két ujján pedig minden 4. sorban (= minden 2. SZO sor). Ismételjük meg a szaporítást a fentiek szerint, összesen 18-22-26-26-30-30 alkalommal a testen (= 9-11-13-13-15-15 alkalommal az ujján). S, M, XL, XXL és XXXL méretekben (az L méretben elkészültünk a szaporításokkal): Folytassuk harisnyakötéssel, és szaporítsunk a raglánvonal kialakításához, de a testen monst csak minden 2. sorban szaporítsunk (a két ujján befejeztük a szaporításokat), 2-1-1-1-5 alkalommal. MINDEN MÉRETBEN: Most összesen 26-29-32-32-37-41 alkalommal szaporítottunk a testen és 15-17-19-19-21-21 alkalommal az ujján. (a rövidített sorok alatt készített szaporításokkal együtt). Miután minden szaporítást elkészítettünk a raglánvonal kialakításához, 268-288-308-324-348-364 szem marad a kötőtűn. Folytassuk a munkát, és kössünk harisnyakötéssel és a pántokat lustakötéssel, amíg a vállrész 24-26-29-29-33-36 cm-es, a háta közepén mérve. Most osszuk el a szemeket, és az eleje és háta darabot (a testrészt) valamint a két ujját külön-külön fejezzük be a köv módon: Kössük le az első 46-49-52-56-60-64 szemet (= eleje). A következő 50-54-58-58-62-62 szemet tegyük szemtartóra az ujjához, szedjünk fel 10-10-10-12-14-16 új szemet az ujja alatt, folytassuk a következő 76-82-88-96-104-112 szemmel (= háta), csúsztassuk a következő 50-54-58-58-62-62 szemet szemtartóra a másik ujjához, szedjünk fel 10-10-10-12-14-16 új szemet az ujja alatt. Kössük le a maradék 46-49-52-56-60-64 szemet (= eleje). TESTRÉSZ: = 188-200-212-232-252-272 szem. Folytassuk a munkát, és kössünk harisnyakötéssel és a pántokat lustakötéssel, további 18-18-17-19-17-16 cm-ig. Kössünk 1 sort S szemekkel a SZO felől, miközben a sorban egyenletesen elosztva szaporítsunk 19-21-21-23-25-27 szemet (a gomb pántokon nem szaporítunk) = 207-221-233-255-277-299 szem. Váltsunk az 4 mm vastag körkötőtűre, és kössük a bordás mintát a SZO felől a következő módon: A gomb pánt 7 szeme lustakötéssel * 1 F, 1. S.* Ismételjük a *-* közötti részt, amíg 8 szem marad a sorban, 1 F , és a gomb pánt 7 lustakötéssel kötött szemével fejezzük be a sort. Folytassuk ezzel a bord mintával 6 cm-ig, majd lazán láncoljuk le a szemeket. A teljes kardigán kb 54-56-58-60-62-64 cm-es a vállrésztől lefelé mérve. Ujjak: Csúsztassuk vissza az egyik ujjához szemtartóra félretett 50-54-58-58-62-62 szemet a 5 mm- vastag kéthegyű kötőtűkészletre / rövidebb körkötőtűre. Szedjünk fel 1-1 új szemet az ujjak alatt felszedett 10-10-10-12-14-16 szem mindegyikébe a = 60-64-68-70-76-78 szem van a kötőtűnkön. Tegyünk jelölőt az ujja alatt az új szemek közepére. Kössünk harisnyakötéssel körben. Amikor a darabunk 4 cm-es (minden méretben) az ujja alsó középvonalánál, fogyasszunk 2 szemet - OLVASSUK EL A FENTI TANÁCSOT A FOGYASZTÁSHOZ! Ismételjük meg a fogyasztásokat a fentiek szerint 5-3½-2½-2½-2-1½ cm -ként összesen 6-8-9-10-11-11 alkalommal = 48-48-50-50-54-56 szem marad. Folytassuk a munkát, amíg az ujja 36-35-33-32-29-27 cm-es, attól a ponttól, ahol a szemeket szétválasztottuk. Kössünk 1 kört S szemekkel minden szemen, és egyenletesen elosztva szaporítsunk 8-8-10-10-10-12 szemet a körben = 56-56-60-60-64-68 szem. Váltsunk a 4 mm vastag körkötőtűre / kéthegyű kötőtű készletre, és kössük a bordás mintát (1 sima /1 fordított) 6 cm-tig. Láncoljuk le a szemeket. Az ujja kb 42-41-39-38-35-33 cm -es lesz attól a ponttól, ahol a szemeket szétválasztottuk, Készítsük el ugyanilyen módon a másik ujját. ÖSSZEÁLLÍTÁS: Varrjuk fel a gombokat a bal elejére. Varrjuk össze a gomb pántokat a háta közepén, és varrjuk fel a nyakkivágásra. |
|
|
|
Elkészítette ezt a mintát?Akkor adja a képeihez a #dropspattern #nononsensecardigan tageket, vagy küldje be a képet a #dropsfan galériába. Segítségre van szüksége a modell elkészítéséhez? 25 tutorial videót találhat, és egy kérdés/felelek részt, és még többet, ha a mintát megkeresi a garnstudio.com oldalán. © 1982-2025 DROPS Design A/S. Minden jog fenntartca. Ez a documentim, az összes részével védelem alatt áll. A weboldalunkon többet olvashat arról, hogy mit tehet és mit nem a mintáinkkal. |
|


Több mint 40 év tapasztalattal a kötés és horgolásminták tervezésében a DROPS Design az ingyenes minták egyik legszélesebb körű gyűjtemnyét kínálja az Interneten, 17 nyelvre fordítva. A mai nappal 314 katalógust 11822 mintát tudunk számon tartani a mintákból 11804 -t fordítottunk le magyarra (európai mértékegységekkel).
keményen dolgozunk azon, hogy a kötés és a horgolás világából a legjobbat hozzuk el, remek fonalakkal, hihetetlen árakon. Ha mintáinkat nemcsak személyes használatra szeretné használni, minden minta alján a Copyright szövegben olvashat arról, mit tehet s mit nem. Sikeres kézimunkázást!
Post a comment to pattern DROPS 244-8
Szívesen vesszük, ha megosztja velünk gondolatait erről a mintáról.
Ha kérdést szeretne feltenni, ügyeljen arra, hogy a megfelelő kategóriát válassza ki, így fegyorsíthatja a válaszadás folyamatát. Það verður að merkja við svæði merktri með *.