
Popular categories
Looking for a yarn?


Megjegyzések / Kérdések (75)
![]() Ana írta:
Ana írta:
I've just finished knitting the 10cm on the mid back, but I fear I may have done it wrong, as now there's a 10 cm height difference between one side of the work and the other, which doesn't make sense as we're not casting off just yet. Should I have been knitting all the stitches and not just the 28+62?
22.10.2022 - 15:28A DROPS Design válasza:
Boa tarde, Now divide the piece mid back to work back and forth from mid back (this is done so that the seam is mid back). Work in garter stitch back and forth until piece measures 10 cm from the 28 stitches cast on mid front. Deve dividir as 152 malhas em 2 partes que tricota separadamente. até ter 10 cm medidos a partir da carreira em que montou a28 malhas, Bons tricôs!
23.10.2022 - 17:21
![]() Ana írta:
Ana írta:
I've just finished knitting the first 24cm and I'm already confused, what do you mean "cast on 1 stitch 2 times and 2 stitches 5 times"? I need a better explanation, please!
09.10.2022 - 16:36A DROPS Design válasza:
Dear Ana, cast on 1 stitch at the end of each row from each side. Cast on 1 stitch at the end of the first row from the RS and WS. Repeat this once more on the next row from the RS and WS. Then, cast on 2 stitches at the end of each row from each side, but repeat this 5 times (so you increase 2 stitches at the end of the next 5 rows from the RS and 5 rows from the WS). Happy knitting!
09.10.2022 - 19:48
![]() Anna írta:
Anna írta:
Dzień dobry, czy jest dostępny szkic/schemat do tego projektu?
09.10.2022 - 11:54A DROPS Design válasza:
Witaj Aniu, niestety nie. Napisz jeśli masz jakiś problem. Pozdrawiamy!
10.10.2022 - 10:09
![]() Jutta írta:
Jutta írta:
Hallo, wir haben mit der Anleitung angefangen, befinden uns aber grade in einer Sackgasse und kommen auch mit vereinten Denkkräften nicht weiter...Nach dem einseitige Anschlagen der 28 Maschen und dem Teilen an der hinteren Mitte können wir uns so langsam nicht mehr vorstellen wie es weiter geht und wie daraus die Kapuze entstehen soll. Hat jemand vielleicht eine Zeichnung? Was genau ist die hintere / vordere Mitte? Wie wird alles zusammengenäht? Ich hoffe jemand kann helfen
06.08.2022 - 15:54A DROPS Design válasza:
Liebe Jutta, die Arbeit wird zuerst in Reihen von der vorderen Mitte gestrickt, dann wenn die neuen Maschen für die Öffnung für Gesicht angeschlagen wurden, soll die Arbeit von der hinteren Mitte gestrickt werden (so gibt es keine Naht an der vorderen Mitte). Am Ende nähen Sie die Kapuze oben zusammen und die unteren Reihen in der hinteren Mitte (ab den neuen Maschen bis zur Abketterand). Viel Spaß beim stricken!
08.08.2022 - 08:07
![]() Tiko írta:
Tiko írta:
First time I got confused with your pattern 😊1. the whole piece is in gaeter stitch except for the 158 stitches around face? 2. Is the piece worked inthe round at any stage? 3. Is it possible to send or add to the pattern a drawing fo what the finished piece looks like prior to been assambled? Thanks for the answerrs 💚
13.03.2022 - 19:12A DROPS Design válasza:
Dear Tiko, 1. correct, only the ribbing edge around face is worked in rib, the whole work is then worked in garter stitch. 2. Piece is only worked in rows, but first from mid front (until opening for face is done), then from mid back (after you have increased/cast on the stitches for under face). 3. we have no chart for this sorry. Happy knitting!
14.03.2022 - 12:06
![]() Ana írta:
Ana írta:
Could I do the whole pattern in rib instead of garter stitch? How could I adapt from one to the other? Thank you so much!
24.02.2022 - 19:10A DROPS Design válasza:
Dear Ana, your tension would be then different and your would have to re-calculate the whole pattern. You might find another pattern among these ones. Happy knitting!
25.02.2022 - 08:59
![]() Ayra írta:
Ayra írta:
Plz explain when you pick up 158 stitches around face opening do you have to pick up all of the stitches or you have to pick up 3 and skip one. Thanks
13.02.2022 - 20:44A DROPS Design válasza:
Hi Ayra, you have to distribute new stitches evenly to have 158 stitches around face opening in total. Happy knitting!
14.02.2022 - 08:18
![]() Ayra írta:
Ayra írta:
Plz explain for mid back seam after working on 28 new cast on stitches and 62 stitches when you turn your work do you have to do the purl stitch from that side and also you have to work on 28 stitches.again so the mid back seam is done. Now you have to do garter stitch for all of the stitches. Thanks
04.02.2022 - 01:51A DROPS Design válasza:
Dear Ayra, when you cut the yarn after the hood part, you start again piece from mid back (= approx. middle of previous rows), and will then cast on new stitches for face opening, ending rows on mid back. The seam on mid back will start here and will be sewn to the bottom edge; the 28 sts are cast on on mid front, there won't be any seam here. Hope it will help. Happy knitting!
04.02.2022 - 09:16
![]() Ayra írta:
Ayra írta:
Plz explain how you sew the hood in the end? Thanks
03.02.2022 - 02:10A DROPS Design válasza:
Dear Ayra, fold the cast on edge double and sew cast on sts together; and then sew on mid back from the beginning of row worked from mid back (after face opening) towards the cast off edge. Happy knitting!
03.02.2022 - 08:47
![]() Marta írta:
Marta írta:
One follow up if I may. If there is a seam mid-back, where is the face opening. I'm really confused as you can tell.
02.02.2022 - 14:18A DROPS Design válasza:
Dear Marta, you first work the hood, back and forth from mid front, then cut the yarn and start on mid back to work now from the mid back, increasing stitches on mid front and working the 2nd half of sts to mid back. The seam will be on mid back from this part. Hope it will help. Happy knitting!
02.02.2022 - 14:29
|
|
Lawless#lawlesshood |
|
 |
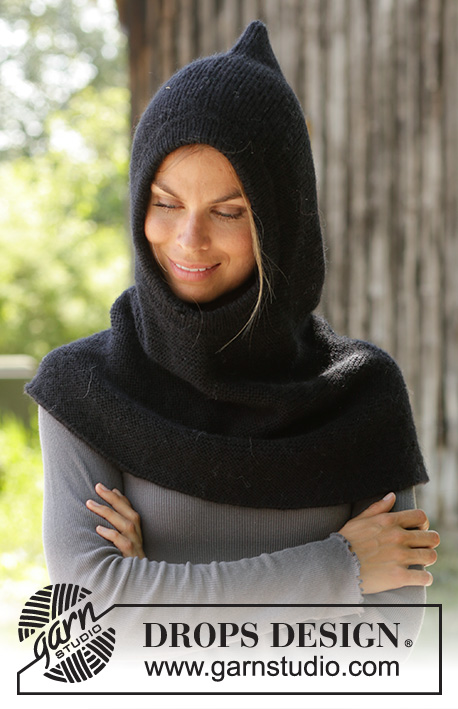 |
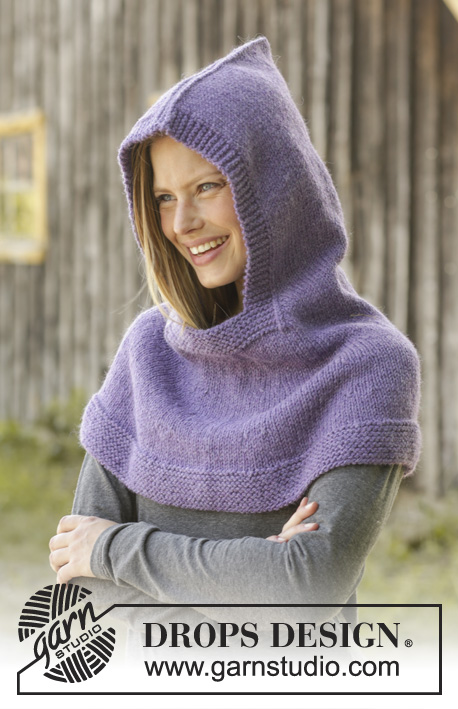
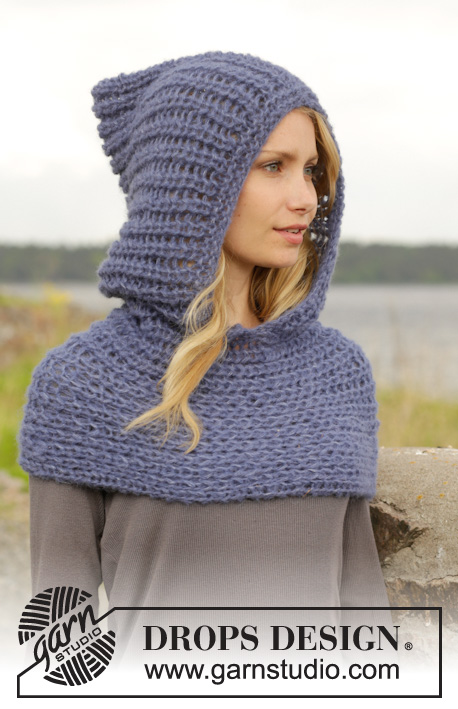
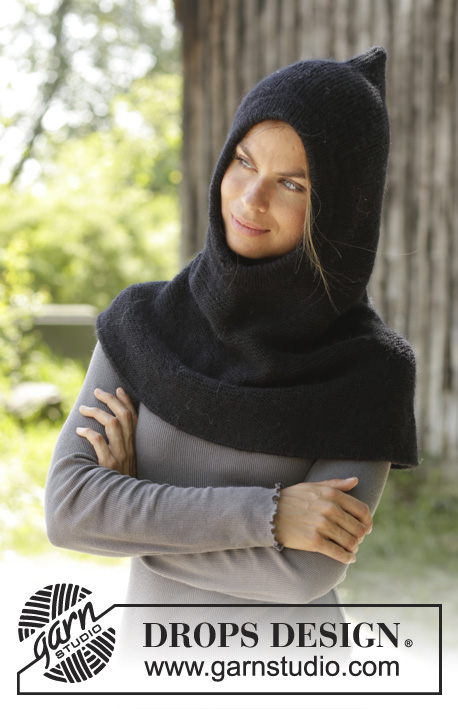
Kötött kapucnis nyakmelegítő Merino Extra Fine vagy DROPS Karisma fonalból A darabot fentről lefelé haladva, lustakötéssel készítjük. Méret: S - XXXL.
DROPS 192-2 |
|
|
TANÁCSOK A MINTA ELKÉSZÍTÉSÉHEZ: ---------------------------------------------------------- LUSTAKÖTÉS (oda-vissza haladva): 1 borda= 2 sima szemekkel kötött sor. TANÁCS A SZAPORÍTÁSHOZ: Kössünk, amíg 1 szemünk marad a jelölőig, 1 rh, 2 sima (a jelölő a 4 szem közepénél van) 1 rh. A következő körben a ráhajtást csavartan kötjük, hogy ne keletkezzen lyuk. ---------------------------------------------------------- A MINTALEÍRÁS ITT KEZDŐDIK: ---------------------------------------------------------- KAPUCNIS NYAKMELEGÍTŐ: RÖVID ÖSSZEFOGLALÓ Körkötőtűn kötjük, oda-vissza az vállrésznél kezdve, onnan lefelé haladva. A kötés végén a darabot a kapucni hátán összevarrjuk. KAPUCNIS NYAKMELEGÍTŐ: A kezdéshez szedjünk fel 100 szemet a 3 mm vastag körkötőtűre, a Merino Extra Fine vagy a Karisma fonallal. Kössünk lustakötéssel -lásd a fenti magyarázatot - oda-vissza haladva. NE FELEDKEZZÜNK MEG A MEGFELELŐ KÖTÉSPRÓBA BETARTÁSÁRÓL! Amikor a darabunk 24 cm-es szedjünk fel új szemeket, mindkét oldalon, minden sor végén, a következő módon: Szedjünk fel 1 szemet 2 alkalommal, majd 2 szemet 5 alkalommal (= 12 szemet szaporítottunk mindkét oldalon) = 124 szem marad a sorban a kötőtűn. A következő sor végén szedjünk fel 28 új szemet = 152 szem. Kössünk a háta közepéig úgy, hogy az eleje közepén felszedett 28 szem után 62 szemet kötünk. Most osszuk szét a szemeket a háta közepén, és oda-vissza haladva folytatjuk a kötést a háta közepétől (így a varrás a háta közepére esik majd). Kössünk lustakötéssel oda-vissza haladva, amíg a darabunk 10 cm-es az eleje közepén felszedett 28 szemtől. Most tegyünk 8 jelölőt a darabba a következő módon: A háta közepén kezdjük, tegyük az első jelölőt 10 szem után a darabba, majd a következő 7 jelölőt egymástól 19 szemnyire, és az utolsó jelölő után 9 szem marad. Folytassuk lustakötéssel. A következő SZO sorban, minden jelölő mindkét oldalán szaporítsunk 1-1 szemet. OLVASSUK EL a fenti tanácsot a szaporításhoz. Ismételjük meg a szaporítást a fentiek szerint kb 3 cm-ként összesen 6-7-8 alkalommal = 248-264-280 szem marad. Kössünk tovább, amíg a darabunk 58-60-62 cm-es lesz. Két szálat összefogva a színe oldal felől láncoljuk le a szemeket. A 2,5 mm vastag kötőtűvel, a SZO felől szedjünk fel 158 szemet, az arc körüli nyílás szélén Kössünk 1 kört F szemekkel, 1 kört S szemekkel, 1 kört F szemekkel. Folytassuk a kötést bordás mintával, (1 sima / 1 fordított) 6 cm-ig, majd láncoljuk el a szemeket, a sima szemeket simán, a fordított szemeket fordított szemekkel. Hajtsunk be a szegélyt a FO felé, és apró öltésekkel rögzítsük. ÖSSZEÁLLÍTÁS: Varrjuk össze a sapkarészt a háta közepén, a külső szemek szélső ívébe öltve a kapucni tetején. |
|
Elkészítette ezt a mintát?Akkor adja a képeihez a #dropspattern #lawlesshood tageket, vagy küldje be a képet a #dropsfan galériába. Segítségre van szüksége a modell elkészítéséhez? 16 tutorial videót találhat, és egy kérdés/felelek részt, és még többet, ha a mintát megkeresi a garnstudio.com oldalán. © 1982-2026 DROPS Design A/S. Minden jog fenntartca. Ez a documentim, az összes részével védelem alatt áll. A weboldalunkon többet olvashat arról, hogy mit tehet és mit nem a mintáinkkal. |
|


Több mint 40 év tapasztalattal a kötés és horgolásminták tervezésében a DROPS Design az ingyenes minták egyik legszélesebb körű gyűjtemnyét kínálja az Interneten, 17 nyelvre fordítva. A mai nappal 324 katalógust 12290 mintát tudunk számon tartani a mintákból 12268 -t fordítottunk le magyarra (európai mértékegységekkel).
keményen dolgozunk azon, hogy a kötés és a horgolás világából a legjobbat hozzuk el, remek fonalakkal, hihetetlen árakon. Ha mintáinkat nemcsak személyes használatra szeretné használni, minden minta alján a Copyright szövegben olvashat arról, mit tehet s mit nem. Sikeres kézimunkázást!
Post a comment to pattern DROPS 192-2
Szívesen vesszük, ha megosztja velünk gondolatait erről a mintáról.
Ha kérdést szeretne feltenni, ügyeljen arra, hogy a megfelelő kategóriát válassza ki, így fegyorsíthatja a válaszadás folyamatát. Það verður að merkja við svæði merktri með *.