
Popular categories
Looking for a yarn?


Comments / Questions (15)
![]() Brigitte wrote:
Brigitte wrote:
Werden im Mustersatz hin und rückreihen gezeigt ? Oder nur hin Reigen ?
10.12.2025 - 21:42DROPS Design answered:
Liebe Brigitte, die Diagramme zeigen alle Reihen, die Hin- sowie die Rückreihen; hier lesen Sie mehr über Diagramme. Viel Spaß beim Stricken!
11.12.2025 - 09:08
![]() Doris wrote:
Doris wrote:
Hallo, wenn diese Jacke nicht in Runden gestrickt wird sonder mit Hin- und Rückrunden warum kann man sie dann nicht auch einfach von unten nach oben stricken? Gruß Doris
18.06.2025 - 14:06DROPS Design answered:
Liebe Doris, die Jacke wird hier in Hin- und Rückreihen gestrickt, man benutzt hier eine Rundnadel, damit alle Maschen auf der Nadel passen, aber man wird abwechslungsweise Hin- und Zurückstricken (= in Reihen) - siehe z.B. hier, im Video wie man hin und zurück mit einer Rundnadel strickt. Sonnst finden Sie auch hier Jacken, die man von unten nach oben strickt. Viel Spaß beim Stricken!
18.06.2025 - 16:22
![]() Saskia Havinga wrote:
Saskia Havinga wrote:
Hallo, Ik ben met de eerste mouw begonnen. Ik moet als de mouw 3 cm meet na de scheiding elke 2 cm (16 keer 2 steken )minderen tot 48 steken. Maar het telpatroon kent elke keer een cyclus van 16 steken, hoe kan ik de patronen blijven breien als ik om de 2 cm minder? Dan kom ik toch elke keer steken te kort ? met vriendelijke groet, Saskia
27.02.2025 - 22:48DROPS Design answered:
Dag Saskia,
Het patroon past door de minderingen inderdaad niet onder de mouw, probeer zover mogelijk door te breien in patroon en pak aan de andere kant van midden onder de mouw het patroon weer op.
01.03.2025 - 14:56
![]() Janne Birgitte Ueland wrote:
Janne Birgitte Ueland wrote:
Denne oppskrifta funker dårleg som jakke som strikkast fram og tilbake. I rad 4, 18 og 29-34 i A1 vil trådane være på motsett side. Dette følger av at rad 1 strikkes frå retta i mønsterfarge (m). Rad 2 frå retta i botnfarge (b) sidan halskant avsluttast på vranga. Og rad 3 strikkes frå vranga i m. Dermed er m på retta i rad 4 og b på vranga når begge fargane skal nyttast i rad 4.
21.07.2024 - 14:57
![]() Trude Dahle wrote:
Trude Dahle wrote:
Strikker jakka,men skjønner ikke når jeg begynner på mønstre.A1 1.omgang hvit ,så brun,så hvit.Må jeg ha 4 nøster i bruk,da det strikkes frem og tilbake?
03.05.2023 - 16:15DROPS Design answered:
Hei Trude, Det er bare de 3 første radene i A.1 som ikke bruker begge fargene. Du kan begynne med natur, strikke tilbake med rust, begynne igjen fra vrangen og strikke tilbake med natur. Da har du begge garn klare til å begynne mønsteret på rad 4. God fornøyelse!
04.05.2023 - 06:42
![]() Anita Strandberg wrote:
Anita Strandberg wrote:
Jag stickar st M och har gjort halskanten. Men mönstret med 179m stämmer inte! 22 rapporter x 8m plus 2 kantmaskor blir 178. Hur ska jag göra för att mönstret ska stämma mitt fram?
03.01.2023 - 16:26DROPS Design answered:
Hej Anita, Når du har 2 masker tilbage: sticka första maskan i A.1 så att mönstret börjar och slutar likadant i varje sida mot mitt fram, och avsluta med 1 kantmaska i rätstickning :)
05.01.2023 - 10:34
![]() Amanda Karlsson wrote:
Amanda Karlsson wrote:
Could you do a video on blocking? both wet and dry, people mention it everywhere in other forums but i cant find a good video on it. And i think this cardigan needs it for the white pattern to look right
06.09.2022 - 12:44DROPS Design answered:
Dear Mrs Karlsson, you can simply wash the garment following care instructions on the label/shadecard + extra tips and let dry flat to the finished measurements on a flat surface. Your DROPS Store might have even more tips for you and will share them with you even per mail or telephone. Happy knitting!
07.09.2022 - 08:03
![]() Georgina wrote:
Georgina wrote:
Gracias por la respuesta. Pero en la chaqueta al seguir las instrucciones de ida y vuelta no sale el dibujo al menos en A1, que es el que he probado. En el jersey sí sale en circular. ¿Puede haber alguna errata en el patrón de la chaqueta y sus diagramas? UN SALUDO
17.11.2021 - 11:11DROPS Design answered:
Hola Georgina, tienes que tener en cuenta que el diagrama muestra todas las filas del patrón. Por lo tanto, el dibujo se trabaja por el lado derecho y por el lado revés (por el que tienes que trabajar los puntos al contrario de como se presentan (derecho en vez de revés...)). El jersey se trabaja siempre por el lado derecho y por eso el dibujo solo se trabaja por el lado derecho.
21.11.2021 - 19:03
![]() Georgina wrote:
Georgina wrote:
Sigo en este otro mensaje con mi otra duda 3. Es viable tejer siempre del lado en que tocaría el punto derecho, posible con agujas circulares? Mejoran los problemas anteriores. Saludo
16.11.2021 - 12:39DROPS Design answered:
Hola Georgina, no entiendo tu pregunta, puedes explicar mas?
17.11.2021 - 08:29
![]() Georgina wrote:
Georgina wrote:
Hola, precioso patrón 1. En la chaqueta abierta se lee cada línea del patrón siempre desde la derecha?, no como creo suele hacerse en ida y vuelta de forma alternada 2. ¿Hay alguna solución para no generar tantos cabos sueltos al cambiar los hilos de color, en especial en aquellas hileras en que solo se da una vuelta y queda el hilo en el lado contrario.
16.11.2021 - 12:38DROPS Design answered:
Hola Georgina, 1. Cuando se teje de ida y vuelta, se teje una hilera por el lado derecho de la labor y una hilera por el lado revés de la labor. Como los diagramas muestran todos los puntos vistos por el lado derecho, tendrás que tejer en el sentido contrario cuando se teje por el lado revés: lees la hilera de izquierda a derecha, los puntos derechos se tejen de revés, y los puntos reveses se tejen de derecho, etc (esto frecuentemente va a estar especificado en la definición de los símbolos: “derecho por el lado derecho, revés por el lado revés”). Mira la leccion drops AQUI. 2. no se puede. Saludos!
17.11.2021 - 08:26
|
|||||||||||||
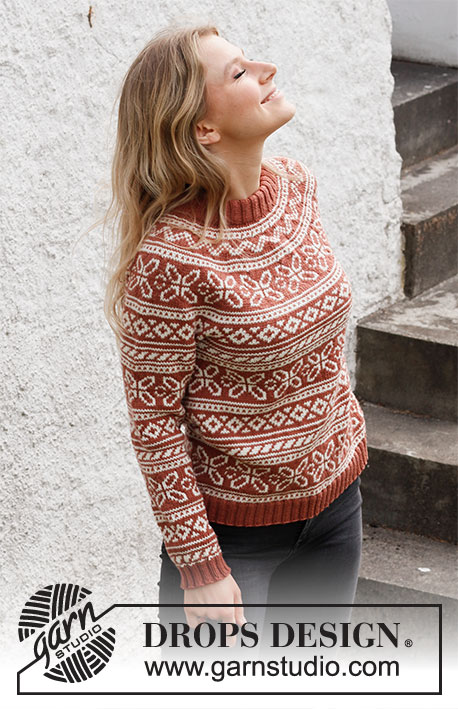
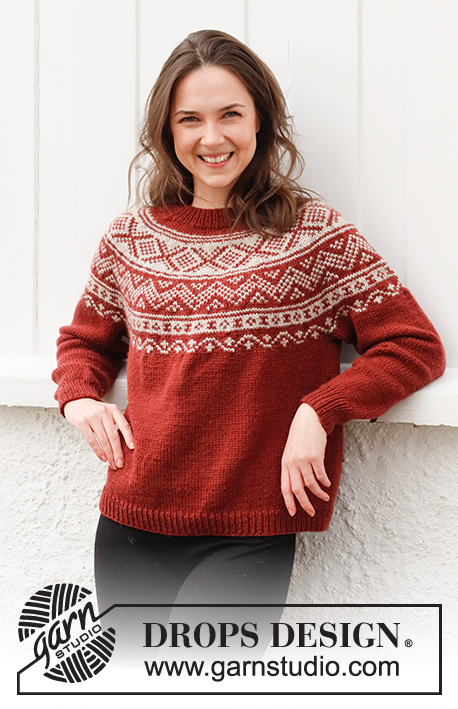
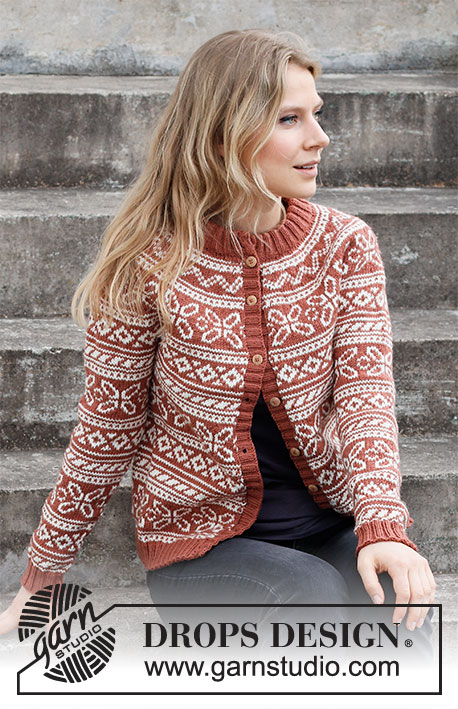
Love Links Jacket#lovelinksjacket |
|||||||||||||
 |
 |
||||||||||||
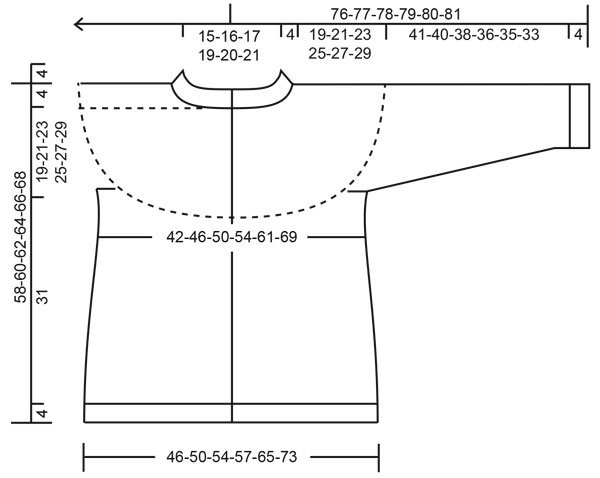
Knitted jacket in DROPS Merino Extra Fine. Piece is knitted top down with double neck edge, round yoke and Nordic pattern. Size XS–XXL.
DROPS 217-18 |
|||||||||||||
|
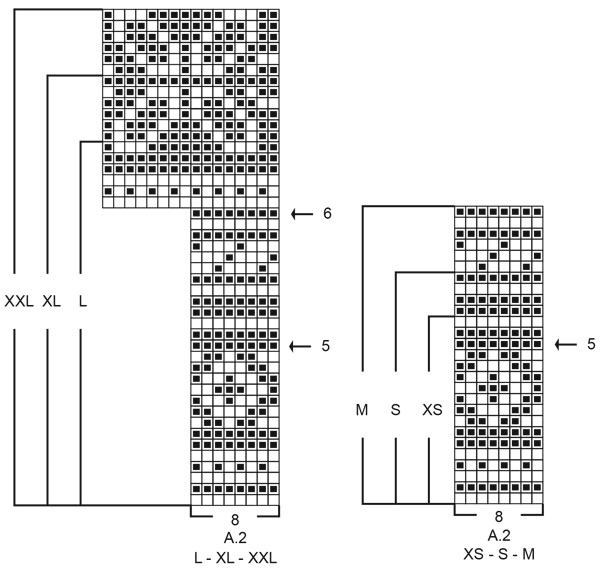
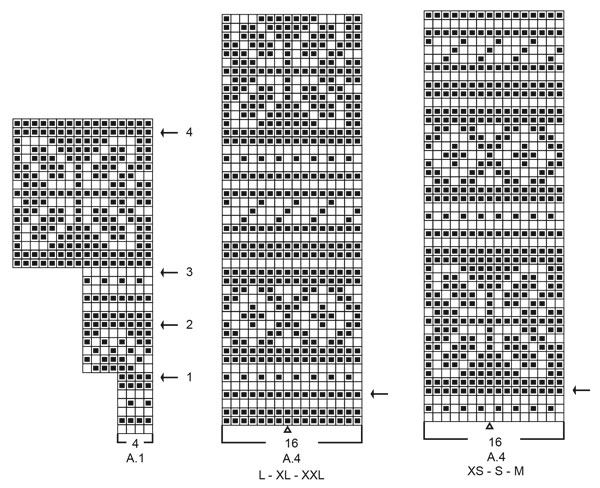
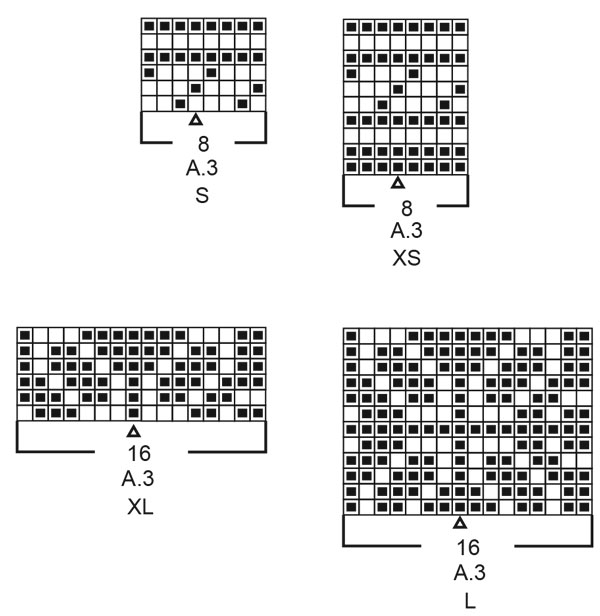
------------------------------------------------------- EXPLANATION FOR THE PATTERN: ------------------------------------------------------- GARTER STITCH (back and forth): Knit all rows. 1 ridge vertically = knit 2 rows. KNITTING TIP: To avoid the knitting gauge to tighten when working pattern, it is important not to tighten the strands on back side of piece. Switch to a higher needle number when working pattern if the pattern is somewhat tight. If the knitting gauge is too tight vertically, the garment will be too short and the armhole will be too small - this can be adjusted by working 1 row more evenly in the sections with one color. If the knitting gauge is too loose vertically, the garment will be too long and the armhole too big, this can be adjusted by working 1 row less in the sections with one color. INCREASE TIP: All increases are done from the right side. To calculate how to increase evenly, use the total number of stitches on row (e.g. 104 stitches) minus edge stitches (e.g. 2 stitches) and divide the remaining 102 stitches by number of increases to be done (e.g. 27) = 3.8. In this example increase by making 1 yarn over after approx. every 4th stitch. On next row (wrong side) purl yarn overs twisted to avoid holes. PATTERN: See diagrams A.1 to A.4. Choose diagram for your size (applies to A.2, A.3 and A.4). Work the entire pattern in stockinette stitch. DECREASE TIP (applies to mid under sleeves): Begin 2 stitches before stitch with marker, knit 2 together, knit 1 (stitch with marker), knit 2 twisted together (= 2 stitches decreased). BIND-OFF TIP: To avoid a tight bind-off edge you may use a larger needle size. If this also is too tight, work a 1 yarn over after approx. every 8th stitch while binding off (bind off yarn overs as regular stitches). BUTTONHOLES: Decrease for buttonholes on right band. Place bottom buttonhole approx. 2 cm = ¾" from bottom edge and place top buttonhole in transition between neck edge and yoke. Adjust placement to decrease in purl sections (seen from right side). 1 BUTTONHOLE = purl 2 together, then make 1 yarn over. On next row (wrong side) knit the yarn over to make a hole. ------------------------------------------------------- START THE PIECE HERE: ------------------------------------------------------- JACKET - SHORT OVERVIEW OF THE PIECE: Work double neck edge and yoke back and forth on circular needle from mid front, top down. When neck edge is done, bind off band stitches, and continue with 1 edge stitch in garter stitch in each side. Now divide yoke for body and sleeves. Work body back and forth on circular needle from mid front, top down. Work sleeves in the round on double pointed needles/short circular needle, top down. Work bands at the end. DOUBLE NECK EDGE: Cast on 116-120-124-132-136-144 stitches (including 6 band stitches in each side towards mid front) on circular needle size 3 mm = US 2,5 with cedar. Purl 1 row (= wrong side). Work next row as follows from right side: 1 edge stitch in GARTER STITCH – read explanation above, * knit 2, purl 2 *, work from *-* until 3 stitches remain, knit 2, and finish with 1 edge stitch in garter stitch. Continue rib like this for 9 cm = 3½". When rib has been finished, work next row as follows from right side: Bind off the first 6 stitches (= band), knit over the next 104-108-112-120-124-132 stitches and increase at the same time 27-31-35-35-39-47 stitches evenly over these stitches – read INCREASE TIP, then work rib as before over the remaining 6 stitches. Turn piece, bind off the first 6 stitches (= band) and purl the rest of row (purl yarn over twisted) = 131-139-147-155-163-179 stitches on row including 1 edge stitch in each side. Insert 1 marker inside edge stitch mid front. Work yoke as explained below, measure yoke from this marker. YOKE: Switch to circular needle size 4 mm = US 6. Read all of the following section on yoke before working and read KNITTING TIP! Work first row as follows from right side: 1 edge stitch in garter stitch, work A.1 until 2 stitches remain on row (= 32-34-36-38-40-44 repetitions of 4 stitches), work first stitch in A.1 so that pattern begins and ends the same way in each side towards mid front, and finish with 1 edge stitch in garter stitch. Continue pattern like this with 1 edge stitch in garter stitch in each side towards mid front (work edge stitches with the color cedar). When A.1 has been worked vertically, work A.2 the same way. REMEMBER THE KNITTING GAUGE! AT THE SAME TIME on every row marked with arrow in A.1 and A.2, increase stitches evenly as explained below - remember INCREASE TIP: Arrow-1: Increase 32-32-32-32-40-40 stitches evenly = 163-171-179-187-203-219 stitches (there is now room for 20-21-22-23-25-27 repetitions A.1 of 8 stitches). Arrow-2: Increase 32-40-40-40-40-48 stitches evenly = 195-211-219-227-243-267 stitches (there is now room for 24-26-27-28-30-33 repetitions A.1 of 8 stitches). Arrow-3: Increase 32-32-40-48-48-40 stitches evenly = 227-243-259-275-291-307 stitches (there is now room for 14-15-16-17-18-19 repetitions A.1 of 16 stitches). Arrow-4: Increase 32-32-32-32-40-48 stitches evenly = 259-275-291-307-331-355 stitches (there is now room for 32-34-36-38-41-44 repetitions A.2 of 8 stitches). Arrow-5: Increase 32-32-32-24-32-32 stitches evenly = 291-307-323-331-363-387 stitches (there is now room for 36-38-40-41-45-48 repetitions A.2 of 8 stitches). Increases in size XS, S and M are now done. Arrow-6: Increase 24-24-32 stitches evenly (only applies to sizes L, XL and XXL) = 291-307-323-355-387-419 stitches (there is now room for 22-24-26 repetitions A.1 of 16 stitches in the 3 largest sizes). The increases in size L, XL and XXL are done. Then work until last row in A.2 remains in your size. Piece measures approx. 19-21-23-25-27-29 cm = 7½"-8¼"-9"-9¾"-10⅝"-11⅜" from marker mid front. Now divide yoke for body and sleeves, i.e. work next row as follows from right side: Work 1 edge stitch in garter stitch, work 40-44-46-50-56-64 stitches in stockinette stitch as shown in last row in A.2 (= front piece), slip the next 64-64-68-76-80-80 stitches on 1 stitch holder for sleeve, cast on 8-8-12-12-16-16 new stitches on needle (= in the side under sleeve), work 81-89-93-101-113-129 stitches as shown in last row in A.2 (= back piece), slip the next 64-64-68-76-80-80 stitches on 1 stitch holder for sleeve, cast on 8-8-12-12-16-16 new stitches on needle (= in the side under sleeve) and work the remaining 40-44-46-50-56-64 stitches as shown in A.2, and finish with 1 edge stitch in garter stitch (= front piece). Finish body and sleeves separately. NOW MEASURE PIECE FROM HERE! BODY: = 179-195-211-227-259-291 stitches. Work first row as follows from wrong side: XS, S, L and XL: Work 1 edge stitch in garter stitch, work first stitch in A.3 (seen from right side), work A.3 until 1 stitch remains on row (= 22-24-14-16 repetitions of 8-8-16-16 stitches), and finish with 1 edge stitch in garter stitch. NOTE! Read diagram from left to right when working from wrong side. Continue pattern back and forth so that pattern border from yoke is finished. When A.3 has been worked vertically, work next row as follows from wrong side: 1 edge stitch in garter stitch, work first stitch in A.4 (seen from right side), work A.4 until 1 stitch remains on row (= 11-12-14-16 repetitions of 16 stitches), and finish with 1 edge stitch in garter stitch. Then work as explained below ALL SIZES. M and XXL: Work 1 edge stitch in garter stitch, work first stitch in A.4 (seen from right side), work A.4 until 1 stitch remains on row (= 13-18 repetitions of 16 stitches), and finish with 1 edge stitch in garter stitch. NOTE! Read diagram from left to right when working from wrong side. Then work as explained below ALL SIZES. ALL SIZES: Continue A.4 with 1 edge stitch in garter stitch in each side. Repeat A.4 vertically as far as you can before rib begins at the bottom of body. AT THE SAME TIME on row marked with arrow in A.4 increase 16 stitches evenly in all sizes = 195-211-227-243-275-307 stitches (this increase is only done first time A.4 is worked vertically, and there is now room for 12-13-14-15-17-19 repetitions A.4 of 16 stitches). Work until piece measures approx. 31 cm = 12¼" from division in all sizes – finish pattern nicely after a whole pattern border. Approx. 4 cm = 1½" remain until finished measurements, try the jacket on and work until desired length. Knit 1 row from right side with cedar while increasing 57-61-65-73-81-93 stitches evenly = 252-272-292-316-356-400 stitches. NOTE! Increase stitches to avoid the rib from contracting when working the piece together. Switch to circular needle size 3 mm = US 2,5 and work first row from wrong side as follows: 1 edge stitch in garter stitch, * purl 2, knit 2 *, repeat from *-* until 3 stitches remain on needle, purl 2, and finish with 1 edge stitch in garter stitch. Continue rib like this for 4 cm = 1½". Bind off stitches with knit over knit and purl over purl - read BIND OFF TIP! Jacket measures approx. 58-60-62-64-66-68 cm = 22¾"-23⅝"-24⅜"-25¼"-26"-26¾" from shoulder and down. SLEEVE: Slip the 64-64-68-76-80-80 stitches from stitch holder in one side of piece on double pointed needles or a short circular needle size 4 mm = US 6 and pick in addition up 1 stitch in each of the 8-8-12-12-16-16 new stitches cast on under sleeve = 72-72-80-88-96-96 stitches. Insert 1 marker in the middle of the 8-8-12-12-16-16 stitches cast on under sleeve, i.e. insert marker in first stitch after the middle, count 35-35-39-43-47-47 stitches, insert 1 marker in next stitch (= middle stitch). 35-35-39-43-47-47 stitches remain on round after last marker. Move markers upwards when working. Marker mid under sleeve is used later when decreasing stitches under sleeve and marker mid on top of sleeve should be used to count where to begin pattern. Work last round in A.2 to finish A.2 the same way as on body - make sure that pattern fits over stitches from yoke. Read the rest of sleeve before continuing! XS, S, L and XL: Work A.3 in the round to finish repetition from yoke vertically but adjust to continue pattern nicely over stitches from yoke. When A.3 has been worked, work A.4 in the round the same way - count outwards from the middle so that middle stitch in A.4 fit with stitch with marker mid on top of sleeve. Repeat A.4 vertically. Then work as explained below ALL SIZES. M and XXL: When last round in A.2 has been worked, work A.4 in the round - count outwards from the middle so that middle stitch in A.4 fit with stitch with marker mid on top of sleeve. Repeat A.4 vertically. Then work as explained below ALL SIZES. ALL SIZES: AT THE SAME TIME when sleeve measures 3 cm = 1⅛" from division in all sizes, decrease 2 stitches mid under sleeve - read DECREASE TIP. Decrease like this every 2½-3-2-1½-1½-1½ cm = 1"-1⅛"-¾"-½"-½"-½" 14-12-16-18-20-20 times in total = 44-48-48-52-56-56 stitches. Work until sleeve measures approx. 41-40-38-36-35-33 cm = 16⅛"-15¾"-15"-14¼"-13¾"-13" from division – finish pattern nicely after a whole pattern border. Approx. 4 cm = 1½" remains until finished measurements. Try the jacket and work to desired length. NOTE! Shorter measurements in the larger sizes because of wider neck and longer yoke. Knit 1 round with cedar while increasing 4 stitches evenly in all sizes = 48-52-52-56-60-60 stitches. Switch to double pointed needles size 3 mm = US 2,5. Work rib in the round = knit 2/purl 2 for 4 cm = 1½". Bind off with knit over knit and purl over purl - remember BIND-OFF TIP. Sleeve measures approx. 45-44-42-40-39-37 cm = 17¾"-17¼"-16½"-15¾"-15¼"-14½" from division. Work the other sleeve the same way. LEFT BAND: Pick up stitches along left front piece on circular needle size 3 mm = US 2,5 with cedar, i.e. begin straight below neck edge and pick up inside 1 edge stitch in garter stitch as follows: Pick up approx. 120-124-128-136-140-144 stitches (equals approx. 25 stitches per 10 cm = 1½" along the edge - number of stitches should be divisible by 4). Work next row as follows from wrong side: 1 edge stitch in garter stitch, * purl 2, knit 2 *, repeat from *-* until 3 stitches remain on needle, purl 2, and finish with 1 edge stitch in garter stitch. Continue rib like this for 2½ = 1" to 3 cm = 1⅛", then bind off with knit over knit and purl over purl. RIGHT BAND: Work band the same way along right front piece but begin at the bottom of front piece and continue up to neck edge. When band measures approx. 1 = ⅜" to 1½ cm = ½", decrease for 8-8-8-9-9-9 BUTTONHOLES evenly – read explanation above. Then continue band until it measure the same as left band. Bind off stitches with knit over knit and purl over purl. ASSEMBLY: Sew band to neck edge inside 1 edge stitch with seam in towards wrong side of garment. Fold rib at the top of neck double in towards wrong side of garment. Fasten rib but to avoid a tight neck edge and avoiding the edge to tip outwards, it is important to make the seam elastic. Sew together opening mid front with small stitches. Sew the buttons on to the left band. |
|||||||||||||
Diagram explanations |
|||||||||||||
|
|||||||||||||
 |
|||||||||||||
 |
|||||||||||||
 |
|||||||||||||
 |
|||||||||||||
Have you finished this pattern?Tag your pictures with #dropspattern #lovelinksjacket or submit them to the #dropsfan gallery. Do you need help with this pattern?You'll find 30 tutorial videos, a Comments/Questions area and more by visiting the pattern on garnstudio.com. © 1982-2026 DROPS Design A/S. We reserve all rights. This document, including all its sub-sections, has copyrights. Read more about what you can do with our patterns at the bottom of each pattern on our site. |
|||||||||||||


With over 40 years in knitting and crochet design, DROPS Design offers one of the most extensive collections of free patterns on the internet - translated to 17 languages. As of today we count 324 catalogs and 12290 patterns - 12280 of which are translated into English (US/in).
We work hard to bring you the best knitting and crochet have to offer, inspiration and advice as well as great quality yarns at incredible prices! Would you like to use our patterns for other than personal use? You can read what you are allowed to do in the Copyright text at the bottom of all our patterns. Happy crafting!
Post a comment to pattern DROPS 217-18
We would love to hear what you have to say about this pattern!
If you want to leave a question, please make sure you select the correct category in the form below, to speed up the answering process. Required fields are marked *.