
Looking for a yarn?


Comments / Questions (20)
![]() Mie wrote:
Mie wrote:
Ved overgang fra en omgang til den næste bliver mønstret skævt, hvordan kan det afhjælpes?
06.01.2025 - 15:08DROPS Design answered:
Hei Mie. Du vil nok alltid få et hak ved mønsterstrikk. Men ta en titt på videoen: Hvordan strikke striper rundt uten hakk / Jog. Kanskje du kan tilpasse noen omganger i den oppskriften du strikker og se om mønstret blir noe bedre. mvh DROPS Design
13.01.2025 - 09:43
![]() Wiktoria wrote:
Wiktoria wrote:
Hej! Jag är nybörjare inom stickning och det här är mitt första projekt. Det verkar som att jag gör ett fel och förstår inte vad det är. Jag har följt instruktionerna väldigt exakt men oket på tröjan hamnar väldigt långt upp. Istället för att lägga sig runt halsen som en normal tröja gör, täcker den hela min hals och når min käke. Det ser riktigt konstigt ut. Jag förstår verkligen inte vad jag gör för fel och uppskattar om någon hjälper mig.
05.04.2024 - 11:10DROPS Design answered:
Hej Wiktoria, Stickar du i DROPS Karisma? Har du 20 m på 10 cm i bredden och 26 varv på 10 cm i höjden? Det är viktigt för att få rätt storlek. Titta på den här, det är en komplett beskrivning i samma garn och samma typ av modell (ja annat mönster och storlek): Christmas KAL I DROPS Karisma
09.04.2024 - 10:01
![]() Pauline Kern wrote:
Pauline Kern wrote:
I love your patterns and yarns....I just finished knitting this is brown mix and light oak....your patterns are explained thoroughly and very easy to understand!! THANK YOU
30.03.2024 - 14:02
![]() Franziska wrote:
Franziska wrote:
Hallo! Könnte man diesen Pullover auch in Double-Face stricken? Wahrscheinlich würde sich der Garnverbrauch erhöhen, aber würden die Maße noch passen? Ich hab etwas Probleme, das Muster glatt zu halten und wollte es gern mal so ausprobieren :)
19.02.2024 - 10:39DROPS Design answered:
Liebe Franziska, sollte Ihre Maschenprobe stimmen, dann könnten Sie wahrscheinlich auch in Double-Face stricken, aber, wie Sie es schreiben, brauchen Sie mehr Wolle; beachten Sie, daß die Textur aber etwas dicker sein wird. Viel Spaß beim stricken!
19.02.2024 - 15:19
![]() Cathi Jennings wrote:
Cathi Jennings wrote:
Do the yoke stitch counts in this pattern include the extra stitches added with the back of neck elevation?
10.12.2023 - 19:06DROPS Design answered:
Dear Cathi, when you do the neck elevation you are not adding stitches, to what is already on the needles. You are turning mid row, and knit, but not adding stitches here. Happy Knitting!
10.12.2023 - 21:34
![]() Anja Gutgesell wrote:
Anja Gutgesell wrote:
Hallo, liebes Drops-Team, kann ich den Pullover nachträglich verlängern (Ärmel und Saum), und wieviel Wolle bräuchte ich bei Grösse M? Danke im Voraus!
31.05.2023 - 12:42DROPS Design answered:
Liebe Frau Gutgesell, ja sicher können Sie den Pullover verlängern, aber die Garnmenge hängt von der Verlängerungen ab - lassen Sie sich bei einem Modell mit der gewünschten Länge inspirieren, gerne wird Ihnen Ihr DROPS Händler (auch per Telefon oder per E-Mail) weiterhelfen. Viel Spaß beim stricken!
31.05.2023 - 16:32
![]() Dessiaume wrote:
Dessiaume wrote:
Bonjour, est-il possible d\'avoir un tableau des tailles femme, s\'il vous plaît ?
14.04.2023 - 16:27DROPS Design answered:
Bonjour Mme Dessiaume, nous n'avons pas de tel tableau car nos modèles remontent aux années 80 et les normes ont changé. Pour trouver votre taille, mesurez un vêtement que vous avez et dont vous aimez la forme et comparez ces mesures à celles du schéma. Retrouvez plus d'infos ici. Bon tricot!
17.04.2023 - 08:39
![]() Gitte Marvig wrote:
Gitte Marvig wrote:
Når jeg laver mønsteret på bærestykket buler/bølger det. Især der hvor udtagningerne er. Er det rigtigt
10.11.2022 - 09:51DROPS Design answered:
Hej Gitte, Strikker du i DROPS Karisma? Sørg for at du ikke strikker mønsteret for stramt, hvis mønstertråden strammer bagpå vil det bule...
11.11.2022 - 13:46
![]() Catherine Hellin wrote:
Catherine Hellin wrote:
Je tricote en rond et jacquard le pull drops outdoor chrismas 217/11 malheureusement il y a toujours un décalage au niveau du dessin à chaque tour pas moyen de le faire aligner pouvez vous m'aider ?
16.12.2021 - 17:53DROPS Design answered:
Bonjour Mme Hellin, nous n'avons pas d'autres astuces particulières que la technique des rayures (pas toujours applicable), peut-être que votre magasin aura une astuce à vous partager, n'hésitez pas à le contacter, même par mail ou téléphone, ou bien demandez conseil à d'autres tricoteuses du monde entier via notre DROPS Workshop. Bon tricot!
17.12.2021 - 08:42
![]() Petra wrote:
Petra wrote:
Ik had voor maat XL niet genoeg aan 100 gram om in te breien.
13.11.2021 - 14:55
|
||||||||||
Outdoor Christmas#outdoorchristmassweater |
||||||||||
 |
 |
|||||||||
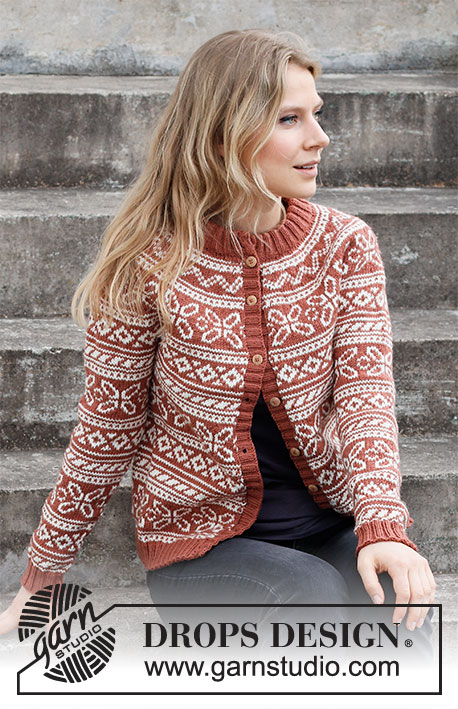
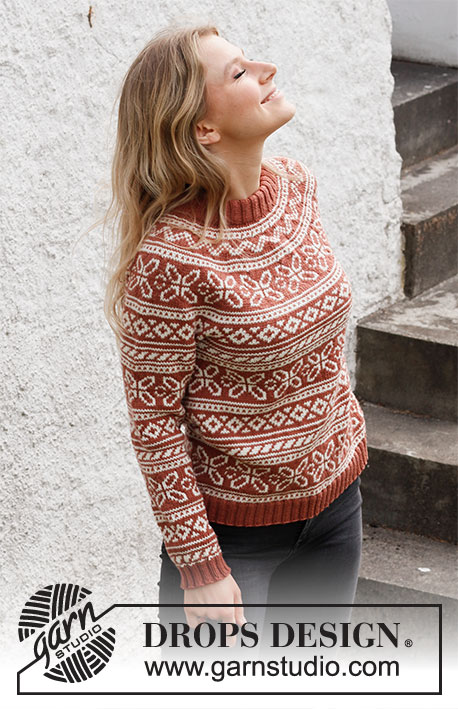
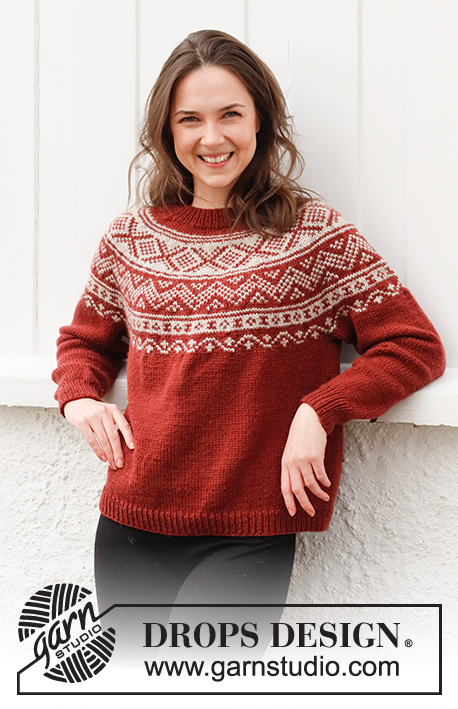
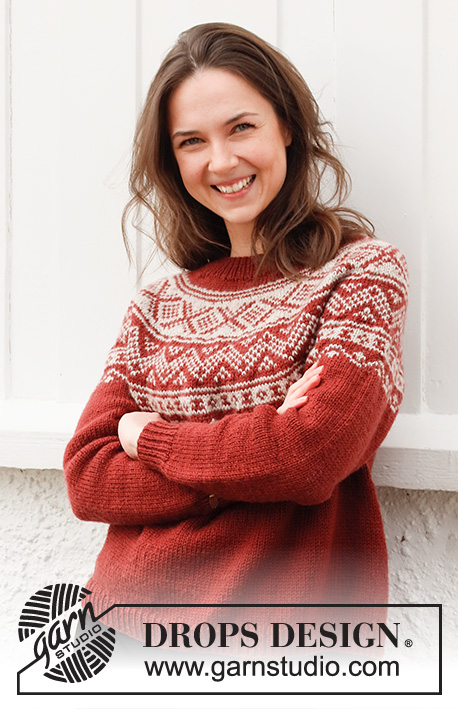
Knitted sweater in DROPS Karisma. The piece is worked top down with round yoke and Nordic pattern on the yoke. Sizes S - XXXL.
DROPS 217-11 |
||||||||||
|
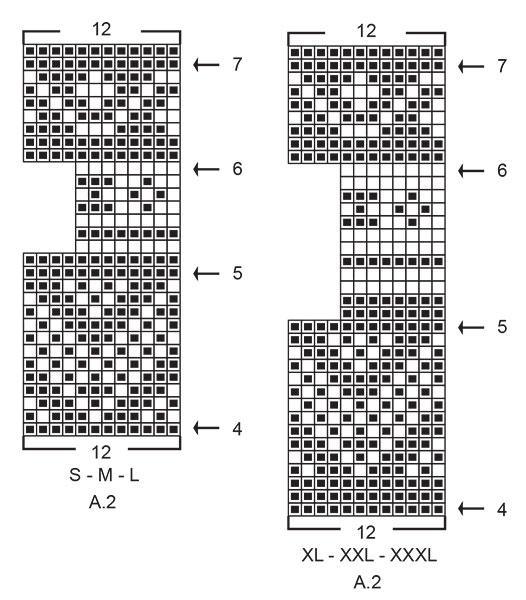
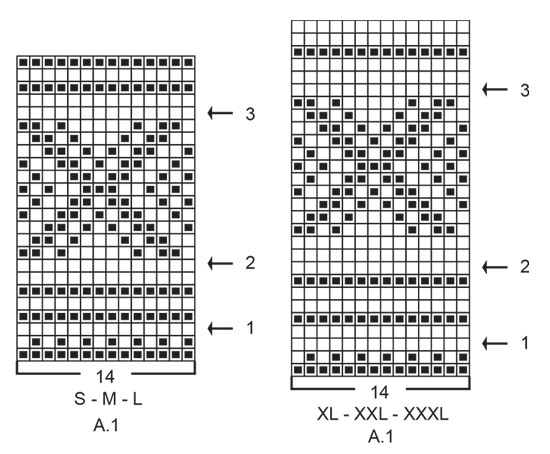
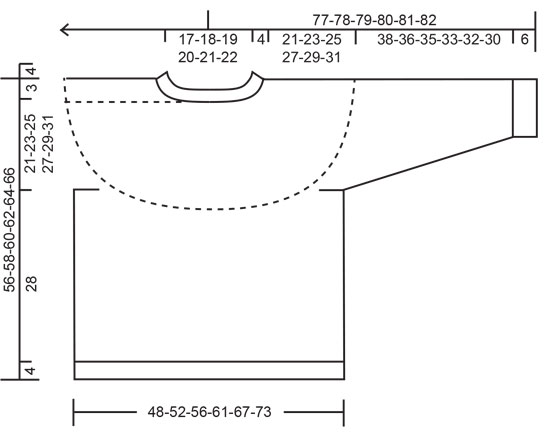
------------------------------------------------------- EXPLANATIONS FOR THE PATTERN: ------------------------------------------------------- INCREASE TIP (evenly spaced): To work out how to increase evenly, count the total number of stitches on the needle (e.g. 92 stitches) and divide by the number of increases to be made (e.g. 30) = 3.1. In this example, increase by making 1 yarn over after each 3rd stitch. On the next round knit the yarn overs twisted to avoid holes. PATTERN: See diagrams A.1 and A.2. Choose diagram for your size. The whole pattern is worked in stockinette stitch. KNITTING TIP: To avoid the knitting gauge becoming tighter when working pattern, it is important that the strands at the back are not tight. Use a size larger needle when working pattern if this is a problem. If the knitting gauge is too tight in height, the garment will be short and the armholes too small – you can correct this by regularly working an extra round in the one-colored sections. If your work is loose, the garment will be long and the armholes too big – you can correct this by regularly working one less round in the one-colored sections. ELEVATION (back of neck): So the sweater is slightly higher at the back of the neck when working a round yoke, you can work an elevation as described here. Skip this section if you do not want an elevation. Insert 1 marker at the beginning of the round (mid-back). Start from the right side with maroon and knit 15-15-16-16-17-17 stitches, turn, tighten strand and purl 30-30-32-32-34-34 stitches back. Turn, tighten strand and knit 45-45-48-48-51-51 stitches, turn, tighten strand and purl 60-60-64-64-68-68 stitches back. Turn, tighten strand and knit 75-75-80-80-85-85 stitches, turn, tighten strand and purl 90-90-96-96-102-102 stitches back. Turn tighten the strand and knit to mid-back. Then work YOKE as described in the text. DECREASE TIP (for mid under sleeve): Work until there are 3 stitches left before the marker thread, knit 2 together, knit 2 (marker thread sits between these 2 stitches), slip 1 stitch as if to knit, knit 1 and pass the slipped stitch over the knitted stitch (= 2 stitches decreased). BINDING-OFF TIP: To avoid the bind-off edge being tight you can bind off with a larger size needle. If the edge is still tight, make 1 yarn over after approx. each 4th stitch at the same time as binding off; the yarn overs are bind off as normal stitches. ------------------------------------------------------- START THE PIECE HERE: ------------------------------------------------------- SWEATER – SHORT OVERVIEW OF THE PIECE: The neck and yoke are worked in the round with circular needle, top down from mid back. The yoke is divided for body and sleeves and the body continued in the round with circular needle. The sleeves are worked in the round with short circular needle/double pointed needles, top down. NECK: Cast on 92-96-100-104-108-112 stitches with short circular needle size 3.5 mm = US 4 and maroon. Knit 1 round, then work rib in the round (= knit 1, purl 1) for 4 cm = 1½". Knit 1 round where you increase 30-32-34-34-36-38 stitches evenly spaced – read INCREASE TIP = 122-128-134-138-144-150 stitches. Change to circular needle size 4.5 mm = US 7 and knit 1 round (yarn overs knitted twisted). Insert 1 marker in the middle of the round (= mid-front), the yoke is measured from this marker!! You can now work an ELEVATION at the back of the neck – read description above. If you do not want an elevation, go straight to YOKE. YOKE: Work 0-4-4-6-6-6 rounds with stockinette stitch and maroon. Then work pattern AT THE SAME TIME as you increase stitches as described below. Read KNITTING TIP and work A.1 (when A.1 has been completed in height, work A.2 in the same way). On each round marked with an arrow in A.1 and A.2, increase as follows: Arrow-1: Increase 24-28-32-36-40-44 stitches evenly spaced = 146-156-166-174-184-194 stitches. Arrow-2: Increase 22-26-30-36-40-44 stitches evenly spaced = 168-182-196-210-224-238 stitches (there is now room for 12-13-14-15-16-17 repeats of A.1 with 14 stitches). Arrow-3: Increase 24-30-28-34-38-44 stitches evenly spaced = 192-212-224-244-262-282 stitches. Arrow-4: Increase 24-28-28-32-38-42 stitches evenly spaced = 216-240-252-276-300-324 stitches (there is now room for 18-20-21-23-25-27 repeats of A.2 with 12 stitches). Arrow-5: Increase 48-48-52-52-52-60 stitches evenly spaced = 264-288-304-328-352-384 stitches (there is now room for 33-36-38-41-44-48 repeats of A.2 with 8 stitches). Arrow-6: Increase 24-24-32-44-44-48 stitches evenly spaced = 288-312-336-372-396-432 stitches (there is now room for 24-26-28-31-33-36 repeats of A.2 with 12 stitches). Arrow-7: Increase 8-8-8-8-8-4 stitches evenly spaced = 296-320-344-380-404-436 stitches. Finish working A.2. When A.2 has been completed the piece measures approx. 21-22-22-27-27-27 cm = 8¼"-8¾"-8¾"-10⅝"-10⅝"-10⅝"-10⅝" from the marker on the neck. Continue with stockinette stitch and maroon (in S and XL only continue if the piece measures less than the above measurement when A.2 is finished). When the piece measures 21-23-25-27-29-31 cm = 8¼"-9"-9¾"-10⅝"-11⅜"-12¼" from the marker on the neck, divide the yoke for the body and sleeves on the next round as follows; Work 45-49-52-57-62-68 stitches in stockinette stitch (= ½ back piece), place the next 58-62-68-76-78-82 stitches on 1 thread for the sleeve and cast on 6-6-8-8-10-10 new stitches on the needle (= in side under sleeve), work 90-98-104-114-124-136 stitches in stockinette stitch (= front piece), place the next 58-62-68-76-78-82 stitches on 1 thread for the sleeve and cast on 6-6-8-8-10-10 new stitches on the needle (= in side under sleeve) and work the remaining 45-49-52-57-62-68 stitches in stockinette stitch (= ½ back piece). Body and sleeves are finished separately. THE PIECE IS NOW MEASURED FROM HERE! BODY: = 192-208-224-244-268-292 stitches. Work stockinette stitch in the round with maroon until the piece measures 28 cm = 11" from the division. There is approx. 4 cm = 1½" left to finished length; try the sweater on and work to desired length. Knit 1 round where you increase 20-20-22-24-26-30 stitches evenly spaced = 212-228-246-268-294-322 stitches (this is done to avoid the rib being tight). Change to circular needle size 3.5 mm = US 4 and work rib (= knit 1, purl 1) for 4 cm = 1½". Bind off with knit over knit and purl over purl – read BINDING-OFF TIP! The sweater measures approx. 56-58-60-62-64-66 cm = 22"-22¾"-23⅝"-24⅜"-25¼"-26" from the shoulder down. SLEEVE: Place the 58-62-68-76-78-82 stitches from the thread on the one side of the piece on double pointed needles/short circular needle size 4.5 mm = US 7 and knit up 1 stitch in each of the 6-6-8-8-10-10 stitches cast on under the sleeve = 64-68-76-84-88-92 stitches. Insert a marker thread in the middle of the 6-6-8-8-10-10 stitches under the sleeve. Allow the thread to follow your work onwards; it will be used when decreasing under the sleeve. Start at the marker thread and work stockinette stitch in the round with maroon. When the sleeve measures 3-3-3-2-2-2 cm = 1⅛"-1⅛"-1⅛"-¾"-¾"-¾" from the division, decrease 2 stitches under the sleeve – read DECREASE TIP. Decrease like this every 4-3½-2½-2-1½-1½ cm = 1½"-1¼"-⅞"-¾"-½"-½" a total of 9-10-13-16-17-18 times = 46-48-50-52-54-56 stitches. Work until the sleeve measures 38-36-35-33-32-30 cm = 15"-14¼"-13¾"-13"-12½"-11¾" from the division. There is approx. 6 cm = 2⅜" left to finished length; try the sweater on and work to desired length. NOTE: Shorter measurements in larger sizes due to wider neck and longer yoke. Change to double pointed needles size 3.5 mm = US 4 and work rib (= knit 1, purl 1) for 6 cm = 2⅜". Bind off with knit over knit and purl over purl – remember BINDING-OFF TIP. The sleeve measures approx. 44-42-41-39-38-36 cm = 17¼"-16½"-16⅛"-15¼"-15"-14¼" from the division. Work the other sleeve in the same way. |
||||||||||
Diagram explanations |
||||||||||
|
||||||||||
|
||||||||||
|
||||||||||
|
||||||||||
Have you finished this pattern?Tag your pictures with #dropspattern #outdoorchristmassweater or submit them to the #dropsfan gallery. Do you need help with this pattern?You'll find 27 tutorial videos, a Comments/Questions area and more by visiting the pattern on garnstudio.com. © 1982-2025 DROPS Design A/S. We reserve all rights. This document, including all its sub-sections, has copyrights. Read more about what you can do with our patterns at the bottom of each pattern on our site. |
||||||||||


With over 40 years in knitting and crochet design, DROPS Design offers one of the most extensive collections of free patterns on the internet - translated to 17 languages. As of today we count 314 catalogs and 11822 patterns - 11812 of which are translated into English (US/in).
We work hard to bring you the best knitting and crochet have to offer, inspiration and advice as well as great quality yarns at incredible prices! Would you like to use our patterns for other than personal use? You can read what you are allowed to do in the Copyright text at the bottom of all our patterns. Happy crafting!
Post a comment to pattern DROPS 217-11
We would love to hear what you have to say about this pattern!
If you want to leave a question, please make sure you select the correct category in the form below, to speed up the answering process. Required fields are marked *.