Cómo leer los diagramas de punto

Un diagrama de punto consiste de cuadrados. 1 cuadrado = 1 punto – la definición del símbolo proporciona información acerca de cómo tejer el punto. El diagrama muestra todos los puntos vistos por el lado derecho (a menos que se especifique de otra manera).

Un diagrama se ve así:

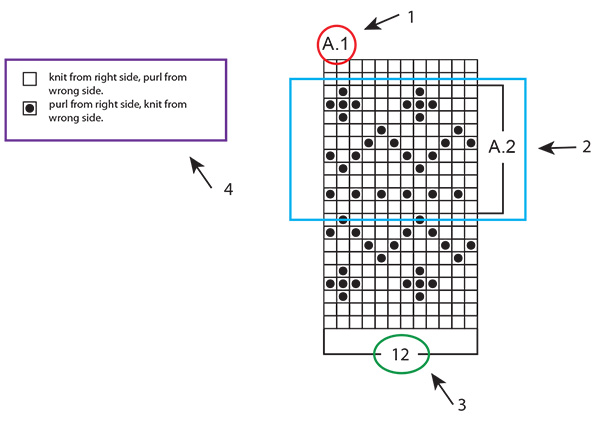
  1. A.1 es el nombre del diagrama, y se refiere al diagrama entero.
  2. A.2 es solo la parte del diagrama que está dentro de los cuadrados separados por líneas más oscuras.
  3. Este número se refiere al número de puntos en la 1ᵃ hilera del diagrama.
  4. Esta es la definición de los símbolos: explica cómo tejer cada punto, o en qué color (en patrones multicolores).

Un diagrama se lee completamente en sentido contrario a cómo leemos normalmente: de derecha a izquierda, de abajo para arriba. Es decir, se comienza con el símbolo en la esquina inferior derecha, y se va tejiendo hacia la izquierda y en dirección hacia arriba (ver lo señalado en ROJO en el diagrama abajo). Si tienes que comenzar en un cuadrado diferente/con un punto diferente, esto será especificado – por ejemplo: las diferentes tallas pueden comenzar en diferentes lugares en el mismo diagrama (ver el rectángulo azul abajo).

Si tienes que tejer varias repeticiones de un diagrama (es decir: tejer el mismo diagrama varias veces a lo ancho) vas a tejer hasta el fin de la hilera del diagrama, y comenzarás nuevamente con el primer punto para la repetición siguiente.

De ida y vuelta:

Cuando se teje de ida y vuelta, se teje una hilera por el lado derecho de la labor y una hilera por el lado revés de la labor. Como los diagramas muestran todos los puntos vistos por el lado derecho, tendrás que tejer en el sentido contrario cuando se teje por el lado revés (ver las flechas AZULES en el diagrama abajo): lees la hilera de izquierda a derecha, los puntos derechos se tejen de revés, y los puntos reveses se tejen de derecho, etc (esto frecuentemente va a estar especificado en la definición de los símbolos: “derecho por el lado derecho, revés por el lado revés”).

En redondo:

Cuando se teje en redondo, todas las vueltas son tejidas por el lado derecho, y el diagrama es leído completamente de derecha a izquierda. Cuando se comienza una nueva vuelta, simplemente comenzar tejiendo el primer símbolo de la hilera siguiente del diagrama.

Varios diagramas diferentes tejidos consecutivamente en la hilera/vuelta:

Si estás tejiendo varios diagramas diferentes, uno después del otro en la misma hilera/vuelta, tejer de la manera siguiente: Tejer la 1ᵃ hilera del diagrama 1, continuar con la 1ª hilera del diagrama 2, después la 1ª hilera del diagrama 3, etc. RECUERDA: si estás tejiendo de ida y vuelta, el diagrama tendrá que ser tejido en el orden contrario por el lado revés – es decir: comenzar con el diagrama 3, después el diagrama 2 y, por último, el diagrama 1. También son tejidos en sentido contrario como se hace habitualmente.

En el patrón, esto puede estar escrito de la manera siguiente: “tejer A.1, A.2, A.3 un total de 1-1-2-3-4 veces”. Esto quiere decir que primero tejes A.1, después A.2 y, finalmente, repites A.3 un total de 1-1-2-3-4 veces (dependiendo de tu talla). Es SOLO el diagrama A.3 que es repetido, A.1 y A.2 se tejen 1 vez cada uno.

Cuando el número de puntos no corresponde a las repeticiones completas del diagrama:

A veces, el número de puntos no es divisible con las repeticiones completas del diagrama a tejer a lo ancho de la labor. Por ejemplo: A.1 cubre 12 puntos y debe ser repetido sobre 40 puntos. En este caso, vas a tejer 3 repeticiones completas de A.1 (= 36 puntos) y después vas a tejer los primeros 4 puntos del diagrama sobre los puntos restantes (ver la línea ROJA abajo). Usualmente este es el caso donde el diagrama es un patrón repetitivo y, por eso, independientemente de tejer repeticiones completas o no, el patrón será consistente.

Comentarios (553)

Jacklyn wrote:

In the pattern Winter Escape 205-4 I have to go from 75 stitches to 270 in the yoke. Are these increase stitches included in the A.1 grid. ?

09.12.2023 - 22:26:

DROPS Design answered:

Dear Jacklyn, the increases are the yarn overs (empty oval shapes) in the A.1 chart. For size M you have 13 increases per chart repeat. Since you have 15 repeats of A.1 on the round, you should have 195 increases. 195+75 = 270 stitches. Happy knitting!

10.12.2023 - 18:09:

Solbritt Hafren wrote:

Hej . Jag stickar Drops mönster 241-17. Min fråga gäller mönster A3. Omslagen- är det en egenn maska eller räknas den in i dom andra maskorna. Får inte mönstret att stämma på A3. Omslagen och "hålen" blir inte där dom ska vara . Ser snett ut. Hålen hamnar fel. Va gör jag för fel?

04.12.2023 - 17:22:

DROPS Design answered:

Hei Solbritt. Usikker på hva du gjør feil, har du riktig maskeantall når du starter med A.3? Tips: Sett 1 maskemarkør/merketråd før du begynner å strikke A.3 og 1 etter at du har strikker A.3. Du har da 63 masker mellom maskemarkørene og du vil da ha en bedre oversikt når A.3 strikkes, slik at ikke mønstret forskyver seg. Evnt. bruk flere maskemarkører, slik at du hele tiden ser hvor du er i diagrammet. Du har 63 masker i A.3 bortsett fra pinne 4, 8, 12 og 16, men det blir riktig maskeantall pinnen etter. mvh DROPS Design

11.12.2023 - 06:55:

Françoise Obissier wrote:

Malgré mes efforts je ne parviens pas à comprendre les explications de l'empiècement pour le modèle Lucky Wish (224-21). Que veut dire :Tricoter un tour endroit en augm. 0-0-0-4-8-0 mailles à intervalles réguliers ?

04.12.2023 - 16:10:

DROPS Design answered:

Bonjour Mme Obissier, en fonction de la taille, vous allez tricoter ce tour endroit en augmentant 4 mailles en taille XL ou bien 8 mailles en taille XXL, mais dans les autres tailles, vous n'avez pas besoin d'augmenter. Bon tricot!

04.12.2023 - 16:18:

Jan Arneberg wrote:

I am knitting the Sky Feather sweater. My question refers to the charts On A 1 after row 4 the two or three stitches on each edge are not shown in the graph. Where are they?

03.12.2023 - 18:51:

DROPS Design answered:

Dear Jan, the stitches on the edges are repeated every 4 rows. That is, when working row 5 of the central stitches, you work row 1 of the edge stitches. Happy knitting!

03.12.2023 - 23:44:

Noreen wrote:

Hallo, Mijn fair isle telpatroon is niet deelbaar, waardoor ik 3 steken overhoud. Het is me niet helemaal duidelijk wat u bedoelt met 'eerste 4 steken in het telpatroon over de overgebleven steken '. Brei ik die steken dan samen? Heeft u misschien een uitleg op video? Bedankt en groetjes, Noreen

03.12.2023 - 09:05:

Vercoutere wrote:

Pas compris les diagrammes pour pull sailor drops blue jacket. Merci pour votre réponse

02.12.2023 - 20:27:

Nicola wrote:

Ich brauche Hilfe mit dem Diagram, bin erst bei A1 und komme schon nicht weiter "Spill the beans" ist das Muster. Ich durfte hier keinen link einfuegen. Es gibt keine gute Anleitung wie man die Symbole verstehen soll. Vielen Dank fuer die Hilfe.

29.11.2023 - 18:38:

Regine Dhaene wrote:

Ik brei de kindertrui North Star. Ik heb een probleem met het patroon, op de plaats waar ik een nieuwe ronde begin volgt het patroon niet en heb ik de steek die verspringt. Heel storend! Nergens vind ik uitleg hoe ik dit kan oplossen ;( Een video Fair Isle breien in het rond staat niet op de site en ook nergens uitleg ook niet bij de andere scandinavische breipatronen. Graag hulp aub, ik denk dat nog klanten met dit probleem zitten? Mvg,

29.11.2023 - 08:31:

Lynette wrote:

Thank you so much for both replies how to knit Drops 219-8. I finally understand how to work all the charts and what it means to work over the first set.. I’m finally making progress. Thank you again for taking the time to answer my questions.

27.11.2023 - 23:48:

Drops 43-5 wrote:

Hi, I'm knitting Sweet Gleam. In the charts above I don't see how to handle the increases. Do you repeat them or is this just to get the number of stitches for the pattern? Thank you, Tina

27.11.2023 - 16:49:

DROPS Design answered:

Dear Tina, the increases are included in diagrams, as you repeat diagrams in the round, you will repeat the increases in the round, for ex when you work (A.1, A.2) all the round you will increase 1 st in each A.1 and 1 stitch in each A.2 all the round. Happy knitting!

28.11.2023 - 09:13:

Brigitte Asp wrote:

Hej! Jag stickar precis pulsvärmare 173-21.\r\nA11 visar 6 rader, men efter rad 4 fattas beskrivningen vad man skall göra med dom ytterste 5 maskor på båda sidorna. Hur skall jag göra?\r\nTack för hjälpen\r\nBrigitte

26.11.2023 - 20:31:

Lynette wrote:

Hello, I’m knitting Drops 219-8. I don’t quite understand “work A2b and A3b over A2a and A3a”? (adjust to make the cable on the same round as A1)?

25.11.2023 - 21:09:

DROPS Design answered:

Dear Lynette, it means that you work the stitches of A.2b over the stitches worked according to chart A.2a and A.3b over the stitches in A.3a. Since all of the charts' rounds are the same, except for the one with the cable, you need to work the round with the cable in the same round as you work the cable in A.1; the rest of the rounds of A.2b and A.3b are worked as repeats of p2, k6, p2. Happy knitting!

26.11.2023 - 17:37:

Barbara wrote:

I'm knitting Sweet Erika. When there is a 0 on the line of the pattern within the box it means to do a YO, that I understand. But, in the box, which ever pattern box we are using at the time, do we knit a stitch, yo then knit the next stitch making three stitches out of two or do we make the last stockinette stitch and use that as a springboard for the yo from the there, making 1 pattern stitch into two? Thank you for your help. Barbara :)

25.11.2023 - 17:26:

DROPS Design answered:

Dear Barbara, when there is a 0 between 2 boxes/stitches, you k1 (first box), make 1 yarn over and k1 (second box). In the next round, there should be 1 more stitch for every yarn over (0) worked, unless you also worked decreases in the same round (which removes 1 stitch from the next round). Happy knitting!

26.11.2023 - 17:47:

Elisabeth wrote:

I am knitting Drops Gleam Jumper. I do not understand the A1 A2 charts. Does it mean every other stitch in row 1 and then every stitch in rows 2-5? I'm not good with pictures so I'm sorry if this is a daft question but I really don't get it. And is A1 and A2 five rows?

24.11.2023 - 23:17:

DROPS Design answered:

Dear Elisabeth, in A.1 in row 1 work k1, yarn over, k1 and then work in stocking stitch the next 4 rows (purl from the wrong side and knit from the right side). In A.2, the first row is worked as in A.1 but the next 4 rows are worked in reverse stocking stitch (knit from the wrong side and purl from the right side). There are a total of five rows in both charts. When you are working the piece, since you are alternating between A.1 and A.2, you should have something similar to a rib; on the 2nd row, for example, you have *purl 3 (A.1) and knit 3 (A.2)* and repeat this rib. Continue until you have worked all 5 rows of charts A.1 and A.2. Happy knitting!

26.11.2023 - 17:59:

Barbara Dietricg wrote:

I have the back on Bluebird Drops Design 134.1 done and am knitting the front. I don’t understand when I get toward the top, and the graph is split. How do I read this? DoI do M.3 and M.3C with 2 dierrerent balls of yarn, skipping the no graph areas?

19.11.2023 - 01:09:

DROPS Design answered:

Dear Mrs Dietricg, that's because you are decreasing on some rows, then on next row you have fewer stitches, to be able to draw the diagram, there are empty spaces (for decreased stitches), so just continue working in line, skipping the spaces that are just matching the stitches you previously decreased. Happy knitting!

20.11.2023 - 11:45:

Viviane Azou wrote:

Hoe lees je een telpatroon bij eentrui die van boven naar beneden wordt gebreid? De oneven cijfers staan rechts en de even staan links

17.11.2023 - 20:35:

Ramona wrote:

Hallo, ich verstehe das Diagramm zu Pullover DROPS Children 32-10 nicht. Wenn ich Größe 80/86 stricken möchte, nehme ich Diagramm A1 mit 6 Maschen. Also A1 6. Ist das korrekt? Aber was bedeuten die Zahlen 12/18-2 darunter? Danke für eine Erklärung. Ramona

17.11.2023 - 12:21:

Katelyn Foster wrote:

I am making Winter Berry Cardigan. I don’t understand why the pattern keeps saying A1 in the first row of the yoke. Am I following a1 or am I following the number of stitches in the pattern?

16.11.2023 - 14:49:

DROPS Design answered:

Dear Mrs Foster, follow the description of the pattern, A.1 will be worked a total of 4 times in the row for each raglan. So just follow the description of the row from RS at the beg of yoke, working stocking stitch (see the number of sts for your size), A.1 at each raglan (a total of 4 times) and 1 stitch in garter stitch on each side. Happy knitting!

17.11.2023 - 08:57:

Raja Paulussen wrote:

Model 244-10. Forest echo cardigan. Bij welke maat brei ik A 1, A2 of A3? Om voor maat S aan 238 steken te komen na A1? Daarna moet ik na patroon A4, A5 of A 6 269 steken hebben maar alleen in A5 en A6 wordt nog een steek per patroon gemeerderd en bij A4 niets meer. Ik heb bij patroon 244-9 gekeken en daar volgt na A1 A2. Maar bij het vest moet A1 A2 A3 A4 A5en A6 achter elkaar gebreid worden. Dat klopt niet, welk patroondelen horen voor welke maat bij elkaar? Dank voor Uw hulp.

14.11.2023 - 22:21:

DROPS Design answered:

Dag Raja,

A.1, A.2 en A.3 brei je in alle maten. In de breedte op de naald brei je eerst A.1, dan herhaal je steeds A.2 in de breedte en tot slot brei je A.3. Dan keer je het werk en brei je terug, waarbij je ook de steken terug leest. Dus op de teruggaande naald brei je eerst A.3, dan herhaal je steeds A.2 en tot slot A.3. Zo brei je steeds heen en weer totdat je deze patronen in de hoogte hebt gebreid. Als het goed is kom je dan (samen met de biessteken) op het juiste aantal steken.

26.11.2023 - 07:47:

Tana wrote:

Können Sie bitte die Diagramme A1 und A3 in der Anleitung 231-16 erklären ? Bis zu Runde 12 ist alles klar, danach sind die Felder entweder nach links oder nach rechts versetzt, damit komme ich nicht zurecht. Vielen Dank

13.11.2023 - 17:15:

DROPS Design answered:

Liebe Tana, setzen Sie Markierungen genau nach jedem Diagram, es wird sich einfach so gestrickt daß die letzte Masche von A.1 z.B. wird zusammen mit den 2 ersten Maschen von A.2/A.3 gestrickt. Deshalb sieht das Diagram etwas anders aus, but stricken Sie einfach weiter genauso wie beschrieben. Viel Spaß beim stricken!

14.11.2023 - 11:09:

Deja un comentario o pregunta en esta lección

Tu dirección de email no será publicada. Los campos obligatorios están marcados con un *.