
Popular categories
Looking for a yarn?


Comments / Questions (92)
![]() Marjo Van T Hof wrote:
Marjo Van T Hof wrote:
Kan dit zelfde patroon (in andere kleuren) ook gebruikt worden voor en man? Maat 50 Zo ja, welke maat zou ik dan moeten aanhouden Alvast bedankt!
25.08.2021 - 14:19DROPS Design answered:
Dag Marjo,
Wat je zou kunnen doen is de maattekening van dit patroon vergelijken met de maattekening van een vergelijkbaar herenpatroon en dan evt. een aantal maten aanpassen, zoals de lengte van de mouw, het lijf, etc.
27.08.2021 - 10:36
![]() Pernilla Evaldsson wrote:
Pernilla Evaldsson wrote:
Hej ska beställa garn till denna otroligt fina tröja, men får inte riktigt ihop det med färgerna. Vill ha samma färg som huvudbilden men är det alternativ A? Den lilla bilden med A är det orange, kan jag få hjälp?
21.02.2021 - 12:04DROPS Design answered:
Hej Pernilla. Om du vill ha färgerna som är på den stora huvudbilden så är det det som står under "GARNÅTGÅNG" som ska användas dvs: DROPS ALPACA från Garnstudio (tillhör garngrupp A) 300-300-350-350-400-450 g färg 7233, gulgrön 50-50-50-50-50-100 g färg 6309, turkos/grå 50-50-50-50-50-50 g färg 100, natur 50-50-50-50-50-50 g färg 7139, grågrön 50-50-50-50-50-50 g färg 4305 lila/grå/blå till tröjan. Mvh DROPS Design
22.02.2021 - 10:50
![]() Evy wrote:
Evy wrote:
Hei! Skal lage en genser i Large. Holder på med A.1 mønster på pil 1. Har økt med 40 masker, men forstår ikke hvordan jeg skal få mønsteret til å passe over hverandre. Ser på bildet at «stjernene» og resten av mønstrene er loddrett ovenfor hverandre. Får det ikke til å stemme når jeg går fra 57 til 67 rapporter med 4 masker.
17.02.2021 - 16:24DROPS Design answered:
Hej Evy, mønsteret skal stemme hele vejen rundt, men efter en udtagningsomgang vil det ikke stemme over maskerne på forrige omgang og det skal det ikke heller :)
23.02.2021 - 09:56
![]() Maja wrote:
Maja wrote:
Czy moge używać 2 nitki razem? I druty numer 4 ?
17.02.2021 - 14:13DROPS Design answered:
Witaj Maju, to będzie już całkiem inny sweterek. Musisz wykonać próbkę, dopasować liczbę oczek... Jeśli masz już doświadczenie to próbuj, jeśli nie, radzę kontakt ze sklepem, w którym kupujesz włóczki, myślę, że będą w stanie ci pomóc. Powodzenia!
17.02.2021 - 14:51
![]() Sissel wrote:
Sissel wrote:
Hei, finnes det mål for størrelsene på genseren? Finner ikke. Nydelig genser 🤗👍
20.01.2021 - 20:08
![]() Lucy Macfarlane wrote:
Lucy Macfarlane wrote:
I am trying to decrease for the hat and don’t understand what this means”knit 1 round where all the stitches are knitted together 2 and 2, “ do I knit 3 rounds then decrease by knitting 2tog every 2nd stitch, for 1 round then knit 5 more rounds without dec and do the same again for 1 round again decreasing every other stitch by knitting 2 tog ? Thank you
13.01.2021 - 07:06DROPS Design answered:
Hi Lucy, This means that on the one round you knit the first 2 stitches together, then knit the next 2 stitches together and so on to the end of the round. This halves the number of stitches on the needle. Then you knit 5 rounds without decreasing and finally decrease by knitting all stitches together 2 and 2 on the 6th round. Happy knitting!
13.01.2021 - 07:36
![]() Ieva wrote:
Ieva wrote:
Hallo, gibt es ein Video mit Abnahmetipp für die untere Ärmelmitte? Wo wird der Markierungsfaden nach der Abnahme plaziert? Für mich verdrehen sich die Ärmel merkwürdig... Danke!
02.01.2021 - 13:22DROPS Design answered:
Liebe Leva, der Markierungsfaden muss immer zwischen den 2 mittleren Masche unter der Ärmel sein, und es wird am Ende der Runde + am Anfang der Runde bzw beidseiting von dieser Markierung abgenommen - siehe diese Lektion (hier wird es beidseitig von der mittleren Maschen abgenommen); bis 3 Maschen vor der Markierung bleiben, 1 M abnehmen, 2 M re stricken (Markierung muss immer zwischen diesen beiden Maschen sein), 1 Masche abnehmen. Viel Spaß beim stricken!
04.01.2021 - 15:38
![]() Angela wrote:
Angela wrote:
Ciao, un informazione è un bellissimo maglione ma non si può comprare?Ci sono articoli bellissimi È un sito molto strano, che x comprare non è facile avevo trovato un articolo ma non c'era il contrassegno! Grazie
28.11.2020 - 13:56DROPS Design answered:
Buonasera Angela, questo è un sito gratuito di spiegazioni di modelli di maglia e uncinetto. Se vuole acquistare i capi finiti può rivolgersi ad un rivenditore DROPS: loro avranno sicuramente delle magliaie che possono realizzare questi capi. Buon lavoro!
28.11.2020 - 21:13
![]() Bia Broberg wrote:
Bia Broberg wrote:
Kan jeg får sendt garn til denne opskrift ?
05.11.2020 - 18:22
![]() Eva Emilia Thea Vogelius wrote:
Eva Emilia Thea Vogelius wrote:
Hej. Kan det være rigtigt at der umiddelbart inden rib på ærmet skal tages masker UD?? Jeg strikker blusen. Mvh Eva
11.10.2020 - 19:34DROPS Design answered:
Hei Eva. Ja, det stemmer. Da vil vrangborden få en naturlig fin overgang til resten av ermet, og ikke en trang vrangbord som det var mye av på 80-tallet. God Fornøyelse!
12.10.2020 - 14:57
|
|||||||||||||||||||
Heim#heimsweater |
|||||||||||||||||||
 |
 |
||||||||||||||||||
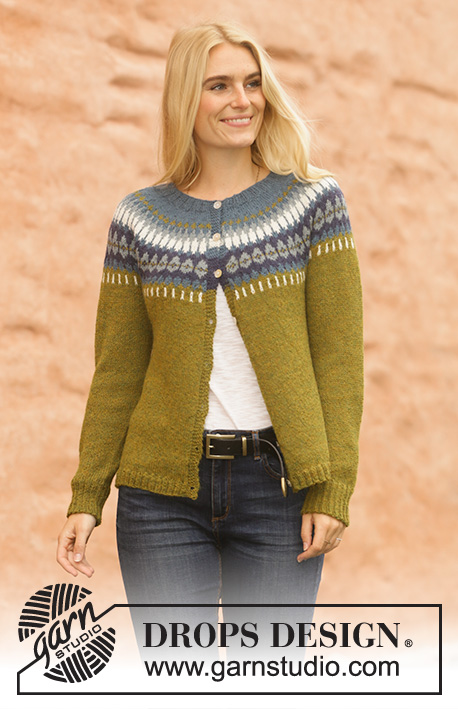
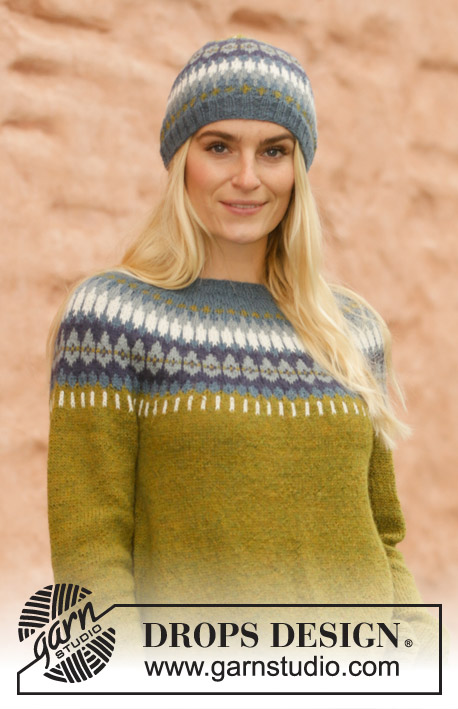
Knitted sweater in DROPS Alpaca. The piece is worked top down with round yoke and Nordic pattern on the yoke. Sizes S - XXXL. Knitted hat with Nordic pattern in DROPS Alpaca.
DROPS 207-1 |
|||||||||||||||||||
|
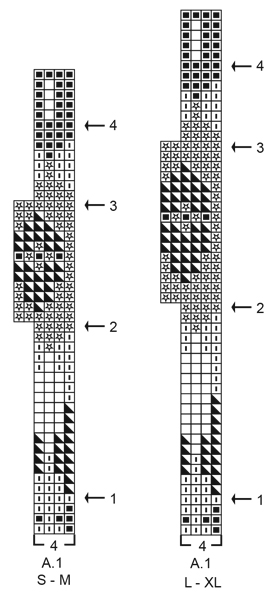
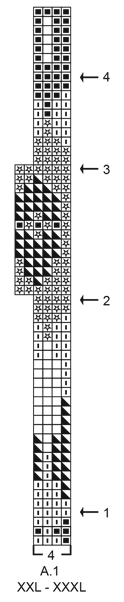
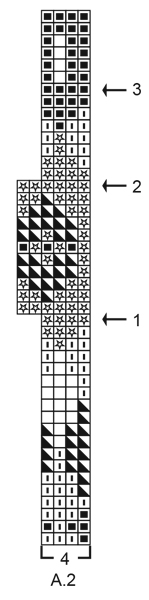
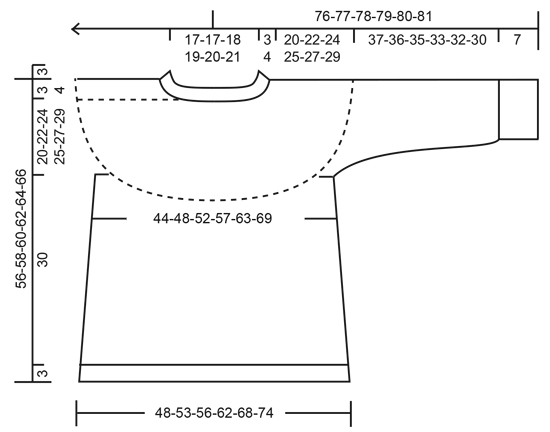
------------------------------------------------------- EXPLANATIONS FOR THE PATTERN: ------------------------------------------------------- INCREASE/DECREASE TIP (evenly spaced): To work out how to increase/decrease evenly, count the total number of stitches on needle (e.g. 104 stitches) and divide by the number of increases/decreases to be made (e.g. 34) = 3.1. In this example, increase by making 1 yarn over after approx. each 3rd stitch. On the next round knit the yarn overs twisted to avoid holes. When decreasing knit together approx. each 2nd and 3rd stitch. ELEVATION (back of neck): To make the sweater slightly higher at the back of the neck when working yoke you can work an elevation as described here. Skip this section if you do not want an elevation. Insert 1 marker at the beginning of the round (mid back). Start from the right side with medium petrol and knit 11-12-12-13-13-14 stitches, turn, tighten strand and purl 22-24-24-26-26-28 stitches back. Turn, tighten strand and knit 33-36-36-39-39-42 stitches, turn, tighten strand and purl 44-48-48-52-52-56 stitches back. Turn, tighten strand and knit 55-60-60-65-65-70 stitches, turn, tighten strand and purl 66-72-72-78-78-84 stitches. Turn, tighten the strand and knit 77-84-84-91-91-98 stitches, turn tighten the strand and purl 88-96-96-104-104-112 stitches. Turn tighten the strand and knit back to mid back. Then work YOKE as described in the text. PATTERN: Sweater: See diagram A.1. Choose diagram for your size. Hat: See diagram A.2. The whole pattern is worked in stockinette stitch. KNITTING TIP: To avoid the knitting gauge becoming tighter when working pattern it is important that the strands at the back are not tight. Use a size larger needle when working pattern if this is a problem. INCREASE TIP-1 (for sides of body): Work until there are 3 stitches left before the marker thread, make 1 yarn over, knit 6 (marker thread sits between these 6 stitches) make 1 yarn over (= 2 stitches increased at each marker thread; 4 stitches increased on round). On the next round knit the yarn overs twisted to avoid holes. Then work the new stitches in stockinette stitch. DECREASE TIP (for mid under sleeve): Work until there are 3 stitches left before the marker thread, knit 2 together, knit 2 (marker thread sits between these 2 stitches), slip 1 stitch as if to knit, knit 1 and pass the slipped stitch over the knitted stitch. CASTING-OFF TIP: To avoid the bind-off edge being tight you can bind off with a larger size needle, or make 1 yarn over after approx. each 8th stitch at the same time as binding off (yarn overs bind off as normal stitches). ------------------------------------------------------- START THE PIECE HERE: ------------------------------------------------------- SWEATER – SHORT OVERVIEW OF THE PIECE: The neck and yoke are worked in the round with circular needle, top down. The yoke is divided for body and sleeves. The body is continued in the round with circular needle. The sleeves are worked in the round with short circular needle/double pointed needles, top down. NECK: Cast on 104-108-112-116-120-124 stitches with short circular needle size 3 mm = US 2,5 and medium petrol. Knit 1 round and then work rib in the round (= knit 2 /purl 2) for 3-3-3-4-4-4 cm = 1⅛"-1⅛"-1⅛"-1½"-1½"-1½". When the rib is finished knit 1 round where you increase 34-36-38-40-42-44 stitches evenly spaced – read INCREASE/DECREASE TIP = 138-144-150-156-162-168 stitches. Knit 1 round (yarn overs knitted twisted). Change to circular needle size 3.5 mm = US 4. Insert 1 marker in the middle of the round (= mid front) – the yoke will be measured from this marker! Now you can work an ELEVATION in the back of the neck – read description above. If you do not want an elevation, go straight to YOKE. YOKE: Work stockinette stitch in the round with medium petrol. When the piece measures 1½-1½-2-2-2-2 cm = ½"-½"-¾"-¾"-¾"-¾" from the marker mid front, increase 34-36-40-46-48-52 stitches evenly spaced = 172-180-190-202-210-220 stitches. When the piece measures 2½-2½-3-3-3-3 cm = 1"-1"-1⅛"-1⅛"-1⅛"-1⅛" from the marker mid front, increase 28-36-38-42-46-48 stitches evenly spaced = 200-216-228-244-256-268 stitches. When the piece measures 3-3-4-4-4-4 cm = 1⅛"-1⅛"-1½"-1½"-1½"-1½" from the marker mid front, start working A.1 in the round (= 50-54-57-61-64-67 repeats of 4 stitches). Continue this pattern. Read KNITTING TIP and REMEMBER THE KNITTING GAUGE! AT THE SAME TIME on each round marked with an arrow in A.1, increase stitches evenly as described below: Arrow-1: Increase 36-36-40-44-44-52 stitches evenly spaced = 236-252-268-288-300-320 stitches (there is now room for 59-63-67-72-75-80 repeats of A.1 with 4 stitches). Arrow-2: Increase 40-42-50-54-60-64 stitches evenly spaced = 276-294-318-342-360-384 stitches (there is now room for 46-49-53-57-60-64 repeats of A.1 with 6 stitches). Arrow-3: Increase 20-26-30-34-44-48 stitches evenly spaced = 296-320-348-376-404-432 stitches (there is now room for 74-80-87-94-101-108 repeats of A.1 with 4 stitches). Arrow-4: Increase 12-20-24-24-28-32 stitches evenly spaced = 308-340-372-400-432-464 stitches (there is now room for 77-85-93-100-108-116 repeats of A.1 with 4 stitches). When A.1 has been completed continue with stockinette stitch and olive. AT THE SAME TIME on the first round after A.1, increase 2-6-6-10-6-14 stitches evenly spaced = 310-346-378-410-438-478 stitches. Work until the piece measures 20-22-24-25-27-29 cm = 8"-8¾"-9½"-9¾"-10⅝"-11⅜" from the marker on the neck. Divide the yoke for body and sleeves, working the next round with olive as follows: Work 46-51-54-60-66-73 stitches in stockinette stitch (= ½ back piece), place the next 62-70-80-84-86-92 stitches on 1 thread for sleeve, cast on 8-8-10-10-12-12 new stitches on the needle (= in side under sleeve), work 93-103-109-121-133-147 stitches in stockinette stitch (= front piece), place the next 62-70-80-84-86-92 stitches on 1 thread for sleeve, cast on 8-8-10-10-12-12 new stitches on the needle (= in side under sleeve) and work the remaining 47-52-55-61-67-74 stitches in stockinette stitch (= ½ back piece). Body and sleeves are finished separately. THE PIECE IS NOW MEASURED FROM HERE! BODY: = 202-222-238-262-290-318 stitches. Insert 1 marker thread on each side of the body in the middle of the 8-8-10-10-12-12 stitches cast on under the sleeve. Allow the threads to follow your work onwards; they will be used when increasing in the sides. Start the round at one of the marker threads and work stockinette stitch in the round with olive. When the piece measures 5 cm = 2" from the division in all sizes increase 1 stitch on each side of both marker threads – read INCREASE TIP (= 4 stitches increased). Increase like this every 5-5-5-4-4-4 cm = 2"-2"-2"-1½"-1½"-1½" a total of 5-5-5-6-6-6 times on each side = 222-242-258-286-314-342 stitches. Continue working until the piece measures 30 cm = 11¾" from the division (there is approx. 3 cm = 1⅛" to finished length; you can try the sweater on and continue working to desired length). Knit 1 round where you increase 74-82-86-98-106-114 stitches evenly spaced = 296-324-344-384-420-456 stitches (this is done so the rib is not tight). Change to circular needle size 3 mm = US 2,5 and work rib (= knit 2 / purl 2) for 3 cm = 1⅛". Bind off with knit over knit and purl over purl – read BINDING OFF TIP! The sweater measures approx. 56-58-60-62-64-66 cm = 22"-22¾"-23⅝"-24⅜"-25¼"-26" from the shoulder down. SLEEVE: Place the 62-70-80-84-86-92 stitches from the thread on the one side of the piece on short circular needle/double pointed needles size 3.5 mm = US 4 and knit up 1 stitch in each of the 8-8-10-10-12-12 stitches cast on under the sleeve = 70-78-90-94-98-104 stitches. Insert 1 marker thread in the middle of the 8-8-10-10-12-12 stitches and allow it to follow your work onwards; it will be used when decreasing mid under sleeve. Start the round at the marker thread and work stockinette stitch in the round with olive. When the piece measures 3 cm = 1⅛" from the division in all sizes decrease 2 stitches mid under sleeve – read DECREASE TIP. Decrease like this every 3½-2½-1½-1½-1½-1 cm = 1¼"-1"-½"-½"-½"-⅜" a total of 10-13-19-19-19-22 times = 50-52-52-56-60-60 stitches. Continue working until the sleeve measures 37-36-35-33-32-30 cm = 14½"-14¼"-13¾"-13"-12½"-11¾" from the division (there is approx. 7 cm = 2¾" to finished length; you can try the sweater on and continue working to desired length). NOTE: Shorter measurements in larger sizes due to wider neck and longer yoke. Knit 1 round where you increase 18-20-20-20-20-20 stitches evenly spaced = 68-72-72-76-80-80 stitches. Change to double pointed needles size 3 mm = US 2,5 and work rib (= knit 2 / purl 2) for 7 cm = 2¾". Bind off with knit over knit and purl over purl – remember BINDING OFF TIP. The sleeve measures approx. 44-43-42-40-39-37 cm = 17¼"-17"-16½"-15¾"-15¼"-14½" from the division. Work the other sleeve in the same way. ------------------------------------------------------- HAT – SHORT OVERVIEW OF THE PIECE: The piece is worked in the round with short circular needle, bottom up. Change to double pointed needles when necessary. HAT: Cast on 116-120-124 stitches with circular needle size 2.5 mm = US 1,5 and medium petrol. Knit 1 round. Then work rib in the round (= knit 2 / purl 2) for 3-4-4 cm = 1⅛"-1½"-1½". Change to circular needle size 3.5 mm = US 4 and knit 1 round where you increase 24 stitches evenly spaced in all sizes – read INCREASE/DECREASE TIP = 140-144-148 stitches. Work A.2 in the round (= 35-36-37 repeats of 4 stitches). Continue this pattern. REMEMBER THE KNITTING GAUGE! AT THE SAME TIME on each round marked with an arrow in A.2, decrease stitches evenly spaced as described below: Arrow-1: Decrease 8-6-4 stitches evenly spaced = 132-138-144 stitches. Continue the pattern (there is now room for 22-23-24 repeats of 6 stitches). Arrow-2: Decrease 24-26-28 stitches evenly spaced = 108-112-116 stitches. Continue the pattern (there is now room for 27-28-29 repeats of 4 stitches). Arrow-3: Decrease 24-24-24 stitches evenly spaced = 84-88-92 stitches. Continue the pattern (there is now room for 21-22-23 repeats of 4 stitches). When A.2 has been completed continue with olive as follows: Knit 3-3-4 rounds, * knit 1 round where all the stitches are knitted together 2 and 2, knit 5-5-6 rounds *, work from *-* 1 more time. Then knit 1 round where all the stitches are knitted together 2 and 2 = 11-11-12 stitches left. Cut the strand, pull it through the remaining stitches, tighten and fasten well. The hat measures approx. 23-24-25 cm = 9"-9½"-9¾" from the top down. |
|||||||||||||||||||
Diagram explanations |
|||||||||||||||||||
|
|||||||||||||||||||
 |
|||||||||||||||||||
 |
|||||||||||||||||||
 |
|||||||||||||||||||
 |
|||||||||||||||||||
Have you finished this pattern?Tag your pictures with #dropspattern #heimsweater or submit them to the #dropsfan gallery. Do you need help with this pattern?You'll find 26 tutorial videos, a Comments/Questions area and more by visiting the pattern on garnstudio.com. © 1982-2026 DROPS Design A/S. We reserve all rights. This document, including all its sub-sections, has copyrights. Read more about what you can do with our patterns at the bottom of each pattern on our site. |
|||||||||||||||||||


With over 40 years in knitting and crochet design, DROPS Design offers one of the most extensive collections of free patterns on the internet - translated to 17 languages. As of today we count 324 catalogs and 12290 patterns - 12280 of which are translated into English (US/in).
We work hard to bring you the best knitting and crochet have to offer, inspiration and advice as well as great quality yarns at incredible prices! Would you like to use our patterns for other than personal use? You can read what you are allowed to do in the Copyright text at the bottom of all our patterns. Happy crafting!
Post a comment to pattern DROPS 207-1
We would love to hear what you have to say about this pattern!
If you want to leave a question, please make sure you select the correct category in the form below, to speed up the answering process. Required fields are marked *.