
Popular categories
Looking for a yarn?


Comments / Questions (92)
![]() Susanne Marquardt wrote:
Susanne Marquardt wrote:
Guten Tag, ich habe die Wolle bestellt und frage mich ob sie beim waschen einlaufen wird. Sollte ich eine Größe mehr stricken? Wie sind die Erfahrungen? LG Susanne
18.02.2025 - 07:11DROPS Design answered:
Liebe Frau Marquardt, stricken Sie Ihre Maschenprobe - gerne können Sie sie auch mal waschen, wenn Sie die Pflegehinweise richtig folgen, sollte die Maschenprobe immer gleich sein. Gerne kann Ihnen damit Ihr DROPS Händler noch mehr helfen - auch per Telefon oder per E-Mail. Viel Spaß beim Stricken!
18.02.2025 - 10:05
![]() Nancy wrote:
Nancy wrote:
Je suis à faire mes échantillons. Avec tous mes calculs rien ne correspond à 23 mailles pour 10 cm. Je vais tenter avec des aiguilles 3ml. Est ce 23 mailles la bonne tension exigée?
16.02.2025 - 13:37DROPS Design answered:
Bonjour Nancy, tout à fait, vous devez avoir 23 mailles pour 10 cm de large et 30 rangs pour 10 cm de hauteur en jersey mais aussi en jacquard. Bon tricot!
17.02.2025 - 09:40
![]() Michèle Hazard wrote:
Michèle Hazard wrote:
Bonjour je voudrai réaliser ce pull en version C couleur. Pouvez-vous me donner le nom des fils utilisés. Merci Bonne fin de journée. Merci. M.HAZARD
14.02.2025 - 15:27DROPS Design answered:
Bonjour Mme Hazard, volontiers, voici les références des couleurs DROPS Alpaca de la version C: 601, 7238, 100, 2916, 7815. Bon tricot!
14.02.2025 - 16:26
![]() Nicole Sigouin Perrault wrote:
Nicole Sigouin Perrault wrote:
En respectant les augmentations à faire flèche 4 = 2 couleur olive, 1 couleur naturel, et 1 couleur olive La 1 couleur naturel devrait arriver avec avec la ligne verticale indigo foncé mais il arrive que je dois faire 3 couleur olive arriver au dessus pour indigo foncé à cause des augmentations. donc la grille ?? J'ai calculé pour les 24 m. ajouter fréquence de à toutes les 14 mailles. merci de me corriger svp
23.01.2025 - 00:43DROPS Design answered:
Bonjour Mme Sigouin Perrault, dans la mesure où vous avez augmenté à intervalles réguliers à la flèche -3 et à la flèche -4, le motif après la flèche -4 ne sera pas aligné avec celui entre les 2 flèches, mais vous avez suffisamment de mailles pour répéter ce motif de 4 mailles tout le tour. Bon tricot!
23.01.2025 - 10:21
![]() Leona Boyens wrote:
Leona Boyens wrote:
Hallo, ik heb de wol gekocht bij Hobby doos en gratis het patroon er bij gekregen maar het telpatroon is zo klein, ik had graag indien mogelijk het boek gekocht waar het patroon in staat. Is dat mogelijk aub. Dank je wel
11.01.2025 - 18:12DROPS Design answered:
Dag Leona,
Wij geven geen boeken meer uit. Al onze patronen zijn gratis af te drukken via de knop 'Afdrukken' onder de materialenlijst. Klik op de knop 'Afdrukken' en dan op 'Patroon'. In het pop-up venster dat vervolgens in beeld komt klik je rechts boven op de link 'Het patroon afdrukken'.
11.01.2025 - 19:06
![]() Millot Jocelyne wrote:
Millot Jocelyne wrote:
Bonjour, pour la flèche 2 on doit faire 42 augmentations pour moi , à la flèche 3 , 26 et a la flèche 4 , 20 , je ne sais pas à quel intervalle régulier on doit faire l’augmentation pour obtenir le nombre de maille pour chaque flèche Merci , cordialement Merci
23.09.2024 - 18:05DROPS Design answered:
Bonjour Mme Millot, cette leçon devrait alors pouvoir vous aider à calculer comment augmenter à intervalles réguliers. Bon tricot!
24.09.2024 - 08:51
![]() Millot Jocelyne wrote:
Millot Jocelyne wrote:
Bonjour, poivre me dire tous les combien de maille doit on faire une augmentation au répère flèche 2 , 3et 4 merci
23.09.2024 - 16:02DROPS Design answered:
Bonjour Mme Millot, en fonction du motif, on va le répéter sur un nombre différent de mailles, ainsi, A.1 se tricote sur 6 mailles après la flèche-2, et de nouveau 4 mailles après la flèche 3 et la flèche 4. Bon tricot!
23.09.2024 - 16:54
![]() Blanquet Elysabeth wrote:
Blanquet Elysabeth wrote:
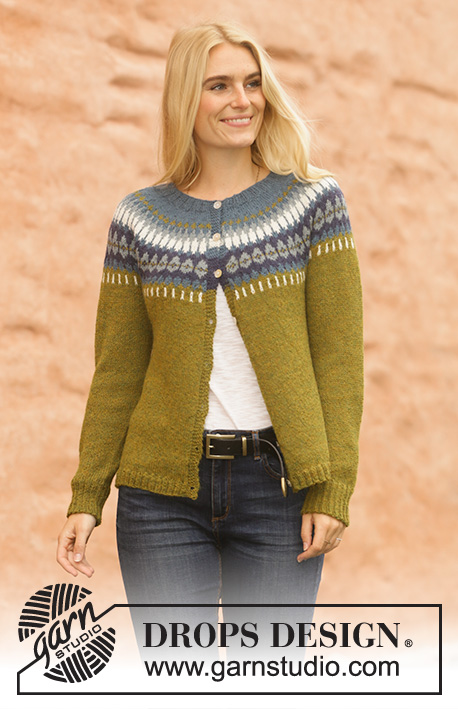
Bonjour Le tour de poitrine n’est pas donné afin de determiner sa taille. Quelles sont les références couleurs de la photo 3, tons orangés . Merci de votre réponse, cordialement .
21.08.2024 - 20:33DROPS Design answered:
Bonjour Mme Blanquet, mesurez un vêtement similaire que vous avez et dont vous aimez la forme et comparez ces mesures à celles du schéma de bas de page, vous trouverez ainsi la taille correspondante (plus d'infos ici). Les références des couleurs de la version A sont les suivantes: DROPS ALPACA 607, 2923, 2020, 2915, 5565.Bon tricot!
22.08.2024 - 08:28
![]() Lou Kruse wrote:
Lou Kruse wrote:
Som jag skrev i tidigare mail så kan jag inte skriva ut mönstret o skulle därför vilja få det skickat från er. Hälsningar Lou Kruse
17.06.2024 - 11:12
![]() ArnoHauteMarne wrote:
ArnoHauteMarne wrote:
Arno est un prénom masculin. je ne suis pas une dame ;-))
07.05.2024 - 20:26
|
|||||||||||||||||||
Heim#heimsweater |
|||||||||||||||||||
 |
 |
||||||||||||||||||
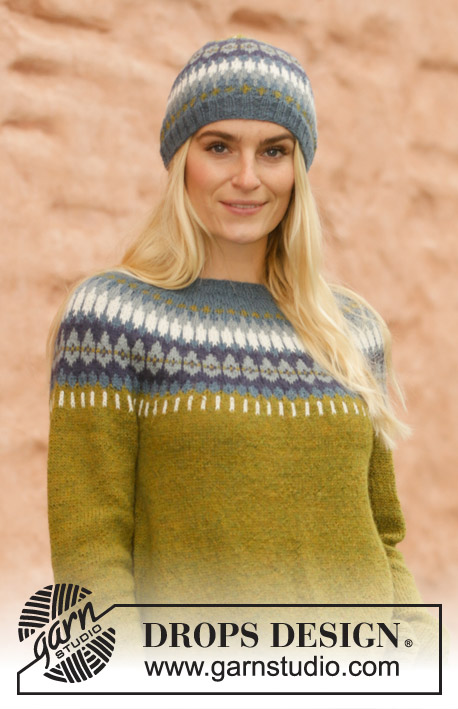
Knitted sweater in DROPS Alpaca. The piece is worked top down with round yoke and Nordic pattern on the yoke. Sizes S - XXXL. Knitted hat with Nordic pattern in DROPS Alpaca.
DROPS 207-1 |
|||||||||||||||||||
|
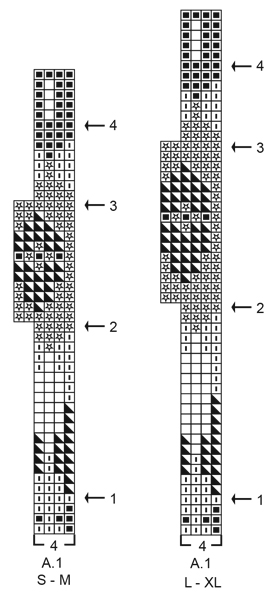
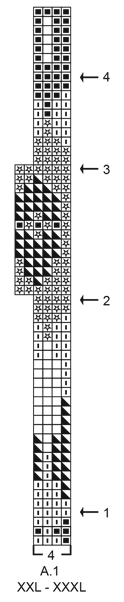
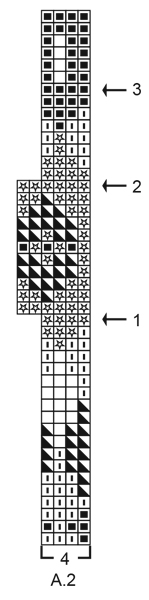
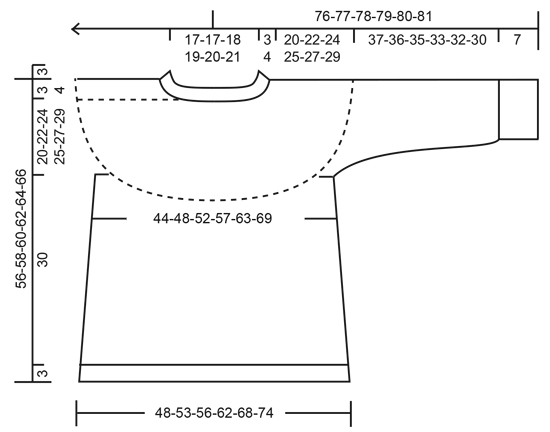
------------------------------------------------------- EXPLANATIONS FOR THE PATTERN: ------------------------------------------------------- INCREASE/DECREASE TIP (evenly spaced): To work out how to increase/decrease evenly, count the total number of stitches on needle (e.g. 104 stitches) and divide by the number of increases/decreases to be made (e.g. 34) = 3.1. In this example, increase by making 1 yarn over after approx. each 3rd stitch. On the next round knit the yarn overs twisted to avoid holes. When decreasing knit together approx. each 2nd and 3rd stitch. ELEVATION (back of neck): To make the sweater slightly higher at the back of the neck when working yoke you can work an elevation as described here. Skip this section if you do not want an elevation. Insert 1 marker at the beginning of the round (mid back). Start from the right side with medium petrol and knit 11-12-12-13-13-14 stitches, turn, tighten strand and purl 22-24-24-26-26-28 stitches back. Turn, tighten strand and knit 33-36-36-39-39-42 stitches, turn, tighten strand and purl 44-48-48-52-52-56 stitches back. Turn, tighten strand and knit 55-60-60-65-65-70 stitches, turn, tighten strand and purl 66-72-72-78-78-84 stitches. Turn, tighten the strand and knit 77-84-84-91-91-98 stitches, turn tighten the strand and purl 88-96-96-104-104-112 stitches. Turn tighten the strand and knit back to mid back. Then work YOKE as described in the text. PATTERN: Sweater: See diagram A.1. Choose diagram for your size. Hat: See diagram A.2. The whole pattern is worked in stockinette stitch. KNITTING TIP: To avoid the knitting gauge becoming tighter when working pattern it is important that the strands at the back are not tight. Use a size larger needle when working pattern if this is a problem. INCREASE TIP-1 (for sides of body): Work until there are 3 stitches left before the marker thread, make 1 yarn over, knit 6 (marker thread sits between these 6 stitches) make 1 yarn over (= 2 stitches increased at each marker thread; 4 stitches increased on round). On the next round knit the yarn overs twisted to avoid holes. Then work the new stitches in stockinette stitch. DECREASE TIP (for mid under sleeve): Work until there are 3 stitches left before the marker thread, knit 2 together, knit 2 (marker thread sits between these 2 stitches), slip 1 stitch as if to knit, knit 1 and pass the slipped stitch over the knitted stitch. CASTING-OFF TIP: To avoid the bind-off edge being tight you can bind off with a larger size needle, or make 1 yarn over after approx. each 8th stitch at the same time as binding off (yarn overs bind off as normal stitches). ------------------------------------------------------- START THE PIECE HERE: ------------------------------------------------------- SWEATER – SHORT OVERVIEW OF THE PIECE: The neck and yoke are worked in the round with circular needle, top down. The yoke is divided for body and sleeves. The body is continued in the round with circular needle. The sleeves are worked in the round with short circular needle/double pointed needles, top down. NECK: Cast on 104-108-112-116-120-124 stitches with short circular needle size 3 mm = US 2,5 and medium petrol. Knit 1 round and then work rib in the round (= knit 2 /purl 2) for 3-3-3-4-4-4 cm = 1⅛"-1⅛"-1⅛"-1½"-1½"-1½". When the rib is finished knit 1 round where you increase 34-36-38-40-42-44 stitches evenly spaced – read INCREASE/DECREASE TIP = 138-144-150-156-162-168 stitches. Knit 1 round (yarn overs knitted twisted). Change to circular needle size 3.5 mm = US 4. Insert 1 marker in the middle of the round (= mid front) – the yoke will be measured from this marker! Now you can work an ELEVATION in the back of the neck – read description above. If you do not want an elevation, go straight to YOKE. YOKE: Work stockinette stitch in the round with medium petrol. When the piece measures 1½-1½-2-2-2-2 cm = ½"-½"-¾"-¾"-¾"-¾" from the marker mid front, increase 34-36-40-46-48-52 stitches evenly spaced = 172-180-190-202-210-220 stitches. When the piece measures 2½-2½-3-3-3-3 cm = 1"-1"-1⅛"-1⅛"-1⅛"-1⅛" from the marker mid front, increase 28-36-38-42-46-48 stitches evenly spaced = 200-216-228-244-256-268 stitches. When the piece measures 3-3-4-4-4-4 cm = 1⅛"-1⅛"-1½"-1½"-1½"-1½" from the marker mid front, start working A.1 in the round (= 50-54-57-61-64-67 repeats of 4 stitches). Continue this pattern. Read KNITTING TIP and REMEMBER THE KNITTING GAUGE! AT THE SAME TIME on each round marked with an arrow in A.1, increase stitches evenly as described below: Arrow-1: Increase 36-36-40-44-44-52 stitches evenly spaced = 236-252-268-288-300-320 stitches (there is now room for 59-63-67-72-75-80 repeats of A.1 with 4 stitches). Arrow-2: Increase 40-42-50-54-60-64 stitches evenly spaced = 276-294-318-342-360-384 stitches (there is now room for 46-49-53-57-60-64 repeats of A.1 with 6 stitches). Arrow-3: Increase 20-26-30-34-44-48 stitches evenly spaced = 296-320-348-376-404-432 stitches (there is now room for 74-80-87-94-101-108 repeats of A.1 with 4 stitches). Arrow-4: Increase 12-20-24-24-28-32 stitches evenly spaced = 308-340-372-400-432-464 stitches (there is now room for 77-85-93-100-108-116 repeats of A.1 with 4 stitches). When A.1 has been completed continue with stockinette stitch and olive. AT THE SAME TIME on the first round after A.1, increase 2-6-6-10-6-14 stitches evenly spaced = 310-346-378-410-438-478 stitches. Work until the piece measures 20-22-24-25-27-29 cm = 8"-8¾"-9½"-9¾"-10⅝"-11⅜" from the marker on the neck. Divide the yoke for body and sleeves, working the next round with olive as follows: Work 46-51-54-60-66-73 stitches in stockinette stitch (= ½ back piece), place the next 62-70-80-84-86-92 stitches on 1 thread for sleeve, cast on 8-8-10-10-12-12 new stitches on the needle (= in side under sleeve), work 93-103-109-121-133-147 stitches in stockinette stitch (= front piece), place the next 62-70-80-84-86-92 stitches on 1 thread for sleeve, cast on 8-8-10-10-12-12 new stitches on the needle (= in side under sleeve) and work the remaining 47-52-55-61-67-74 stitches in stockinette stitch (= ½ back piece). Body and sleeves are finished separately. THE PIECE IS NOW MEASURED FROM HERE! BODY: = 202-222-238-262-290-318 stitches. Insert 1 marker thread on each side of the body in the middle of the 8-8-10-10-12-12 stitches cast on under the sleeve. Allow the threads to follow your work onwards; they will be used when increasing in the sides. Start the round at one of the marker threads and work stockinette stitch in the round with olive. When the piece measures 5 cm = 2" from the division in all sizes increase 1 stitch on each side of both marker threads – read INCREASE TIP (= 4 stitches increased). Increase like this every 5-5-5-4-4-4 cm = 2"-2"-2"-1½"-1½"-1½" a total of 5-5-5-6-6-6 times on each side = 222-242-258-286-314-342 stitches. Continue working until the piece measures 30 cm = 11¾" from the division (there is approx. 3 cm = 1⅛" to finished length; you can try the sweater on and continue working to desired length). Knit 1 round where you increase 74-82-86-98-106-114 stitches evenly spaced = 296-324-344-384-420-456 stitches (this is done so the rib is not tight). Change to circular needle size 3 mm = US 2,5 and work rib (= knit 2 / purl 2) for 3 cm = 1⅛". Bind off with knit over knit and purl over purl – read BINDING OFF TIP! The sweater measures approx. 56-58-60-62-64-66 cm = 22"-22¾"-23⅝"-24⅜"-25¼"-26" from the shoulder down. SLEEVE: Place the 62-70-80-84-86-92 stitches from the thread on the one side of the piece on short circular needle/double pointed needles size 3.5 mm = US 4 and knit up 1 stitch in each of the 8-8-10-10-12-12 stitches cast on under the sleeve = 70-78-90-94-98-104 stitches. Insert 1 marker thread in the middle of the 8-8-10-10-12-12 stitches and allow it to follow your work onwards; it will be used when decreasing mid under sleeve. Start the round at the marker thread and work stockinette stitch in the round with olive. When the piece measures 3 cm = 1⅛" from the division in all sizes decrease 2 stitches mid under sleeve – read DECREASE TIP. Decrease like this every 3½-2½-1½-1½-1½-1 cm = 1¼"-1"-½"-½"-½"-⅜" a total of 10-13-19-19-19-22 times = 50-52-52-56-60-60 stitches. Continue working until the sleeve measures 37-36-35-33-32-30 cm = 14½"-14¼"-13¾"-13"-12½"-11¾" from the division (there is approx. 7 cm = 2¾" to finished length; you can try the sweater on and continue working to desired length). NOTE: Shorter measurements in larger sizes due to wider neck and longer yoke. Knit 1 round where you increase 18-20-20-20-20-20 stitches evenly spaced = 68-72-72-76-80-80 stitches. Change to double pointed needles size 3 mm = US 2,5 and work rib (= knit 2 / purl 2) for 7 cm = 2¾". Bind off with knit over knit and purl over purl – remember BINDING OFF TIP. The sleeve measures approx. 44-43-42-40-39-37 cm = 17¼"-17"-16½"-15¾"-15¼"-14½" from the division. Work the other sleeve in the same way. ------------------------------------------------------- HAT – SHORT OVERVIEW OF THE PIECE: The piece is worked in the round with short circular needle, bottom up. Change to double pointed needles when necessary. HAT: Cast on 116-120-124 stitches with circular needle size 2.5 mm = US 1,5 and medium petrol. Knit 1 round. Then work rib in the round (= knit 2 / purl 2) for 3-4-4 cm = 1⅛"-1½"-1½". Change to circular needle size 3.5 mm = US 4 and knit 1 round where you increase 24 stitches evenly spaced in all sizes – read INCREASE/DECREASE TIP = 140-144-148 stitches. Work A.2 in the round (= 35-36-37 repeats of 4 stitches). Continue this pattern. REMEMBER THE KNITTING GAUGE! AT THE SAME TIME on each round marked with an arrow in A.2, decrease stitches evenly spaced as described below: Arrow-1: Decrease 8-6-4 stitches evenly spaced = 132-138-144 stitches. Continue the pattern (there is now room for 22-23-24 repeats of 6 stitches). Arrow-2: Decrease 24-26-28 stitches evenly spaced = 108-112-116 stitches. Continue the pattern (there is now room for 27-28-29 repeats of 4 stitches). Arrow-3: Decrease 24-24-24 stitches evenly spaced = 84-88-92 stitches. Continue the pattern (there is now room for 21-22-23 repeats of 4 stitches). When A.2 has been completed continue with olive as follows: Knit 3-3-4 rounds, * knit 1 round where all the stitches are knitted together 2 and 2, knit 5-5-6 rounds *, work from *-* 1 more time. Then knit 1 round where all the stitches are knitted together 2 and 2 = 11-11-12 stitches left. Cut the strand, pull it through the remaining stitches, tighten and fasten well. The hat measures approx. 23-24-25 cm = 9"-9½"-9¾" from the top down. |
|||||||||||||||||||
Diagram explanations |
|||||||||||||||||||
|
|||||||||||||||||||
 |
|||||||||||||||||||
 |
|||||||||||||||||||
 |
|||||||||||||||||||
 |
|||||||||||||||||||
Have you finished this pattern?Tag your pictures with #dropspattern #heimsweater or submit them to the #dropsfan gallery. Do you need help with this pattern?You'll find 26 tutorial videos, a Comments/Questions area and more by visiting the pattern on garnstudio.com. © 1982-2026 DROPS Design A/S. We reserve all rights. This document, including all its sub-sections, has copyrights. Read more about what you can do with our patterns at the bottom of each pattern on our site. |
|||||||||||||||||||


With over 40 years in knitting and crochet design, DROPS Design offers one of the most extensive collections of free patterns on the internet - translated to 17 languages. As of today we count 324 catalogs and 12290 patterns - 12280 of which are translated into English (US/in).
We work hard to bring you the best knitting and crochet have to offer, inspiration and advice as well as great quality yarns at incredible prices! Would you like to use our patterns for other than personal use? You can read what you are allowed to do in the Copyright text at the bottom of all our patterns. Happy crafting!
Post a comment to pattern DROPS 207-1
We would love to hear what you have to say about this pattern!
If you want to leave a question, please make sure you select the correct category in the form below, to speed up the answering process. Required fields are marked *.