
Popular categories
Looking for a yarn?


Comments / Questions (46)
![]() Elisabeth wrote:
Elisabeth wrote:
Bonjour C’est mon 1er tricot en rond et en jacquard ! Modèle 7/8. Arrivée au niveau de la flèche je ne comprends plus : il y a 4 mailles et ensuite 6 mailles dont je ne sais pas quoi faire : diminuer ? Mais pourquoi une diminution à cet endroit ? Merci de m’aider
29.04.2026 - 14:14DROPS Design answered:
Bonjour Elisabeth, la flèche dan A.1 montre le tour où on doit augmenter, cf. explications écrites: au tour avec la flèche, vous allez augmenter 30 mailles à intervalles réguliers tout le tour pour avoir désormais 280 mailles (vous aviez 250 mailles avant ce tour) et répéter ensuite 70 fois les 4 mailles de A.1 (soit70x4=280). Bon tricot!
29.04.2026 - 16:31
![]() Carole wrote:
Carole wrote:
Why can't I print patterns on this site. I've tried three and none will work
15.04.2026 - 23:22DROPS Design answered:
Hi Carole, You should be able to print out the pattern by clicking on the printer symbol top right of the page. Regards, Drops Team.
16.04.2026 - 06:47
![]() Hetty wrote:
Hetty wrote:
You have almost the same quantities of yarn for the whole set and the jumper alone. I’m planning to use Nord. Are the quantities correct? And can I use the same quantities for Nord?
30.03.2026 - 01:38DROPS Design answered:
Hi Hetty, There is always some yarn left over after working a garment, so the small added quantity for the hat is correct. And, yes, you can use Drops Nord for this project as both baby Merino and Nord com e from the same yarn group A. Happy Easter!
30.03.2026 - 08:40
![]() Daria wrote:
Daria wrote:
Can I use Drops Flora yarn?
10.03.2026 - 04:42DROPS Design answered:
Hi Daria, Yes, Drops Baby Merino and Flora both belong to the same yarn group, so can be used for the same patterns. Regards, Drops Team.
10.03.2026 - 06:33
![]() Desmaretz Sylvie wrote:
Desmaretz Sylvie wrote:
Bonjour, J'ai l'habitude de faire la rehausse en rangs raccourcis à l'allemande que veut dire serrer le fil?
06.12.2025 - 17:37DROPS Design answered:
Bonjour Mme Desmaretz, cette technique permet juste d'éviter un trou au rang suivant (autre façon de tricoter les rangs raccourcis), retrouvez cette façon de faire dans cette vidéo. Bon tricot!
08.12.2025 - 09:03
![]() Rollande wrote:
Rollande wrote:
Bonjour, Après avoir fait le motif A1 (7/8), pourquoi doit-on couper le fil au milieu du dos et commencer sous la manche? Est-ce que je peux continuer le tout sans couper le fil qui est en gris et qui termine le chandail? Merci à l'avance!
27.07.2025 - 15:22DROPS Design answered:
Bonjour Rollande, vous n'avez effectivement pas besoin de couper le fil, tricotez le tour jusqu'au milieu sous la 1ère manche et commencez les nouveaux tours du dos/devant à partir du côté. Bon tricot!
28.07.2025 - 08:01
![]() María Cristina wrote:
María Cristina wrote:
El dibujo del diagrama solo en el derecho de la labor?
26.07.2025 - 19:37DROPS Design answered:
Hola María Cristina, el diagrama muestra todas las filas vistas por el lado derecho. Este patrón se trabaja en redondo así que todas las vueltas se trabajan por el lado derecho y trabajas directamente las filas del diagrama. Recuerda leer el diagrama de derecha a izquierda y de abajo arriba.
27.07.2025 - 22:19
![]() Jacinthe wrote:
Jacinthe wrote:
Bonjour je ne comprends pas de quelle couleur faire la jeter A1 patron Dalvik
28.06.2025 - 01:37DROPS Design answered:
Bonjour Jacinthe, faites le jeté avec la couleur principale du rang (tour) de A.1 que vous tricotez, ainsi, au début, vous faites les jetés avec la couleur de la rayure, puis vers la fin de A.1, faites le jeté de A.1 dans la couleur du fond = en naturel. Et au rang avec la flèche, faites les jetés en gris (couleur du rang avec la flèche). Bon tricot!
30.06.2025 - 08:06
![]() Brita Corbeels wrote:
Brita Corbeels wrote:
Wat bedoelen jullie bij het proeflapje met tricotsteek en Scandinavisch patroon? Tricot steek ken ik maar ik begrijp niet wat jullie met bovenstaande bedoelen. Alvast bedankt.
26.02.2025 - 19:03DROPS Design answered:
Dag Brita,
Met het Scandinavisch patroon wordt de ingebreide figuurtjes bedoeld die je volgens het telpatroon maakt. Dit telpatroon wordt ook in tricotsteek gebreid.
26.02.2025 - 20:43
![]() Denise wrote:
Denise wrote:
I am having difficulty with the pattern, my inability! I am knitting size 7/8. I'm working on the yoke, following pattern A1. On the 2nd row the pattern repeat is 6 stitches but on the needle before the arrow I should have 250 stitches, I still have 125. Please advise.
20.01.2025 - 13:21DROPS Design answered:
Dear Denise, you start diagram A.1 with 25 repeats of the 5 sts (=125 sts) and you will increase by and by as shown in A.1, when all increases in A.1 are done you will have 10 sts in each A.1 = 250 sts in total. On the very first row in A.1 work as follows (knit 5, YO) x 25 = there are now 6 sts in each of the 26 repeats and 150 sts on needle. Happy knitting!
21.01.2025 - 10:06
|
||||||||||||||||||||||
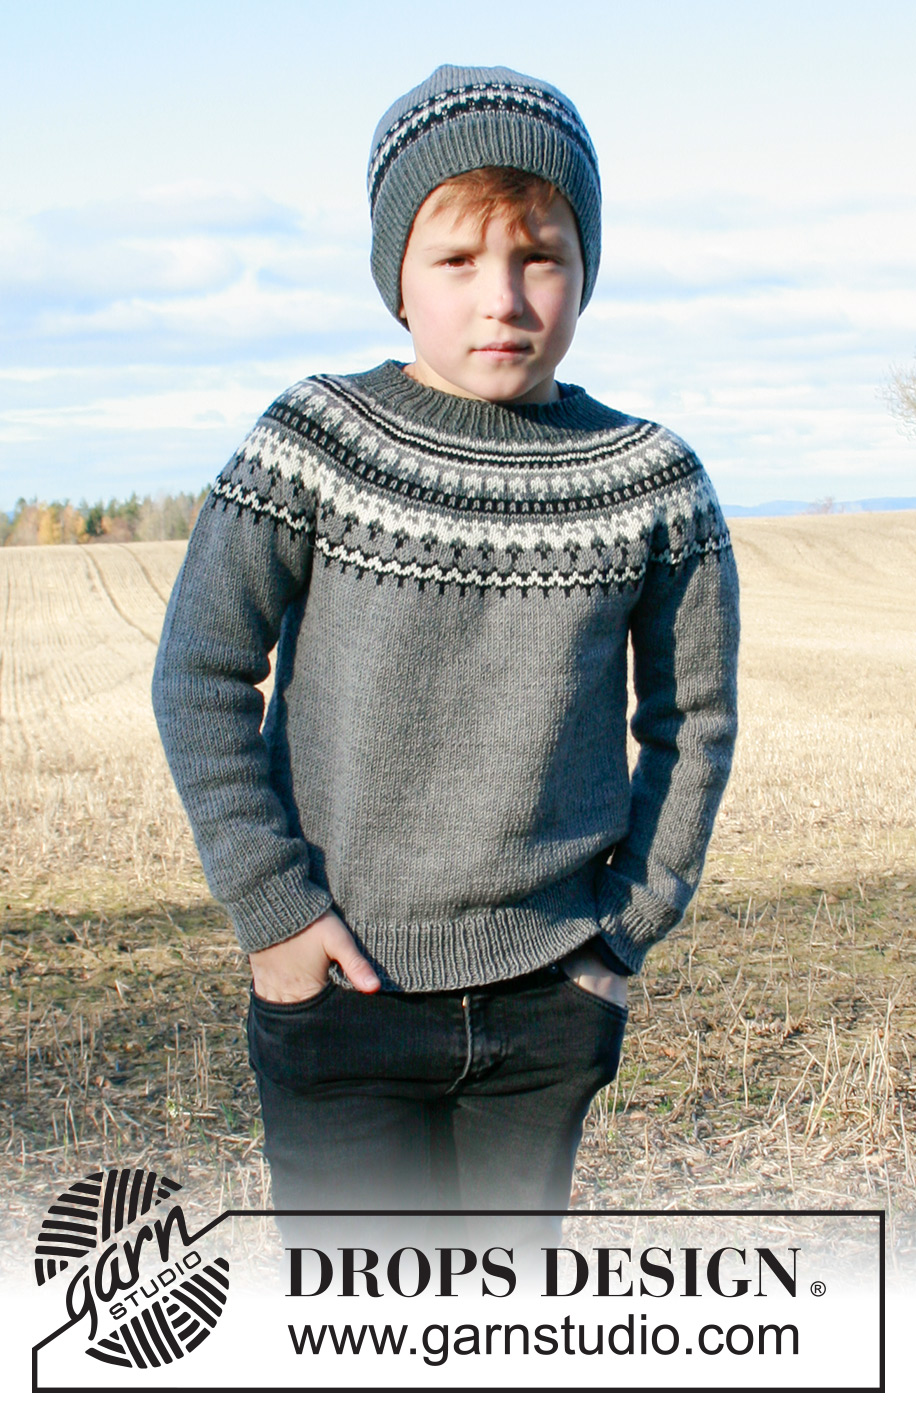
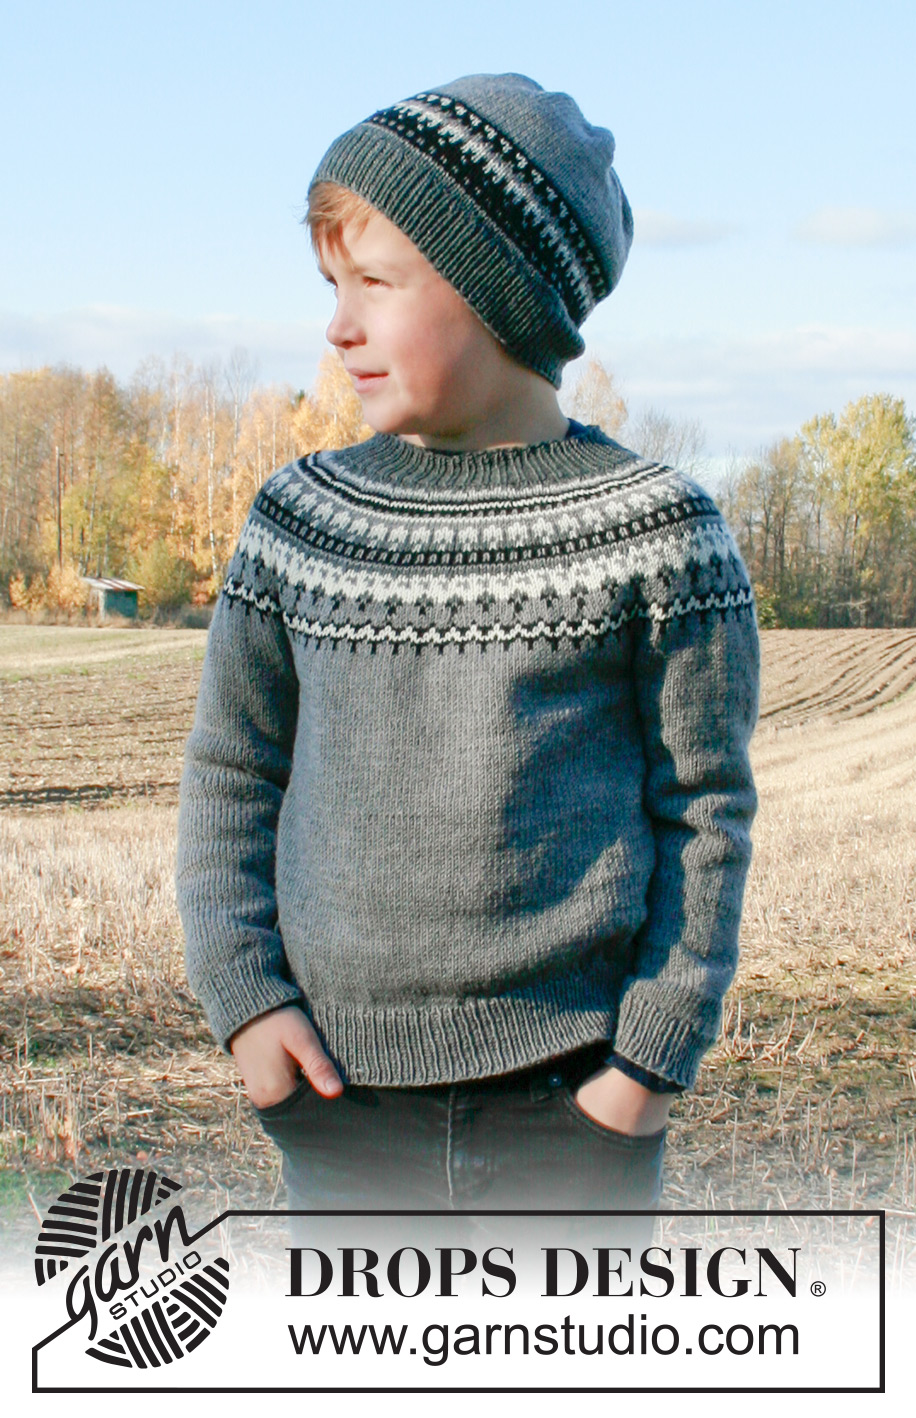
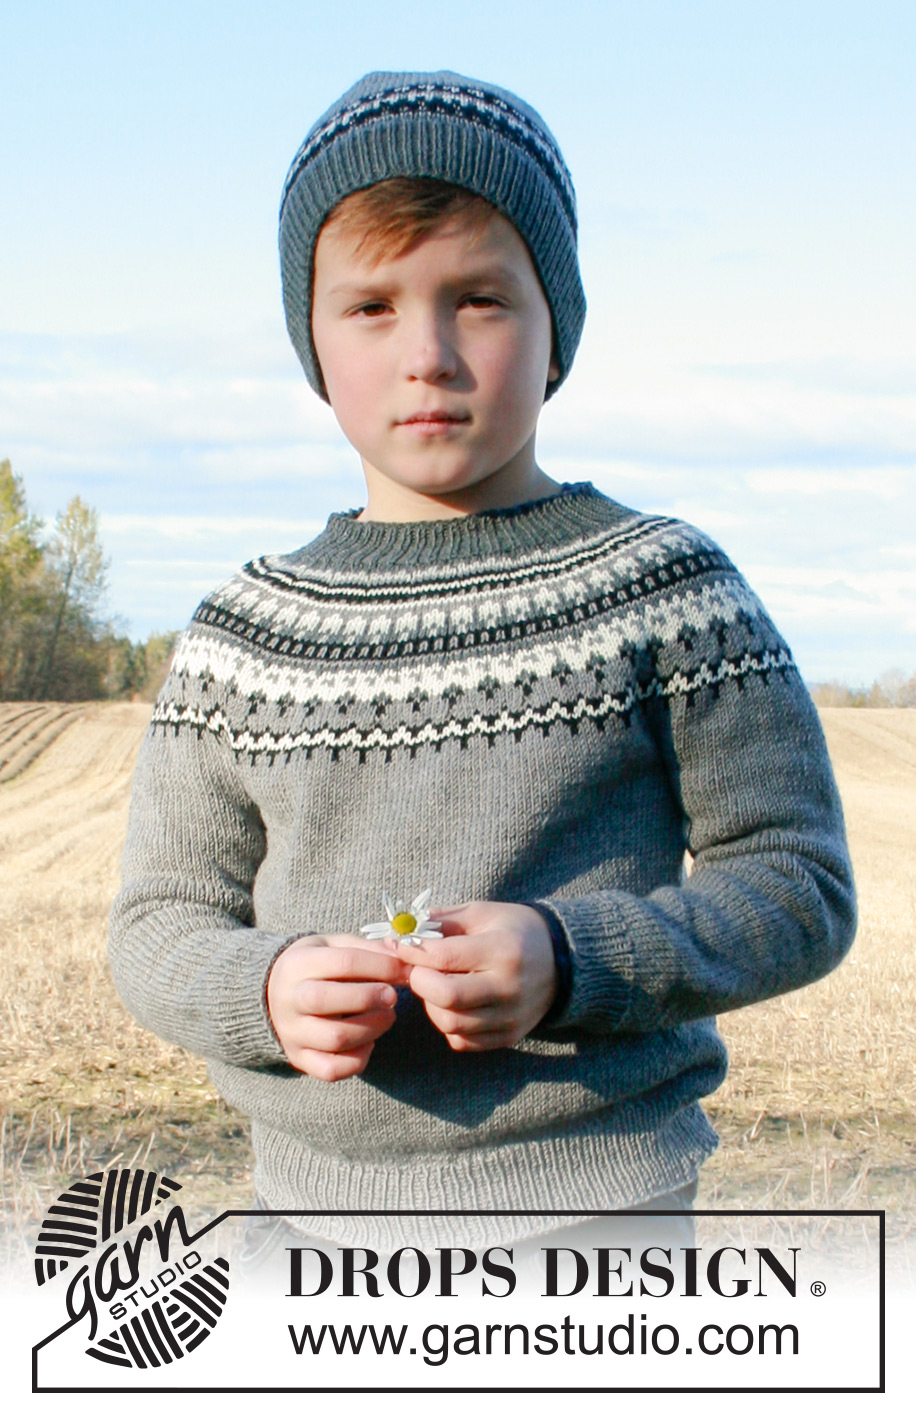
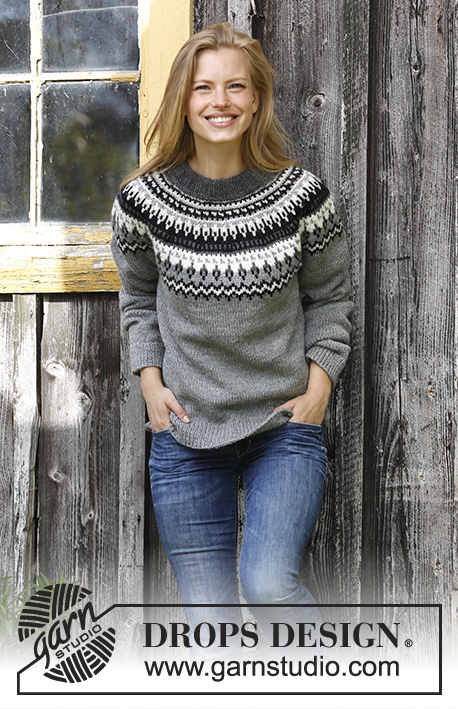
Dalvik#dalviksweater |
||||||||||||||||||||||
 |
 |
|||||||||||||||||||||
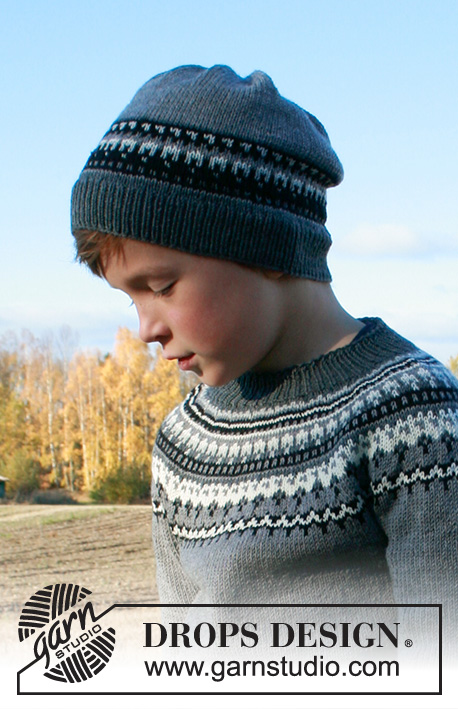
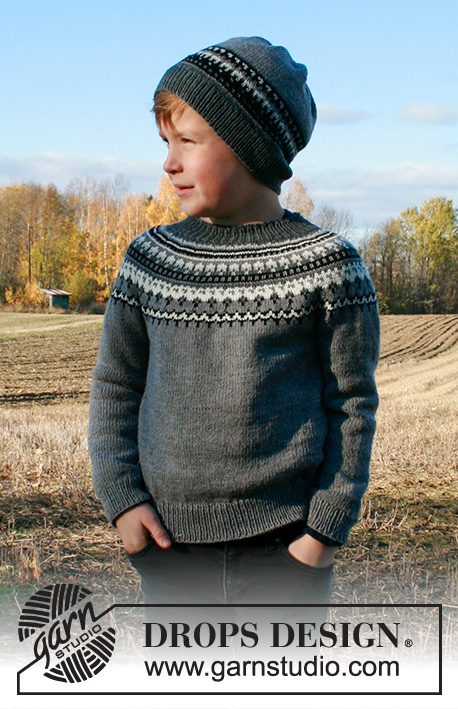
Knitted sweater for children in DROPS BabyMerino. The piece is worked top down with round yoke and Nordic pattern. Sizes 2-12 years. Knitted hat for children in DROPS BabyMerino with Nordic pattern.
DROPS Children 34-18 |
||||||||||||||||||||||
|
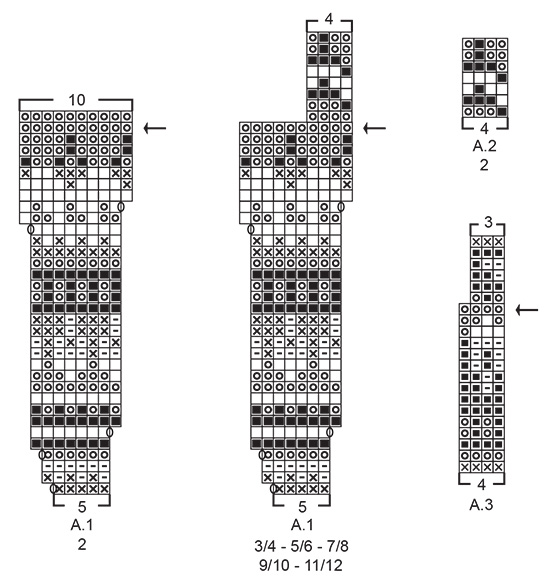
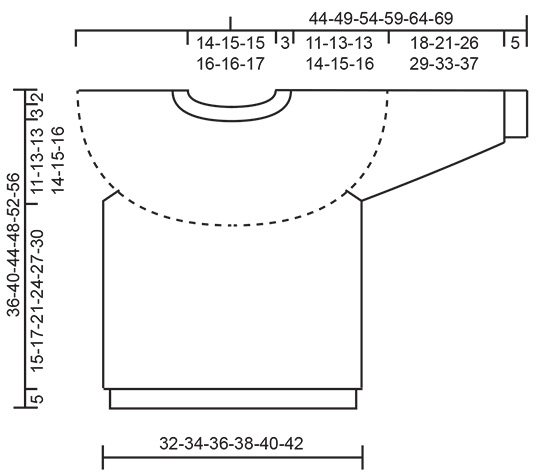
------------------------------------------------------- EXPLANATIONS FOR THE PATTERN: ------------------------------------------------------- INCREASE/DECREASE TIP (evenly spaced): To work out how to increase/decrease evenly, count the total number of stitches on needle (e.g. 88 stitches) and divide by the number of increases/decreases to be made (e.g. 27) = 3.2. In this example, increase by making 1 yarn over after approx. each 3rd stitch. On the next row knit the yarn overs twisted to avoid holes. When decreasing, knit together approx. each 2nd and 3rd stitch. ELEVATION (back of neck): To make the sweater slightly higher at the back of the neck when working the yoke, work an elevation as described here. Skip this section if you do not want an elevation. Start from the right side, mid back and work with dark grey as follows: Knit 15-15-16-16-17-17 stitches, turn, tighten strand and purl 30-30-32-32-34-34 stitches back. Turn, tighten strand and knit 45-45-48-48-51-51 stitches, turn, tighten strand and purl 60-60-64-64-68-68 stitches back. Turn, tighten strand and knit 75-75-80-80-85-85 stitches, turn, tighten strand and purl 90-90-96-96-102-102 stitches, turn and knit to mid back. Then work YOKE as described in the text. PATTERN: Sweater: See diagrams A.1 and A.2. Choose diagram for your size (A.2 applies only to sizes 2 years – this repeat is worked on the yoke in the other sizes). Hat: See diagram A.3. The whole pattern is worked in stockinette stitch. DECREASE TIP (for mid under sleeves): Decrease 1 stitch on each side of the marker thread as follows: Work until there are 3 stitches left before the marker thread, slip 1 stitch as if to knit, knit 1 and pass the slipped stitch over the knitted stitch, knit 2 (marker thread sits between these 2 stitches), knit 2 together (= 2 stitches decreased). BINDING-OFF TIP: To avoid the bind-off edge being tight you can bind off with a larger needle size; or you can make 1 yarn over after approx. each 8th stitch at the same time as binding off (yarn overs bind off as normal stitches). ------------------------------------------------------- START THE PIECE HERE: ------------------------------------------------------- SWEATER - SHORT OVERVIEW OF THE PIECE: Neck and yoke are worked in the round with circular needle, top down. The yoke is divided for body and sleeves and the body is continued in the round with circular needle. Sleeves are worked in the round with double pointed needles, top down. NECK: Cast on 88-90-92-94-96-98 stitches with short circular needle size 2.5 MM = US 1.5 and dark grey. Knit 1 round and then work rib in the round (= knit 1 / purl 1) for 3 cm = 1⅛". Knit 1 round where you increase 27-30-33-31-34-37 stitches evenly spaced – read INCREASE/DECREASE TIP = 115-120-125-125-130-135 stitches. Knit 1 round. Insert 1 marker at the beginning of the round = mid back. Now you can work an ELEVATION in the back of the neck – read description above. If you do not want an elevation, go straight to yoke. YOKE: Change to circular needle size 3 MM = US 2.5 and work A.1 in the round (= 23-24-25-25-26-27 repeats of 5 stitches). Continue this pattern and increase as shown in the diagram. REMEMBER THE KNITTING GAUGE! On the round before the one marked with an arrow in A.1, there are 230-240-250-250-260-270 stitches on the needle. On the round marked with an arrow in A.1, increase 10-20-22-30-36-38 stitches evenly spaced = 240-260-272-280-296-308 stitches. When A.1 has been completed the piece measures approx. 14-16-16-16-16-16 cm = 5½"-6¼"-6¼"-6¼"-6¼"-6¼" from the cast-on edge mid front. Continue in the round with stockinette stitch and grey until the piece measures 14-16-16-17-18-19 cm = 5½"-6¼"-6¼"-6¾"-7"-7½" from the cast-on edge mid front. Now, on the next round, divide the yoke for body and sleeves as follows: Work 35-38-40-42-44-46 stitches in stockinette stitch with grey (= ½ back piece), place the next 50-54-56-56-60-62 stitches on 1 thread for sleeve, cast on 6-6-6-8-8-8 new stitches on the needle (= in side under sleeve), work 70-76-80-84-88-92 stitches in stockinette stitch with grey (= front piece), place the next 50-54-56-56-60-62 stitches on 1 thread for sleeve, cast on 6-6-6-8-8-8 new stitches on the needle (= in side under sleeve) and work the remaining 35-38-40-42-44-46 stitches in stockinette stitch with grey (= ½ back piece). Cut the strand. Body and sleeves are continued separately. THE PIECE IS NOW MEASURED FROM HERE! BODY: = 152-164-172-184-192-200 stitches. Insert 1 marker in the middle of the 6-6-6-8-8-8 stitches under the one sleeve. Start the round at this marker and work A.2 in the round (applies only to sizes 2 years– this repeat was worked on the yoke in the other sizes). When A.2 has been completed continue with stockinette stitch and grey (all sizes). Work with grey until the piece measures 15-17-21-24-27-30 cm = 6"-6¾"-8¼"-9½"-10⅝"-11¾" from the division (or to desired length; there is approx. 5 cm = 2" left to finished length). Change to circular needle size 2.5 MM = US 1.5 and work rib in the round (= knit 1/ purl 1) for 5 cm = 2". Loosely bind off with knit over knit and purl over purl – read BINDING-OFF TIP! The sweater measures approx. 36-40-44-48-52-56 cm = 14¼"-15¾"-17¼"-19"-20½"-22" from the shoulder down. SLEEVE: Place the 50-54-56-56-60-62 stitches from the thread on the one side of the piece on double pointed needles size 3 MM = US 2.5 and knit up 1 stitch in each of the 6-6-6-8-8-8 stitches cast on under sleeve = 56-60-62-64-68-70 stitches. Insert 1 marker thread in the middle of the 6-6-6-8-8-8 stitches under the sleeve; allow it to follow your work onwards - it will be used when decreasing mid under sleeve. Start the round at the marker thread and work A.2 in the round (applies only to sizes 2 years – this repeat was worked on the yoke in the other sizes). When A.2 has been completed continue with stockinette stitch and grey (all sizes). AT THE SAME TIME when the piece measures 2 cm = ¾" from the division, decrease 2 stitches mid under sleeve – read DECREASE TIP. Decrease like this every 3-3-3½-4-4-4½ cm = 1⅛"-1⅛"-1¼"-1½"-1½"-1⅝" a total of 6-7-7-7-8-8 times = 44-46-48-50-52-54 stitches. Continue with grey until the piece measures 18-21-26-29-33-37 cm = 7"-8¼"-10¼"-11⅜"-13"-14½" from the division (or to desired length; there is approx. 5 cm = 2" left to finished length). Change to double pointed needles size 2.5 MM = US 1.5 and work rib in the round (knit 1/ purl 1) for 5 cm = 2". Loosely bind off with knit over knit and purl over purl – read BINDING-OFF TIP! The sleeve measures approx. 23-26-31-34-38-42 cm = 9"-10¼"-12¼"-13⅜"-15"-16½" from the division. Work the other sleeve in the same way. ------------------------------------------------------- HAT - SHORT OVERVIEW OF THE PIECE: The piece is worked in the round with short circular needle, bottom up. Change to double pointed needles when necessary. HAT: Cast on 138-144-150 stitches with short circular needle size 2.5 MM = US 1.5 and dark grey. Work rib in the round (= knit 1/ purl 1) for 4 cm = 1½". Knit 1 round where you decrease 26-28-30 stitches evenly spaced – read INCREASE/DECREASE TIP = 112-116-120 stitches. Change to short circular needle size 3 MM = US 2.5 and work A.3 in the round (= 28-29-30 repeats of 4 stitches). REMEMBER THE KNITTING GAUGE! On the round marked with an arrow in A.3 decrease 1-2-0 stitches evenly spaced = 111-114-120 stitches. Continue the pattern (there is now room for 37-38-40 repeats of 3 stitches). When A.3 has been completed the piece measures approx. 11 cm = 4⅜" from the cast-on edge. Continue with stockinette stitch and grey. When the piece measures 13-15-17 cm = 5⅛"-6"-6¾" from the cast-on edge, knit 1 round where you decrease 1-4-0 stitches evenly spaced = 110-110-120 stitches. Now insert 10 markers in the piece with 11-11-12 stitches between each one. On the next round decrease 1 stitch after each marker by knitting 2 stitches together (= 10 stitches decreased). Decrease like this every 2nd round a total of 9 times in all sizes (change to double pointed needles when necessary) = 20-20-30 stitches left. On the next round knit all stitches together 2 and 2 = 10-10-15 stitches left. Work 1 more round where all stitches are knitted together 2 and 2 = 5-5-8 stitches left. Cut the strand, pull it through the remaining stitches, tighten and fasten well. The hat measures approx. 19-21-23 cm = 7½"-8¼"-9" from the top down. |
||||||||||||||||||||||
Diagram explanations |
||||||||||||||||||||||
|
||||||||||||||||||||||
 |
||||||||||||||||||||||
 |
||||||||||||||||||||||
Have you finished this pattern?Tag your pictures with #dropspattern #dalviksweater or submit them to the #dropsfan gallery. Do you need help with this pattern?You'll find 31 tutorial videos, a Comments/Questions area and more by visiting the pattern on garnstudio.com. © 1982-2026 DROPS Design A/S. We reserve all rights. This document, including all its sub-sections, has copyrights. Read more about what you can do with our patterns at the bottom of each pattern on our site. |
||||||||||||||||||||||


With over 40 years in knitting and crochet design, DROPS Design offers one of the most extensive collections of free patterns on the internet - translated to 17 languages. As of today we count 324 catalogs and 12290 patterns - 12280 of which are translated into English (US/in).
We work hard to bring you the best knitting and crochet have to offer, inspiration and advice as well as great quality yarns at incredible prices! Would you like to use our patterns for other than personal use? You can read what you are allowed to do in the Copyright text at the bottom of all our patterns. Happy crafting!
Post a comment to pattern DROPS Children 34-18
We would love to hear what you have to say about this pattern!
If you want to leave a question, please make sure you select the correct category in the form below, to speed up the answering process. Required fields are marked *.