DROPS Baby Merino
DROPS Baby Merino
100% vlna
od 98.00 Kč /50g
Přízi na tento model můžete mít už za 784.00Kč.

Cenu za klubka počítáme podle spotřeby při výrobě modelu v nejmenší velikosti a nejlevnější variantě příze. Rádi byste ještě lepší cenu? Třeba ji najdete mezi DROPS Deals!

Dalvik

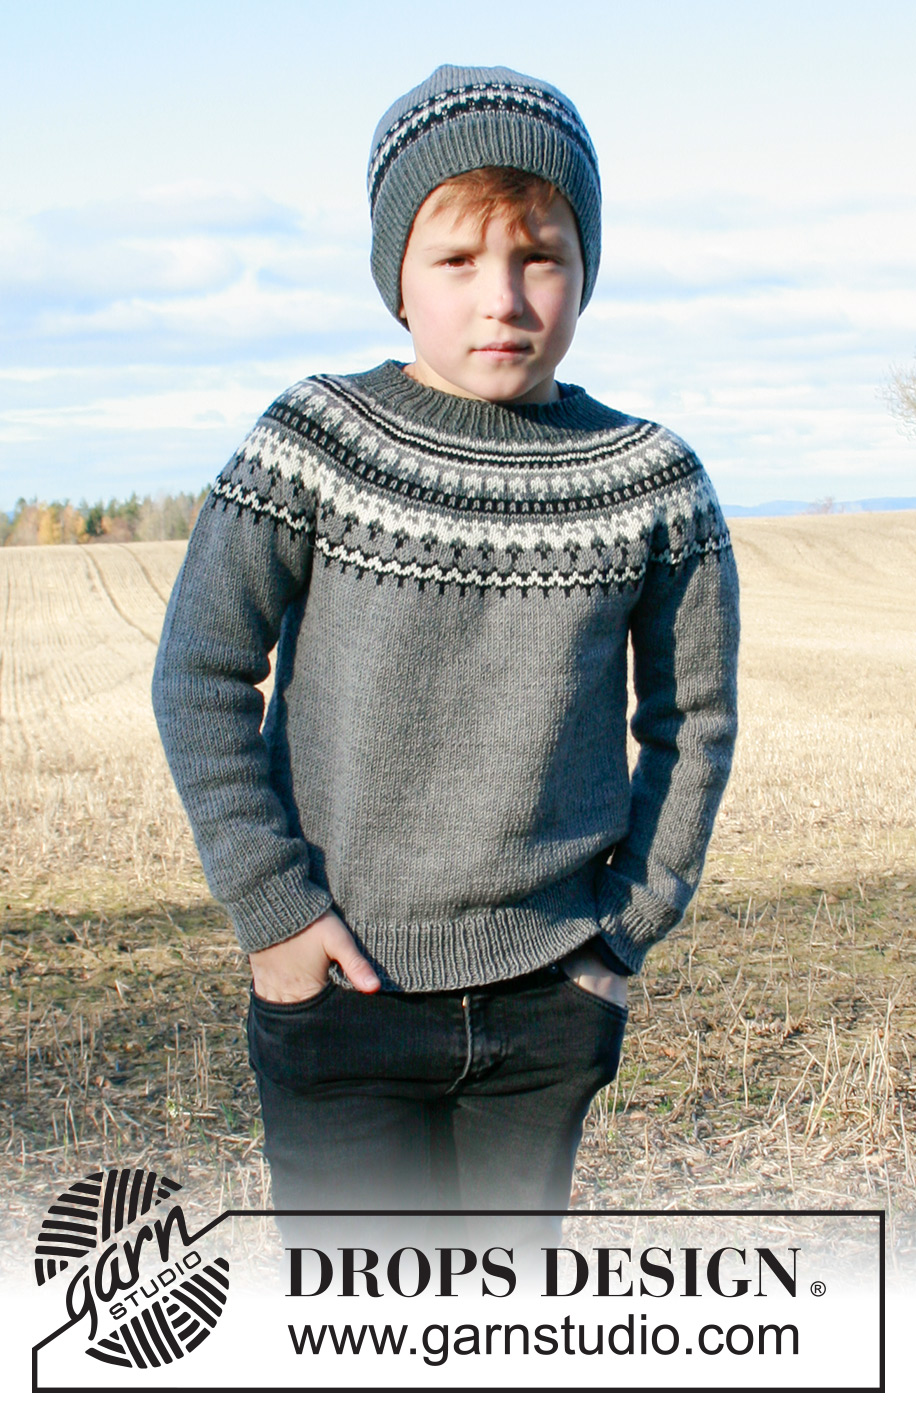
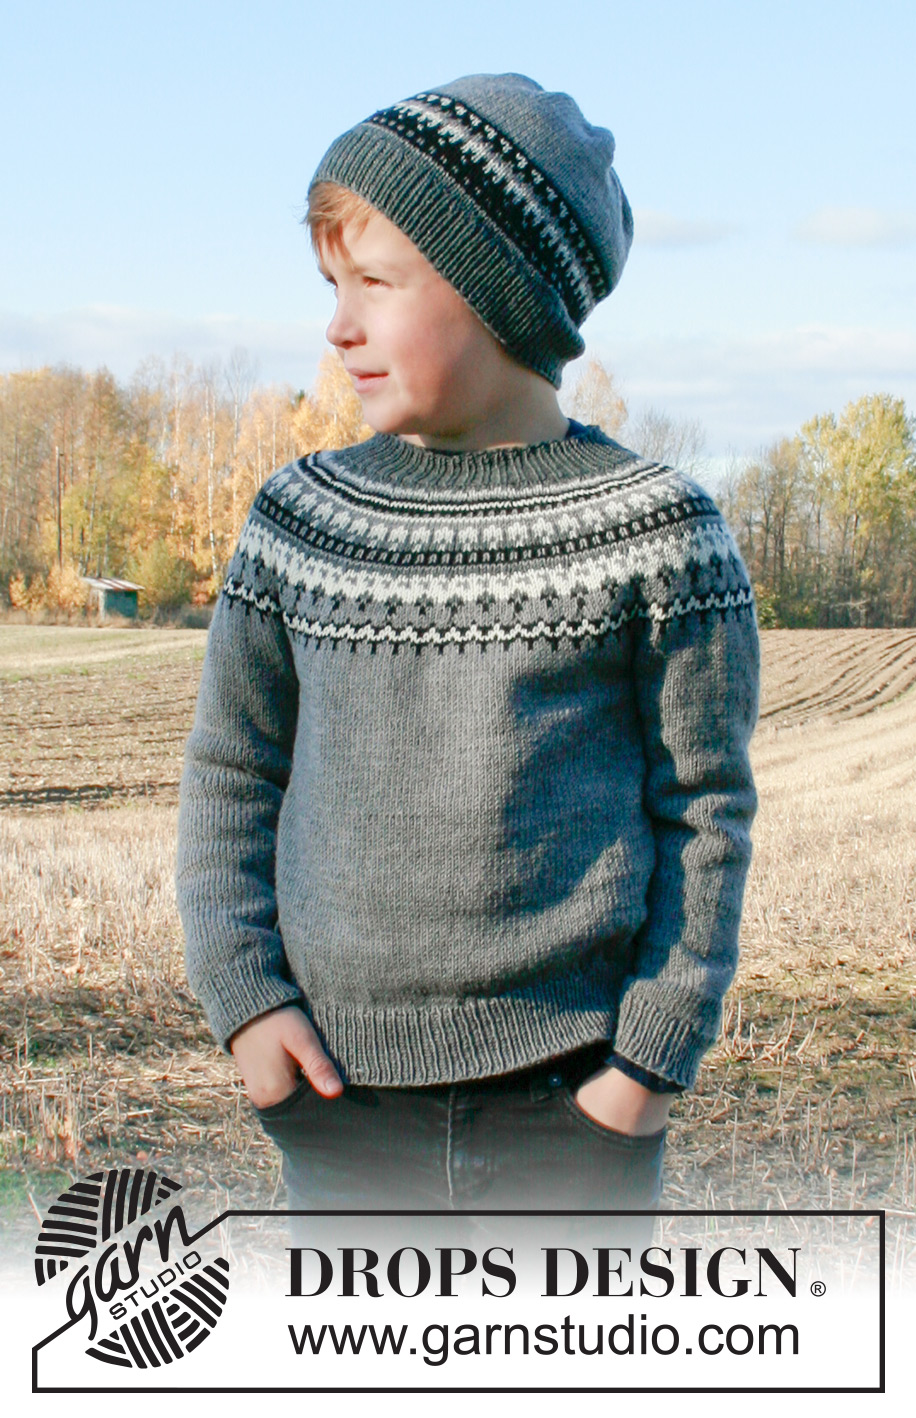
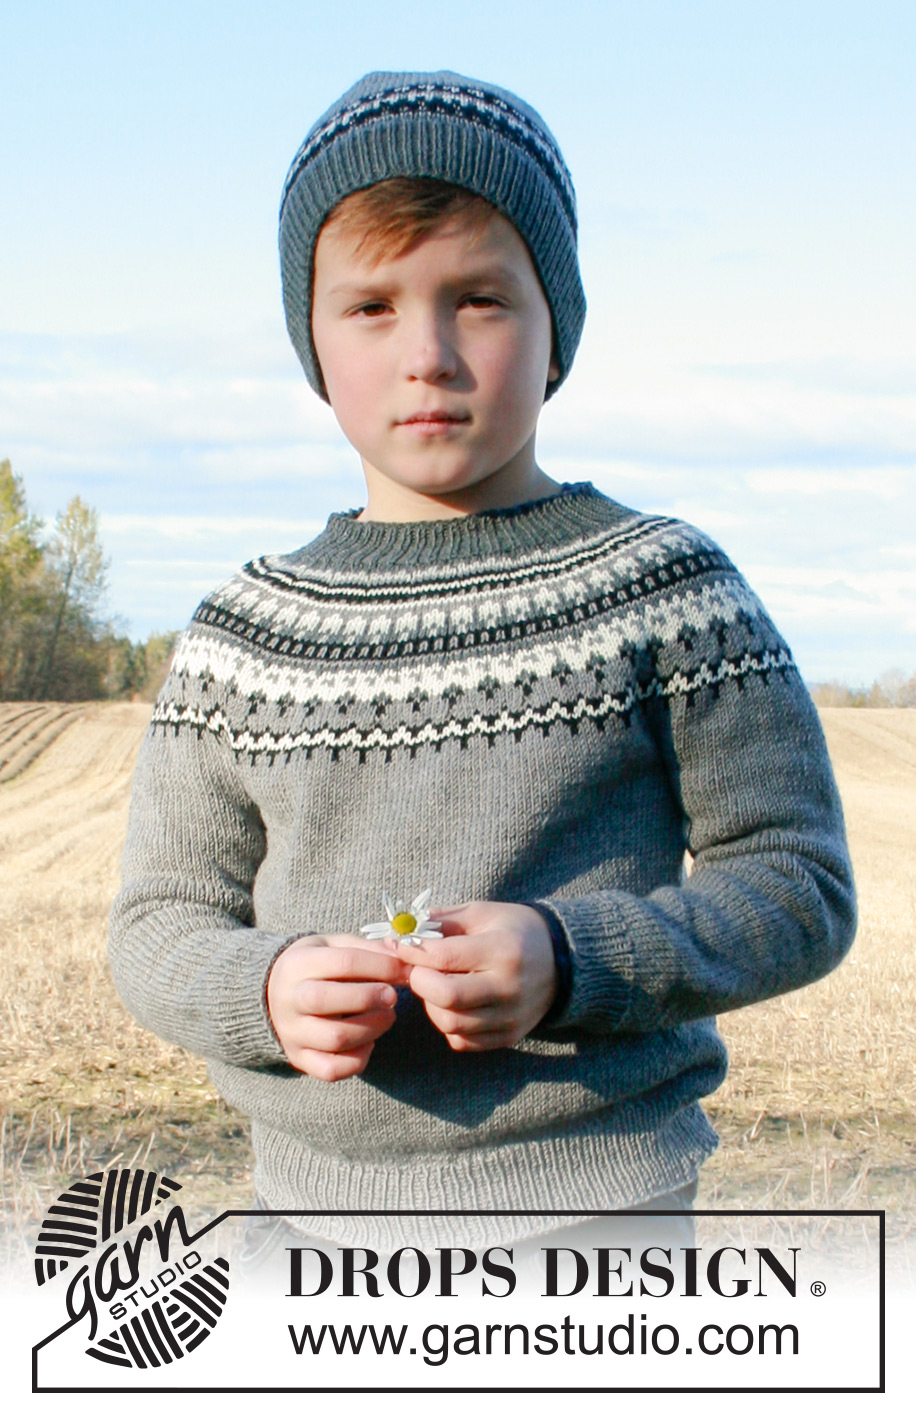
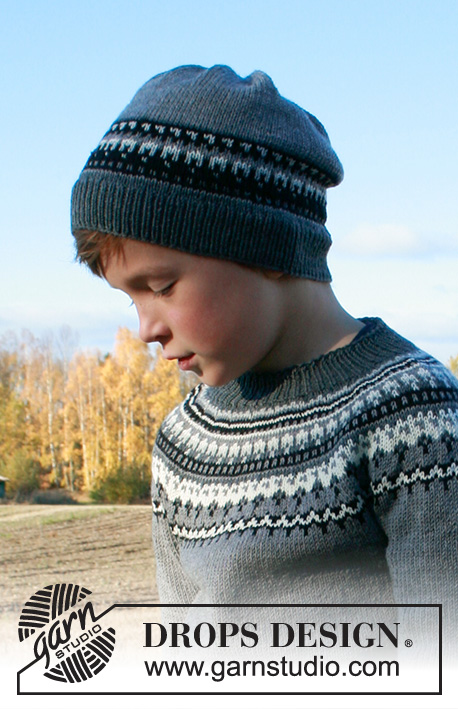
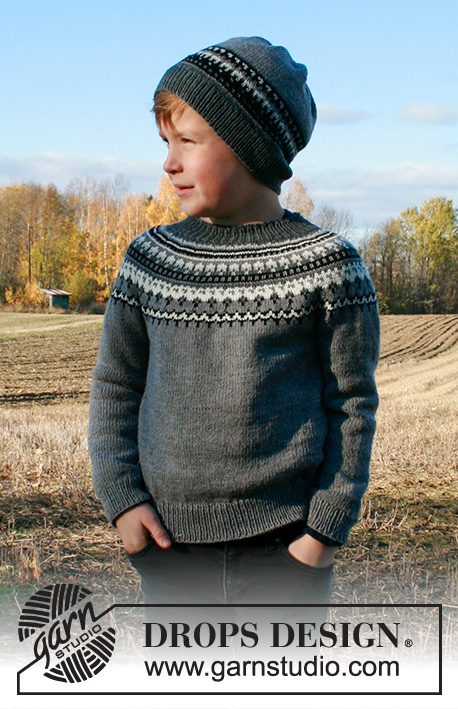
Dětský pulovr s kruhovým sedlem a norským vzorem pletený shora dolů z příze DROPS BabyMerino. Velikost 2-12 let. Dětská čepice s norským vzorem pletená z příze DROPS BabyMerino.

DROPS Children 34-18
DROPS Design: model č.bm-017-bn
Skupina přízí A
-------------------------------------------------------

CELÁ SOUPRAVA:

VELIKOST:
2 - 3/4 - 5/6 - 7/8 - 9/10 - 11/12 let
Velikost v cm:
92 - 98/104 - 110/116 - 122/128 - 134/140 - 146/152

MATERIÁL:
DROPS BABYMERINO firmy Garnstudio (spadá do skupiny přízí A)
200-200-200-250-250-300 g, barva č. 19, šedá
50-50-50-50-50-50 g, barva č. 02, smetanová
50-50-50-50-50-50 g, barva č. 20, tmavá šedá
50-50-50-50-50-50 g, barva č. 21, černá
50-50-50-50-50-50 g, barva č. 22, světlá šedá

PULOVR:

VELIKOST:
2 - 3/4 - 5/6 - 7/8 - 9/10 - 11/12 let
Velikost v cm:
92 - 98/104 - 110/116 - 122/128 - 134/140 - 146/152

MATERIÁL:
DROPS BABYMERINO firmy Garnstudio (spadá do skupiny přízí A)
150-200-200-200-250-300 g, barva č. 19, šedá
50-50-50-50-50-50 g, barva č. 02, smetanová
50-50-50-50-50-50 g, barva č. 20, tmavá šedá
50-50-50-50-50-50 g, barva č. 21, černá
50-50-50-50-50-50 g, barva č. 22, světlá šedá

ZKUŠEBNÍ VZOREK:
24 ok na šířku a 32 řad na výšku lícovým žerzejem norským vzorem = 10 x 10 cm.

JEHLICE:
DROPS PONOŽKOVÉ JEHLICE a KRUHOVÁ JEHLICE č.3, dlouhá 40 a 60 cm.
DROPS PONOŽKOVÉ JEHLICE a KRUHOVÁ JEHLICE č.2,5, dlouhá 40 a 60 cm – na lemy.
Uvedená síla jehlic je pouze orientační. Máte-li ve svém zkušebním vzorku více ok na 10 cm, použijte jehlice silnější. Pokud máte naopak méně ok na 10 cm, použijte jehlice slabší.

ČEPICE:

VELIKOST:
2/4 - 5/8 – 9/12 let
Obvod hlavy: asi 48/52-52/54-54/56 cm

MATERIÁL:
DROPS BABYMERINO firmy Garnstudio (spadá do skupiny přízí A)
50-50-50-50-50-50 g, barva č. 19, šedá
50-50-50-50-50-50 g, barva č. 02, smetanová
50-50-50-50-50-50 g, barva č. 20, tmavá šedá
50-50-50-50-50-50 g, barva č. 21, černá
50-50-50-50-50-50 g, barva č. 22, světlá šedá

ZKUŠEBNÍ VZOREK:
24 ok na šířku a 32 řad na výšku lícovým žerzejem norským vzorem = 10 x 10 cm.

JEHLICE:
DROPS PONOŽKOVÉ JEHLICE a KRUHOVÁ JEHLICE č.3, dlouhá 40 cm.
DROPS KRUHOVÁ JEHLICE č.2,5, dlouhá 40 cm – na lem.
Uvedená síla jehlic je pouze orientační. Máte-li ve svém zkušebním vzorku více ok na 10 cm, použijte jehlice silnější. Pokud máte naopak méně ok na 10 cm, použijte jehlice slabší.

-------------------------------------------------------

Náhradní příze – Podívejte se, jak změnit přízi
Skupina přízí A až F – Neměňte návod, změňte přízi
Spotřeba příze při použití náhradní příze – Využijte náš převodník

-------------------------------------------------------

DROPS Baby Merino
DROPS Baby Merino
100% vlna
od 98.00 Kč /50g
Přízi na tento model můžete mít už za 784.00Kč.

Cenu za klubka počítáme podle spotřeby při výrobě modelu v nejmenší velikosti a nejlevnější variantě příze. Rádi byste ještě lepší cenu? Třeba ji najdete mezi DROPS Deals!

DROPS Super Sale

SAVE 30% on 6 cotton favourites!
Platí do 12.04.2024

Návod

----------------------------------------------------------

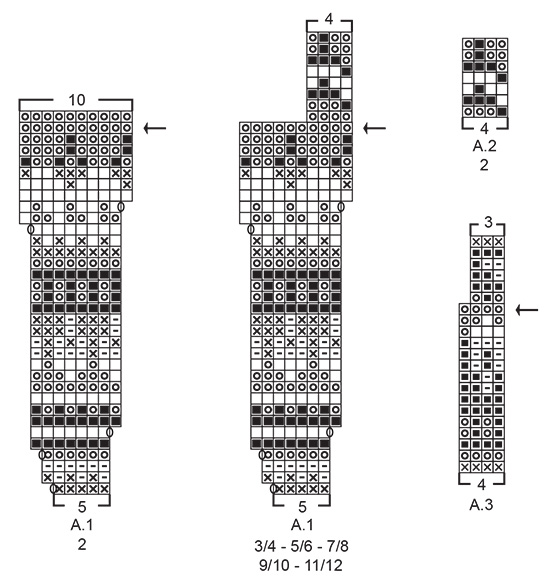
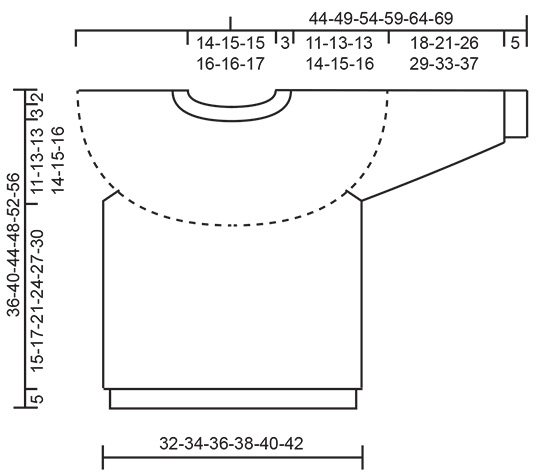
VYSVĚTLIVKY:

----------------------------------------------------------

TIP – PŘIDÁVÁNÍ/UJÍMÁNÍ:
Abychom vypočítali, jak často musíme přidávat/ujímat, vydělíme celkový počet ok na jehlici (např. 88 ok) počtem ok, která potřebujeme přidat/ujmout (tj. 27), takže 88 : 27 = 3,2.
V tomto případě tedy 1x nahodíme za každým zhruba 3. okem. V následující kruhové řadě pleteme nahození za zadní nit, aby se v pletenině netvořily dírky.
Pokud ujímáme, spleteme hladce dohromady každé zhruba 2. a 3. oko.

ZVÝŠENÍ zadního průkrčníku:
Aby svetr lépe seděl, můžeme pomocí zkrácených řad mírně vytvarovat zadní průkrčník. Pokud zadní průkrčník tvarovat nechcete, můžete tuto pasáž přeskočit. Pleteme lícovým žerzejem v řadách od středu zadního průkrčníku tmavě šedou přízí - začínáme lícovou řadou: upleteme hladce 15-15-16-16-17-17 ok, práci otočíme, přízi utáhneme a pleteme obrace 30-30-32-32-34-34 ok. Práci otočíme, přízi utáhneme, upleteme hladce 45-45-48-48-51-51 ok, práci otočíme, přízi utáhneme a pleteme obrace 60-60-64-64-68-68 ok. Práci otočíme, přízi utáhneme, upleteme hladce 75-75-80-80-85-85 ok, práci otočíme, přízi utáhneme a pleteme obrace zpět ke středu zadního průkrčníku. Pak pokračujeme pletením SEDLA dle popisu níže.

VZOR:
Pulovr: Viz schémata A.1 a A.2. Zvolte si schéma pro požadovanou velikost (schéma A.2 platí pouze pro velikost 2 roky – sekvenci tohoto vzoru pleteme u ostatních velikostí na sedle).
Čepice: Viz schéma A.3.
Celý vzor pleteme lícovým žerzejem.

TIP - UJÍMÁNÍ (rukávy):
Na každé straně značky ujmeme 1 oko, takto - začínáme 3 oka před značkou: 1 oko sejmeme hladce, 1 oko upleteme hladce a sejmuté přes ně přetáhneme, 2 oka upleteme hladce (značka leží mezi nimi), 2 oka spleteme hladce (= ujmuli jsme 2 oka).

TIP – UZAVŘENÍ:
Abychom neměli uzavřený okraj moc stažený, můžeme na uzavření ok použít silnější jehlice; nebo během uzavírání 1x nahodíme za každým zhruba 8. okem a nahození hned uzavřeme jako běžné oko.

-------------------------------------------------------

POPIS PRÁCE:

-------------------------------------------------------

PULOVR - JAK BUDEME POSTUPOVAT:
Průkrčník a sedlo pleteme v kruhových řadách na kruhové jehlici, shora dolů. Pak pleteninu rozdělíme na trup a rukávy – trup pleteme dál v kruhových řadách, rukávy upleteme také v kruhových řadách na ponožkových jehlicích.

PRŮKRČNÍK:
Na krátkou kruhovou jehlici č.2,5 nahodíme tmavě šedou přízí 88-90-92-94-96-98 ok a upleteme 1 kruhovou řadu hladce. Pokračujeme v kruhových řadách pružným vzorem 1/1 (= střídáme 1 oko hladce, 1 obrace). Ve výši 3 cm upleteme 1 kruhovou řadu hladce a SOUČASNĚ přidáme rovnoměrně 27-30-33-31-34-37 ok – viz TIP – PŘIDÁVÁNÍ/UJÍMÁNÍ = 115-120-125-125-130-135 ok. Upleteme 1 kruhovou řadu hladce. Označíme si začátek kruhové řady = střed zadního průkrčníku. Nyní můžeme průkrčník vytvarovat - viz ZVÝŠENÍ zadního průkrčníku výše. Pokud průkrčník tvarovat nechcete, tuto část vynechte a pokračujte rovnou pletením sedla.

SEDLO:
Pleteninu převedeme na kruhovou jehlici č.3 a pleteme v kruhových řadách vzor A.1 (= 23-24-25-25-26-27 sekvencí vzoru po 5 okách). Pokračujeme v pletení vzoru a přidáváme dle schématu. V kruhové řadě před řadou, která je ve schématu A.1 označena šipkou, máme na jehlici 230-240-250-250-260-270 ok.
V kruhové řadě označené ve schématu A.1 šipkou přidáme rovnoměrně 10-20-22-30-36-38 ok = 240-260-272-280-296-308 ok.
Po dokončení celé sekvence vzoru A.1 (na výšku) měří díl asi 14-16-16-16-16-16 cm (měřeno uprostřed předního dílu od počáteční, nahozené řady).
Pokračujeme v kruhových řadách lícovým žerzejem šedou přízí do výše 14-16-16-17-18-19 cm (měřeno uprostřed předního dílu od počáteční, nahozené řady).
V další kruhové řadě rozdělíme pleteninu na díly – trup a rukávy, takto: upleteme 35-38-40-42-44-46 ok lícovým žerzejem šedou přízí (= ½ zadního dílu), následujících 50-54-56-56-60-62 ok odložíme na pomocnou jehlici (= rukáv), nahodíme 6-6-6-8-8-8 nových ok (= podpaží), 70-76-80-84-88-92 ok upleteme lícovým žerzejem šedou přízí (= přední díl), dalších 50-54-56-56-60-62 ok odložíme na pomocnou jehlici, nahodíme 6-6-6-8-8-8 nových ok (= podpaží) a zbylých 35-38-40-42-44-46 ok upleteme lícovým žerzejem šedou přízí (= ½ zadního dílu). Přízi odstřihneme. Trup a rukávy dál pleteme odděleně. NYNÍ MĚŘÍME DÍL OD TOHOTO MÍSTA!

TRUP:
= 152-164-172-184-192-200 ok. Doprostřed 6-6-6-8-8-8 nových ok v podpaží na jedné straně dílu vložíme značku. Kruhová řada začíná u značky a pleteme v kruhových řadách vzorem A.2 (toto platí jen pro velikosti 2 roky – u ostatních velikostí jsme už sekvenci vzoru upletli na sedle).
Po dokončení celé sekvence vzoru A.2 pleteme lícovým žerzejem šedou přízí (platí pro všechny velikosti).
Pleteme šedou přízí až do výše 15-17-21-24-27-30 cm od podpaží (ppř. do libovolné výšky; do ukončení práce nám zbývá doplést asi 5 cm).
Pleteninu převedeme na kruhovou jehlici č.2,5 a pleteme v kruhových řadách lem pružným vzorem 1/1 (tj. střídáme 1 oko hladce, 1 obrace). Když je lem vysoký 5 cm, všechna oka dle vzoru volně uzavřeme – viz TIP - UZAVŘENÍ! Pulovr měří asi 36-40-44-48-52-56 cm (od ramene k dolnímu okraji).

RUKÁV:
Odložených 50-54-56-56-60-62 ok jednoho rukávu vrátíme z pomocné jehlice zpět na ponožkové jehlice č.3 a navíc k nim nabereme po 1 oku z každého ze 6-6-6-8-8-8 nových ok v podpaží = 56-60-62-64-68-70 ok. Doprostřed těchto 6-6-6-8-8-8 ok vložíme značku; značku během pletení snímáme vždy do aktuálně pletené kruhové řady – využijeme ji při ujímání.
Kruhová řada začíná u značky a pleteme v kruhových řadách vzorem A.2 (toto platí jen pro velikosti 2 roky – u ostatních velikostí jsme už sekvenci vzoru upletli na sedle).
Po dokončení celé sekvence vzoru A.2 pleteme lícovým žerzejem šedou přízí (platí pro všechny velikosti).
SOUČASNĚ ve výši 2 cm od podpaží ujmeme na každé straně značky 1 oko – viz TIP - UJÍMÁNÍ. Takto ujímáme vždy po 3-3-3,5-4-4-4,5 cm výšky, celkem 6-7-7-7-8-8x = 44-46-48-50-52-54 ok.
Pleteme šedou přízí až do výše 18-21-26-29-33-37 cm od podpaží (ppř. do libovolné výšky; do ukončení práce nám zbývá doplést asi 5 cm).
Pleteninu převedeme na ponožkové jehlice č.2,5 a pleteme v kruhových řadách lem pružným vzorem 1/1. Když je lem vysoký 5 cm, všechna oka dle vzoru volně uzavřeme – viz TIP - UZAVŘENÍ! Rukáv měří asi 23-26-31-34-38-42 cm (od podpaží).
Stejným způsobem upleteme i druhý rukáv.

-------------------------------------------------------

ČEPICE - JAK BUDEME POSTUPOVAT:
Pleteme v kruhových řadách na krátké kruhové jehlici, podle potřeby převedeme na ponožkové jehlice.

ČEPICE:
Na krátkou kruhovou jehlici č.2,5 nahodíme tmavě šedou přízí 138-144-150 ok a pleteme v kruhových řadách lem pružným vzorem 1/1, tj. střídáme 1 oko hladce, 1 obrace. Ve výši 4 cm upleteme 1 kruhovou řadu hladce a SOUČASNĚ ujmeme rovnoměrně 26-28-30 ok – viz TIP – PŘIDÁVÁNÍ/UJÍMÁNÍ = 112-116-120 ok.
Pleteninu převedeme na kruhovou jehlici č.3 a pleteme v kruhových řadách vzor A.3 (= 28-29-30 sekvencí vzoru po 4 okách).
V kruhové řadě označené ve schématu A.3 šipkou ujmeme rovnoměrně 1-2-0 oka = 111-114-120 ok. Pokračujeme v pletení vzoru (nyní máme v kruhové řadě 37-38-40 sekvencí vzoru po 3 okách). Po dokončení celé sekvence vzoru A.3 (na výšku) měří díl asi 11 cm (od počáteční nahozené řady).
Dál pleteme lícovým žerzejem a šedou přízí. Ve výši 13-15-17 cm (od počáteční nahozené řady) upleteme 1 kruhovou řadu hladce a SOUČASNĚ ujmeme rovnoměrně 1-4-0 oka = 110-110-120 ok. Pak vložíme do pleteniny 10 značek, vždy po 11-11-12 okách. V následující kruhové řadě ujmeme za každou značkou 1 oko, ujímáme spletením 2 ok hladce (= ujmeme 10 ok). Toto ujímání opakujeme v každé 2. kruhové řadě, celkem 9x – platí pro všechny velikosti (podle potřeby převedeme pleteninu na ponožkové jehlice) = zbývá 20-20-30 ok. V následující kruhové řadě spleteme každá 2 oka hladce = zbývá 10-10-15 ok. Upleteme ještě 1 kruhovou řadu, v níž opět spleteme každá 2 oka hladce = zbývá 5-5-8 ok.
Přízi odstřihneme, protáhneme zbylými oky, stáhneme a zapošijeme. Čepice měří asi 19-21-23 cm.

Schéma

symbols = tmavá šedá
symbols = světlá šedá
symbols = šedá
symbols = černá
symbols = smetanová
symbols = 1x nahodíme mezi 2 oky, nahazujeme základní barvou vzoru; v následující kruhové řadě pleteme nahození za zadní nit, aby se v pletenině netvořily dírky
symbols = kruhová řada s přidáváním/ujímáním
diagram
diagram

Každý náš návod je doprovázen speciálními video-ukázkami, které vás navedou.

Chcete se na něco zeptat? Projděte si seznam nejčastějších otázek (FAQ).

Knitting tension is what determines the final measurements of your work, and is usually measured per 10 x 10 cm. It is provided like so: number of stitches in width x number of rows in height - eg: 19 stitches x 26 rows = 10 x 10 cm.

The knitting tension is very individual; some people knit/crochet loosely while others work tightly. You adjust the knitting tension with the needle size, which is why the suggested needle size is only meant as a guide! You need to adjust this (up or down) to ensure that YOUR knitting tension matches the knitting tension provided in the pattern. If you work with a different knitting tension than provided you will have a different yarn consumption, and your work will have different measurements than what the pattern suggests.

The knitting tension also determines which yarns can replace each other. As long as you achieve the same knitting tension you can replace one yarn with another.

See DROPS lesson: How to measure your tension/gauge

See DROPS video: How to make a gauge tension swatch

The required amount of yarn is provided in grams, eg: 450 g. To calculate how many balls you’ll need you first need to know how many grams are in 1 ball (25g, 50g or 100g). This information is available if you click on the individual yarn quality on our pages. Divide the amount required with the amount of each ball. For example, if each ball is 50g (the most common amount), the calculation will be as follows: 450 / 50 = 9 balls.

The important thing when changing from one yarn to another is that the knitting/crochet tension remains the same. This is so that the measurements of the finished piece will be the same as on the sketch provided. It is easier to achieve the same knitting tension using yarns from the same yarn group. It is also possible to work with multiple strands of a thinner yarn to achieve the knitting tension of a thicker one. Please try our yarn converter. We recommend you to always work a test swatch.

Please NOTE: when changing yarn the garment might have a different look and feel to the garment in the photo, due to individual properties and qualities of each yarn.

See DROPS lesson: Can I use a different yarn than the one mentioned in the pattern?

All our yarns are categorised into yarn groups (from A to F) according to thickness and knitting tension – group A contains the thinnest yarns and group F the thickest. This makes it easier for you to find alternative yarns to our patterns, should you wish to switch yarn. All yarns within the same group have a similar knitting tension and can easily replace each other. However, different yarn qualities have different structures and properties which will give the finished work a unique look and feel.

Click here for an overview of the yarns in each yarn group

At the top of all our patterns you’ll find a link to our yarn calculator, which is a helpful tool should you wish to use a different yarn than suggested. By filling in the yarn quality you wish to replace, the amount (in your size) and number of strands, the calculator will present good alternative yarns with the same knitting tension. Additionally it will tell you how much you’ll require in the new qualities and whether you’ll need to work with multiple strands. Most skeins are 50g (some are 25g or 100g).

If the pattern is worked with multiple colours, every colour will have to be calculated separately. Similarly, if the pattern is worked with several strands of different yarns (for example 1 strand Alpaca and 1 strand Kid-Silk) you will have to find alternatives for each, individually.

Click here to see our yarn calculator

Since different yarns have different qualities and textures we have chosen to keep the original yarn in our patterns. However, you can easily find options among our available qualities by using our yarn calculator, or simply pick a yarn from the same yarn group.

It is possible that some retailers still have discontinued yarns in stock, or that someone has a few skeins at home that they would like to find patterns for.

The yarn calculator will provide both alternative yarn as well as required amount in the new quality.

If you think it's hard to decide what size to make, it can be a good idea to measure a garment you own already and like the size of. Then you can pick the size by comparing those measures with the ones available in the pattern's size chart.

You'll find the size chart at the bottom of the pattern.

See DROPS lesson: How to read size chart

The needle size provided in the pattern serves only as a guide, the important thing is to follow the knitting tension. And since knitting tension is very individual, you will have to adjust the needle size to ensure that YOUR tension is the same as in the pattern – maybe you’ll have to adjust 1, or even 2 needle sizes, up or down to achieve the correct tension. For this, we recommend that you work test swatches.

Should you work with a different knitting tension than the one provided, the measurements of the finished garment might deviate from the measurement sketch.

See DROPS lesson: How to measure your tension/gauge

See DROPS video: How to make a tension/gauge swatch

Working a garment top-down provides more flexibility and room for personal adjustment. For example it is easier to try the garment on while working, as well as making adjustments to length of yoke and shoulder caps.

The instructions are carefully explaining every step, in the correct order. Diagrams are adjusted to the knitting direction and are worked as usual.

The diagram depicts all rows/rounds, and every stitch seen from the right side. It is read from bottom to top, from right to left. 1 square = 1 stitch.

When working back and forth, every other row is worked from the right side and every other row is worked from the wrong side. When working from the wrong side, the diagram will have to be worked reversed: from left to right, knit stitches are purled, purl stitches are knit etc.

When working in the round every round is worked from the right side and the diagram are worked from right to left on all rounds.

See DROPS lesson: How to read knitting diagrams

The diagram depicts all rows/rounds, and every stitch seen from the right side. It is worked from bottom to top, from right to left.

When working back and forth every other row is worked from the right side: from right to left and every other row is worked from the wrong side: from left to right.

When working in the round, every row in the diagram are worked from the right side, from right to left.

When working a circular diagram you start in the middle and work your way outwards, counter clockwise, row by row.

The rows usually start with a given number of chain stitches (equivalent to the height of the following stitch), this will either be depicted in the diagram or explained in the pattern.

See DROPS lesson: How to read crochet diagrams

Instructions for working several diagrams after each other on the same row/round, will often be written like so: “work A.1, A.2, A.3 a total of 0-0-2-3-4 times". This means you work A.1 once, then A.2 is worked once, and A.3 is repeated (in width) the number of times provided for your size – in this case like so: S = 0 times, M = 0 times, L=2 times, XL= 3 times and XXL = 4 times.

The diagrams are worked as usual: begin with the first row in A.1, then work the first row in A.2 etc.

See DROPS lesson: How to read knitting diagrams

See DROPS lesson: How to read crochet diagrams

The total width of the garment (from wrist-to-wrist) will be larger in the larger sizes, despite the actual sleeves being shorter. The larger sizes have longer sleeve caps and wider shoulders, so there will be a good fit in all sizes.

The measurement sketch/schematic drawing provides information regarding the full length of the garment. If it’s a jumper or a jacket the length is measured from the highest point on the shoulder closest to the neckline, and straight down to the bottom of the garment. It is NOT measured from the tip of shoulder. Similarly, the length of yoke is measured from the highest point on the shoulder and down to where yoke is split into body and sleeves.

On a jacket measures are never taken along bands, unless specifically stated. Always measure inside band stitches when measuring the length.

See DROPS lesson: How to read a schematic drawing

Diagrams are often repeated on the round or in height. 1 repeat is the diagram the way it appears in the pattern. If it says to work 5 repeats of A.1 in the round, then you work A.1 a total of 5 times after/next to each other in the round. If it says to work 2 repeats of A.1 vertically/in height you work the entire diagram once, then begin again at the start and work the entire diagram one more time.

Chain stitches are slightly narrower than other stitches and to avoid working the cast-on edge too tight, we simply chain more stitches to begin with. The stitch count will be adjusted on the following row to fit the pattern and measurement sketch.

The rib edge is more elastic and will contract slightly compared to, for example, stocking stitch. By increasing before the rib edge, you avoid a visible difference in width between the rib edge and the rest of the body.

It’s very easy to cast off too tightly, and by making yarn overs while casting off (and simultaneously casting these off) you avoid a too tight cast off edge.

See DROPS video: How to bind off with yarn overs (yo)

To achieve an even increase (or decrease) you can increase on, for example: every 3rd and 4th row alternately, like so: work 2 rows and increase on the 3rd row, work 3 rows and increase on the 4th. Repeat this until the increase is complete.

See DROPS lesson: Increase or decrease 1 st on every 3rd and 4th row alternately

Should you prefer to work in the round instead of back and forth, you may of course adjust the pattern. You’ll need to add steeks mid-front (usually 5 stitches), and follow the instructions. When you would normally turn and work from the wrong side, simply work across the steek and continue in the round. At the end you’ll cut the piece open, pick up stitches to work bands, and cover the cut edges.

See DROPS video: How to knit steeks and cut open

Should you prefer to work back and forth instead of in the round, you may of course adjust the pattern so you work the pieces separately and then assemble them at the end. Divide the stitches for the body in 2, add 1 edge stitch in each side (for sewing) and work the front and back pieces separately.

See DROPS lesson: Can I adapt a pattern for circular needles into straight needles?

Pattern repeats can vary slightly in the different sizes, in order to get the correct proportions. If you’re not working the exact same size as the garment in the photo, yours might deviate slightly. This has been carefully developed and adjusted so that the complete impression of the garment is the same in all sizes.

Make sure to follow instructions and diagrams for your size!

If you have found a pattern you like which is available in women’s size it’s not very difficult to convert it to men’s size. The biggest difference will be the length of sleeves and body. Start working on the women size that you think would fit across the chest. The additional length will be worked right before you cast off for the armhole/sleeve cap. If the pattern is worked top-down you can add the length right after the armhole or before the first decrease on sleeve.

Regarding additional yarn amount, this will depend on how much length you add, but it is better with a skein too many than too few.

All yarns will have excess fibres (from production) that might come off as lint or shedding. Brushed yarns (ie hairier yarns) have more of these loose, excess fibres, causing more shedding.

Shedding also depends on what is worn under or over the garment, and whether this pulls at the yarn fibres. It’s therefore not possible to guarantee that there will be no shedding

Below are some tips on how to get the best result when working with hairier yarns:

1. When the garment is finished (before you wash it) shake it vigorously so the looser hairs come off. NOTE: do NOT use a lint roller, brush or any method that pulls at the yarn.

2. Place the garment in a plastic bag and put it in your freezer - the temperature will cause the fibres to become less attached to each other, and excess fibres will come off easier.

3. Leave in the freezer for a few hours before taking it out and shaking it again.

4. Wash the garment according to the instructions on the yarn label.

Pilling is a natural process that happens to even the most exclusive of fibers. It's a natural sign of wear and tear that is hard to avoid, and that is most visible in high friction areas of your garment like a sweater's arms and cuffs.

You can make your garment look as new by removing the pilling, using a fabric comb or a pill/lint remover.

Pořád se nemůžete dobrat odpovědi, kterou hledáte? Pak posuňte stránku dolů a napište nám svůj dotaz, naši specialisté se vám pokusí poradit. Obvykle to zvládneme během 5 až 10 pracovních dnů..
Mezitím si můžete pročíst otázky a odpovědi, které k tomuto modelu položili ostatní, nebo navštívit skupinu DROPS Workshop na Facebooku, kde vám může poradit některá spřízněná duše!

Mohly by se vám líbit...

Dalvik

Bettina Sundman, Finland

Dalvik

Martina, Czech Republic

Přidejte komentář k návodu DROPS Children 34-18

Rádi bychom věděli, co si o tomto modelu myslíte!

Pokud se chcete na něco zeptat, dbejte prosím na to, abyste ve formuláři níže vybrali správnou kategorii - díky tomu se dříve dozvíte, co potřebujete vědět. Povinná pole jsou označena *.

Komentáře / Otázky (34)

country flag Catherine wrote:

Thank you. I am knitting size 5/6.

04.03.2024 - 16:29

DROPS Design answered:

Dear Catherine, that's right, you first increase at the bottom of each A.1 (3 sts) then work straight until 24th row, increase 2 more times before the round with an arrow = 250 sts, then increase 22 sts evenly on this round = 272 sts. Happy knitting!

05.03.2024 - 09:55

country flag Catherine wrote:

Are there no increases in A1 between row 6 and row 26? I'm a bit worried it won't widen over the shoulders. I'm now on row 11 and have 200 stitches. Is this right?

01.03.2024 - 20:35

DROPS Design answered:

Dear Catherine, could you please indicate which size you are working so that we may check if the amount of stitches at that stage is correct? Here the increases are all accumulated at the start and the end so that the increases won't interrupt the pattern in later rows. So those increases should be enough. Happy knitting!

03.03.2024 - 19:10

country flag Diane wrote:

Bonjour je fais le modèle dalvik j’ai besoin de renseignement quand on commence le diagramme je comprends que je commence par le bas du diagramme jusqu’au haut. Deux choses j’ai comme l’impression que le diagramme donne pas le même motif que sur la photo du modèle et deuxième on spécifie que quand on a terminé le motif avant la flèche sur le diagramme j’ai l’impression que j’aurai plus que 250 mailles . Merci de me venir en aide à une personne qui apprend seule.

10.01.2024 - 21:19

DROPS Design answered:

Bonjour Diane, en taille 5/6 ou 7/8, vous commencez par 125 mailles et tricotez 25 fois le diagramme A.1 (25 x 5 = 125), vous augmentez 5 mailles au total dans chaque A.1 comme indiqué dans le diagramme, ainsi vous avez 10 mailles dans chaque A.1 avant le tour avec la flèche, soit 25 x 10 = 250 mailles, diminuez 22 ou 30 mailles au tour suivant = 272-280 mailles et continuez le diagramme. Bon tricot!

11.01.2024 - 08:03

country flag Tiffany wrote:

The instructions for the back of neck elevation are not corrected in the US English version of the pattern. They are correct in the UK English pattern.

11.11.2023 - 05:51

country flag Riitta-Liisa Alaraasakka wrote:

Malli bm-017-bn (children 34-18) koko 3/4 Silmukkaluvut ovat kaarrokkeen jälkeen väärin, pyydän korjausta!

13.10.2023 - 13:57

DROPS Design answered:

Hei, silmukkaluku näyttää oikealta. Etu- ja takakappaleessa on 164 silmukkaa (38 + 6 + 76 + 6 + 38 s).

18.10.2023 - 16:39

country flag Ann-Gerd Salmonson wrote:

Var finns diagrammet till mönstret?

11.08.2023 - 20:35

DROPS Design answered:

Hej Ann-Gerd, nederst i mönstret ovanför måttskissen :)

16.08.2023 - 11:21

country flag Anne Roget wrote:

Merci pour Le tutoriel "comment tricoter des rayures en rond sans décalage" découvert grâce à votre réponse à Julia le 13.07.21 car je me demande que faire avec les fils qui ne sont pas utilisés par exemple pendant 8 rangs comme le noir. Couper le fil? Ou le faire "monter" : comment? Je propose d'ajouter ce tutoriel aux 8 autres.

06.09.2022 - 18:07

DROPS Design answered:

Bonjour Mme Roget, vous pouvez soit le couper quand les rayures sont trop longues, soit le faire suivre avec les autres couleurs (en les croisant pour éviter des longueurs sur l'envers). On retrouve cette technique dans cette autre vidéo montre comment croiser les fils pour des rayures en rangs, mais on peut procéder de la même façon au changement de tour. Bon tricot!

07.09.2022 - 08:14

country flag Sten-Inge Olsson wrote:

Stickat den tidigare bra modell

22.04.2022 - 20:39

country flag Marcela wrote:

Como hacer este patrón con lana chenilla,y cuánto cantidad necesito y que agujas tengo que usar,se tejer pero nunca eh usado este patrón para jersey nórdico,si eh hecho jackar ,me puedes guiar o dirigirme adónde buscar en tu página???.

12.04.2022 - 20:38

DROPS Design answered:

Hola Marcela, la cantidad y aguja dependerá del grosor del hilo de chenilla que estés usando; tendrás que realizar una muestra y probar aquella que se ajuste más a la indicada en el patrón. Ten en cuenta que chenilla es un hilo más delicado y tenderá a estropearse si se trabaja jacquard de forma prieta, como en este jersey. Puedes consultar en nuestra colección otros patrones con dibujo jacquard trabajado con hilos más gordos, que probablemente sea menos problemático para trabajar con chenilla.

14.04.2022 - 18:22

country flag Christine wrote:

Hallo, ich habe eine dünnere Wolle und möchte diesen Pulli Stricken. Meine Wolle ist für Nadelstärke 2,5 bis 3,5 und die Lauflänge beträgt 410 Meter pro 100 Gramm. Kann ich einfach statt Größe 122/128 (das ist die Größe die ich brauche), die nächste Größe nehmen, also 134/140? Für eine Antwort bin ich wirklich sehr dankbar. Liebe Grüße

09.03.2022 - 20:12

DROPS Design answered:

Liebe Christine, am besten stricken Sie Ihre Maschenprobe und dann können Sie die Anleitung neu umrechnen - gerne wird Ihnen Ihr Wolleladen damit helfen. Viel Spaß beim stricken!

10.03.2022 - 10:10