
Popular categories
Looking for a yarn?


Comments / Questions (210)
![]() Mona Helen Pettersen wrote:
Mona Helen Pettersen wrote:
Hei. Jeg fikk dessverre for lite garn selv om strikkefastheten stemte,
08.05.2023 - 11:55
![]() Elena wrote:
Elena wrote:
I was thinking to do the body with button holes on both front sides instead of having the buttons on the middle front side. Any advice on how I can do that?
28.04.2023 - 12:06DROPS Design answered:
Dear Elena, we don't make custom patterns. You can consult other patterns for newborns in our website to see if any other one matches what you are seeking!
30.04.2023 - 22:07
![]() Susi wrote:
Susi wrote:
Hallo, ich stricke die Größe 0/1. Beim Rumpfteil steht, dass bei einer Länge von 20/33 cm die Arbeit geteilt wird und die Vorder- und das Rückenteil(e) einzeln weiter gestrickt werden/wird. Somit beginnt die Teilung ca. auf der Höhe zwischen dem 2. und 3. Knopfloch. Auf dem zweiten Bild fängt die Teilung beim untersten Loch an, was ja auch das Loch rechtfertigt. Müsste die Teilung nicht bei 10/23 cm anfangen? Wo liegt mein Denkfehler?
17.04.2023 - 21:50DROPS Design answered:
Liebe Susi, die Teilung entsteht kurz vor dem 4. Knopfloch, genauso wie bei dem Foto (siehe 2. Foto), dh ein paar Reihen nach den neuen Maschen für die Ärmel. Viel Spaß beim stricken!
18.04.2023 - 10:10
![]() Mona wrote:
Mona wrote:
Hej! Har ni tips på hur jag kan göra en enkel krage istället för huva?
11.04.2023 - 20:01DROPS Design answered:
Hei Mona. Ta en titt på baby jakker som er strikket med garn fra garngruppe B og se om det er noen krager du syns er pent og som du kan tilpasse heldressen. F.eks enkelt vrangbord (DROPS Baby 45-1), eller en liten krage (DROPS Baby 17-1), eller bare en rillekant (DROPS Extra 0-1143). mvh DROPS Design
17.04.2023 - 11:44
![]() Catherine wrote:
Catherine wrote:
I have just picked up stitches along the neck to start the hood. However, due to picking up the last 11 stitches from the stitch holder, there is a gap between where I should start knitting and where my yarn is from picking up stitches. How do I move the yarn to the beginning of the row to start knitting the hood? Thank you!
03.04.2023 - 09:08DROPS Design answered:
When you pick up the stitches you can put the stitches from the stitch holder on a needle and then knit them. This way there will be no gap between where you start knitting and where the yarn is.
03.04.2023 - 17:05
![]() Maria wrote:
Maria wrote:
Hallo, mich würde interessieren, bei welchem Teil der Arbeit der zunahmetipp 2 zur Anwendung kommt. Wenn ich das in der Beschreibung richtig verstehe wird bei den Beinen ausser bei der größten Größe, nicht zugenommen. Ist das richtig oder bedarf es doch Zunahmen? Vielen Dank
10.03.2023 - 10:14DROPS Design answered:
Liebe Maria, das wird am Anfang der Kapuze benutzt - siehe Absatz KAPUZE. Die Zunahmen bei den Beinen werden nur in 3/4 Jahre gestrickt, es sind ja bei den anderen Grössen keine Zunahmen bei den Beinen. Viel Spaß beim stricken!
10.03.2023 - 13:30
![]() Catharina wrote:
Catharina wrote:
Ik brei 6/9 mnd. Wat ik niet begrijp: Als ik de twee pijpen op de naald heb gezet, begin ik met de 6 steken die extra opgezet zijn. Ik moet dan een kantsteek breien in ribbelsteek. Er blijven dan nog 5 steken over voordat het patroon zich weer hervat in de rechter pijp. Het patroon heeft een even aantal steken (2 r.- 2 av.). Wat doe ik met die ene steek?
06.03.2023 - 11:52DROPS Design answered:
Dag Catharina,
Je breit het patroon zo ver mogelijk door, dat wil zeggen dat je dus nog 1 steek van het patroon breit (dus alsof je het patroon door zou breien)
09.03.2023 - 20:39
![]() Claudi wrote:
Claudi wrote:
Hallo liebes Dropsteam ich habe die Beinchen mit italienischem Maschenanschlag gestrickt in Runden. Ich habe das Video gesehen wie man die Beine auf eine Rundnadel zusammenführt. Hier gibt es aber die zusätzlichen Maschen , vorne und hinten. Wie gehe ich in diesem Fall am besten vor ? Lieben Dank für eure Hilfe und tollen Anleitungen
26.01.2023 - 00:37DROPS Design answered:
Liebe Claudi, bei diesem Modell werden die Beine in Hin- und Rückreihen gestrickt, die zusätzlichen Maschen werden dann am Ende der Hin- dann am Ende der nächsten Rückreihe angeschlagen und alle Maschen stillgelegt. Wenn Sie die Beinen zuerst in Runden stricken möchten, dann sollen Sie nach 12-35 cm (siehe Größe) in Hin- und Rückreihen weiterstricken. Viel Spaß beim stricken!
26.01.2023 - 10:07
![]() Carolin wrote:
Carolin wrote:
Hallo, habe meinen schönen Anzug gewaschen. Jetzt ist er viel größer. Er wirkt fast wie ausgeleiert, obwohl ich sehr fest gestrickt habe? Wie kann das sein? Habe ihn im Wollwaschgang bei 30 Grad und mit Wollwaschmittel gewaschen. Bin für einenAntwort sehr dankbar!
24.01.2023 - 21:53DROPS Design answered:
Liebe Carolin, schauen Sie mal mit Ihrem DROPS Händler, wie Sie den Anzug gewaschen haben, so kann man Ihnen dort gerne - auch per E-Mail oder per Telefon - weiterhelfen.
25.01.2023 - 12:18
![]() Catherine wrote:
Catherine wrote:
I am at the end of the front-right side and gave reached the part where it says "work 1 ridge back and forth over all stitches". What does this mean and does "all stitches" include the ones on the stitches holder? Thank you 😊
21.01.2023 - 15:20DROPS Design answered:
Hi Catherine, 1 ridge is 2 rows of garter stitch (2 knitted rows worked back and forth). This does not include the stitches on the holder. Happy knitting!
22.01.2023 - 08:31
|
|||||||
Truly Wooly#trulywoolyonesie |
|||||||
 |
 |
||||||
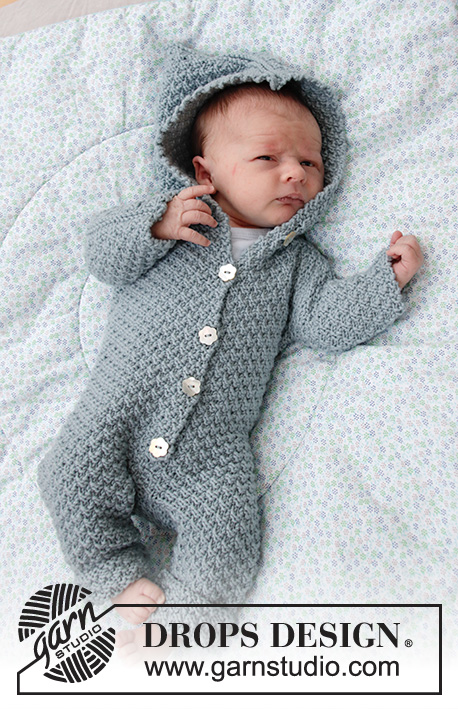
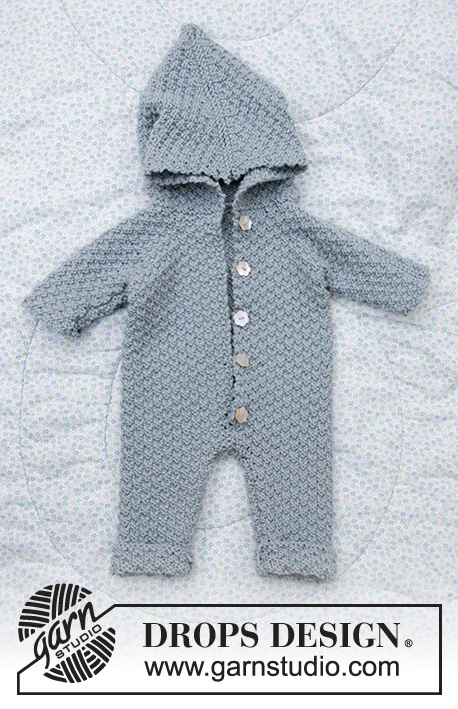
Knitted suit for baby in DROPS Merino Extra Fine. Piece is knitted with textured pattern and hood. Size premature - 4 years
DROPS Baby 33-8 |
|||||||
|
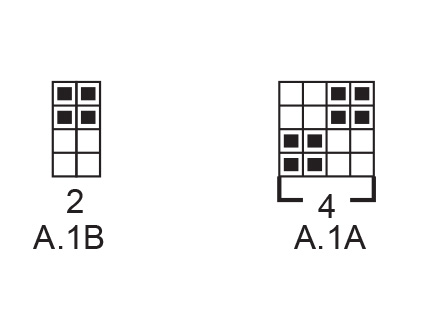
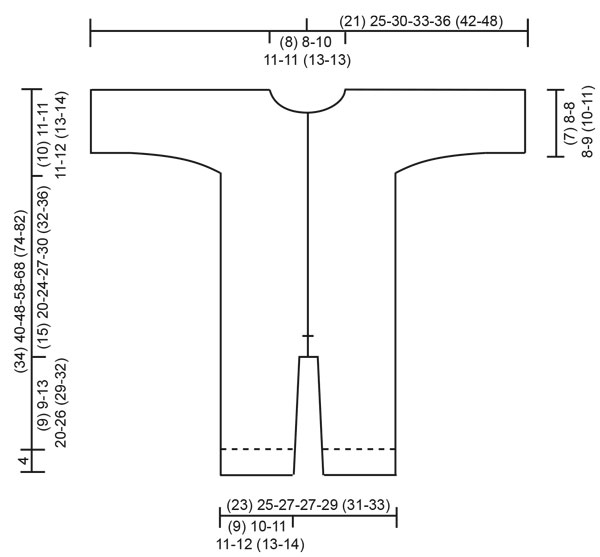
---------------------------------------------------------- EXPLANATION FOR THE PATTERN: ---------------------------------------------------------- GARTER STITCH (back and forth): 1 ridge = knit 2 rows. 1 edge stitch in garter stitch = knit stitch from right side and knit stitch from wrong side. PATTERN: See diagram A.1. Diagrams show all rows in pattern seen from the right side. INCREASE TIP-1: Increase 1 stitch inside 1 edge stitch in garter stitch by making 1 yarn over. On next row work yarn overs twisted to avoid holes. Work the increased stitches in A.1. INCREASE TIP-2 (evenly): To calculate how to increase evenly, use the total number of stitches on row (e.g. 44 stitches) and divide stitches by number of increases to be done (e.g. 14) = 3.1. In this example increase by making 1 yarn over after approx. every 3rd stitch. On next row knit yarn overs twisted to avoid holes. BUTTONHOLES (bottom up): Decrease for buttonholes on right band. 1 BUTTONHOLE = knit third and fourth stitch from edge together and make 1 yarn over. On next row purl or knit yarn over (depending on where in the diagram you are) to make holes. Decrease for buttonholes when piece measures (measured from where legs where put together): (premature): 5, 10, 15 and 20 cm = 2", 4", 6" and 8" 0/1 months: 6, 11, 16, 21 and 26 cm = 2⅜", 4⅜", 6¼", 8¼" and 10¼" 1/3 months: 5, 10, 15, 20, 25 and 30 cm = 2", 4", 6", 8", 9¾" and 11¾" 6/9 months: 6, 12, 17, 22, 27 and 32 cm = 2⅜", 4¾", 6¾", 8¾", 10⅝" and 12½" 12/18 months: 6, 12, 18, 24, 30 and 36 cm = 2⅜", 4¾", 7", 9½", 11¾" and 14¼" 2 years: 9, 15, 21, 27, 33 and 39 cm = 3½", 6", 8¼", 10⅝", 13" and 15¼" 3/4 years: 7, 13, 19, 25, 31, 37 and 43 cm = 2¾", 5⅛", 7½", 9¾", 12¼", 14½" and 17" ---------------------------------------------------------- START THE PIECE HERE: ---------------------------------------------------------- SUIT - SHORT OVERVIEW OF THE PIECE: Work each leg back and forth on circular needle, bottom up. Place legs together and work back and forth on circular needle from mid front up to sleeves. Then cast on new stitches for sleeves in each side and finish front pieces and back piece separately. Sew piece together on the shoulder. Finish by picking up stitches around the neck and work a hood. RIGHT LEG (when suit is worn): Cast on (40) 44-48-48-52 (56-60) stitches on circular needle size 4 MM = US 6 with Merino Extra Fine. Work first row as follows from right side: 1 edge stitch in GARTER STITCH – read explanation above, work A.1A until 3 stitches remain on row (= 9-10-11-11-12 (13-14) repetitions of 4 stitches), work A.1B (= 2 stitches) and finish with 1 edge stitch in garter stitch. Continue pattern like this. REMEMBER THE KNITTING GAUGE! When piece measures 4 cm = 1½", insert 1 marker in piece (marks fold). When piece measures (5) 5-7-8-10 (12-14) cm = (2") 2"-2¾"-3⅛"-4" (4¾"-5½") increase 1 stitch in each side – read INCREASE TIP-1. Repeat increase when piece measures (8) 8-12-18-20 (22-24) cm = (3⅛") 3⅛"-4¾"-7"-8" (8¾"-9½") = (44) 48-52-52-56 (60-64) stitches on needle. Work until piece measures (12) 12-16-23-31 (32-35) cm = (4¾") 4¾"-6¼"-9"-12¼" (12½"-13¾") from cast-on edge, adjust so that next row is worked from right side. Bind off 1 stitch at beginning of the next 2 rows (i.e. bind off edge stitches) = (42) 46-50-50-54 (58-62) stitches. Then work the next 2 rows as follows, begin from right side: Work as before over all stitches and cast on 3 new stitches at the end of row (= mid back). Turn piece, work A.1 as before over all stitches, but make sure to continue pattern correctly, then cast on (4) 4-4-4-4 (4-4) stitches at the end of row from wrong side (= mid front). There are now (49) 53-57-57-61 (65-69) stitches on needle and piece measures approx. (13) 13-17-24-30 (33-36) cm = (5⅛") 5⅛"-6¾"-9½"-11¾" (13"-14¼") from cast-on edge. Put piece aside and work left leg as explained below. LEFT LEG (when suit is worn): Cast on (40) 44-48-48-52 (56-60) stitches on circular needle size 4 MM = US 6 and work first row as follows from right side: 1 edge stitch in garter stitch, work A.1A until 3 stitches remain on row (=9-10-11-11-12 (13-14) repetitions of 4 stitches), work A.1B (= 2 stitches) and finish with 1 edge stitch in garter stitch. Continue pattern like this. When piece measures 4 cm = 1½", insert 1 marker in piece (marks fold). When piece measures (5) 5-7-8-10 (12-14) cm = (2") 2"-2¾"-3⅛"-4" (4¾"-5½") increase 1 stitch in each side – remember INCREASE TIP-. Repeat increase when piece measures (8) 8-12-18-20 (22-24) cm = (3⅛") 3⅛"-4¾"-7"-8" (8¾"-9½") = (44) 48-52-52-56 (60-64) stitches on needle. Work until piece measures (12) 12-16-23-31 (32-35) cm = (4¾") 4¾"-6¼"-9"-12¼" (12½"-13¾") from cast-on edge, adjust so that next row is worked from right side. Bind off 1 stitch at beginning of the next 2 rows (i.e. bind off edge stitches) = (42) 46-50-50-54 (58-62) stitches. Then work the next 2 rows as follows, begin from right side: Work as before over all stitches and cast on 4 new stitches at the end of row (= mid front). Turn piece, work A.1 as before over all stitches, but make sure to continue pattern correctly, then cast on 3 stitches at the end of row from wrong side (= mid back). There are now (49) 53-57-57-61 (65-69) stitches on needle and piece measures approx. (13) 13-17-24-30 (33-36) cm = (5⅛") 5⅛"-6¾"-9½"-11¾" (13"-14¼") from cast-on edge. Cut the yarn. Now place the parts together as explained below. BODY: Place right leg and left leg on same circular needle with right leg first. Begin from right side on right leg, work 1 edge stitch in garter stitch, continue A.1 as before over the remaining stitches on right leg (make sure to continue pattern correct according to finish on leg), then continue pattern over the first (48) 52-56-56-60 (64-68) stitches on left leg (make sure to continue pattern correct) and finish with 1 edge stitch in garter stitch = (98) 106-114-114-122 (130-138) stitches on needle. Insert another marker in piece! NOW MEASURE PIECE FROM THIS MARKER! Continue A.1 back and forth with 1 edge stitch in garter stitch in each side towards mid front. When piece measures (3) 3-3-3-4 (5-5) cm = (1⅛") 1⅛"-1⅛"-1⅛"-1½" (2"-2") from marker (adjust to work next row from right side) bind off 1 stitch at beginning of the next 2 rows (i.e. bind off edge stitches). Then work the next 2 rows as follows, begin from right side: Work as before over all stitches and cast on 4 new stitches at the end of row (= left band at the front). Turn piece, work A.1 as before over all stitches (make sure to continue pattern correctly) and cast on 4 new stitches at the end of row from wrong side (= right band at the front). There are now (104) 112-120-120-128 (136-144) stitches on needle. Continue A.1 back and forth over all stitches (i.e. do not work edge stitches in garter stitch). Remember BUTTONHOLES on right band - read explanation above. When piece measures (15) 20-24-27-30 (32-36) cm = (6") 8"-9½"-10⅝"-11¾" (12½"-14¼") from the new marker, i.e. (28) 33-41-51-60 (65-72) cm = (11") 13"-16⅛"-20"-23⅝" (25½"-28⅜") from cast-on edge, divide the piece in each side. Finish front pieces and back piece separately as explained below. RIGHT FRONT PIECE: Begin from right side and work as before over the first (27) 29-31-31-33 (35-37) stitches, then cast on (7) 13-13-17-17 (21-25) new stitches for sleeve. Slip the remaining stitches on 1 stitch holder for back piece and left front piece. Continue A.1 back and forth as before but make sure that pattern fits over all stitches. AT THE SAME TIME cast on (6) 7-11-12-14 (18-21) new stitches for sleeve at the end of the next 2 rows from right side = (46) 56-66-72-78 (92-104) stitches on needle. Continue pattern back and forth over all stitches until piece measures (22) 28-32-35-38 (41-45) cm = (8¾") 11"-12½"-13¾"-15" (16⅛"-17¾") from marker, i.e. (35) 41-49-59-68 (74-81) cm = (13¾") 16⅛"-19¼"-23¼"-26¾" (29⅛"-32") from cast-on edge. At the beginning of next row from right side slip the first (8) 8-9-11-11 (12-12) stitches on 1 stitch holder for neck but to avoid cutting the yarn work them before slipping them on the stitch holder. Continue pattern back and forth as before and bind off for neck at the beginning of every row from mid front as follows: Bind off 2 stitches 1 time and 1 stitch (1) 1-2-2-2 (3-3) times = (35) 45-53-57-63 (75-87) stitches remain on needle. Then work until the entire suit measures approx. (24) 30-34-37-41 (44-49) cm = (9½") 11¾"-13⅜"-14½"-16⅛" (17¼"-19¼") from marker, i.e. (37) 43-51-61-71 (77-85) cm = (14½") 17"-20"-24"-28" (30⅜"-33½") from cast-on edge, but adjust so that next row is worked from right side. Work 1 ridge back and forth over all stitches. Then bind off by knitting from the right side. The entire suit measures approx. (38) 44-52-62-72 (78-86) cm = (15") 17¼"-20½"-24⅜"-28⅜" (30¾"-33⅞") from cast-on edge. Now work back piece as explained below. BACK PIECE: Slip the first (50) 54-58-58-62 (66-70) stitches on stitch holder (seen from right side) on circular needle size 4 MM = US 6 and continue A.1 back and forth over these stitches as before. AT THE SAME TIME cast on new stitches for sleeves at the end of every row in each side as follows: Cast on (7) 13-13-17-17 (21-25)stitches 1 time in each side and then (6) 7-11-12-14 (18-21) stitches 2 times in each side = (88) 108-128-140-152 (180-204) stitches on needle. Continue pattern back and forth over all stitches until piece measures (23) 29-33-36-40 (43-48) cm = (9") 11⅜"-13"-14¼"-15¾" (17"-19") from marker). On next row bind off the middle (14) 14-18-22-22 (26-26) stitches for neck and finish each shoulder/sleeve separately. Then bind off 2 stitches on next row from neck = (35) 45-53-57-63 (75-87) stitches remain on needle for shoulder/sleeve. Then work until the entire suit measures approx. (24) 30-34-37-41 (44-49) cm = (9½") 11¾"-13⅜"-14½"-16⅛" (17¼"-19¼") from marker, but adjust according to front piece and make sure that next row is from right side. Work 1 ridge back and forth over all stitches. Then bind off by knitting from the right side. Work the other shoulder/sleeve the same way. Then work left front piece as explained below. LEFT FRONT PIECE: Slip the remaining (27) 29-31-31-33 (35-37) stitches on stitch holder back on needle size 4 MM = US 6. Begin from right side and continue A.1 back and forth as before. AT THE SAME TIME cast on new stitches for sleeve at the end of the next 3 rows from wrong side as follows: Cast on (7) 13-13-17-17 (21-25) stitches 1 time and then (6) 7-11-12-14 (18-21) stitches 2 times = (46) 56-66-72-78 (92-104) stitches on needle. Continue pattern back and forth over all stitches until piece measures (22) 28-32-35-36 38 (41-45) cm = (8¾") 11"-12½"-13¾"-14¼" 15" (16⅛"-17¾") from marker, i.e. (35) 41-49-59-68 (74-81) cm = (13¾") 16⅛"-19¼"-23¼"-26¾" (29⅛"-32") from cast-on edge. At the beginning of next row from wrong side slip the first (8) 8-9-11-11 (12-12) stitches on 1 stitch holder for neck but to avoid cutting the yarn work them before slipping them on the stitch holder. Continue pattern back and forth as before and bind off for neck at the beginning of every row from mid front as follows: Bind off 2 stitches 1 time and 1 stitch (1) 1-2-2-2 (3-3) times = (35) 45-53-57-63 (75-87) stitches remain on needle. Then work until the entire suit measures approx. (24) 30-34-37-41 (44-49) cm = (9½") 11¾"-13⅜"-14½"-16⅛" (17¼"-19¼") from marker, i.e. (37) 43-51-61-71 (77-85) cm = (14½") 17"-20"-24"-28" (30⅜"-33½") from cast-on edge, but measure so that next row is worked from right side. Work 1 ridge back and forth over all stitches. Then bind off by knitting from the right side. The entire suit measures approx. (38) 44-52-62-72 (78-86) cm = (15") 17¼"-20½"-24⅜"-28⅜" (30¾"-33⅞") from cast-on edge. ASSEMBLY: Sew shoulder seams inside bind-off edges. Sew the seams under the sleeve. Sew seam on inside of both legs inside 1 edge stitch in each side. Sew seam mid front from bottom of band and down inside 1 edge stitch in each side. Sew together the opening between the legs. Fold the end of legs at the marker. Sew the buttons on to the left band. HOOD: Pick up from right side approx. 44 to 70 stitches around the neck (including stitches on stitch holders at the front). Knit 1 row from wrong side while increasing evenly to (58) 70-74-74-78 (86-86) stitches – read INCREASE TIP-2. Knit 1 row from right side and knit 1 row from wrong side. Work next row as follows from right side: Work A.1A until 2 stitches remain on needle and finish with A.1B (= 2 stitches). Continue pattern like this until piece measures (17) 18-19-20-21 (22-23) cm = (6¾") 7"-7½"-8"-8¼" (8¾"-9") from ridge in the neck, but adjust so that next row is from right side. Work 1 ridge back and forth over all stitches. Then bind off by knitting from the right side. Place the hood double and sew seam at the top inside bind-off edge. |
|||||||
Diagram explanations |
|||||||
|
|||||||
 |
|||||||
 |
|||||||
Have you finished this pattern?Tag your pictures with #dropspattern #trulywoolyonesie or submit them to the #dropsfan gallery. Do you need help with this pattern?You'll find 27 tutorial videos, a Comments/Questions area and more by visiting the pattern on garnstudio.com. © 1982-2026 DROPS Design A/S. We reserve all rights. This document, including all its sub-sections, has copyrights. Read more about what you can do with our patterns at the bottom of each pattern on our site. |
|||||||


With over 40 years in knitting and crochet design, DROPS Design offers one of the most extensive collections of free patterns on the internet - translated to 17 languages. As of today we count 325 catalogs and 12298 patterns - 12288 of which are translated into English (US/in).
We work hard to bring you the best knitting and crochet have to offer, inspiration and advice as well as great quality yarns at incredible prices! Would you like to use our patterns for other than personal use? You can read what you are allowed to do in the Copyright text at the bottom of all our patterns. Happy crafting!
Post a comment to pattern DROPS Baby 33-8
We would love to hear what you have to say about this pattern!
If you want to leave a question, please make sure you select the correct category in the form below, to speed up the answering process. Required fields are marked *.