
Looking for a yarn?


Comments / Questions (152)
![]() Janine wrote:
Janine wrote:
Werden ab dem Muster A3 die Maschen der Rückreihen gestrickt wie man sie sieht? Die Umschlag verstehe ich dass man sie rechts strickt um ein Loch zu erhalten.
26.05.2025 - 22:02DROPS Design answered:
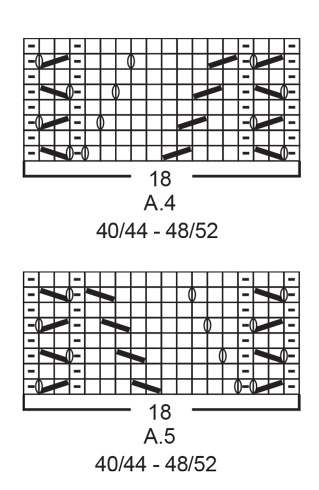
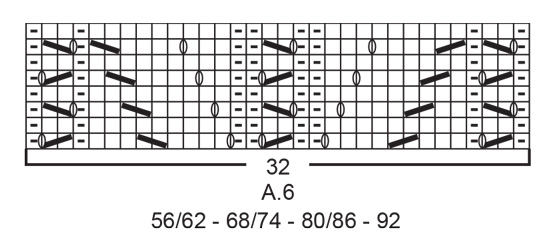
Liebe Janine, also ja, bei A.3 wird man die Maschen bei den Rückreihen stricken, wie sie erscheinen, so wird das doppelte Perlmuster gestrickt (siehe auch Video); nur die schwarze Umschläge (in A.1 und A.2) werden verschränkt gestrickt, damit keine Löcher entstehen; die Umschläge bei A.4, A.5 und A.6 sollen Löcher für das Lochmuster bilden. Viel Spaß beim Stricken!
27.05.2025 - 09:13
![]() Terrie wrote:
Terrie wrote:
I am working 1-3 months. Do I work all 8 rows of A6 and then work one row A2 and repeat A6 (8 rows) A2 1 row?
19.04.2025 - 22:35DROPS Design answered:
Dear Terrie, you only work both rows of A.2 at the very beginning of the section, once. Then you start the pattern with A.3 and A.6. When you work the ALL SIZES section, you only continue with A.3 and A.6, not A.2. Happy knitting!
21.04.2025 - 00:33
![]() Maria Aparecida wrote:
Maria Aparecida wrote:
Bom dia,\r\npor que não tricotar frente e costas juntos?\r\nassim diminui a quantidade de costuras.\r\nestou pensando em tentar assim, há algo que eu não estou percebendo agora?
16.01.2025 - 13:31
![]() Jessica wrote:
Jessica wrote:
Ich bin verwirrt. Man soll für Größe 1/3 Monate 68 Maschen anschlagen. Jetzt sind die 4cm gestrickt für das Vorderteil und es wird nur noch von 26 bzw. 32 Maschen gesprochen. Kann mir das bitte jemand erklären? Dankeschön
03.12.2024 - 23:58DROPS Design answered:
Liebe Jessica, so stricken Sie diese 68 Maschen: 1 Randmasche Krausrechts, A.2 (=26 M), 14 M links, A.2 (26 M), 1 Randmasche Krausrechts (=1+26+14+26+1=68); bei der 1. Reihe A.2 wird man 6 Maschen zunehmen, so sind es 32 M in jedem A.2= 1+32+14+32+1=80 Maschen. Bei der nächsten Hinreihe stricken Sie A.6 über A.2. Viel Spaß beim Stricken!
04.12.2024 - 08:00
![]() Floriane wrote:
Floriane wrote:
Je viens de trouver la réponse à la question que j'ai postée à l'instant en tombant sur votre page "lire les diagrammes de tricot". Pour celles et ceux qui se poseraient également la question : sur l'envers, comme on tricote en allers-retous, lire le diagramme de gauche à droite.
15.11.2024 - 23:24
![]() Floriane wrote:
Floriane wrote:
Bonjour, Je viens de commencer à tricoter ce modèle en taille 1/3 mois. Arrivée à l'étape "toutes les tailles" (répétition de A6), je m'interroge : pour les rangs envers (lignes 2, 4, 6 et 8 du diagramme), dois-je lire le diagramme de gauche à droite ou dois-je le lire traditionnellement de droite à gauche ? Merci pour votre aide, Floriane
15.11.2024 - 23:19DROPS Design answered:
Bonjour Floriane, sur l'envers, lisez les diagrammes de gauche à droite; retrouvez ici plus d'infos sur les diagrammes. Bon tricot!
18.11.2024 - 07:24
![]() Sylvie Cloutier wrote:
Sylvie Cloutier wrote:
Toutes tailles: quand vous dites continuer ainsi, on refait tous le paragraphe avec les augmentations et tout
13.11.2024 - 22:22DROPS Design answered:
Bonjour Mme Cloutier, vous continuez le point fantaisie indiqué auparavant pour la taille concernée, autrement dit, comme indiqué dans le 2ème paragraphe "Tricoter le rang suivant sur l'endroit ainsi"; jusqu'à c que l'ouvrage mesure 16 à 38 cm. Bon tricot!
18.11.2024 - 09:01
![]() Claudia wrote:
Claudia wrote:
Wunderschön, Anleitung funktioniert super, die Wolle ist herrlich weich und kratzt nicht. Nach dem Waschen (Handwäsche mit Wollwaschmittel, liegend getrocknet ) war das Strickstück allerdings deutlich länger (ca 8 cm) als davor. Nicht schlimm, aber evtl. mitbedenken,
13.09.2024 - 07:01
![]() Kathrin wrote:
Kathrin wrote:
Guten Morgen, ich hätte gern genau dieses graugrün bestellt, finde aber die Farbe gar nicht in der Auswahl? gibt es diese nicht in der Merino extra fine? Vielen Dank
09.09.2024 - 08:46DROPS Design answered:
Liebe Kathrin, die Farbe Nr 15 gibt es immer noch für Merino Extra Fine, nur der Name wurde verändert. Viel Spaß beim Stricken!
09.09.2024 - 11:08
![]() Chantal Larcheveque wrote:
Chantal Larcheveque wrote:
Est-il possible de tricoter le modèle de nid d’ange ci-dessus avec des aiguilles droites et pouvez-vous me donner les explications dans ce sens Me Chantal Larchevêque
04.09.2024 - 10:28DROPS Design answered:
Bonjour Mme Larcheveque, on tricote ici en allers et retours sur aiguille circulaire pour avoir suffisamment de place pour y loger toutes les mailles, vous pouvez donc utiliser des aiguilles droites, vos mailles seront juste plus serrées - retrouvez plus d'infos ici. Bon tricot!
05.09.2024 - 08:37
|
|||||||||||||||||||
Cable Snooze#cablesnoozebuntingbag |
|||||||||||||||||||
 |
 |
||||||||||||||||||
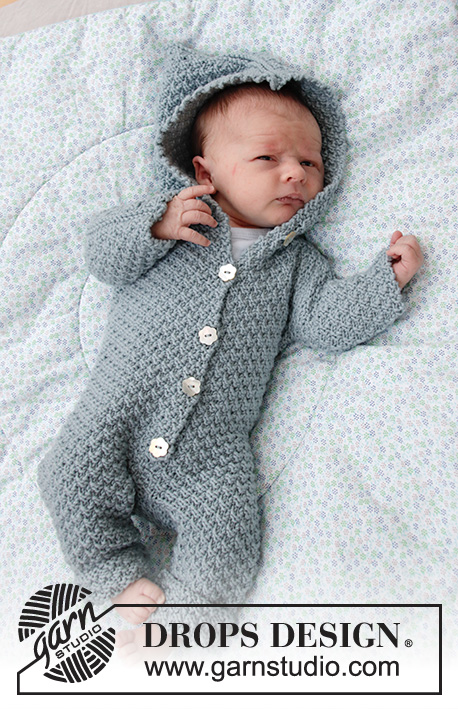
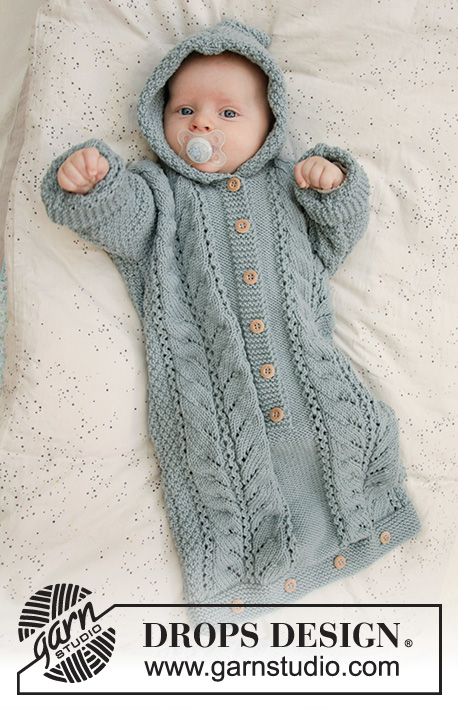
Knitted bag for babies in DROPS Merino Extra Fine. The piece is worked with lace pattern, double moss stitch and hood. Sizes premature – 2 years.
DROPS Baby 33-7 |
|||||||||||||||||||
|
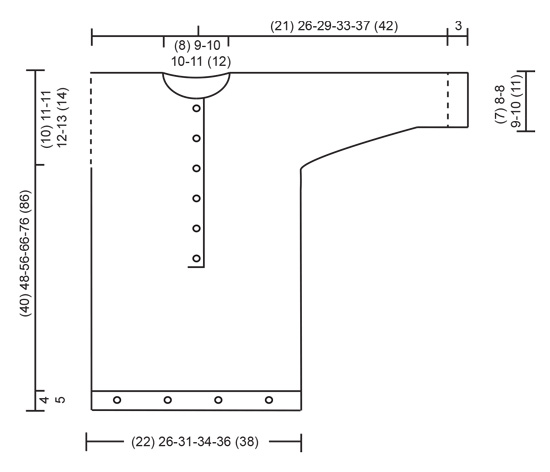
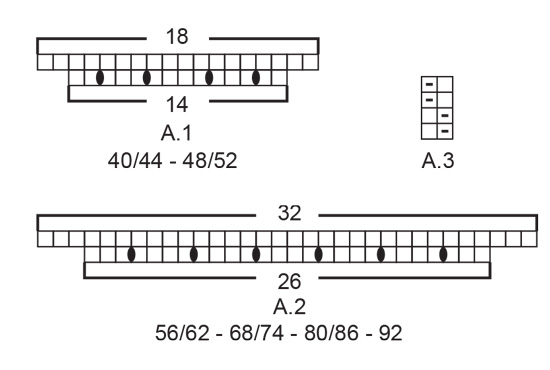
------------------------------------------------------- EXPLANATIONS FOR THE PATTERN: ------------------------------------------------------- RIDGE/GARTER STITCH (worked back and forth): 1 ridge = Knit 2 rows. PATTERN: Sizes (<0) 0/1 month: See diagrams A.1, A.3, A.4 and A.5. Sizes 1/3 - 6/9 - 12/18 months (2) years: See diagrams A.2, A.3 and A.6. The diagrams show all the rows in the pattern seen from the right side. BUTTONHOLE-1 (for bottom of bag): 1 BUTTONHOLE = knit 2 together, make 1 yarn over. On the next round knit the yarn over to leave a hole. The other (4) 4-4-5-5 (5) buttonholes are worked evenly spaced with approx. (4½) 5-6-5½-6 (6) cm = (1¾") 2"-2⅜"-2⅛"-2⅜" 2⅜" between each. BUTTONHOLE-2 (for band mid front): Work buttonholes on the right band working from the right side. 1 BUTTONHOLE = knit together the 3rd and 4th stitch from the edge, make 1 yarn over. On the next row (wrong side) knit the yarn over to leave a hole. Work buttonholes when the band measures (measured from the marker): (<0) months: 2, 8, 14 and 20 cm = ¾", 3⅛", 5½" and 8" 0/1 month: 2, 8, 14, 20 and 26 cm = ¾", 3⅛", 5½", 8" and 10¼" 1/3 months: 2, 7, 13, 18, 24 and 29 cm = ¾", 2¾", 5⅛", 7", 9½" and 11⅜" 6/9 months: 2, 9, 16, 23, 29 and 35 cm = ¾", 3½", 6¼", 9", 11⅜" and 13¾" 12/18 months: 2, 8, 14, 20, 26, 32 and 38 cm = ¾", 3⅛", 5½", 8", 10¼", 12½" and 15" (2) years: 2, 8, 15, 21, 28, 34 and 41 cm = ¾", 3⅛", 6", 8¼", 11", 13⅜" and 16⅛" ------------------------------------------------------- START THE PIECE HERE: ------------------------------------------------------- BAG - SHORT OVERVIEW OF THE PIECE: The piece is worked back and forth with circular needle in 2 parts. You cast on stitches in each side for the sleeves. The piece is sewn together on the shoulders/mid top of sleeves and under sleeves. You work a hood to finish. FRONT PIECE: Cast on (48) 56-68-74-78 (82) stitches (including 1 edge stitch in each side) with circular needle size 4 mm = US 6 and Merino Extra Fine. Work GARTER STITCH – read description above. When the piece measures (2) 2-2-2½-2½ (2½) cm= (3/4") ¾"-¾"-1"-1" (1") work (4) 4-4-5-5 (5) buttonholes evenly spaced – read BUTTONHOLE-1. Continue with garter stitch until the piece measures (4) 4-4-5-5 (5) cm = (1½") 1½"-1½"-2"-2" (2"). The next row is worked as follows from the right side: SIZES (<0) 0/1 MONTH: 1 edge stitch in garter stitch, purl (2) 6 stitches, A.1 (= 14 stitches which increase to 18 stitches), purl (14) 14 stitches, A.1 (= 14 stitches which increase to 18 stitches), purl (2) 6 stitches and finish with 1 edge stitch in garter stitch = (56) 64 stitches on the row. Purl 1 row from the wrong side (edge stitches worked in garter stitch). The next row is worked as follows from the right side: 1 edge stitch in garter stitch, A.3 over the first (2) 6 stitches, A.4 (= 18 stitches), purl (14) 14 stitches, A.5 (= 18 stitches), A.3 over the next (2) 6 stitches and finish with 1 edge stitch in garter stitch. Then work as described under ALL SIZES! SIZES 1/3 - 6/9 - 12/18 MONTHS (2) YEARS: 1 edge stitch in garter stitch, purl 0-2-4 (6) stitches, work A.2 (= 26 stitches which increase to 32 stitches), purl 14-16-16 (16) stitches, A.2 (= 26 stitches which increase to 32 stitches), purl 0-2-4 (6) stitches and finish with 1 edge stitch in garter stitch = 80-86-90 (94) stitches. Purl 1 row from the wrong side (edge stitches worked in garter stitch). The next row is worked as follows from the right side: 1 edge stitch in garter stitch, work A.3 over the first 0-2-4 (6) stitches, A.6 (= 32 stitches), purl 14-16-16 (16) stitches, A.6 (= 32 stitches), A.3 over the next 0-2-4 (6) stitches and finish with 1 edge stitch in garter stitch. Then work as described under ALL SIZES! ALL SIZES: Continue this pattern. REMEMBER THE KNITTING GAUGE! When the piece measures (16) 18-22-26-32 (38) cm = (6¼") 7"-8¾"-10¼"-12½" (15") – adjust so that the next row is worked from the right side, divide the piece mid front and each side is finished separately. Cut the strand. Place the first (25) 29-37-40-42 (44) stitches, seen from the right side, on 1 thread (= left front piece). There are now (31) 35-43-46-48 (50) stitches left on needle for right front piece. RIGHT FRONT PIECE: = (31) 35-43-46-48 (50) stitches. Insert 1 marker in the piece - will be used to measure the positions of the buttonholes. Start from the right side and continue pattern as before, but the outermost 6 stitches towards mid front are worked in garter stitch (= band). Work buttonholes on the right band – read BUTTONHOLE-2. AT THE SAME TIME when the piece measures (30) 37-45-54-63 (72) cm = (11¾") 14½"-17¾"-21¼"-24¾" (28⅜") from the cast-on edge cast on stitches for the sleeve at the end of each row from the right side (i.e. towards the side) as follows: Cast on (4) 6-6-7-9 (12) stitches a total of 3 times and then (14) 15-16-17-18 (18) stitches 1 time = (57) 68-77-84-93 (104) stitches on the needle (the new stitches are worked into A.3 as you go). When all stitches are cast on continue with pattern as before, but the outermost 12 stitches on the sleeve are worked in garter stitch (= turn-up). Continue working until the piece measures (37) 45-52-62-71 (81) cm = (14½") 17¾"-20½"-24⅜"-28" (32"). You should now have worked approx. 1 cm = ⅜" after the last buttonhole on the band, but adjust so that the next row is worked from the right side. On the next row (right side) place the outermost (7) 8-9-10-10 (11) stitches towards mid front on 1 thread for neck, but to avoid having to cut the strand, work the stitches before placing them on the thread. Continue the pattern as before. Then bind off for the neck at the beginning of each row from the neck as follows: Bind off 2 stitches 1 time and then 1 stitch (2) 2-2-2-3 (3) times = (46) 56-64-70-78 (88) stitches left on needle for shoulder/sleeve. Continue the pattern as before until the piece measures (39) 47-55-65-75 (85) cm = (15¼") 18½"-21⅝"-25½"-29½" (33½"), but adjust so that the next row is worked from the right side. Knit 1 row from the right side and at the same time decrease (4) 4-6-6-6-6 (6) stitches evenly over A.5/A.6 = (42) 52-58-64-72 (82) stitches on the row. Knit 1 row from the wrong side. Bind off with knit from the right side, but make sure that the bind-off edge is not tight. The piece measures approx. (40) 48-56-66-76 (86) cm = (15¾") 19"-22"-26"-30" (33⅞") from the cast-on edge. Work the left front piece as described below. LEFT FRONT PIECE: Place the (25) 29-37-40-42 (44) stitches from the strand back on the circular needle. Start from the right side and continue pattern as before. AT THE SAME TIME, at the end of the first row, knit up 6 new stitches behind the right band, i.e. knit up 1 stitch in each of the 6 band stitches = (31) 35-43-46-48 (50) stitches on needle. Continue pattern as before, but the outermost 6 stitches towards mid front are worked in garter stitch (= band – NOTE: do not work buttonholes on left band). AT THE SAME TIME when the piece measures (30) 37-45-54-63 (72) cm = (11¾") 14½"-17¾"-21¼"-24¾" (28⅜") cast on new stitches for the sleeve at the end of each row from the wrong side (i.e. towards the side) as follows: Cast on (4) 6-6-7-9 (12) stitches a total of 3 times and then (14) 15-16-17-18 (18) stitches 1 time = (57) 68-77-84-93 (104) stitches on the needle (the new stitches are worked into A.3 as you go). When all stitches are cast on continue pattern as before, but the outermost 12 stitches on the sleeve are worked in garter stitch = turn up). Continue until the piece measures approx. (37) 45-52-62-71 (81) cm = (14½") 17¾"-20½"-24⅜"-28" (32") - adjust to match the right front piece and so that the next row is worked from the wrong side. On the next row (wrong side) place the outermost (7) 8-9-10-10 (11) stitches towards mid front on a thread for the neck, but to avoid having to cut the strand, work the stitches before placing them on the thread. Continue the pattern as before. Then bind off for the neck at the beginning of each row from the neck as follows: Bind off 2 stitches 1 time and then 1 stitch (2) 2-2-2-3 (3) times = (46) 56-64-70-78 (88) stitches left on shoulder/sleeve. Continue pattern as before until the piece measures (39) 47-55-65-75 (85) cm = (15¼") 18½"-21⅝"-25½"-29½" (33½"), but adjust so that the next row is from the right side. Knit 1 row from the right side and decrease at the same time (4) 4-6-6-6 (6) stitches evenly over A.4 = (42) 52-58-64-72 (82) stitches on needle. Knit 1 row from the wrong side. Bind off with knit from the right side, but make sure that the bind-off edge is not tight. The piece measures approx. (40) 48-56-66-76 (86) cm = (15¾") 19"-22"-26"-30" (33⅞"). Work the back piece as described below. BACK PIECE: Cast on (48) 56-68-74-78 (82) stitches and work garter stitch for (4) 4-4-5-5 (5) cm = (1½") 1½"-1½"-2"-2" (2"). Work 2 rows stockinette stitch with 1 edge stitch in garter stitch in each side. The next row is worked as follows from the right side: 1 edge stitch in garter stitch, work A.3 until there is 1 stitch left on the row and finish with 1 edge stitch in garter stitch. Continue this pattern. When the piece measures (30) 37-45-54-63 (72) cm (12¼") 14½"-17¾"-21¼"-23¾" (28 3/(") cast on new stitches for the sleeves at the end of each row on each side as follows: Cast on (4) 6-6-7-9 (12) stitches a total of 3 times on each side and then (14) 15-16-17-18 (18) stitches 1 time on each side = (100) 122-136-150-168 (190) stitches on the row (the new stitches are worked into A.3 as you go). When all stitches are cast on continue with A.3 as before, but the outermost 12 stitches on both sleeves are worked in garter stitch (= turn up). When the piece measures (38) 46-54-64-74 (84) cm = (15") 18"-21¼"-25¼"-29⅛" (33") bind off the middle (12) 14-16-18-20 (22) stitches for neck. Then bind off 2 stitches on the next row from the neck = (42) 52-58-64-72 (82) stitches left on needle for shoulder/sleeve. Continue pattern as before until there is 1 cm = ⅜" left before the piece measures (40) 48-56-66-76 (86) cm = (15¾") 19"-22"-26"-30" (33⅞"), but adjust so that the next row is worked from the right side. Knit 1 row from the right side and knit 1 row from the wrong side. Bind off with knit from the right side, but make sure that the bind-off edge is not tight. Work the other shoulder in the same way. ASSEMBLY: Sew shoulder/top of sleeve seams inside the bind-off edge. Sew under-sleeve seams and side seams inside the 1 edge stitch. Turn up the bottom 3 cm = 1⅛" on each sleeve and fasten with a couple of small stitches on each side. Sew buttons onto bottom of bag (the buttons are sewn along the middle of the garter stitch edge on the back piece but on the wrong side so that they are buttoned through the buttonholes on the front piece). Sew the remaining buttons to the left band. HOOD: Knit up from the right side approx. 52 to 72 stitches around the neck (including the stitches from the threads in front) with circular needle size 4 mm = US 6 and Merino Extra Fine. Knit 1 row from the wrong side. Then knit 1 row from the right side, where you increase evenly on row until you have a total of (68) 76-84-88-92 (96) stitches. Work A.3 back and forth over all stitches - AT THE SAME TIME cast on 6 new stitches at the end of the next 2 rows for the folding edge = (80) 88-96-100-104 (108) stitches. Continue with A.3 over all stitches until the hood measures approx. (18) 19-20-21-22 (23) cm = (7") 7½"-8"-8¼"-8¾" (9"). Knit 1 row from the right side and knit 1 row from the wrong side. Bind off with knit from the right side. Fold the hood double and sew together at the top, inside the bind-off edge. Fold the 6 outermost stitches on each side to the right side and sew down to the neck with small, neat stitches. |
|||||||||||||||||||
Diagram explanations |
|||||||||||||||||||
|
|||||||||||||||||||
|
|||||||||||||||||||
|
|||||||||||||||||||
|
|||||||||||||||||||
|
|||||||||||||||||||
Have you finished this pattern?Tag your pictures with #dropspattern #cablesnoozebuntingbag or submit them to the #dropsfan gallery. Do you need help with this pattern?You'll find 27 tutorial videos, a Comments/Questions area and more by visiting the pattern on garnstudio.com. © 1982-2025 DROPS Design A/S. We reserve all rights. This document, including all its sub-sections, has copyrights. Read more about what you can do with our patterns at the bottom of each pattern on our site. |
|||||||||||||||||||


With over 40 years in knitting and crochet design, DROPS Design offers one of the most extensive collections of free patterns on the internet - translated to 17 languages. As of today we count 314 catalogs and 11822 patterns - 11812 of which are translated into English (US/in).
We work hard to bring you the best knitting and crochet have to offer, inspiration and advice as well as great quality yarns at incredible prices! Would you like to use our patterns for other than personal use? You can read what you are allowed to do in the Copyright text at the bottom of all our patterns. Happy crafting!
Post a comment to pattern DROPS Baby 33-7
We would love to hear what you have to say about this pattern!
If you want to leave a question, please make sure you select the correct category in the form below, to speed up the answering process. Required fields are marked *.