
Popular categories
Looking for a yarn?


|
|||||||
Truly Wooly |
|||||||
 |
 |
||||||
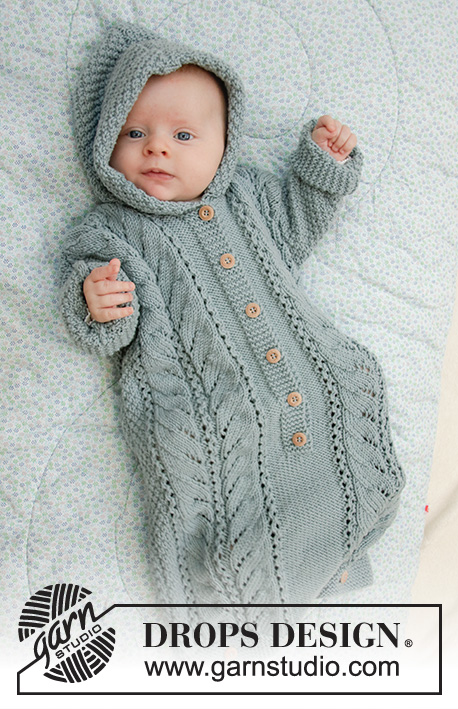
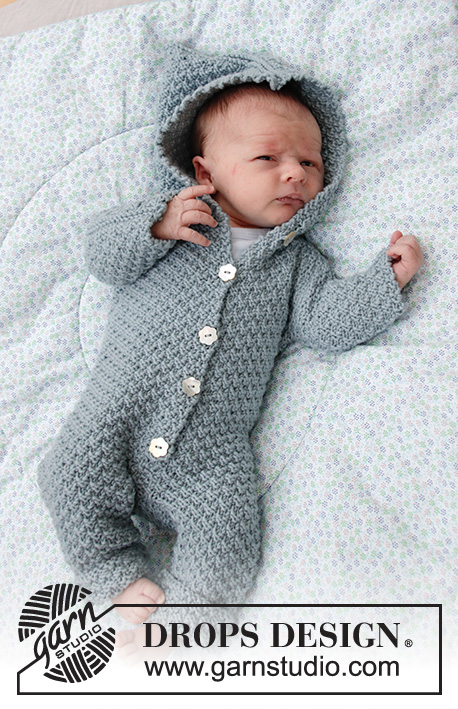
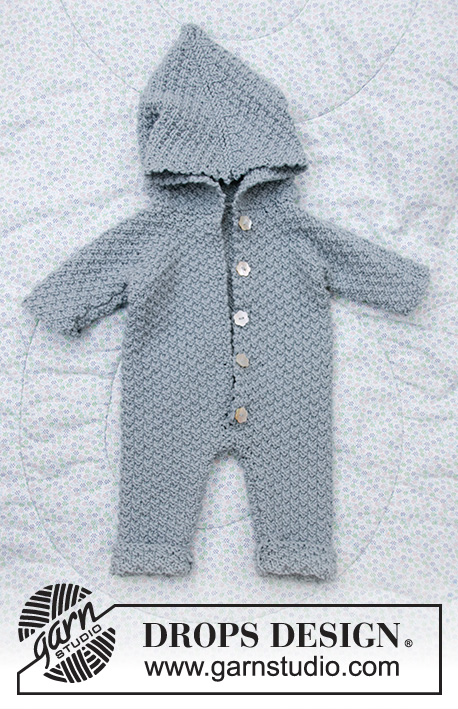
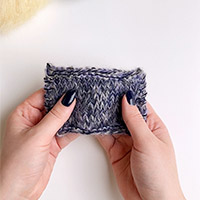
Knitted suit for baby in DROPS Merino Extra Fine. Piece is knitted with textured pattern and hood. Size premature - 4 years
DROPS Baby 33-8 |
|||||||
|
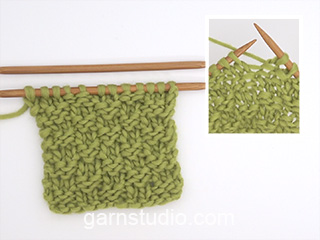
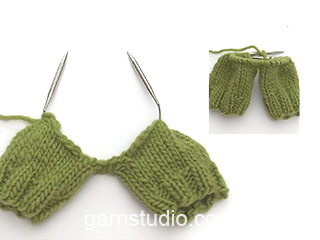
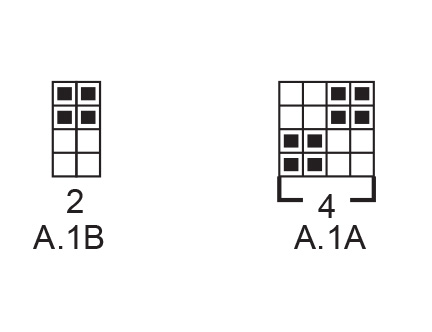
---------------------------------------------------------- EXPLANATION FOR THE PATTERN: ---------------------------------------------------------- GARTER STITCH (back and forth): 1 ridge = knit 2 rows. 1 edge stitch in garter stitch = knit stitch from right side and knit stitch from wrong side. PATTERN: See diagram A.1. Diagrams show all rows in pattern seen from the right side. INCREASE TIP-1 (applies to legs in size 3/4 years): Increase 1 stitch inside 1 edge stitch in garter stitch by making 1 yarn over. On next row work yarn overs twisted to avoid holes. Work the increased stitches in A.1. INCREASE TIP-2 (evenly): To calculate how to increase evenly, use the total number of stitches on row (e.g. 44 stitches) and divide stitches by number of increases to be done (e.g. 14) = 3.1. In this example increase by making 1 yarn over after approx. every 3rd stitch. On next row knit yarn overs twisted to avoid holes. BUTTONHOLES (bottom up): Decrease for buttonholes on right band. 1 BUTTONHOLE = knit third and fourth stitch from edge together and make 1 yarn over. On next row purl or knit yarn over (depending on where in the diagram you are) to make holes. Decrease for buttonholes when piece measures (measured from where legs where put together): (<0): 5, 10, 15 and 20 cm = 2", 4", 6" and 8" 0/1 months: 6, 11, 16, 21 and 26 cm = 2⅜",4⅜", 8¼" and 10¼" 1/3 months: 5, 10, 15, 20, 25 and 30 cm = 2", 4", 6", 8", 9¾" and 11¾" . 6/9 months: 6, 12, 17, 22, 27 and 32 cm = 2⅜", 4¾", 6¾", 8¾", 10⅝" and 12½". 12/18 months: 6, 12, 17, 23, 28 and 34 cm = 2⅜", 4¾", 6¾", 9", 13⅜". 2 years: 9, 15, 21, 27, 33 and 39 cm = 3½", 6", 8¼", 9½", 10⅝" and 15¼". 3/4 years: 7, 13, 19, 25, 31, 37 and 43 cm = 2¾", 5⅛", 7½", 9¾", 12¼", 14½" and 17" ---------------------------------------------------------- START THE PIECE HERE: ---------------------------------------------------------- SUIT - SHORT OVERVIEW OF THE PIECE: Work each leg back and forth on circular needle, bottom up. Place legs together and work back and forth on circular needle from mid front up to sleeves. Then cast on new stitches for sleeves in each side and finish front pieces and back piece separately. Sew piece together on the shoulder. Finish by picking up stitches around the neck and work a hood. RIGHT LEG (when suit is worn): Cast on (32) 36-40-40-44 (44-48) stitches on circular needle size 4 mm = US 6 with Merino Extra Fine. Work first row as follows from right side: 1 edge stitch in GARTER STITCH – read explanation above, work A.1A until 3 stitches remain on row (= 7-8-9-9-10 (10-11) repetitions of 4 stitches), work A.1B (= 2 stitches) and finish with 1 edge stitch in garter stitch. Continue pattern like this. REMEMBER THE KNITTING GAUGE! When piece measures 4 cm = 1½", insert 1 marker in piece (marks fold). When piece measures 14 cm = 5½" (only applies to size 3/4 years) increase 1 stitch in each side – read INCREASE TIP-1 (do not increase in the other sizes). Repeat increase in size 3/4 years when piece measures 24 cm = 9½" = (32) 36-40-40-44 (44-52) stitches on needle. Work until piece measures (12) 12-16-23-31 (32-35) cm = (4¾") 4¾"-6¼"-9"-12¼" (12½"-12¾") from cast-on edge, adjust so that next row is worked from right side. Bind off 1 stitch at beginning of the next 2 rows (i.e. bind off edge stitches) = (30) 34-38-38-42 (42-50) stitches. Then work the next 2 rows as follows, begin from right side: Work as before over all stitches and cast on (3) 3-3-5-5 (7-7) new stitches at the end of row (= mid back). Turn piece, work A.1 as before over all stitches, but make sure to continue pattern correctly, then cast on (4) 4-4-6-6 (8-8) stitches at the end of row from wrong side (= mid front). There are now (37) 41-45-49-53 (57-65) stitches on needle and piece measures approx. (13) 13-17-24-32 (33-36) cm = (5⅛") 5⅛"-6¾"-9½"-12½" (13"-14¼") from cast-on edge. Put piece aside and work left leg as explained below. LEFT LEG (when suit is worn): Cast on (32) 36-40-40-44 (44-48) stitches on circular needle size 4 mm = US 6 and work first row as follows from right side: 1 edge stitch in garter stitch, work A.1A until 3 stitches remain on row (= 7-8-9-9-10 (10-11) repetitions of 4 stitches), work A.1B (= 2 stitches) and finish with 1 edge stitch in garter stitch. Continue pattern like this. When piece measures 4 cm = 1½", insert 1 marker in piece (marks fold). When piece measures 14 cm = 5½" (only applies to size 3/4 years) increase 1 stitch in each side – remember INCREASE TIP-1 (do not increase in the other sizes). Repeat increase in size 3/4 years when piece measures 24 cm = 9½" = (32) 36-40-40-44 (44-52) stitches on needle. Work until piece measures (12) 12-16-23-31 (32-35) cm = (4¾") 4¾"-6¼"-9"-12¼" (12½"-12¾") from cast-on edge, adjust so that next row is worked from right side. Bind off 1 stitch at beginning of the next 2 rows (i.e. bind off edge stitches) = (30) 34-38-38-42 (42-50) stitches. Then work the next 2 rows as follows, begin from right side: Work as before over all stitches and cast on (4) 4-4-6-6 (8-8) new stitches at the end of row (= mid front). Turn piece, work A.1 as before over all stitches, but make sure to continue pattern correctly, then cast on (3) 3-3-5-5 (7-7) stitches at the end of row from wrong side (= mid back). There are now (37) 41-45-49-53 (57-65) stitches on needle and piece measures approx. (13) 13-17-24-32 (33-36) cm = (5⅛") 5⅛"-6¾"-9½"-12½" (13"-14¼") from cast-on edge. Cut the yarn. Now place the parts together as explained below. BODY: Place right leg and left leg on same circular needle with right leg first. Begin from right side on right leg, work 1 edge stitch in garter stitch, continue A.1 as before over the remaining stitches on right leg (make sure to continue pattern correct according to finish on leg), then continue pattern over the first (36) 40-44-48-52 (56-64) stitches on left leg (make sure to continue pattern correct) and finish with 1 edge stitch in garter stitch = (74) 82-90-98-106 (114-130) stitches on needle. Insert another marker in piece! NOW MEASURE PIECE FROM THIS MARKER! Continue A.1 back and forth with 1 edge stitch in garter stitch in each side towards mid front. When piece measures (3) 3-3-3-4 (5-5) cm = (1⅛") 1⅛"-1⅛"-1⅛"-1½" (2"-2") from marker (adjust to work next row from right side) bind off 1 stitch at beginning of the next 2 rows (i.e. bind off edge stitches). Then work the next 2 rows as follows, begin from right side: Work as before over all stitches and cast on 3 new stitches at the end of row (= left band at the front). Turn piece, work A.1 as before over all stitches (make sure to continue pattern correctly) and cast on 3 new stitches at the end of row from wrong side (= right band at the front). There are now (78) 86-94-102-110 (118-134) stitches on needle. Continue A.1 back and forth over all stitches (i.e. do not work edge stitches in garter stitch). Remember BUTTONHOLES on right band - read explanation above. When piece measures (15) 20-24-27-28 (32-36) cm = (6") 8"-9½"-10⅝"-11" (12½"-12¼") from the new marker, i.e. (28) 33-41-51-60 (65-72) cm = (11") 12"-16⅛"-20"-23⅝" (25½"-28¾") from cast-on edge, divide the piece in each side. Finish front pieces and back piece separately as explained below. RIGHT FRONT PIECE: Begin from right side and work as before over the first (21) 23-25-27-29 (31-35) stitches, then cast on (9) 13-13-17-17 (21-25) new stitches for sleeve. Slip the remaining stitches on 1 stitch holder for back piece and left front piece. Continue A.1 back and forth as before but make sure that pattern fits over all stitches. AT THE SAME TIME cast on (8) 10-14-14-16 (20-22) new stitches for sleeve at the end of the next 2 rows from right side = (46) 56-66-72-78 (92-104) stitches on needle. Continue pattern back and forth over all stitches until piece measures (22) 28-32-35-36 (41-45) cm = (8¾") 11"-12½"-12¾"-14¼" (16⅛"-17¾") from marker, i.e. (35) 41-49-59-68 (74-81) cm = (13¾") 16⅛"-19¼"-23¼" (29⅛"-32" from cast-on edge. At the beginning of next row from right side slip the first (8) 8-9-11-11 (12-12) stitches on 1 stitch holder for neck but to avoid cutting the yarn work them before slipping them on the stitch holder. Continue pattern back and forth as before and bind off for neck at the beginning of every row from mid front as follows: Bind off 2 stitches 1 time and 1 stitch (1) 1-2-2-2 (3-3) times = (35) 45-53-57-63 (75-87) stitches remain on needle. Then work until the entire suit measures approx. (24) 30-34-37-39 (44-49) cm = (9½") 11⅜"-13⅜"-14½"-15¼" (17¼"-19¼") from marker, i.e. (37) 43-51-61-71 (77-85) cm = (14½") 17"-20"-24"-28" (30⅜"-33½") from cast-on edge, but adjust so that next row is worked from right side. Work 1 ridge back and forth over all stitches. Then bind off by knitting from the right side. The entire suit measures approx. (38) 44-52-62-72 (78-86) cm = (15") 17¼"-20½"-24⅜"-28⅜" (30¾"-33⅞") from cast-on edge. Now work back piece as explained below. BACK PIECE: Slip the first (36) 40-44-48-52 (56-64) stitches on stitch holder (seen from right side) on circular needle size 4 mm = US 6 and continue A.1 back and forth over these stitches as before. AT THE SAME TIME cast on new stitches for sleeves at the end of every row in each side as follows: Cast on (9) 13-13-17-17 (21-25) stitches 1 time in each side and then (8) 10-14-14-16 (20-22) stitches 2 times in each side = (86) 106-126-138-150 (178-202) stitches on needle. Continue pattern back and forth over all stitches until piece measures (23) 29-33-36-38 (43-48) cm = (9") 11⅜"-13"-14¼"-15" (17"-19") from marker). On next row bind off the middle (12) 12-16-20-20 (24-24) stitches for neck and finish each shoulder/sleeve separately. Then bind off 2 stitches on next row from neck = (35) 45-53-57-63 (75-87) stitches remain on needle for shoulder/sleeve. Then work until the entire suit measures approx. (24) 30-34-37-39 (44-49) cm = (9½") 11¾"-13⅜"-14½"-15¼" (17¼"-19¼") from marker, but adjust according to front piece and make sure that next row is from right side. Work 1 ridge back and forth over all stitches. Then bind off by knitting from the right side. Work the other shoulder/sleeve the same way. Then work left front piece as explained below. LEFT FRONT PIECE: Slip the remaining (21) 23-25-27-29 (31-35) stitches on stitch holder back on needle size 4 mm = US 6. Begin from right side and continue A.1 back and forth as before. AT THE SAME TIME cast on new stitches for sleeve at the end of the next 3 rows from wrong side as follows: Cast on (9) 13-13-17-17 (21-25) stitches 1 time and then (8) 10-14-14-16 (20-22) stitches 2 times = (46) 56-66-72-78 (92-104) stitches on needle. Continue pattern back and forth over all stitches until piece measures the same as right front piece. At the beginning of next row from wrong side slip the first (8) 8-9-11-11 (12-12) stitches on 1 stitch holder for neck but to avoid cutting the yarn work them before slipping them on the stitch holder. Continue pattern back and forth as before and bind off for neck at the beginning of every row from mid front as follows: Bind off 2 stitches 1 time and 1 stitch (1) 1-2-2-2 (3-3) times = (35) 45-53-57-63 (75-87) stitches remain on needle. Then work until the entire suit measures approx. (24) 30-34-37-39 (44-49) cm = (9½") 11¾"-13⅜"-14½"-15¼" (17¼"-19¼") from marker, i.e. (37) 43-51-61-71 (77-85) cm = (14½") 17"-20"-24"-28" (30⅜"-33½") from cast-on edge, but measure so that next row is worked from right side. Work 1 ridge back and forth over all stitches. Then bind off by knitting from the right side. The entire suit measures approx. (38) 44-52-62-72 (78-86) cm = (15") 17¼"-20½"-24⅜"-28⅜" (30¾"-33⅞") from cast-on edge. ASSEMBLY: Sew shoulder seams inside bind-off edges. Sew the seams under the sleeve. Sew seam on inside of both legs inside 1 edge stitch in each side. Sew seam mid front from bottom of band and down inside 1 edge stitch in each side. Sew together the opening between the legs. Fold the end of legs at the marker. Sew the buttons on to the left band. HOOD: Pick up from right side approx. 44 to 70 stitches around the neck (including stitches on stitch holders at the front). Knit 1 row from wrong side while increasing evenly to (58) 70-74-74-78 (86-86) stitches – read INCREASE TIP-2. Knit 1 row from right side and knit 1 row from wrong side. Work next row as follows from right side: Work A.1A until 2 stitches remain on needle and finish with A.1B (= 2 stitches). Continue pattern like this until piece measures (17) 18-19-20-21 (22-23) cm = (6¾") 7"-7½"-8"-8¼" (8¼"-9") from ridge in the neck, but adjust so that next row is from right side. Work 1 ridge back and forth over all stitches. Then bind off by knitting from the right side. Place the hood double and sew seam at the top inside bind-off edge. |
|||||||
Diagram explanations |
|||||||
|
|||||||
|
|||||||

|
|||||||
|
Have you made this or any other of our designs? Tag your pictures in social media with #dropsdesign so we can see them! Do you need help with this pattern?You'll find tutorial videos, a Comments/Questions area and more by visiting the pattern on garnstudio.com. © 1982-2024 DROPS Design A/S. We reserve all rights. This document, including all its sub-sections, has copyrights. Read more about what you can do with our patterns at the bottom of each pattern on our site. |
|||||||


With over 40 years in knitting and crochet design, DROPS Design offers one of the most extensive collections of free patterns on the internet - translated to 17 languages. As of today we count 304 catalogs and 11422 patterns - 11417 of which are translated into English (US/in).
We work hard to bring you the best knitting and crochet have to offer, inspiration and advice as well as great quality yarns at incredible prices! Would you like to use our patterns for other than personal use? You can read what you are allowed to do in the Copyright text at the bottom of all our patterns. Happy crafting!
Comments / Questions (170)
Klar for montering, men usikker på samme sying av skuldersømmene, hardere bilde av hvordan det blir? Skal rillene være som en kant på skuldra?
15.10.2020 - 12:34DROPS Design answered:
Hej Marianne. Ja det stämmer, du ser på ena ärmen på bilden att det blir en kant av rillene. Mvh DROPS Design
16.10.2020 - 09:31Hallo, ich bin beim rechten Vorderteil und verstehe den Teil mit dem abketten nicht ganz. Die ersten 11 M (6-9 Monate) sind stillgelegt. Dann in den nächsten Hinreihen Kette ich 2 M 1 mal ab und 1 M 2 mal? Ich weiß nicht wie ich eine Masche zwei mal abkette. Vielleicht gibt es auch ein Video zu diesem Teil. Vielen Dank schonmal für die Hilfe!
13.10.2020 - 22:17DROPS Design answered:
Liebe Charleen, bei einer Hinreihe stricken Sie die ersten 11 M und legen Sie sie still, dann stricken Sie bis zur Ende, wenden und Rückreihe stricken. Am Anfang der nächste Reihe ketten Sie 2 Maschen ab, Reihe bis zur Ende stricken, wenden und Rückreihe stricken. Am Anfang der nächste Reihe ketten Sie 1 Masche ab, Reihe bis zur Ende stricken, wenden und Rückreihe stricken. Diese 2 Reihen noch einmal stricken = alle Maschen für Halsausschnitt sind jetzt abgekettet. Viel Spaß beim stricken!
14.10.2020 - 08:00Hallo! Die Garnmenge für Gr. 80/86 stimmt nicht, man braucht auf jeden Fall 400g, wenn man die Kapuze noch stricken will 😋 Viele Grüße!
07.10.2020 - 17:13Hei! Jeg strikker denne i størrelsen 1-3 måneder. Og jeg er på bakstykket nå Det ser ut til at armene blir mye større enn de skal være. Både lengere og bredere. Er det en grunn til dette?
12.09.2020 - 17:20DROPS Design answered:
Hei Emma. Har du sjekket om strikkefastheten din stemmer med det som står i oppskriften? Sjekk strikkefastheten og målene på målskissen og se om det stemmer/ mye forskjell. mvh DROPS design
14.09.2020 - 11:48Hallo! Ist es möglich, dass der Onesie auf dem Foto ein anderes Muster als in der Anleitung ist?
09.09.2020 - 14:46DROPS Design answered:
Liebe Tamara, das Modell auf dem Foto wurde gestrickt mit den beiden Diagramme A.1A/A.1B wie erklärt, dh doppelte Perlmuster in der Breite und in der Höhe - wie in diesem Video gezeigt. Viel Spaß beim stricken!
09.09.2020 - 15:08Hi I am not used to reading diagrams and am new to knitting but would love to do this pattern, please could you give me a written instruction for pattern a 1a and a 1b so I can follow that instead please? Thank you
09.09.2020 - 09:58DROPS Design answered:
Dear Jen, you will find more explanations about diagrams and how to read them here. This should help you to understand them. Do not hesitate to make a test on a swatch it's always easier to practice with fewer stitches. Happy knitting!
09.09.2020 - 10:18Har akkurat strikket beina, og der sluttet det med at man skal legge opp 3 masker på den siden som skal være bak, og 4 masker på den siden som skal være foran. Jeg forstår ikke hvordan jeg skal få mønsteret til å passe når jeg fortsetter på bolen, når én av de 4 maskene jeg har lagt opp skal være kantmaske. Da står jeg jo igjen med 3 masker før jeg er på det opprinnelige mønsteret, og jeg må jo da enten øke eller felle en maske for å få det til å gå opp i mønsteret?
05.09.2020 - 18:53DROPS Design answered:
Hej Stine, du behøver kun 2 masker til at strikke videre i mønster i og med at du hele tiden strikker, 2 ret, 2 vrang, 2 ret, 2 vrang osv... Hvis du får 1 maske tilovers, så strikker du den i mønster, dvs hvis du har afsluttet med 2vrang, så strikkes den ene maske ret, og sidst kantmasken. God fornøjelse!
09.09.2020 - 14:17Hei. Strikker heldressen i størrelse 1/3 mnd. Når jeg plukker opp de 25 maskene til venstre forstykke, begynner mønsteret med kun en vrangmaske. Når det totalt blir 66 masker betyr det at enden på armen også får en enkelt maske (ikke i par med to rette, to vrange osv). På de andre tre armene går det opp slik at det på kanten av armen er et par av rett/vrang. Skal det ikke gå opp slik at enden av armen på venstre forstykke også har par av rette/vrange masker?
06.08.2020 - 18:26DROPS Design answered:
Hej Norun, jo men du skal sørge for at strikke de nye masker så mønsteret passer ind i de gamle masker, du udgår altså från det du allerede har strikket. God fornøjelse!
19.08.2020 - 11:44Hallo! Geweldig pakje geworden! Maar klopt het dat de binnenbeenlengte maar 13 cm is? En dan heb ik nog géén omslag gemaakt. Hartelijke groet! Gberg
26.07.2020 - 13:22DROPS Design answered:
Dag Gberg,
Ja, dat zou kunnen (afhankelijk van je maat). Wanneer de onderkant van de pijp omgevouwen is, meet de pijp (9)-9-13-20-28 (29-32) cm tot het kruis.
02.08.2020 - 20:07Hej, kan man strikke den i retstrik, ?
25.07.2020 - 15:10DROPS Design answered:
Hej Jane, ja selvfølgelig kan du det, men sørg for at overholde strikkefastheden ifølge opskriften. Du vil sikkert bruge lidt mere garn hvis du vælger retstrik. God fornøjelse!
27.07.2020 - 15:24