
Popular categories
Looking for a yarn?


Comments / Questions (31)
![]() Lutina wrote:
Lutina wrote:
Solution trouvée. Dernière question plus nécessaire. Le dernier post peut être supprimé. Même si les remerciements restent d'actualité. Merci.
22.03.2026 - 10:59
![]() Lutina wrote:
Lutina wrote:
Bonjour, Un grand merci pour la précédente réponse. Je suis sur le pouce de la mitaine gauche et quand je reprends le motif A2 mes mini-torsades apparaissent à l'envers. Pourtant je n'ai pas eu de soucis sur la mitaine et je continue à tricoter tout à l'endroit car en circulaire. Une idée d'où pourrait venir mon erreur? Encore merci por ce beau modèle, les explications détaillées et vos précieux conseils. Merci!
21.03.2026 - 09:33DROPS Design answered:
Bonjour Lutina, qu'entendez-vous par "à l'envers"? Elles doivent apparaître sur l'endroit car le pouce se tricote en rond, sur l'endroit. Les torsades de A.2 se font dans le même sens tout du long (même pour le pouce) on met 1 m derrière, on tricote la m suivante et on tricote ensuite la maille en attente. Essayez de montrer votre ouvrage à votre magasin (même en lui envoyant une photo par mail), ce sera sans doute plus facile pour eux de pouvoir vous aider ainsi. Bonne continuation!
23.03.2026 - 08:05
![]() Lutina wrote:
Lutina wrote:
Bonjour, Petit doute de compréhension. J'en suis à la mise en attente des mailles du gousset du pouce. Il est indiqué au tour suivant de monter 3 mailles au-dessus des mailles en attente. On confirme qu'il s'agit juste de monter 3 mailles supplémentaires à la fin de tour? Merci!
05.03.2026 - 21:16DROPS Design answered:
Bonjour Lutina, vous devez effectivement monter ces 3 mailles à la fin du tour (mitaine gauche), juste après avoir mis les mailles du pouce en attente , ces 3 mailles remplacent la maille centrale (l'avant-dernière maille) et 1 maille de chaque côté de cette maille car elles ont été mises en attente (en même temps que les augmentations). Retrouvez ici, en vidéo comment on tricote le gousset du pouce d'une moufle (même technique que pour une mitaine) et comment on va monter ces mailles pour continuer la main. Bon tricot!
06.03.2026 - 07:45
![]() Cousseau wrote:
Cousseau wrote:
Bonjour. Je ne comprends pas comment on doit tricoter le dos de la main entre les deux motifs A3 c est a dire entre les 14 et 19 cm. Merci
24.02.2026 - 18:36DROPS Design answered:
Bonjour Mme Cousseau, tricotez les mailles comme indiqué auparavant, autrement dit, juste après que vous ayez obtenu 50-=54 m (cf taille), vous continuez A.3 (répétez le diagramme en hauteur) et tricotez toutes les autres mailles en jersey. Bon tricot!
25.02.2026 - 07:20
![]() Cousseau wrote:
Cousseau wrote:
Bonjour Je ne comprends pas comment il faut tricoter côté motif, pendant les 6 augmentations du gousset du pouce, c'est a dire entre les 14 et 19cm de long, en taille s. Faut il refaire le motif A3 ? Merci
21.02.2026 - 16:50DROPS Design answered:
Bonjour Mme Cousseau, les augmentations du pouce se tricotent en jersey. Bon tricot!
23.02.2026 - 08:12
![]() Joyce Iszard wrote:
Joyce Iszard wrote:
I purchased this pattern, on starting to knit discover the right hand side of the pattern instruction are missing, as I use this printer all time and this hasn’t happen before could you please resend. Thank you for your help Joyce
17.01.2026 - 20:43DROPS Design answered:
Hi Joyce, the pattern is available for free on our website HERE. Happy knitting!
17.01.2026 - 22:32
![]() Corinne wrote:
Corinne wrote:
Bonjour, concernant les mitaines en petite taille, on a 50 mailles avant les augmentations du gousset. On doit augmenter 6 fois 2 mailles et et vous indiquez une augmentation total de 13 mailles. Est-ce une erreur ou y a t il quelque chose que je n’ai pas compris. Merci d’avance pour votre réponse . Bonne nouvelle année
08.01.2026 - 17:22DROPS Design answered:
Bonjour Corinne, vous augmentez pour le pouce 6 fois au total de chaque côté de la maille du pouce, autrement dit vous aurez 6 augmentations, 1 maille pour le pouce (l'avant-dernière maille pour la mitaine gauche) et 6 augmentations soit 13 mailles au total pour le pouce. Bon tricot!
09.01.2026 - 08:40
![]() Lilja Dögg wrote:
Lilja Dögg wrote:
Rangur lykkjufjöldi í uppfiti á vinstri handstúkunni. Þar er talað um 67 lykkjur en á hægri á að fitja upp 64 lykkjur.
28.12.2025 - 19:11DROPS Design answered:
Blessuð Lilja Dögg. Takk fyrir ábendinguna, þetta hefur verið leiðrétt.
30.12.2025 - 11:52
![]() Connie Hansen wrote:
Connie Hansen wrote:
Diagram A1 pandebånd 182-12 ser ud til at mangle nogle rækker ellers skal der være 2 store snoninger ovenpå hinanden med 1 pind mellem sidste og første Diagram pind i hver side Vh Connie
26.12.2025 - 19:03DROPS Design answered:
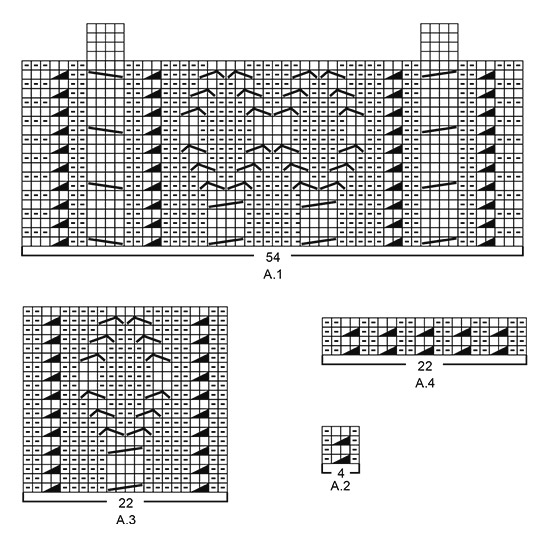
Hei Connie. Litt usikker på hva du mener, men diagrammet skal stemme. Se på de 2 bildene i #dropsfan galleriet helt nederst på siden. Der ser man flettene bedre. Om du tenker på de 2 flettene i siden på diagrammet, så strikkes det etter diagram A.1 og når man har strikket 20 pinner, skal man starte på 1. pinne igjen, bortsett fra maske nr. 8.-11 (flette) og 44.-47 (flette). Disse skal forsettes 4 pinner til, før man starter på 1. pinne igjen. Så da må man følge godt med på hvor i diagrammet man er. mvh DROPS Design
05.01.2026 - 12:56
![]() Emsy80 wrote:
Emsy80 wrote:
Bonjour, pour les mitaines, quel type de montage des mailles est recommandé pour ce modèle svp?
23.11.2025 - 10:42DROPS Design answered:
Bonjour Emsy80, vous pouvez utiliser votre technique de montage préférée, veillez juste à ce qu'elle ne soit pas trop serrée pour éviter de resserrer la bordure; découvrez ici différentes techniques de montage. Bon tricot!
24.11.2025 - 09:40
|
|||||||||||||||||||||||||
Annely#annelyset |
|||||||||||||||||||||||||
 |
 |
||||||||||||||||||||||||
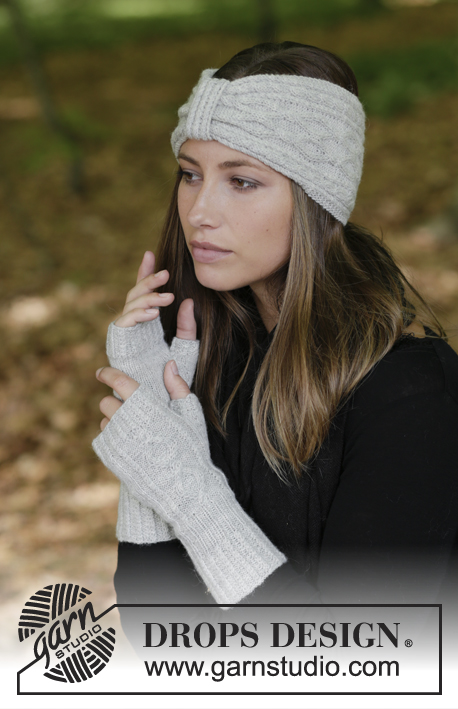
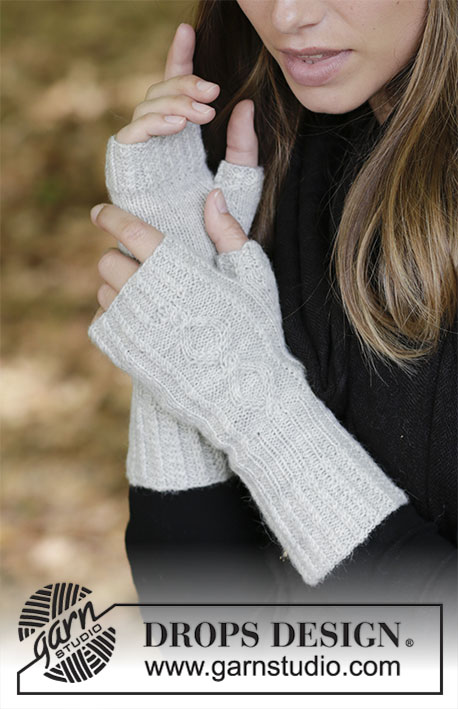
The set consists of: Knitted head band and wrist warmers with cables. The piece is worked in DROPS Flora.
DROPS 182-12 |
|||||||||||||||||||||||||
|
INFORMATION FOR THE PATTERN: RIDGE/GARTER STITCH (worked back and forth): 1 ridge = Knit 2 rows. PATTERN: Head band: See diagrams A.1 and A.2. Wrist warmers: See diagrams A.2 to A.4. The diagrams show all the rows in the pattern seen from the right side. DECREASE TIP (for head band): To work out how to decrease evenly, count the total number of stitches on the needle (e.g. 54 stitches), minus the edge stitches (e.g. 6 stitches) and divide by the number of decreases to be made (e.g. 12) = 4. In this example, you knit every 3rd and 4th stitch together, but do not decrease over the edge stitches. INCREASE TIP-1 (for the thumb gusset on the wrist warmers): Make 1 yarn over, knit 1, make 1 yarn over (= 2 stitches increased). On the next round knit the yarn overs twisted to prevent holes. Continue to increase on each side of the increased stitches so that you get a gusset. INCREASE TIP-2 (for wrist warmers): To work out how to increase evenly, count the total number of stitches on the needle (e.g. 50 stitches), minus the stitches you are not going to increase over (e.g. 22 stitches) and divide the remaining stitches with the number of increases to be made (e.g. 14) = 2. In this example, you increase after every 2nd stitch by making 1 yarn over, on the next round work the yarn overs twisted to prevent holes. ---------------------------------------------------------- HEAD BAND: The piece is worked back and forth on the needle. Cast on 42 stitches with needle size 2.5 mm / US 1.5 and Flora. Work 2 RIDGES – see description above. The next row is worked as follows from the right side: Knit 3 edge stitches, * Knit 3, 1 yarn over *, repeat from *-* until there are 3 stitches left on the needle and finish with knit 3 edge stitches = 54 stitches. Purl 1 row from the wrong side with knit 3 edge stitches in each side (the yarn overs are purled twisted to prevent holes). Continue by working A.1 (= 54 stitches) until the piece measures approx. 48-54 cm / 19"-21¼" – finish with the 6th row in A.1 so that the pattern starts and finishes in the same way. Knit 1 row from the right side and decrease AT THE SAME TIME 12 stitches evenly on row – read DECREASE TIP = 42 stitches. Knit 5 rows and then loosely bind off with knit from the right side. BAND: The piece is worked back and forth on the needle. Cast on 14 stitches with needle size 2.5 mm / US 1.5. Work 1 ridge. The next row is worked as follows from the right side: 1 edge stitch in garter stitch, work A.2 over the next 12 stitches (= 3 repeats of 4 stitches), finish with 1 edge stitch in garter stitch. Continue the pattern in this way until the piece measures 10 cm / 4". Work 1 ridge and then loosely bind off with knit from the right side. Cut the strand, form the band into a ring and sew the bind-off edge to the cast-on edge with 1 stitch in each stitch. Pull the head band through the ring. Sew the head band together mid front – sew the bind-off edge to the cast-on edge with 1 stitch in each stitch. Place the band mid front so that it hides the seam. ---------------------------------------------------------- LEFT WRIST WARMER: The piece is worked in the round with double pointed needles. Cast on 64-72 stitches with double pointed needles size 2.5 mm / US 1.5 and Flora. Knit 1 round. Then work A.2 in the round (= 16-18 repeats of 4 stitches). When the piece measures 5-6 cm / 2"-2⅜" knit the stitches in each cable together 2 and 2 the complete round (the other stitches are purled) = 48-54 stitches. Continue working with knit over knit and purl over purl until the piece measures 10-11 cm / 4"-4½". REMEMBER THE GAUGE! The next round is worked as follows: S/M: Knit 2, purl 9, knit 1 in the front and back of each of the next 2 stitches (= 2 stitches increased), purl 9 and knit 26 = 50 stitches. L/XL: Knit 3, purl 9, knit 1 in the front and back of each of the next 2 stitches (= 2 stitches increased), purl 9, knit 31 and decrease at the same time 2 stitches evenly over these 31 stitches = 54 stitches. The next round is worked as follows in both sizes: 2-3 stitches stockinette stitch, work A.3 (= 22 stitches) and work 26-29 stitches stockinette stitch. Continue the pattern in this way. When the piece measures 14-15 cm / 5½"-6" start the increases for the thumb gusset. Increase 1 stitch on each side of the next to last stitch on the round (i.e. on the inside of the hand) – read INCREASE TIP-1. Increase in this way on each side of the increased stitches every 3rd round a total of 6-7 times = 13-15 thumb-gusset stitches and a total of 62-68 stitches on the needle. When the piece measures 19-21 cm / 7½"-8¼" place the 13-15 thumb-gusset stitches + 1 stitch on each side of these on a thread (= 15-17 stitches on the thread). On the next round, cast on 3 new stitches on the needle over the stitches on the thread = 50-54 stitches. Continue with stockinette stitch and A.3 as before until the piece measures 21-22 cm / 8¼"-8¾". Knit 1 round and increase at the same time 14 stitches evenly in both sizes – read INCREASE TIP-2 (do not increase over the 22 stitches in A.3) = 64-68 stitches. Continue working A.2 in the round – NOTE: A.4 shows how A.2 fits over A.3, there should be purl 2 / 2 cable stitches the complete round. When you have worked 10 rounds with A.2 the whole wrist warmer measures approx. 24-25 cm / 9½"-9¾". Bind off with knit over knit and purl over purl. THUMB: Place the 15-17 stitches from the thread back on double pointed needles size 2.5 mm / US 1.5 and in addition knit up 9-7 stitches on the edge of the back of the thumb-gusset stitches (i.e. knit up 1 stitch in each of the 3 stitches which were cast on + 3-2 stitches on each side of these 3 stitches) = 24-24 stitches. Work 3-5 rounds stockinette stitch in the round. Then work 6 rounds of A.2 before binding off with knit over knit and purl over purl. RIGHT WRIST WARMER: Cast on 64-72 stitches with double pointed needles size 2.5 mm / US 1.5. Knit 1 round. Then work A.2 in the round (= 16-18 repeats of 4 stitches). When the piece measures 5-6 cm / 2"-2⅜" knit the stitches in each cable together 2 and 2 the complete round (the other stitches are purled) = 48-54 stitches. Continue working with knit over knit and purl over purl until the piece measures 10-11 cm / 4"-4½". The next round is worked as follows: S/M: Knit 26, purl 9, knit 1 in the front and back of each of the next 2 stitches (= 2 stitches increased), purl 9 and knit 2 = 50 stitches. L/XL: Knit 31 and decrease at the same time 2 stitches evenly over these 31 stitches, purl 9, knit 1 in the front and back of each of the next 2 stitches (= 2 stitches increased), purl 9 and knit 3 = 54 stitches. The next round is worked as follows in both sizes: 26-29 stitches stockinette stitch, work A.3 (= 22 stitches) and finish with 2-3 stitches stockinette stitch. Continue the pattern in this way. When the piece measures 14-15 cm / 5½"-6" start the increases for the thumb gusset. Increase 1 stitch on each side of the second stitch on the round (i.e. on the inside of the hand) – read INCREASE TIP-1. Increase in this way on each side of the increased stitches every 3rd round a total of 6-7 times = 13-15 thumb-gusset stitches and a total of 62-68 stitches on the needle. When the piece measures 19-21 cm / 7½"-8¼" place the 13-15 thumb-gusset stitches + 1 stitch on each side of these on a thread (= 15-17 stitches on the thread). On the next round cast on 3 new stitches on the needle over the stitches on the thread = 50-54 stitches. Continue with stockinette stitch and A.3 as before until the piece measures 21-22 cm / 8¼"-8¾". Knit 1 round and at the same time increase 14 stitches evenly in both sizes – read INCREASE TIP-2 (do not increase over the 22 stitches in A.3) = 64-68 stitches. Continue to work A.2 in the round – NOTE: A.4 shows how A.2 fits over A.3, there should be purl 2 / 2 cable stitches the complete round. When you have worked 10 rounds of A.2 the whole wrist warmer measures approx. 24-25 cm / 9½"-9¾". Bind off with knit over knit and purl over purl. Work thumb in the same way as for the left wrist warmer. |
|||||||||||||||||||||||||
Diagram explanations |
|||||||||||||||||||||||||
|
|||||||||||||||||||||||||
 |
|||||||||||||||||||||||||
Have you finished this pattern?Tag your pictures with #dropspattern #annelyset or submit them to the #dropsfan gallery. Do you need help with this pattern?You'll find 25 tutorial videos, a Comments/Questions area and more by visiting the pattern on garnstudio.com. © 1982-2026 DROPS Design A/S. We reserve all rights. This document, including all its sub-sections, has copyrights. Read more about what you can do with our patterns at the bottom of each pattern on our site. |
|||||||||||||||||||||||||


With over 40 years in knitting and crochet design, DROPS Design offers one of the most extensive collections of free patterns on the internet - translated to 17 languages. As of today we count 324 catalogs and 12290 patterns - 12280 of which are translated into English (US/in).
We work hard to bring you the best knitting and crochet have to offer, inspiration and advice as well as great quality yarns at incredible prices! Would you like to use our patterns for other than personal use? You can read what you are allowed to do in the Copyright text at the bottom of all our patterns. Happy crafting!
Post a comment to pattern DROPS 182-12
We would love to hear what you have to say about this pattern!
If you want to leave a question, please make sure you select the correct category in the form below, to speed up the answering process. Required fields are marked *.