
Popular categories
Looking for a yarn?


Comments / Questions (26)
![]() Pat wrote:
Pat wrote:
Where do I find how much yarn is required for this pattern and the measurements that go with sizes sm , xl,ll etc
26.03.2026 - 03:53DROPS Design answered:
Hi Pat, The amounts of yarn needed are at the top of the pattern under Materials (Drops baby Merino is sold in 50 g balls). The size chart is at the bottom of the pattern, with all the measurements for the different sizes. Regards, Drops Team.
26.03.2026 - 06:28
![]() Silke Dornhege-Zanger wrote:
Silke Dornhege-Zanger wrote:
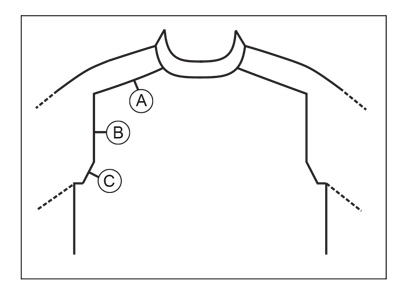
Wie komme ich nach der Zunahme der Passe ( Zeichnung A ) Gr xxl auf 298 Maschen? Zunahme nach Bund = 182 M Danach je Runde 4 M zunehmen ( über Mustersatz A.1b ) = 80 M Das sind gesamt 262 M. Mir fehlen da 36 Maschen.
15.11.2025 - 12:31DROPS Design answered:
Dear Silke, when increasing for the saddle shoulders, you increase 4 stitches 29 times in total (in size XXL). This means that you have: 182 stitches + (4 stitches x 29 times = 116 stitches) = 298 stitches. Happy knitting!
09.12.2025 - 12:28
![]() Gasnier wrote:
Gasnier wrote:
Pourriez-vous me donner les explication si je voulais faire des manches longues pour la taille m
23.08.2025 - 14:50DROPS Design answered:
Bonjour Mme Gasnier, en fonction de la longueur/largeur des manches souhaitez, vous pouvez vous inspirer d'un modèle similaire de même tension et de la forme voulue pour ajuster les diminutions. Bon tricot!
25.08.2025 - 09:28
![]() Jenn wrote:
Jenn wrote:
For the sizing information, there are 6 sizes listed but only 5 chest circumferences. Is there one missing? That's the measurement that matters most for me!
01.12.2024 - 16:12DROPS Design answered:
Hi Jenn, On the size chart at the bottom of the pattern, all the measurements have the 6 numbers for the 6 different sizes. Happy knitting!
02.12.2024 - 07:17
![]() Daniela wrote:
Daniela wrote:
Hallo liebes Team, es gibt in der Anleitung einen Rechenfehler. Schlage ich für die Halsblende 126 Maschen bei Größe L an und verteile die nachher auf je 27 Maschen für die Ärmel, 33 Maschen für das Vorderteil und 15+18 Maschen für je ein halbes Rückenteil, sind das 120 Maschen. liebe Grüße
24.02.2024 - 05:17
![]() Conni wrote:
Conni wrote:
Man kan ikke vælge alternativt garn, det virker ikke har prøvet i flere dage Mvh Conni
07.10.2023 - 14:54
![]() Mme Soares wrote:
Mme Soares wrote:
Que veut dire répéter au dessus des 12 premières mailles pour les tailles S M L il est écrit 1 m endroit 2 m envers répéter de *-* au dessus des 12-12-15 premières mailles
25.05.2023 - 20:50DROPS Design answered:
Bonjour Mme Soares, vous tricotez 4 fois *1 m endroit, 2 m envers*, soit 12 mailles au total en côtes 1m end/2 m env. Bon tricot!
26.05.2023 - 10:03
![]() Luísa Seabra wrote:
Luísa Seabra wrote:
Sorry I´m wrong. It´s like you say.
29.04.2022 - 21:51
![]() Luísa Sofia Seabra wrote:
Luísa Sofia Seabra wrote:
The instructions translation are wrong. In english: BEFORE THE MARKERS: The new stitch twists to the right. Use the left needle to pick up the back strand between 2 stitches from the previous round and knit in the front loop. AFTER THE MARKERS: The new stitch twists to the left. Use the left needle to pick up the front strand between 2 stitches from the previous round and knit in the back loop. and in portuguese is the wrong way what should be before the marker is after
29.04.2022 - 21:21
![]() Alcy wrote:
Alcy wrote:
Hola, no entiendo el término 1 hebra entre 2 puntos. No sé cómo se tejen o qué se les hace a los puntos antes y después de la lazada que se crea. No entiendo tampoco el diagrama porque evidentemente la lazada abarca 2 puntos y no sé cómo hacerlo. Gracias!!
04.03.2022 - 00:03DROPS Design answered:
Hola Alcy, la lazada se trabaja entre 2 puntos, por eso se muestra entre 2 símbolos del diagrama (no abarca los 2 puntos). Por ejemplo, cuando se tiene un cuadrado blanco, símbolo de hebra y cuadrado blanco, significa 1 derecho, hacer 1 lazada y 1 derecho (por el lado derecho). Los puntos antes y después de la lazada pueden ser de diferentes tipos: 2 puntos juntos, derechos o reveses...
06.03.2022 - 12:41
|
||||||||||||||||||||||||||||
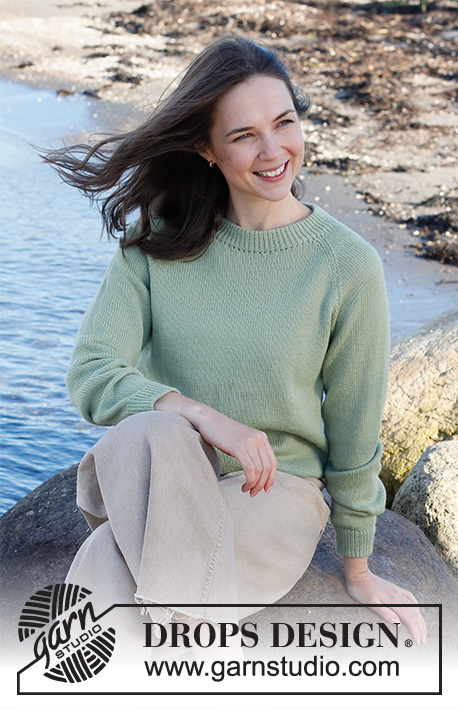
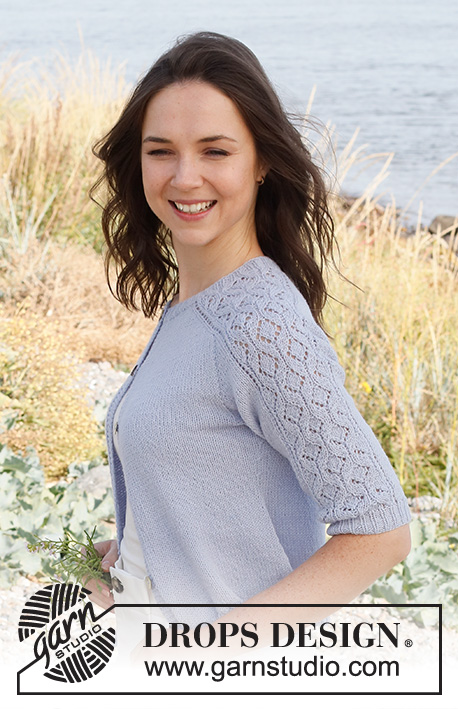
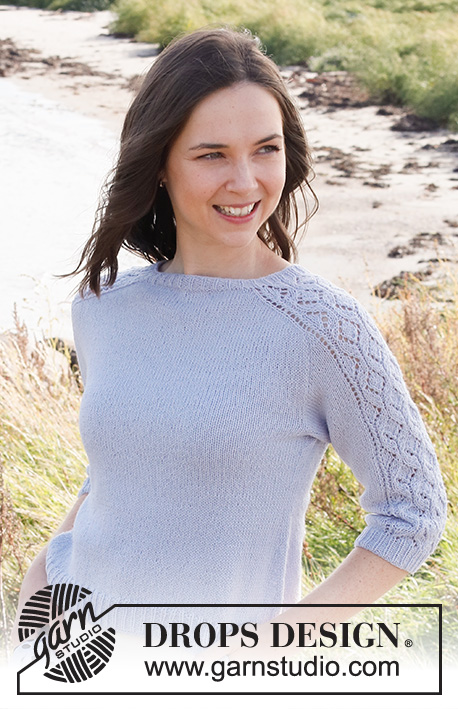
Dancing Diamonds#dancingdiamondssweater |
||||||||||||||||||||||||||||
 |
 |
|||||||||||||||||||||||||||
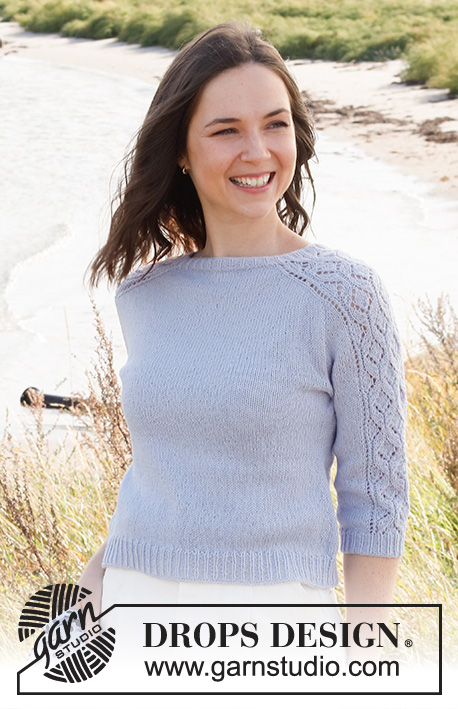
Knitted sweater in DROPS BabyMerino. The piece is worked top down with saddle-shoulders, lace pattern and ¾-length sleeves. Sizes S - XXXL.
DROPS 221-7 |
||||||||||||||||||||||||||||
|
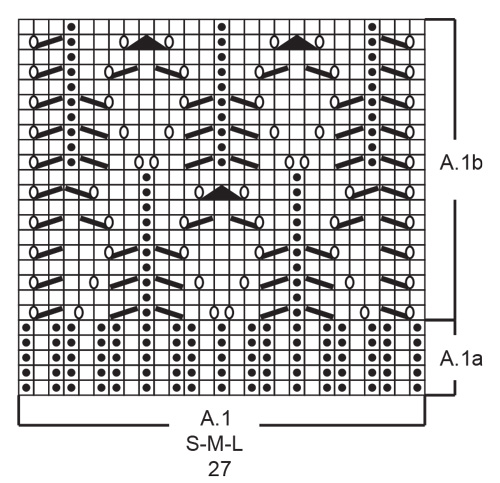
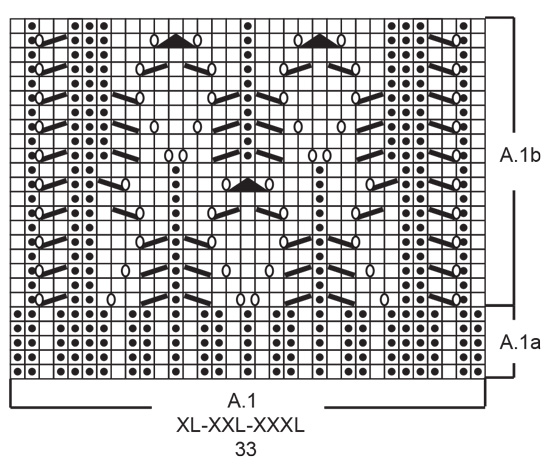
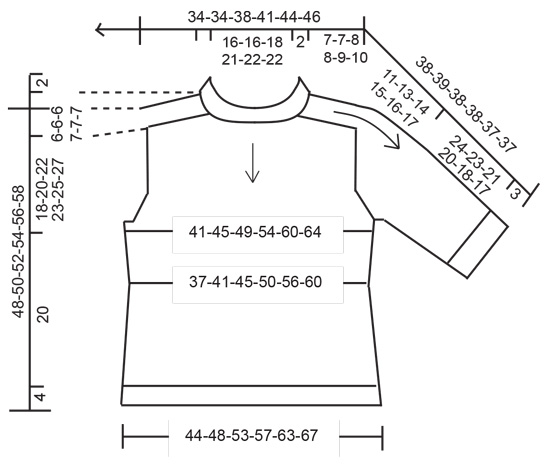
------------------------------------------------------- EXPLANATIONS FOR THE PATTERN: ------------------------------------------------------- PATTERN: See diagram A.1. Choose diagram for your size. INCREASE TIP-1 (evenly spaced): To work out how to increase evenly, count the total number of stitches to be increased over (e.g. 14 stitches) and divide by the number of increases to be made (e.g. 5) = 2.8. In this example, increase by making 1 yarn over after approx each 3rd stitch. On the next round work the yarn overs twisted to avoid holes. INCREASE TIP-2: BEFORE THE MARKERS: The new stitch twists to the right. Use the left needle to pick up the back strand between 2 stitches from the previous round and knit in the front loop. AFTER THE MARKERS: The new stitch twists to the left. Use the left needle to pick up the front strand between 2 stitches from the previous round and knit in the back loop. INCREASE TIP-3 (for sides of body): Work until there are 3-3-3-4-4-4 stitches left before the marker thread, 1 yarn over, knit 6-6-6-8-8-8 (the marker thread sits in the middle of these stitches), 1 yarn over (= 2 stitches increased). On the next round knit the yarn over twisted to avoid a hole. Then work the new stitch in stockinette stitch. DECREASE TIP (for sides of body and sleeves): Decrease 1 stitch on each side of the marker thread as follows: Work until there are 4-4-4-5-5-5 stitches left before the marker thread, knit 2 together, knit 4-4-4-6-6-6 (the marker thread sits in the middle of these stitches), slip 1 stitch as if to knit, knit 1 and pass the slipped stitch over the knitted stitch (= 2 stitches decreased). BINDING-OFF TIP: To avoid the bind-off edge being tight you can bind off with a larger size needle. If the edge is still tight, make 1 yarn over after either each 3rd or each 6th stitch, at the same time as binding off; the yarn overs are bind off as normal stitches. ------------------------------------------------------- START THE PIECE HERE: ------------------------------------------------------- SWEATER – SHORT OVERVIEW OF THE PIECE: The neck and yoke are worked in the round with circular needle, from mid back and top down. The yoke is divided for body and sleeves and the body is continued in the round with circular needle. The sleeves are worked with double pointed needles/short circular needle, top down. NECK: Cast on 114-114-126-140-146-146 stitches with circular needle size 2.5 MM = US 1.5 and Baby Merino. Knit 1 round. Then work rib in the different sizes as follows: Sizes S, M and L: * Knit 1, purl 2 * work from *-* over the first 12-12-15 stitches, knit 1, purl 1 (= ½ back piece), work A.1a (choose diagram for your size) over the next 27-27-27 stitches (= right shoulder), purl 1, * knit 1, purl 2 *, work from *-* over the next 27-27-33 stitches, knit 1, purl 1 (= front piece), work A.1a over the next 27-27-27 stitches (= left shoulder), purl 1, * knit 1, purl 2 *, work from *-* over the next 15-15-18 stitches. Continue this rib in the round for 2 cm = ¾" (A.1a is repeated in height). Sizes XL, XXL and XXXL: *Knit 1, purl 2 *, work from *-* over the first 18-18-18 stitches, knit 1, (= ½ back piece), work A.1a (choose diagram for your size) over the next 33-33-33 stitches (= right shoulder), * knit 1, purl 2 *, work from *-* over the next 36-39-39 stitches, knit 1 (= front piece), work A.1a over the next 33-33-33 stitches (= left shoulder), * knit 1, purl 2 *, work from *-* over the next 18-21-21 stitches. Continue this rib in the round for 2 cm = ¾" (A.1a is repeated in height). The next round is worked as follows: Knit 14-14-17-19-19-19 stitches and increase 5-7-5-7-9-9 evenly over these stitches – read INCREASE TIP-1, work A.1a as before over the next 27-27-27-33-33-33 stitches, knit 30-30-36-37-40-40 stitches and increase 10-14-10-15-18-18 evenly over these stitches, work A.1a as before over the next 27-27-27-33-33-33 stitches, knit 16-16-19-18-21-21 stitches and increase 5-7-5-8-9-9 evenly over these stitches = 134-142-146-170-182-182 stitches. Change to circular needle size 3 = US 2,5. YOKE: Insert 1 marker after 66-70-72-86-90-90 stitches (= approx. mid-front) – THE PIECE IS MEASURED FROM HERE! In addition, insert 4 other markers as described below, without working the stitches and each marker is inserted between 2 stitches. The markers are used when increasing for the shoulders. Marker 1: Start mid-back, count 19-21-22-26-28-28 stitches (= ½ back piece), insert the marker before the next stitch. Marker 2: Count 27-27-27-33-33-33 stitches from marker 1 (= shoulder), insert the marker before the next stitch. Marker 3: Count 40-44-46-52-58-58 stitches from marker 2 (= front piece), insert the marker before the next stitch. Marker 4: Count 27-27-27-33-33-33 stitches from marker 3 (= shoulder), insert the marker before the next stitch. There are 21-23-24-26-30-30 stitches left after marker 4 (= ½ back piece). Allow the markers to follow your work onwards. INCREASES FOR SADDLE SHOULDERS: Read the whole section before continuing! Continue working with A.1b over A.1a on the sleeves and stockinette stitch on the front and back pieces. AT THE SAME TIME on the first round increase 4 stitches for the shoulders as follows: Increase BEFORE markers 1 and 3 and AFTER markers 2and 4 – read INCREASE TIP-2. You are only increasing on the front and back pieces, the number of stitches on the shoulders remain the same. Continue the pattern and increase like this every round a total of 22-22-27-27-29-32 times = 222-230-254-278-298-310 stitches (the increased stitches are worked in stockinette stitch). REMEMBER THE KNITTING GAUGE! After the last increase, the piece measures approx. 7-7-8-8-9-10 cm = 2¾"-2¾"-3⅛"-3⅛"-3½"-4" from the marker on the neck. Now increase for the sleeves as follows. INCREASES FOR SLEEVES: Continue the pattern. AT THE SAME TIME, on the next round, increase 4 stitches for the sleeves as follows: Increase AFTER markers 1 and 3 and BEFORE markers 2 and 4 – remember INCREASE TIP-2. You are only increasing on the shoulders and the number of stitches on the front and back pieces remains the same. The increased stitches are worked in stockinette stitch. Increase like this every 2nd round a total of 18-19-18-19-18-16 times = 294-306-326-354-370-374 stitches. The piece measures approx. 18-19-19-20-20-20 cm = 7"-7½"-7½"-8"-8"-8" from the marker on the neck. Now increase for the yoke as follows. INCREASES FOR YOKE: Move the 4 markers so each one sits in the outermost stitch on each sleeve. There are 61-63-61-69-67-63 stitches between the marker-stitches on the sleeves. On the next round, increase 8 stitches for the yoke by increasing both before and after all 4 marker-stitches – remember INCREASE TIP-2. You are increasing on both the front and back pieces and on the sleeves and the increased stitches are worked in stockinette stitch. Increase like this every 2nd round a total of 1-4-4-5-7-9 times = 302-338-358-394-426-446 stitches. When all the increases are finished, the piece measures approx. 18-20-22-23-25-27 cm = 7"-8"-8¾"-9"-9¾"-10⅝" from the marker on the neck. If the piece is shorter than this, continue working to the correct length. Now divide the piece for body and sleeves on the next round as follows: Work the first 42-47-50-56-61-65 stitches (= ½ back piece), place the next 65-73-77-85-89-91 stitches on a thread for the sleeve, cast on 12-12-16-18-20-22 stitches (= in side under sleeve), work the next 86-96-102-112-124-132 stitches (= front piece), place the next 65-73-77-85-89-91 stitches on a thread for the sleeve, cast on 12-12-16-18-20-22 stitches (= in side under sleeve), work the last 44-49-52-56-63-67 stitches (= ½ back piece). Body and sleeves are finished separately. THE PIECE IS NOW MEASURED FROM HERE. BODY: = 196-216-236-260-288-308 stitches. Insert 1 marker thread in the middle of the cast-on stitches under each sleeve. There are 98-108-118-130-144-154 stitches between the marker threads on the front and back pieces. Allow the threads to follow your work onwards; they are used when decreasing and increasing in the sides. Continue in the round with stockinette stitch. When the piece measures 3 cm = 1⅛" from the division, decrease 1 stitch on each side of both marker threads – read DECREASE TIP (= 4 stitches decreased). Decrease like this every 1½ cm = ½" a total of 5-5-5-5-5-5 times = 176-196-216-240-268-288 stitches. When the piece measures 11 cm = 4⅜" from the division, increase 1 stitch on each side of both marker threads – read INCREASE TIP-3 (= 4 stitches increased). Increase like this every cm a total of 9-9-9-8-8-8 times = 212-232-252-272-300-320 stitches. When the piece measures 20 cm = 8" in all sizes (try the sweater on and work to desired length; there is approx 4 cm = 1½" left to finished length), increase 13-14-15-16-18-19 stitches evenly spaced = 225-246-267-288-318-339 stitches. Change to circular needle size 2,5 = US 1,5. Work rib (knit 1, purl 2) for 4 cm = 1½". Bind off with knit over knit and purl over purl - read BINDING-OFF TIP. The sweater measures approx. 48-50-52-54-56-58 cm = 19"-19¾"-20½"-21¼"-22"-22¾" from the shoulder down. SLEEVES: Place the 65-73-77-85-89-91 stitches from the thread on the one side of the piece on double pointed needles/short circular needle size 3 MM = US 2.5 and knit up 1 stitch in each of the 12-12-16-18-20-22 stitches cast on under the sleeve = 77-85-93-103-109-113 stitches. Insert a marker thread in the middle of the new stitches under sleeve. Allow the thread to follow your work onwards; it will be used when decreasing under the sleeve. Work pattern as before over the middle 27-27-27-33-33-33 stitches. The other stitches are worked in stockinette stitch. When the sleeve measures 3-3-3-3-2-2 cm = 1⅛"-1⅛"-1⅛"-1⅛"-¾"-¾", decrease 1 stitch on each side of the marker thread under the sleeve - read DECREASE TIP. Decrease like this every 3-2-1½-1-1-1 cm = 1⅛"-¾"-½"-⅜"-⅜"-⅜" a total of 6-9-12-14-15-15 times = 65-67-69-75-79-83 stitches. When the sleeve measures 24-23-21-20-18-17 cm = 9½"-9"-8¼"-8"-7"-6¾" from the division, increase 2-3-4-4-3-5 stitches evenly over the stockinette stitches (A.1b is continued as before) = 67-70-73-79-82-88 stitches. Change to double pointed needles size 2.5 MM = US 1.5 and work A.1a over A.1B and rib over the other stitches (knit 1, purl 2). When the rib measures 3 cm = 1⅛", bind off with knit over knit and purl over purl. The sleeve measures approx. 27-26-24-23-21-20 cm = 10⅝"-10¼"-9½"-9"-8¼"-8" from the division. Work the other sleeve in the same way. |
||||||||||||||||||||||||||||
Diagram explanations |
||||||||||||||||||||||||||||
|
||||||||||||||||||||||||||||
 |
||||||||||||||||||||||||||||
 |
||||||||||||||||||||||||||||
 |
||||||||||||||||||||||||||||
 |
||||||||||||||||||||||||||||
Have you finished this pattern?Tag your pictures with #dropspattern #dancingdiamondssweater or submit them to the #dropsfan gallery. Do you need help with this pattern?You'll find 31 tutorial videos, a Comments/Questions area and more by visiting the pattern on garnstudio.com. © 1982-2026 DROPS Design A/S. We reserve all rights. This document, including all its sub-sections, has copyrights. Read more about what you can do with our patterns at the bottom of each pattern on our site. |
||||||||||||||||||||||||||||


With over 40 years in knitting and crochet design, DROPS Design offers one of the most extensive collections of free patterns on the internet - translated to 17 languages. As of today we count 324 catalogs and 12290 patterns - 12280 of which are translated into English (US/in).
We work hard to bring you the best knitting and crochet have to offer, inspiration and advice as well as great quality yarns at incredible prices! Would you like to use our patterns for other than personal use? You can read what you are allowed to do in the Copyright text at the bottom of all our patterns. Happy crafting!
Post a comment to pattern DROPS 221-7
We would love to hear what you have to say about this pattern!
If you want to leave a question, please make sure you select the correct category in the form below, to speed up the answering process. Required fields are marked *.