
Popular categories
Looking for a yarn?


|
|
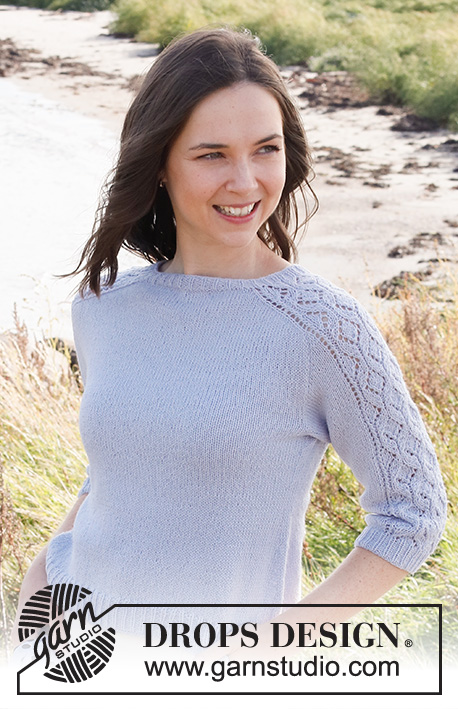
Sweet Sea |
|
 |
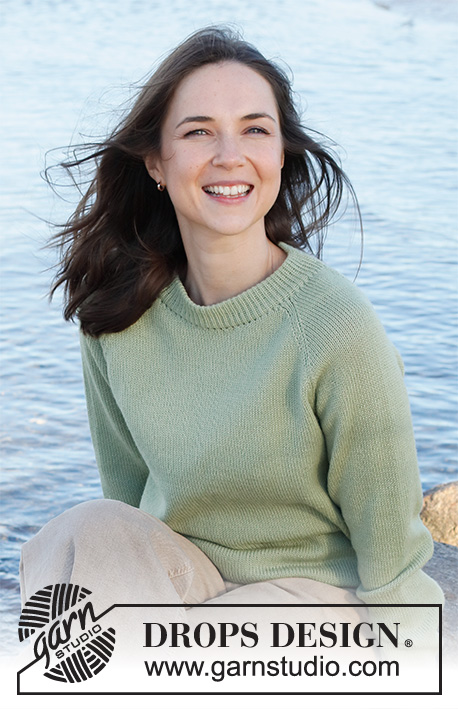 |
Knitted sweater in DROPS BabyAlpaca Silk. Piece is knitted top down with raglan. Size: S - XXXL
DROPS 221-25 |
|
|
------------------------------------------------------- EXPLANATION FOR THE PATTERN: ------------------------------------------------------- INCREASE TIP (evenly): To calculate how to increase/decrease evenly, use the total number of stitches on row (e.g. 96 stitches) , and divide stitches by number of increases/decreases to be done (e.g. 24) = 4. In this example increase by making 1 yarn over after every 4th stitch. On next row work yarn overs twisted to avoid holes. RAGLAN: Increase 1 stitch on each side of marker thread in every transition between sleeves and body as follows: Work until 1 stitch remains before marker thread, make 1 yarn over, knit 2 (marker thread is between these stitches), make 1 yarn over. Repeat at the remaining marker threads (= 8 stitches increased on round). On next round knit yarn overs twisted to avoid holes. Then work the new stitches in stockinette stitch. DECREASE TIP (applies to mid under sleeves): Decrease 1 stitch on each side of stitch with marker as follows: Work until 2 stitches remain before stitch with marker, knit 2 together, knit 1 (marker is in this stitch), slip 1 stitch knitwise, knit 1, pass slipped stitch over stitch worked. BIND-OFF TIP: To avoid a tight bind-off edge you may use a larger needle size. If this also is too tight, work a 1 yarn over after approx. every 4th stitch while binding off (bind off yarn overs as regular stitches). ------------------------------------------------------- START THE PIECE HERE: ------------------------------------------------------- SWEATER - SHORT OVERVIEW OF THE PIECE: Neck edge and yoke are worked in the round on circular needle, top down. Increase for raglan. Now divide yoke for body and sleeves. Body is worked in the round on circular needle, top down. Work sleeves in the round on double pointed needles/short circular needle, top down. DOUBLE NECK EDGE: Cast on 120-136-140-152-164-168 stitches on circular needle size 3 MM = US 2.5 with Baby Alpaca Silk. Switch to circular needle size 2.5 MM = US 1.5 and work rib in the round = knit 1 twisted/purl 1. Continue like this until rib measures approx. 8-9 cm = 3⅛"-3½". Switch to circular needle size 3 MM = US 2.5. Insert 1 marker at the beginning of round, measure yoke from this marker! YOKE: Now insert 4 marker threads in the piece without working as follows: Beginning of round = mid back. Count 19-23-23-26-28-29 stitches (= half back piece), and insert 1st marker thread here (= between back piece and sleeve). Count 22-22-24-24-25-25 stitches and insert 2nd marker thread here (= sleeve). Count 38-46-46-52-57-59 stitches (= front piece), and insert 3rd marker thread here. Count 22-22-24-24-25-25 stitches (= sleeve) and insert 4th marker thread here. 19-23-23-26-29-30 stitches (= half back piece) remain until beginning of round. REMEMBER THE KNITTING GAUGE! Work in stockinette stitch in the round, AT THE SAME TIME on first round begin increase for RAGLAN – read explanation above. Increase like this every other round 26-28-32-36-40-44 times in total = 328-360-396-440-484-520 stitches on row. Work in stockinette stitch until piece measures 21-23-25-26-28-30 cm = 8¼"-9"-9¾"-10¼"-11"-11¾" from marker at the neck. Now divide the piece for body and sleeves, begin mid back and work until 2-1-1-1-3-5 stitches past 1st marker thread (= half back piece), and slip the next 70-76-86-94-99-103 stitches on a stitch holder without working them, cast on 7 new stitches in the side under sleeve. Work the next 94-104-112-126-143-157 stitches (= front piece), slip the next 70-76-86-94-99-103 stitches on a stitch holder for sleeve without working them, cast on 7 new stitches in the side under sleeve and work until beginning of round. Then finish body and sleeves separately. Remove the marker threads in piece. NOW MEASURE PIECE FROM HERE! BODY: = 202-222-238-266-300-328 stitches. Continue in the round in stockinette stitch until piece measures 22-22-22-23-23-23 cm = 8¾"-8¾"-8¾"-9"-9"-9" from division. Switch to circular needle size 2.5 MM = US 1.5. Knit 1 round while AT THE SAME TIME increasing 26-26-26-30-30-32 stitches evenly on round = 228-248-264-296-330-360 stitches. Work rib (= knit 1 twisted/purl 1) until rib measures 4 cm = 1½" in all sizes. Bind off with knit over knit and purl over purl - read BIND-OFF TIP. Sweater measures approx. 52-54-56-58-60-62 cm = 20½"-21¼"-22"-22¾"-23⅝"-24⅜" from shoulder and down. SLEEVE: Slip the 70-76-86-94-99-103 stitches from stitch holder in one side of piece on a short circular needle or double pointed needles size 3 MM = US 2.5, pick in addition up 1 stitch in each of the 7 stitches cast on under sleeve = 77-83-93-101-106-110 stitches stitch. Insert 1 marker in the middle of the 7 stitches that were cast on under sleeve. Work in stockinette stitch in the round. When sleeve measures 2-2-3-3-3-3 cm = ¾"-¾"-1⅛"-1⅛"-1⅛"-1⅛" from division in all sizes, decrease 1 stitch on each side of stitch with marker - read DECREASE TIP. Decrease like this approx. every 2½-2-1½-1-1-1 cm = 1"-¾"-½"-⅜"-⅜"-⅜" 12-13-16-20-21-23 times in total = 53-57-61-61-64-64 stitches. Work until piece measures 37-34-33-31-29-28 cm = 14½"-13⅜"-13"-12¼"-11⅜"-11" from division – or desired length, approx. 4 cm = 1½" remain until finished measurements. Switch to double pointed needles size 2.5 MM = US 1.5. Knit 1 round and decrease 1-1-1-1-0-0 stitches evenly = 52-56-60-60-64-64 stitches. Work rib (= knit 1 twisted/purl 1) until rib measures 4 cm = 1½" in all sizes. Bind off with knit over knit and purl over purl - remember BIND-OFF TIP! Work the other sleeve the same way. ASSEMBLY: Fold rib at the top of neck down on the inside of garment. Fasten rib, it is important that the seam is elastic and not to sew stitch by stitch - sew with long and loose stitches. |
|

|
|
|
Have you made this or any other of our designs? Tag your pictures in social media with #dropsdesign so we can see them! Do you need help with this pattern?You'll find tutorial videos, a Comments/Questions area and more by visiting the pattern on garnstudio.com. © 1982-2024 DROPS Design A/S. We reserve all rights. This document, including all its sub-sections, has copyrights. Read more about what you can do with our patterns at the bottom of each pattern on our site. |
|


With over 40 years in knitting and crochet design, DROPS Design offers one of the most extensive collections of free patterns on the internet - translated to 17 languages. As of today we count 304 catalogs and 11422 patterns - 11417 of which are translated into English (US/in).
We work hard to bring you the best knitting and crochet have to offer, inspiration and advice as well as great quality yarns at incredible prices! Would you like to use our patterns for other than personal use? You can read what you are allowed to do in the Copyright text at the bottom of all our patterns. Happy crafting!
Comments / Questions (40)
Kan man ändra halskanten till en enkel kant? Varför är nästan alla era modeller med dubbelhalskant?
22.11.2023 - 15:33DROPS Design answered:
Hej Elin, Det er trendigt med dobbelt halskant just nu, men det bestemmer du jo selv ;)
24.11.2023 - 14:22In one of the comments you have answered that the sleeves are 3/4 length but in the images the sleeves are quite long. So are the images right and the given answer to a comment wrong or how should I understand this? And if the image is showing wrong length, is it a wrong one? Quite confusing...
01.06.2023 - 19:53DROPS Design answered:
Dear Fina, both pattern and pictures are right, check the measurements for the sleeve in the chart including yoke part + length of sleeve after dividing and adjust depending on the required length if desired. Happy knitting!
02.06.2023 - 08:28Je viens de finir ce modèle et je suis déçue par le résultat qui ne correspond pas du tout à la photo. Je pense que les dimensions ne correspondent pas, qu'il faut faire beaucoup plus grand que les explications, difficile quand ce n'est pas pour soi. C'est dommage car c'est un tricot assez long à réaliser, il faudrait le signaler dans les explications...
15.11.2022 - 19:04DROPS Design answered:
Bonjour Mme Pasutto, pensez à toujours bien vérifier votre échantillon, non seulement en largeur, mais aussi en hauteur, car dans ce type de modèle, si vous n'avez pas la bonne hauteur, vous devrez compenser pour le raglan en tricotant soit davantage de rangs, soit moins de rangs entre les augmentations pour conserver les bonnes mesures du schéma. Bonne continuation!
16.11.2022 - 09:52I'm really enjoying the pattern, but I have a question about the sleeves. It says I have knit until the total length from the separation is 37cm for a size small. Right now the sleeves are much too short, too short to reach the desired length with the 4cm edge I think it needs about 10cm more. Now I'm wondering if I should continue knitting to reach the desired length or of the work will grow sufficiently. I am using the recommended yarn with a slightly tighter tension, can you help me?
16.10.2022 - 09:43DROPS Design answered:
Dear Florine, these sleeves are shorter than usual sleeves (almost 3/4 sleeves). The total length of the sleeve is 41 cm (37 + the 4cm edge). So work without decreases until you reach your desired final length (regardless of it being 37 or more cm) minus the 4 cm edge. Happy knitting!
17.10.2022 - 00:32Merci beaucoup !!! Je pense que je vais m'en sortir avec ces bonnes explications, en fait j'étais perdue car je croyais que le 1er fil marqueur était au demi-dos donc je ne comprenais pas pourquoi ce n'était pas les mailles de la manche qu'il fallait mettre en attente... Merci !!!
04.07.2022 - 10:35DROPS Design answered:
Bonjour Mme Pasutto, effectivement, ce tour commence au milieu dos, jusqu'à 2-1-1-1-3-5 mailles après le 1er fil marqueur, mais ensuite la technique sera la même que dans la leçon indiquée. Bonne continuation!
04.07.2022 - 16:23Bonsoir, je ne comprends pas ce que signifie "monter 7mailles sur le côté sous la manche" Est-ce que je dois monter ces 7 mailles sur une nouvelle aiguille ou sur un nouvel arrêt de mailles ou à la suite des 70 mailles en attente ? Merci beaucoup pour votre aide !
02.07.2022 - 23:37DROPS Design answered:
Bonjour Mme Pasutto, cette leçon montre comment tricoter un pull de haut en bas, vous retrouverez à partir de la photo 9 comment on va diviser l'ouvrage en glissant les mailles de la manche en attente (photos 10 et 13) et comment monter les mailles sous la manche (photos 11 et 14) et comment continuer en rond (photos 15 et 16). En espérant que ceci puisse vous aider. Bon tricot!
04.07.2022 - 08:03Merci beaucoup, en fait je n'avais pas compris ce qu'était un jeté torse, maintenant que je les fais les trous sont nettement plus petits, c'est un joli modèle !
17.03.2022 - 18:35Bonjour, je n'arrive pas à faire les emmanchures raglan sans qu'il y ait des trous, pouvez vous me dire comment faire ? Merci beaucoup
13.03.2022 - 08:35DROPS Design answered:
Bonjour Mme Pasutto, il peut rester quelques petits trous quand on augmente avec des jetés, même en les tricotant torse. Pour qu'ils ne soient pas trop grands, essayez de ne pas faire des jetés trop lâches, et si vous ne voulez vraiment pas de trous, utilisez une autre technique, cf par exemple cette vidéo. Bon tricot!
14.03.2022 - 11:02Er det ikke beregnet at genseren skal bli lavere i halsen foran. Bildet av modellen viser at den er lavere foran eller i nakken. Lengden på genseren er også lengre på bildet eller det oppskriften viser.Er det feil, modell på bildet i forhold til oppskriften,?
03.03.2022 - 10:24DROPS Design answered:
Hei Martha. Denne genseren har ingen beskrivelse på forhøyning bak og kan ikke se at bildet viser det, men modellen sitter litt foroverlendt (kanskje det du reagerer på?) I oppskriften står det at i f.eks str. S at lengden på genseren er ca 52 cm, det samme målet som står i oppskriften. Så ingen feil bilde til oppskriften. mvh DROPS Design
07.03.2022 - 14:02Wie bekomme ich ein ebenmäßiges Strickbild hin, muss der Pulli vielleicht erst gewaschen werden und die Maschen sehen dann nach dem ziehen alle gleich aus oder hat jemand eine Idee?
01.02.2022 - 06:25DROPS Design answered:
Liebe Tina62, also ja stimmt, nach dem Waschen werden die Maschen mehr regelmäßig aussehen. Bitte beachten, die Hinweise auf der Banderolle richtig folgen - hier lesen Sie noch mehr. Viel Spaß beim stricken!
01.02.2022 - 09:07