DROPS BabyAlpaca Silk
70% Alpaca, 30% Silk
Discontinued
find alternatives
DROPS Kid-Silk
DROPS Kid-Silk
75% Mohair, 25% Silk
from 4.75 $ /25g
DROPS Super Sale

Galatea

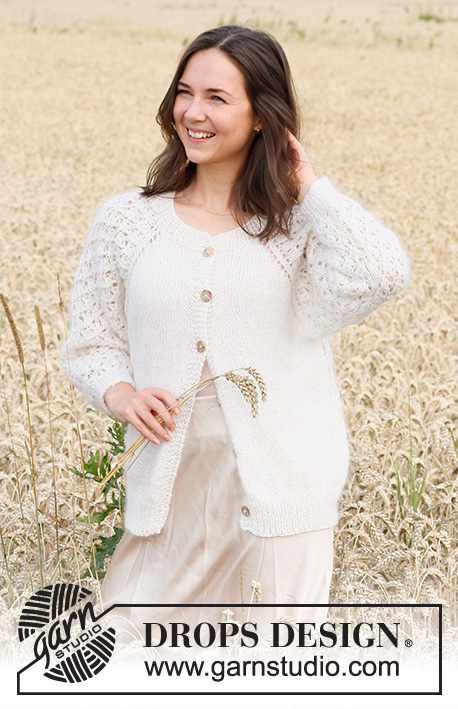
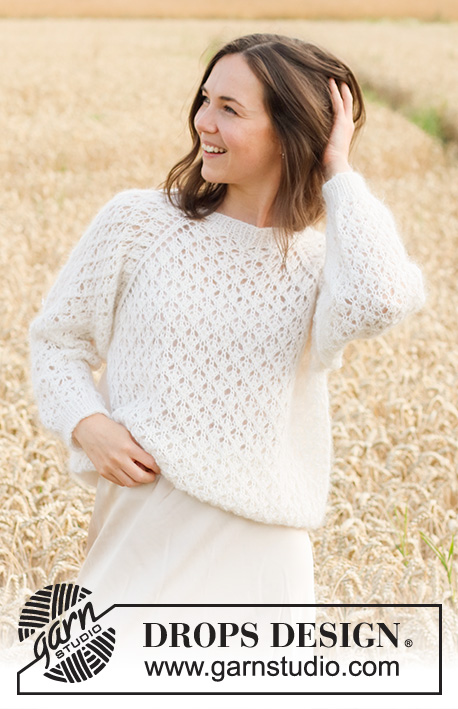
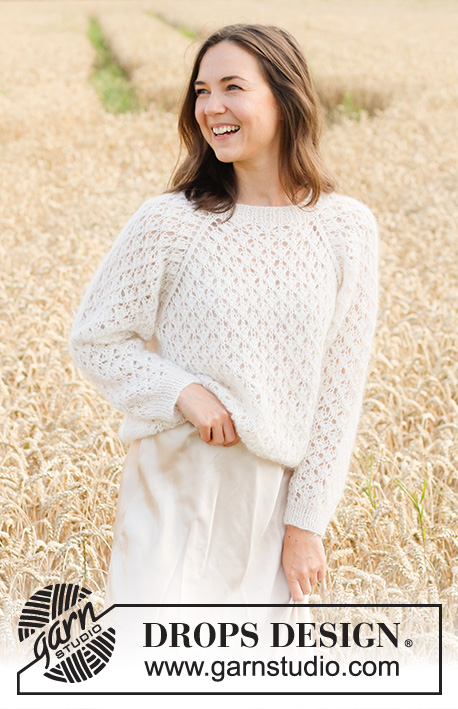
Knitted sweater in 1 strand DROPS Kid-Silk and 1 strand DROPS BabyAlpaca Silk. The piece is worked top down with raglan and lace pattern. Sizes S - XXXL.

DROPS 220-3
DROPS Design: Pattern no bs-161
Yarn group A + A or C
-------------------------------------------------------

SIZES:
S - M - L - XL - XXL – XXXL

Finished measurements:
Chest measurements: 98-106-112-120-134-142 cm = 38½"-41¾"-44"-47¼"-52¾"-55¾"
Full length: 56-58-60-62-64-66 cm = 22"-22¾"-23⅝"-24⅜"-25¼"-26"
All measurements in charts are in cm.

MATERIALS:
DROPS BABY ALPACA SILK from Garnstudio (belongs to yarn group A)
250-300-300-350-350-400 g color 1101, white
And use:
DROPS KID-SILK from Garnstudio (belongs to yarn group A)
100-125-125-150-150-175 g color 01, off white

KNITTING GAUGE:
17 stitches in width and 22 rows in height with pattern and 1 strand of each quality = 10 x 10 cm = 4" x 4".

NEEDLES:
DROPS DOUBLE POINTED NEEDLES SIZE 5 MM = US 8.
DROPS CIRCULAR NEEDLE SIZE 5 MM = US 8: Length 40 cm = 16" and 60 cm = 24" or 80 cm = 32" for stockinette stitch.
DROPS DOUBLE POINTED NEEDLES SIZE 4 MM = US 6.
DROPS CIRCULAR NEEDLE SIZE 4 MM = US 6: Length 40 cm = 16" and 80 cm = 32" for rib.
Needle size is only a guide. If you get too many stitches on 10 cm = 4", change to a larger needle size. If you get too few stitches on 10 cm = 4", change to a smaller needle size.

-------------------------------------------------------

Alternative Yarn – See how to change yarns here
Yarn Groups A to F – Use the same pattern and change the yarn here
Yarn usage using an alternative yarn – Use our yarn converter here

-------------------------------------------------------

DROPS BabyAlpaca Silk
70% Alpaca, 30% Silk
Discontinued
find alternatives
DROPS Kid-Silk
DROPS Kid-Silk
75% Mohair, 25% Silk
from 4.75 $ /25g

Pattern instructions

NOTE: This pattern is written in American English. All measurements in charts are in cm. For conversion from inches to cm - click here. There are different terms for crocheting in American and British English. If this pattern includes crochet, click for "crochet terms" here. For this pattern in British English, please click here.
-------------------------------------------------------

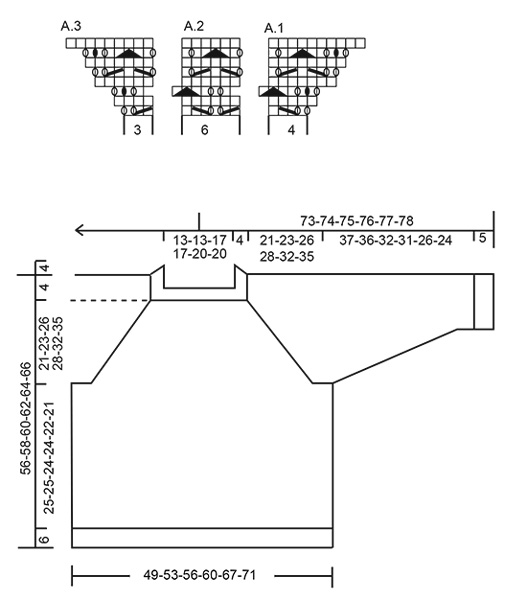
EXPLANATIONS FOR THE PATTERN:

-------------------------------------------------------

PATTERN:
See diagrams A.1 to A.3

DECREASE TIP-1 (for sleeves):
Decrease 1 stitch on either side of the marker thread as follows: Work until there are 3 stitches left before the marker-stitch, knit 2 together, knit 3 (marker thread sits in the middle of these stitches), slip 1 stitch as if to knit, knit 1 and pass the slipped stitch over the knitted stitch (2 stitches decreased).


DECREASE TIP-2 (evenly spaced):
To work out how to decrease evenly, count the total number of stitches on the needle (e.g. 50 stitches) and divide by the number of decreases to be made (e.g. 8) = 6.25.
In this example knit approx. each 5th and 6th stitch together.

BINDING-OFF TIP:
To avoid the bind-off edge being tight you can bind off with a larger size needle. If the edge is still tight, make 1 yarn over after approx. each 4th stitch at the same time as binding off; the yarn overs are bind off as normal stitches.

-------------------------------------------------------

START THE PIECE HERE:

-------------------------------------------------------

SWEATER – SHORT OVERVIEW OF THE PIECE:
The neck and yoke are worked in the round with circular needle, top down. The round starts between the left sleeve and the back piece. The yoke is divided for body and sleeves and the body continued in the round with circular needle. The sleeves are worked in the round with short circular needle/double pointed needles, top down.
The piece is worked with 1 strand Baby Alpaca Silk and 1 strand Kid-Silk (= 2 strands).

NECK:
Cast on 72-72-84-84-96-96 stitches with circular needle size 4 MM = US 6 and 1 strand Kid-Silk and 1 strand Baby Alpaca Silk (= 2 strands). Knit 1 round. Then work rib (knit 1, purl 1) for 4 cm = 1½". Insert 1 marker at the beginning of the round. The yoke is measured from this marker. Change to circular needle size 5 MM = US 8. REMEMBER THE KNITTING GAUGE!

YOKE:
Continue as follows: Work 1 stitch in stockinette stitch, work A.1 (= 4 stitches), A.2 over the next 12-12-18-18-24-24 stitches (= 2-2-3-3-4-4 repeats of 6 stitches), A.3 (= 3 stitches), 2 stitches in stockinette stitch, A.1, A.2, A.3, 2 stitches in stockinette stitch, A.1, A.2 over the next 12-12-18-18-24-24 stitches (= 2-2-3-3-4-4 repeats of 6 stitches), A.3, 2 stitches in stockinette stitch, A.1, A.2, A.3, 1 stitch in stockinette stitch.

Continue this pattern; all increases are drawn in A.1 and A.3. You increase 8 and 16 stitches alternately, every 2nd round. Each time A.1 and A.3 are completed in height, there will be 2 more repeats of A.2 in width. Increase every 2nd round a total of 18-20-20-22-24-26 times = 288-312-324-348-384-408 stitches. The piece measures approx. 16-18-19-20-21-24 cm = 6¼"-7"-7½"-8"-8¼"-9½". Continue the pattern but without further increases; stitches which do not fit into the pattern in the sides are worked in stockinette stitch. Continue working until the piece measures 21-23-26-28-32-35 cm = 8¼"-9"-10¼"-11"-12½"-13¾" from the marker on the neck.

Now divide the yoke for the body and sleeves on the next round as follows (continuing the pattern): Work 75-81-87-93-105-111 stitches (= back piece), place the next 69-75-75-81-87-93 stitches on 1 thread for the sleeve, cast on 9 stitches (in side under the sleeve), work 75-81-87-93-105-111 stitches as before (= front piece), place the next 69-75-75-81-87-93 stitches on 1 thread for the sleeve, cast on 9 stitches. Body and sleeves are finished separately. Cut the strand.

BODY:
= 168-180-192-204-228-240 stitches. Continue with A.2 over all stitches; make sure the pattern matches the pattern on the yoke. Continue working until the piece measures 25-25-24-24-22-21 cm = 9¾"-9¾"-9½"-9½"-8¾"-8¼" from the division (there is approx. 6 cm = 2⅜" left to finished length, you can try the sweater on and work to desired length). Change to circular needle size 4 MM = US 6 and work rib (knit 1, purl 1) for 6 cm = 2⅜". Bind off with knit over knit and purl over purl – read BINDING-OFF TIP! The sweater measures approx. 56-58-60-62-64-66 cm = 22"-22¾"-23⅝"-24⅜"-25¼"-26" from the shoulder down.

SLEEVES:
Place the 69-75-75-81-87-93 stitches from the thread on the one side of the piece on double pointed needles/short circular needle size 5 MM = US 8 and knit up 1 stitch in each of the 9 stitches cast on under the sleeve = 78-84-84-90-96-102 stitches. Insert a marker in the middle of the 9 stitches under the sleeve. Allow the marker to follow your work onwards; it will be used when decreasing under the sleeve.
Continue pattern A.2 in the round, making sure the pattern matches the pattern on the yoke. When the sleeve measures 3 cm = 1⅛" from the division in all sizes, decrease 2 stitches under the sleeve – read DECREASE TIP-1. Decrease like this every 2½-2-1½-1½-1-1 cm = 1"-¾"-½"-½"-⅜"-⅜" a total of 14-16-16-17-19-20 times = 50-52-52-56-58-62 stitches; stitches which do not fit into the pattern under the sleeve are worked in stockinette stitch. Continue working until the sleeve measures 37-36-32-31-26-24 cm = 14½"-14¼"-12½"-12¼"-10¼"-9½" from the division (there is approx. 5 cm = 2" left to finished length, you can try the sweater on and work to desired length). NOTE: Shorter measurements in larger sizes due to wider neck and longer yoke.
Knit 1 round where you decrease 10 stitches evenly spaced in all sizes – read DECREASE TIP-2 = 40-42-42-46-48-52 stitches. Change to double pointed needles size 4 MM = US 6 and work rib (knit 1, purl 1) for 5 cm = 2". Bind off with knit over knit and purl over purl – remember BINDING-OFF TIP! The sleeve measures approx. 42-41-37-36-31-29 cm = 16½"-16⅛"-14½"-14¼"-12¼"-11⅜" from the division. Work the other sleeve in the same way.

Diagram

All measurements in charts are in cm.

symbols = knit
symbols = knit 2 together
symbols = slip 1 stitch as if to knit, knit 1 and pass the slipped stitch over the knitted stitch
symbols = slip 1 stitch as if to knit, knit 2 together and pass the slipped stitch over the knitted-together stitches
symbols = between 2 stitches make 1 yarn over; on the next round knit the yarn over to leave a hole
symbols = between 2 stitches make 1 yarn over, on the next round knit the yarn over twisted - NO hole
diagram

Each of our patterns has specific tutorial videos to help you.

Do you have a question? See a list of frequently asked questions (FAQ)

Knitting tension is what determines the final measurements of your work, and is usually measured per 10 x 10 cm. It is provided like so: number of stitches in width x number of rows in height - eg: 19 stitches x 26 rows = 10 x 10 cm.

The knitting tension is very individual; some people knit/crochet loosely while others work tightly. You adjust the knitting tension with the needle size, which is why the suggested needle size only serve as a guide! You need to adjust this (up or down) to ensure that YOUR knitting tension matches the knitting tension provided in the pattern. If you work with a different knitting tension than provided you will have a different yarn consumption, and your work will have different measurements than what the pattern suggests.

The knitting tension also determines which yarns can replace each other. As long as you achieve the same knitting tension you can replace one yarn with another.

See DROPS lesson: How to measure your tension/gauge

See DROPS video: How to make a gauge tension swatch

The required amount of yarn is provided in grams, eg: 450 g. To calculate how many balls you’ll need you first need to know how many grams are in 1 ball (25g, 50g or 100g). This information is available if you click on the individual yarn quality on our pages. Divide the amount required with the amount of each ball. For example, if each ball is 50g (the most common amount), the calculation will be as follows: 450 / 50 = 9 balls.

The important thing when changing from one yarn to another is that the knitting/crochet tension remains the same. This is so that the measurements of the finished piece will be the same as on the sketch provided. It is easier to achieve the same knitting tension using yarns from the same yarn group. It is also possible to work with multiple strands of a thinner yarn to achieve the knitting tension of a thicker one. Please try our yarn converter. We recommend you to always work a test swatch.

Please NOTE: when changing yarn the garment might have a different look and feel to the garment in the photo, due to individual properties and qualities of each yarn.

See DROPS lesson: Can I use a different yarn than the one mentioned in the pattern?

All our yarns are categorised into yarn groups (from A to F) according to thickness and knitting tension – group A contains the thinnest yarns and group F the thickest. This makes it easier for you to find alternative yarns to our patterns, should you wish to switch yarn. All yarns within the same group have a similar knitting tension and can easily replace each other. However, different yarn qualities have different structures and properties which will give the finished work a unique look and feel.

Click here for an overview of the yarns in each yarn group

At the top of all our patterns you’ll find a link to our yarn converter, which is a helpful tool should you wish to use a different yarn than suggested. By filling in the yarn quality you wish to replace, the amount (in your size) and number of strands, the converter will present good alternative yarns with the same knitting tension. Additionally it will tell you how much you’ll require in the new qualities and whether you’ll need to work with multiple strands. Most skeins are 50g (some are 25g or 100g).

If the pattern is worked with multiple colours, every colour will have to be converted separately. Similarly, if the pattern is worked with several strands of different yarns (for example 1 strand Alpaca and 1 strand Kid-Silk) you will have to find alternatives for each, individually.

Click here to see our yarn converter

Since different yarns have different qualities and textures we have chosen to keep the original yarn in our patterns. However, you can easily find options among our available qualities by using our yarn converter, or simply pick a yarn from the same yarn group.

It is possible that some retailers still have discontinued yarns in stock, or that someone has a few skeins at home that they would like to find patterns for.

The yarn converter will provide both alternative yarn as well as required amount in the new quality.

If you think it's hard to decide what size to make, it can be a good idea to measure a garment you own already and like the size of. Then you can pick the size by comparing those measures with the ones available in the pattern's size chart.

You'll find the size chart at the bottom of the pattern.

See DROPS lesson: How to read size chart

The needle size provided in the pattern serves only as a guide, the important thing is to follow the knitting tension. And since knitting tension is very individual, you will have to adjust the needle size to ensure that YOUR tension is the same as in the pattern – maybe you’ll have to adjust 1, or even 2 needle sizes, up or down to achieve the correct tension. For this, we recommend that you work test swatches.

Should you work with a different knitting tension than the one provided, the measurements of the finished garment might deviate from the measurement sketch.

See DROPS lesson: How to measure your tension/gauge

See DROPS video: How to make a gauge tension swatch

Working a garment top-down provides more flexibility and room for personal adjustment. For example it is easier to try the garment on while working, as well as making adjustments to length of yoke and shoulder caps.

The instructions are carefully explaining every step, in the correct order. Diagrams are adjusted to the knitting direction and are worked as usual.

The diagram depicts all rows/rounds, and every stitch seen from the right side. It is read from bottom to top, from right to left. 1 square = 1 stitch.

When working back and forth, every other row is worked from the right side and every other row is worked from the wrong side. When working from the wrong side, the diagram will have to be worked reversed: from left to right, knit stitches are purled, purl stitches are knit etc.

When working in the round every round is worked from the right side and the diagram are worked from right to left on all rounds.

See DROPS lesson: How to read knitting diagrams

The diagram depicts all rows/rounds, and every stitch seen from the right side. It is worked from bottom to top, from right to left.

When working back and forth every other row is worked from the right side: from right to left and every other row is worked from the wrong side: from left to right.

When working in the round, every row in the diagram are worked from the right side, from right to left.

When working a circular diagram you start in the middle and work your way outwards, counter clockwise, row by row.

The rows usually start with a given number of chain stitches (equivalent to the height of the following stitch), this will either be depicted in the diagram or explained in the pattern.

See DROPS lesson: How to read crochet diagrams

Instructions for working several diagrams after each other on the same row/round, will often be written like so: “work A.1, A.2, A.3 a total of 0-0-2-3-4 times". This means you work A.1 once, then A.2 is worked once, and A.3 is repeated (in width) the number of times provided for your size – in this case like so: S = 0 times, M = 0 times, L=2 times, XL= 3 times and XXL = 4 times.

The diagrams are worked as usual: begin with the first row in A.1, then work the first row in A.2 etc.

See DROPS lesson: How to read knitting diagrams

See DROPS lesson: How to read crochet diagrams

The total width of the garment (from wrist-to-wrist) will be larger in the larger sizes, despite the actual sleeves being shorter. The larger sizes have longer sleeve caps and wider shoulders, so there will be a good fit in all sizes.

The measurement sketch/schematic drawing provides information regarding the full length of the garment. If it’s a jumper or a jacket the length is measured from the highest point on the shoulder (usually closest to the neckline), and straight down to the bottom of the garment. It is NOT measured from the tip of shoulder. Similarly, the length of yoke is measured from the highest point on the shoulder and down to where yoke is split into body and sleeves.

See DROPS lesson: How to read a schematic drawing

Diagrams are often repeated on the round or in height. 1 repeat is the diagram the way it appears in the pattern. If it says to work 5 repeats of A.1 in the round, then you work A.1 a total of 5 times after/next to each other in the round. If it says to work 2 repeats of A.1 vertically/in height you work the entire diagram once, then begin again at the start and work the entire diagram one more time.

Chain stitches are slightly narrower than other stitches and to avoid working the cast-on edge too tight, we simply chain more stitches to begin with. The stitch count will be adjusted on the following row to fit the pattern and measurement sketch.

The rib edge is more elastic and will contract slightly compared to, for example, stocking stitch. By increasing before the rib edge, you avoid a visible difference in width between the rib edge and the rest of the body.

It’s very easy to cast off too tightly, and by making yarn overs while casting off (and simultaneously casting these off) you avoid a too tight cast off edge.

See DROPS video: How to bind off with yarn overs (yo)

To achieve an even increase (or decrease) you can increase on, for example: every 3rd and 4th row alternately, like so: work 2 rows and increase on the 3rd row, work 3 rows and increase on the 4th. Repeat this until the increase is complete.

See DROPS lesson: Increase or decrease 1 st on every 3rd and 4th row alternately

Should you prefer to work in the round instead of back and forth, you may of course adjust the pattern. You’ll need to add steeks mid-front (usually 5 stitches), and follow the instructions. When you would normally turn and work from the wrong side, simply work across the steek and continue in the round. At the end you’ll cut the piece open, pick up stitches to work bands, and cover the cut edges.

See DROPS video: How to knit steeks and cut open

Should you prefer to work back and forth instead of in the round, you may of course adjust the pattern so you work the pieces separately and then assemble them at the end. Divide the stitches for the body in 2, add 1 edge stitch in each side (for sewing) and work the front and back pieces separately.

See DROPS lesson: Can I adapt a pattern for circular needles into straight needles?

Pattern repeats can vary slightly in the different sizes, in order to get the correct proportions. If you’re not working the exact same size as the garment in the photo, yours might deviate slightly. This has been carefully developed and adjusted so that the complete impression of the garment is the same in all sizes.

Make sure to follow instructions and diagrams for your size!

If you have found a pattern you like which is available in women’s size it’s not very difficult to convert it to men’s size. The biggest difference will be the length of sleeves and body. Start working on the women size that you think would fit across the chest. The additional length will be worked right before you cast off for the armhole/sleeve cap. If the pattern is worked top-down you can add the length right after the armhole or before the first decrease on sleeve.

Regarding additional yarn amount, this will depend on how much length you add, but it is better with a skein too many than too few.

All yarns will have excess fibres (from production) that might come off as lint or shedding. Brushed yarns (ie hairier yarns) have more of these loose, excess fibres, causing more shedding.

Shedding also depends on what is worn under or over the garment, and whether this pulls at the yarn fibres. It’s therefore not possible to guarantee that there will be no shedding

Below are some tips on how to get the best result when working with hairier yarns:

1. When the garment is finished (before you wash it) shake it vigorously so the looser hairs come off. NOTE: do NOT use a lint roller, brush or any method that pulls at the yarn.

2. Place the garment in a plastic bag and put it in your freezer - the temperature will cause the fibres to become less attached to each other, and excess fibres will come off easier.

3. Leave in the freezer for a few hours before taking it out and shaking it again.

4. Wash the garment according to the instructions on the yarn label.

Pilling is a natural process that happens to even the most exclusive of fibers. It's a natural sign of wear and tear that is hard to avoid, and that is most visible in high friction areas of your garment like a sweater's arms and cuffs.

You can make your garment look as new by removing the pilling, using a fabric comb or a pill/lint remover.

Still can't find the answer you need? Then scroll down and leave your question so one of our experts can try to help you. This will be done normally within 5 to 10 working days.
In the meantime, you can read the questions and answers that others have left to this pattern or join the DROPS Workshop on Facebook to get help from fellow knitters/crocheters!

You might also like...

Galatea

Bethany

Galatea

Bethany

Galatea

LeelooNile, France

Galatea

Anne Wirth, Switzerland

Galatea

Anne, Switzerland

Galatea

Fabienne, France

Galatea

tekeleet, Finland

Galatea

Tina, Germany

Post a comment to pattern DROPS 220-3

We would love to hear what you have to say about this pattern!

If you want to leave a question, please make sure you select the correct category in the form below, to speed up the answering process. Required fields are marked *.

Comments / Questions (84)

country flag Jytte Bering wrote:

Ved pind 3 på bærestykket har jeg 2 m tilbage men mangler A2 A3 og en maske glat…. Ville kræve 20 masker at lave det jeg mangler…. Hvor er fejlen?? Har talt og talt og talt igen.

26.08.2021 - 22:07

DROPS Design answered:

Hej Jytte, Hvilken størrelse strikker du, og hvor mange masker har du? Er du på første pind i diagrammet? Har du taget 8 nye masker ud ifølge diagram A.1 og A.3?

21.09.2021 - 11:41

country flag Sara Marie wrote:

Jeg kan ikke få maskeantallet til at passe. Jeg strikker en str s, har slået 72 masker op, strikket rib og er lige kommet til bærestykket. Når jeg strikker hele første omgang af bærestykket får jeg det kun til 71 masker. Jeg har altså en maske til sidst, som jeg ikke ved, hvad jeg skal gøre med. Jeg har efterfølgende regnet efter, og her får jeg også kun jeres opskrift på første omg til i alt 71 masker. Hvordan kommer jeg videre herfra? Håber, I kan hjælpe. Mvh Sara Marie

26.08.2021 - 17:26

country flag Dagny Nielsen wrote:

Hej jeg sidder med garn og opskrift fra drops .på bluse drops220-3 men har opgivet ,at få diagramet til og passe vil rigtig gerne ha hjælp Hilsen Dagny

25.08.2021 - 16:51

DROPS Design answered:

Hei Dagny. For at vi skal hjelpe deg, er det fint at du beskriver hva det er du trenger hjelp til, hvor går det galt for deg/hvor du mener det ikke stemmer. Og husk å skrive hvilken str. du strikker. mvh DROPS design

27.08.2021 - 11:22

country flag Rikke wrote:

Jeg strikker str xl og er kommet til der hvor man skal øge med 2 stk A2. Jeg har strikket mønsteret i en højde. Jeg synes ikke man kan læse hvor man skal sætte øg ingen ind henne

25.08.2021 - 15:07

country flag Kirsi wrote:

S-kokoisessa paidassa Alpaca silk -langan menekki ohjeessa on merkitty virheellisesti olevan 150g. Norjaksi katsottuna oli 250g. Lanka loppui siksi kesken.

17.08.2021 - 10:02

country flag Rikke Richtendorff wrote:

Det her afsnit i opskriften er ret forvirrende. Der står at udtagningerne er medregnet, men også at man skal øge med 2 A2 i bredden? Altså er det så på ryg og forstykke en gang hver eller er det for 2 ekstra for hver gang (mellem hver raglan udtagning = 8 ekstra A2 på en omgang)? Så er der nogle udtagninger på hver anden pind i siderne??? Hvor? Er der nogen der kan hjælpe med et svar.

12.08.2021 - 19:13

DROPS Design answered:

Hej Rikke, hvilken størrelse strikker du, hvor er du i opskriften? Gælder det udtagningen til raglan, strikker du de nye masker løbende ind i mønsteret :)

25.08.2021 - 10:16

country flag Ela wrote:

Zrobilam flora i kid silk piękny polecam dziejcie ! Dziękuję za cudny wzór!

11.08.2021 - 14:45

country flag Claudia Göbel wrote:

Guten Tag , meine Frage bezieht sich gleich auf den Anfang zur Passe. Und zwar soll man jede 2.Runde abwechselnd 8 und 16 Machen zunehmen . Wenn ich dies tue bleiben bei mir am Ende der darauffolgenden Runde genau diese 8 Maschen übrig , da diese bei der Abfolge von " 1 M re, A1,2xA2,A3, 2Mre usw" nicht reinpassen. Soll ich diese 8 Maschen glatt rechts stricken ? Oder nochmal ein A2 irgendwo mehr stricken ? Aber dann kommt das Muster doch durcheinander. Mfg

08.07.2021 - 11:02

DROPS Design answered:

Liebe Frau Göbel, die Raglanzunahmen sind im Diagram gezeichnet, dh bei A.1 und A.3, 1. und 5. Reihe nehmen Sie je 1 Masche zu und bei 3. und 7. Reihe nehmen Sie je 2 Maschen zu. Die Zunahmen stricken Sie jeweils wie bei der nächsten Runde gezeigt (entwder rechts (= Löcher) oder rechts verschränkt (kein Loch)). Kann es Ihnen helfen? Viel Spaß beim stricken!

08.07.2021 - 13:38

country flag Jannie wrote:

Kunne det ikke være muligt at få et diagram som viser hvorledes mønsteret strikkes efter man er færdig med udtagninger til bærestykke? Jeg har prøvet flere gange nu, og hver gang går jeg gal i det….

02.07.2021 - 17:51

DROPS Design answered:

Hei Jannie. Det ville ha blitt et altfor stort diagram for å vise alle økningenefor deretter å få det tilpasset web vil det bli skalert ned slik at det vil være umulig å se. Anbefaler deg å bruke maskemarkør/merketråd mellom diagrammene. Da får man en bedre oversikt. mvh DROPS design

05.07.2021 - 12:58

country flag Fabienne Borel wrote:

Bjr, j ai fait un document avec toutes les explications qui me permettront de refaire ce magnifique modèle à nouveau sans être dans le doute de faire juste au raglan et sous les manches. Si cela vous intéresse, je peux vous l envoyer. Il est en français et en taille S seulement. Je pense que c est surtout le principe à suivre pour garder le motif intact que c est important de donner une explication claire. Merci pour vos superbes créations.

28.05.2021 - 11:03