
Popular categories
Looking for a yarn?


Comments / Questions (121)
![]() Malgorzata wrote:
Malgorzata wrote:
Wiem ktora to prawa strona a ktora lewa chodzi mi o ramiona ktore to prawe a ktore lewe
01.11.2023 - 19:14DROPS Design answered:
Witaj Małgosiu, patrzymy jakbyś założyła sweter. Więc prawe ramię przodu jak robótka jest rozłożona na płasko np. na stole prawą stroną do góry, będzie lewym ramieniem gdy nałożysz gotowy sweter. Pozdrawiamy!
02.11.2023 - 08:40
![]() Malgorzata wrote:
Malgorzata wrote:
Rozumiem ze srodkowe oczka musze sciagnac na dodatkowy drut ale nie rozumiem jak zamknac oczka na ramionach na dekold jak rozpoznac ktory prawa strona a ktore lewa czemu nie ma na to filmiku
31.10.2023 - 07:18DROPS Design answered:
Witaj Małgosiu, prawa strona robótki to ta gdzie są pionowe rzędy oczek prawych naprzemiennie z rzędami ściegiem francuskim (patrz zdjęcie swetra). Na tej stronie będziesz przerabiać 3 oczka dżersejem prawym wzdłuż dekoltu i będziesz zamykać oczka jak w opisie w części ZAMYKANIE OCZEK-2 (dekolt przodu). W video poniżej znajdziesz 2 sposoby zamykania oczka: patrz 1. Zamykanie oczek: 2 oczka razem na prawo, 2. Zamykanie oczek–zdjąć 1 o., 1 o.p., przełożyć o. zdjęte nad przerobionym oczkiem. Pozdrawiamy!
31.10.2023 - 14:08
![]() Malgorzata wrote:
Malgorzata wrote:
Dlaczego nie jest pokazana na filmiku jak zamykac te oczka na dekold bo nie rozumiem za dobrze
29.10.2023 - 05:58DROPS Design answered:
Witaj Małgosiu, napisz dokładnie czego nie rozumiesz.
30.10.2023 - 08:20
![]() Barbara wrote:
Barbara wrote:
Ik brei de sweater Drops 210-5 maar begrijp niet hoe ik de “hokjesstructuur” in het voorpand moet breien.
15.10.2023 - 13:25DROPS Design answered:
Dag Barbara,
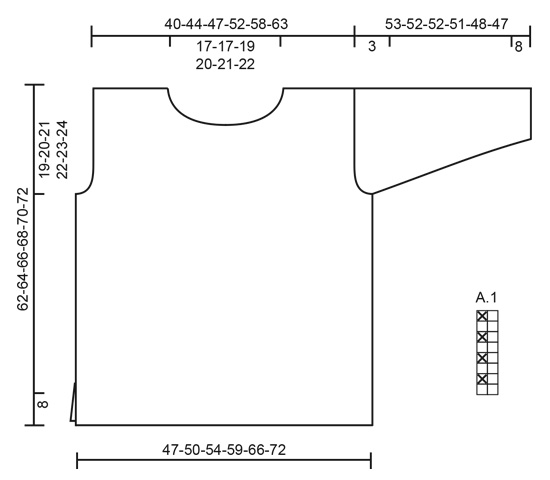
Hiervoor staat een telpatroon (A.1) afgebeeld onderaan het patroon. (Bij de maattekening onder de mouw.) Als je dit telpatroon volgt, ontstaat het hokjespatroon.
15.10.2023 - 17:18
![]() Laurel wrote:
Laurel wrote:
This pattern does not read like the picture of it. How does the pattern go over the shoulder? It appears that the sleeve connects BELOW the shoulder. It the picture incorrect? How do 68 stitches for large work with 21 cm for the armhole opening?
11.08.2023 - 22:34DROPS Design answered:
Dear Laurel, with correct tension (16 sts = 10 cm), the 68 sts in size L should be approx. 42 cm, so 21 cm fitting the armhole. Happy knitting!
14.08.2023 - 08:51
![]() Salla wrote:
Salla wrote:
If there are so many questions about the instructions, isn't it a failure? Next time, please make sure that at least 10 people test the knitting instructions before publishing it. This way you will make sure everything is written precisely as it should be. ;) Oh well, better get back and try to figure out what was meant to be done. Not fun!
30.04.2023 - 18:02
![]() Lia wrote:
Lia wrote:
Oh ja dan snap ik het. Ik brei gewoon met 2 naalden. Kant ik wel aan het begin van de naalden af! Dank voor de reactie 😃
06.04.2023 - 21:33
![]() Lia Roelofs wrote:
Lia Roelofs wrote:
Ik begrijp het minderen van de 3 steken aan elke kant van de markeerdraad niet. Is dat gewoon 3x2 steken samenbreien?
29.03.2023 - 21:00DROPS Design answered:
Dag Lia,
Je breit de mouw in de rondte en de markeerdraad zit midden onder de mouw. Ter hoogte van de oksel kant je 3 steken aan beide kanten van de markeerdraad af en daarna brei je verder heen en weer. Je kant af door steeds de een na laatste steek over de laatste steek heen te halen. (Het is dus echt afkanten en niet samenbreien.)
01.04.2023 - 19:26
![]() Franca wrote:
Franca wrote:
Habe für Größe L 400 Gramm Air gebraucht statt 350 Gramm
27.03.2023 - 11:44
![]() Lone Kramer wrote:
Lone Kramer wrote:
Jeg har stille et spørgsmål 15/10 ang indtagning til ærmer jeg strikker str s
25.10.2022 - 18:07DROPS Design answered:
Hej Lone, du starter med 89 masker, tager 12 masker ind efter ribben, lukker 3, 2, 1 masker af i hver side og har 65 masker tilbage :)
26.10.2022 - 08:14
|
|||||||
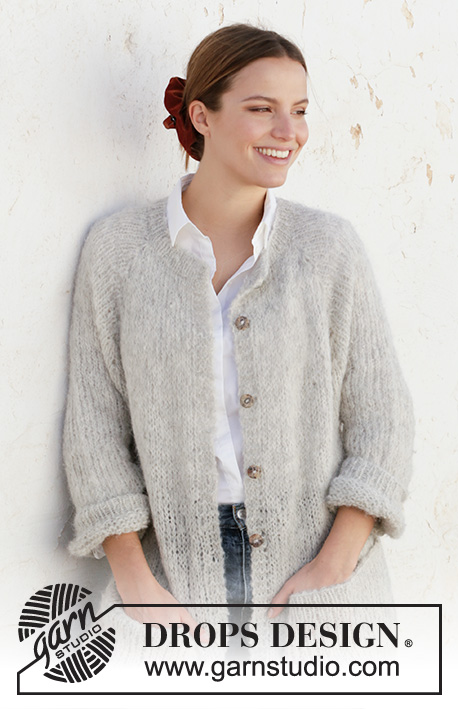
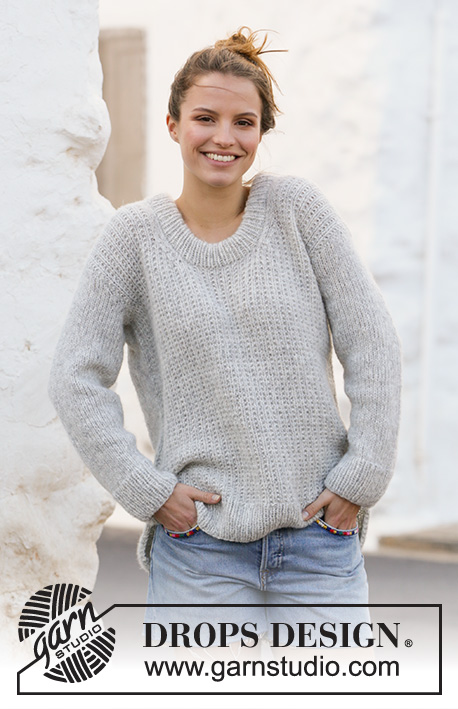
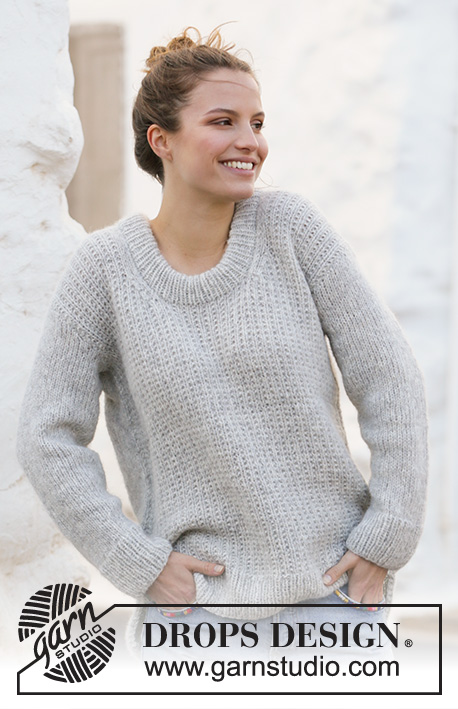
Rainy Day Sweater#rainydaysweater |
|||||||
 |
 |
||||||
Knitted sweater with textured pattern in DROPS Air. Size: S - XXXL
DROPS 210-5 |
|||||||
|
---------------------------------------------------------- EXPLANATION FOR THE PATTERN: ---------------------------------------------------------- GARTER STITCH (back and forth): Knit all rows. 1 ridge vertically = knit 2 rows. PATTERN: See diagram A.1. DECREASE TIP-1 (evenly): To calculate how to decrease evenly, use the total number of stitches on row (e.g. 89 stitches) and divide stitches by number of decreases to be done (e.g. 12) = 7.4. In this example decrease by knitting approx. every 6th and 7th stitch together. DECREASE TIP–2 applies to neck decrease front piece. Decrease inside 3 stitches, continue these 3 stitches in stockinette stitch up along neck edge. All decreases are done from the right side. Decrease as follows before stitches slipped on a stitch holder for neck (left shoulder). Work until 5 stitches on needle (towards stitches slipped on a stitch holder), knit 2 together, work the last 3 stitches on needle in stockinette stitch. Decrease as follows after stitches slipped on a stitch holder for neck (right shoulder). Work 3 stitches in stockinette stitch, slip next stitch knitwise, knit next stitch, pass slipped stitch over, work the rest of row. INCREASE TIP (applies to sleeves): Begin 1 stitch before marker thread, make 1 yarn over, 2 stitches (marker thread is in the middle of these stitches), make 1 yarn over. On next round knit yarns over twisted to avoid holes. ---------------------------------------------------------- START THE PIECE HERE: ---------------------------------------------------------- SWEATER - SHORT OVERVIEW OF THE PIECE: Work sweater back and forth in 2 parts that are sewn together when finished. Work sleeves in the round on double pointed needles. BACK PIECE: Cast on 89-97-103-113-125-137 stitches on circular needle size 4.5 mm = US 7 with Air. Purl 1 row from wrong side, then work as follows from right side: 2 edge stitches in in GARTER STITCH – see explanation above, * knit 1/purl 1 *, repeat from *-* until 3 stitches remain, knit 1 and 2 stitches in garter stitch. Continue like this until piece measures 8 cm = 3⅛". Switch to circular needle size 5.5 mm = US 9. Knit 1 row from right side while decreasing 12-14-14-16-18-20 stitches evenly - READ DECREASE TIP-1 = 77-83-89-97-107-117 stitches. Work A.1 with 1 edge stitch in garter stitch in each side. When piece measures 43-44-45-46-47-48 cm = 17"-17¼"-17¾"-18"-18½"-19", bind off for armholes in each side. Bind off stitches at beginning of every row in each side: Bind off 3 stitches 1-1-1-1-1-1 time, 2 stitches 1-1-1-1-1-1 time and 1 stitch 1-1-2-2-2-3 times = 65-71-75-83-93-101 stitches. Continue in A.1 until piece measures 60-62-64-66-68-70 cm = 23⅝"-24⅜"-25¼"-26"-26¾"-27½". Now bind off the middle 27-27-29-31-33-35 stitches for neck, and finish each shoulder separately. Then decrease on next row from the neck as follows: 1 stitch 1 time = 18-21-22-25-29-32 stitches remain for shoulder. Continue until piece measures 62-64-66-68-70-72 cm = 24⅜"-25¼"-26"-26¾"-27½"-28⅜", and bind off. Work the other shoulder the same way. FRONT PIECE: Cast on and work as on back piece until piece measures 54-56-58-60-62-64 cm = 21¼"-22"-22¾"-23⅝"-24⅜"-25¼". Now slip the middle 17-17-19-21-23-25 stitches on 1 stitch holder for neck, and finish each shoulder separately. Then decrease every row from the right side as follows: 1 stitch 6 times - READ DECREASE TIP-2 (applies to neck) = 18-21-22-25-29-32 stitches remain for shoulder. Continue until piece measures 62-64-66-68-70-72 cm = 24⅜"-25¼"-26"-26¾"-27½"-28⅜", and bind off. Work the other shoulder the same way. SLEEVE: Work sleeves in the round on double pointed needles/ circular needle, bottom up. Divide piece when decreasing for sleeve cap and work back and forth on needle. Cast on 46-48-50-52-52-56 stitches on double pointed needles size 4.5 mm = US 7 with Air. Knit 1 round, then work rib, knit 1/purl 1. When piece measures 8 cm = 3⅛", switch to double pointed needles size 5.5 mm = US 9, and work in stockinette stitch On first round in in stockinette stitch decrease 8-8-8-8-8-10 stitches evenly = 38-40-42-44-44-46 stitches. Insert a marker thread at beginning of round = mid under sleeve. Continue in stockinette stitch, AT THE SAME TIME when piece measures 10-10-10-10-12-12 cm = 4"-4"-4"-4"-4¾"-4¾", increase 1 stitch on each side of marker thread - READ INCREASE TIP. Work yarn overs twisted on next round to avoid holes. Increase every 3½-3½-3-3-2-2 cm = 1¼"-1¼"-1⅛"-1⅛"-¾"-¾" 11-12-13-13-15-15 times in total = 60-64-68-70-74-76 stitches. When piece measures 50-49-49-48-45-44 cm = 19¾"-19¼"-19¼"-19"-17¾"-17¼", bind off 3 stitches on each side of marker thread (= 6 stitches bind off mid under sleeve), then work sleeve back and forth. Bind off for sleeve cap at beginning of every row in each side as follows: 2 stitches 1 time, 3 stitches 1 time, then bind off the remaining stitches. Work another sleeve the same way. ASSEMBLY: Sew the shoulder seams. Sew in sleeves. Sew side seams inside 1 edge stitch until 8 cm = 3⅛" remain = vent. NECK EDGE: Pick up approx. 92-106 stitches around the neck (including stitches on stitch holder and adapt so that the number of stitches is divisible by 2). Work rib knit 1/purl 1 for 9 cm = 3½". Bind off. Fold rib at the top of neck down on the inside of garment. Fasten rib to form a folding edge. To avoid a tight neck edge and avoiding the edge to tip outwards, it is important to make the seam elastic. |
|||||||
Diagram explanations |
|||||||
|
|||||||
 |
|||||||
Have you finished this pattern?Tag your pictures with #dropspattern #rainydaysweater or submit them to the #dropsfan gallery. Do you need help with this pattern?You'll find 26 tutorial videos, a Comments/Questions area and more by visiting the pattern on garnstudio.com. © 1982-2026 DROPS Design A/S. We reserve all rights. This document, including all its sub-sections, has copyrights. Read more about what you can do with our patterns at the bottom of each pattern on our site. |
|||||||


With over 40 years in knitting and crochet design, DROPS Design offers one of the most extensive collections of free patterns on the internet - translated to 17 languages. As of today we count 324 catalogs and 12278 patterns - 12268 of which are translated into English (US/in).
We work hard to bring you the best knitting and crochet have to offer, inspiration and advice as well as great quality yarns at incredible prices! Would you like to use our patterns for other than personal use? You can read what you are allowed to do in the Copyright text at the bottom of all our patterns. Happy crafting!
Post a comment to pattern DROPS 210-5
We would love to hear what you have to say about this pattern!
If you want to leave a question, please make sure you select the correct category in the form below, to speed up the answering process. Required fields are marked *.