
Popular categories
Looking for a yarn?


Comments / Questions (19)
![]() Lucia Bandirali wrote:
Lucia Bandirali wrote:
Se volessi farlo x tg 8mesi, come mi comporto, cioè elimino 1 motivo? Quante m inizio? Grazie
10.12.2024 - 10:21DROPS Design answered:
Buonasera Lucia, questo modello parte dai 12 mesi: per lavorare una taglia più piccola deve riadattare le spiegazioni. Buon lavoro!
13.12.2024 - 23:04
![]() Angela wrote:
Angela wrote:
I have several of your patterns to knit top down jumpers with yokes including ‘Little Red Nose’ I am an experienced fairisle knitter but yokes are a new challenge! I find that each time I increase by a stitch it spoils the continuity of the pattern eg by going from 3 to 4 stitches between the next colour stitch. The subsequent row is therefore out of synchronicity too. This gets worse as the repeats increase. Please can you help? Thanks!
26.11.2023 - 20:03
![]() Marie-Claude wrote:
Marie-Claude wrote:
À la fin de la manche, juste avant les côtes, on a les indications suivantes: “Diminuer ainsi 6 (6-8-8-8-8-9) fois au total tous les 1½ (2-2-2½-3-3½-3½) cm = 36 (40-40-44-44-48-48) mailles. Quand la manche mesure 10 (12-17-20-24-27-31) cm depuis la séparation, diminuer 2 mailles à intervalles réguliers = 36 (40-40-44-44-48-48) mailles. “ On dit de diminuer de 2 mailles, mais le nombre de mailles reste le même?….. Merci
15.11.2022 - 02:44DROPS Design answered:
Bonjour Marie-Claude, c'est une erreur, on ne doit pas diminuer mais changer pour les aiguilles 3 et tricoter les côtes, merci pour votre retour, la correction a été faite. Bonne continuation!
15.11.2022 - 09:47
![]() Marie-Claude Roy wrote:
Marie-Claude Roy wrote:
Bonjour. Ne doit-on pas utiliser les aiguilles 3 pour les côtes 2/2 dans le bas des devants/dos ? Il n’est pas indiqué de changer d’aiguilles. Aussi, juste avant ces côtes, on dit de faire un rang d’augmentations sur l’endroit, puis le rang suivant où l’on commence les côtes est aussi sur l’endroit? Merci de clarifier
11.11.2022 - 00:05DROPS Design answered:
Bonjour Mme Roy, effectivement, les côtes doivent être tricotées avec les aiguilles 3 en bas du dos/devants; augmentez vos mailles à intervalles réguliers sur l'envers, ainsi votre 1er rang de côtes sera sur l'endroit (ou bien si vous augmentez sur l'envers, adaptez les côtes pour qu'il y ait bien 2 mailles endroit des côtes à 5 mailles point mousse du bord de chaque côté. Bon tricot!
11.11.2022 - 09:01
![]() Petrucciani wrote:
Petrucciani wrote:
Bonjour, comment se fait-il que je n'aie plus rien dans mes favoris? Merci de votre réponse
18.07.2022 - 21:59DROPS Design answered:
Bonjour, vous pouvez associer votre adresse mail à un total de 200 favoris (sans date d'expiration). Toutefois, pour des raisons de politique de confidentialité, si vous n'utilisez pas notre rubrique des favoris pendant plus d'un an, votre compte sera vidé et votre mail et favoris supprimés de notre site.
19.07.2022 - 07:56
![]() Ginette wrote:
Ginette wrote:
Quelle l expérience j ai fait cette veste pour enfants de deux ans dans le gris WoW je suis très contente du résultat avec le bonnet vos explications sont tellement bien expliquées je voulais juste vous dire merci 🙏
27.05.2022 - 17:32
![]() Birgt Lohschelder wrote:
Birgt Lohschelder wrote:
Bis zur Stilllegung der Ärmel kein Problem, aber dann kome ich nicht weiter. Auf einmal werden lt Beschreibung 34 M gestrickt wohl kommen die zusätzlichen Maschen und wie werden die stillgelegten M behandelt. Ich hoffe das mir jemand weiterhelfen kann
04.10.2021 - 20:59DROPS Design answered:
Liebe Frau Lohschelder, diese Lektion zeigt, wie man einen Pullover von oben nach unten strickt, und ab Bild 9) wie man die Arbeit verteilt und dann wie man weiterstrickt. Beim Rumpfteil wird man 1 Markierung für beiden Seiten einsetzen = 34 M Vorderteil/62 M Rückenteil / 34 M Vorderteil = 130 M auf der Nadel in die 2. Größe. Viel Spaß beim stricken!
05.10.2021 - 07:08
![]() Marcella wrote:
Marcella wrote:
Vorrei sapere come comportarmi per lo sprone se voglio fare un pullover girocollo per un bambino di 5 anni. Grazie
05.11.2020 - 11:50DROPS Design answered:
Buongiorno Marcella, se si riferisce a questo modello, nelle istruzioni è spiegato come lavorare lo sprone per la taglia 5 anni, altrimenti se cerca una spiegazione generale, può rivolgersi al suo rivenditore DROPS di fiducia. Buon lavoro!
05.11.2020 - 11:55
![]() Janne B wrote:
Janne B wrote:
Hei. Jeg skulle egentlig strikket en str. midt mellom 9/10 og 11/12 her. Hvis jeg strikker 11/12 og går ned en halv pinnestr., testet strikkefastheten selvsagt, kan jeg da regne ut målene på genseren? Eller er det ikke et lineært forhold her? Takknemlig for svar.
22.10.2020 - 13:52DROPS Design answered:
Hej Janne, Jo det kan du godt prøve, men der er kun 4 cm forskel i bredden på de to størrelser, så det letteste er at følge opskriften (længden kan du jo altid justere). God fornøjelse!
28.10.2020 - 15:01
![]() Pauline wrote:
Pauline wrote:
Est-il traduit en français
25.04.2020 - 01:03
|
|||||||||||||
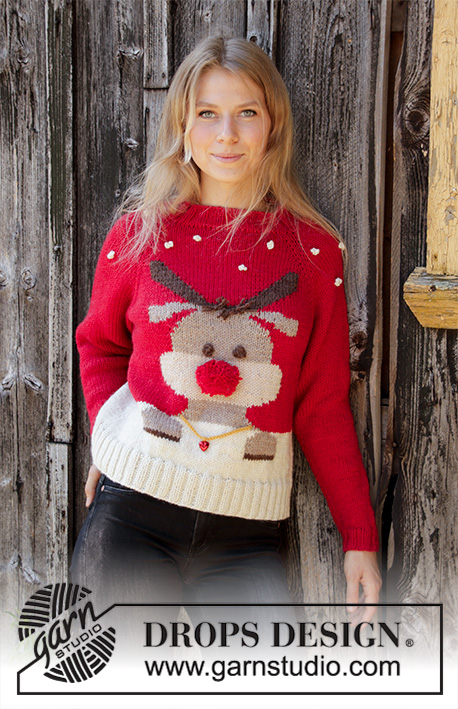
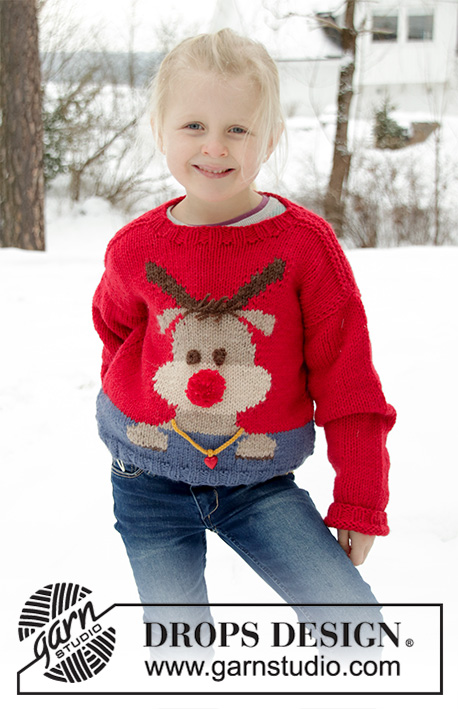
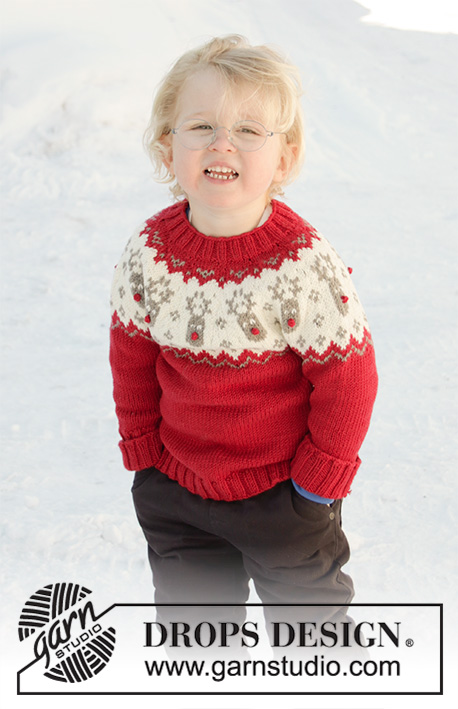
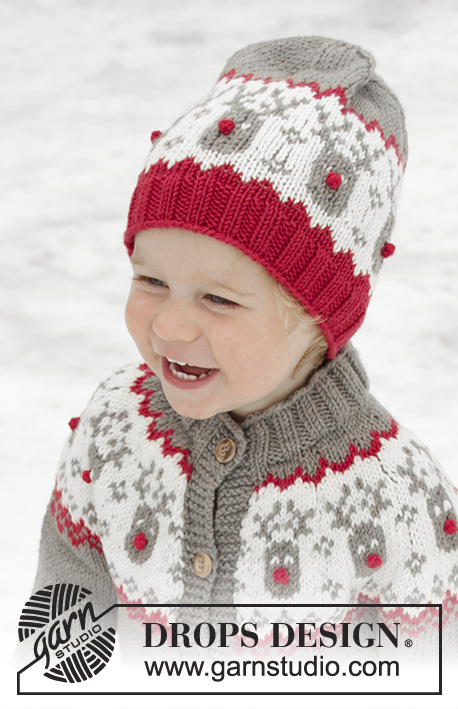
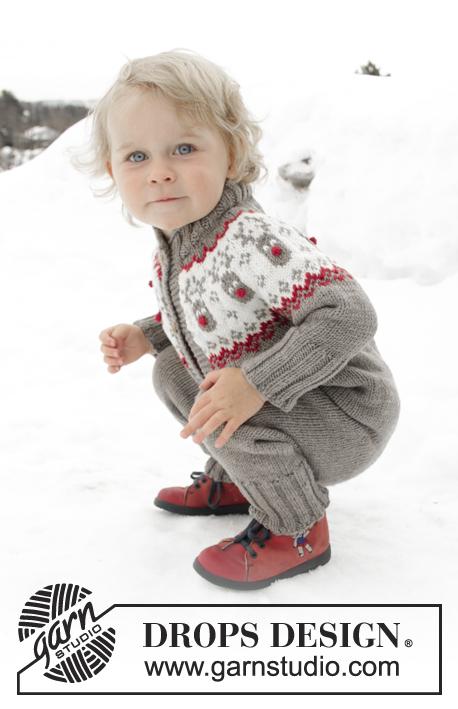
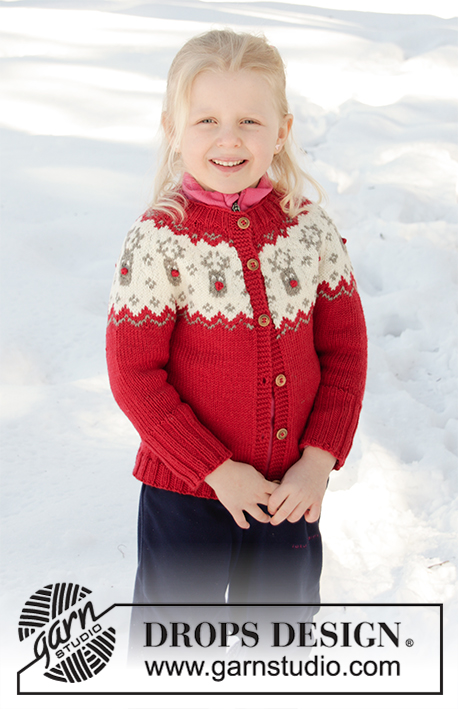
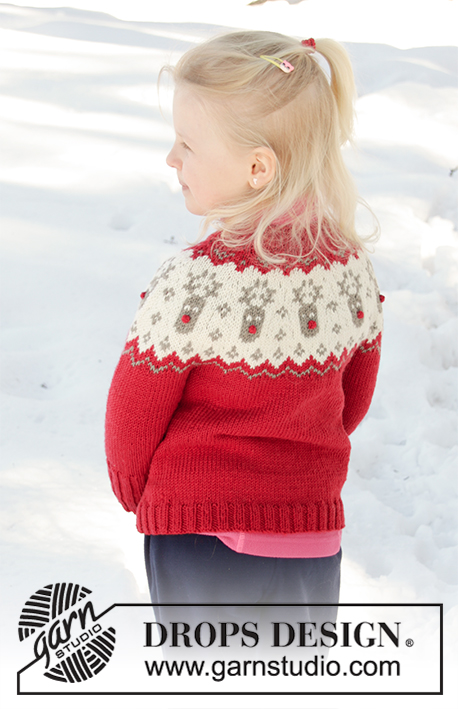
Little Red Nose Jacket#littlerednosejacket |
|||||||||||||
 |
 |
||||||||||||
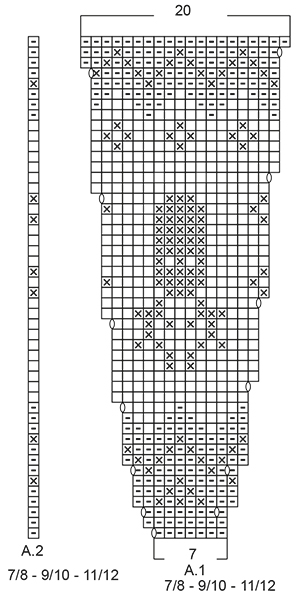
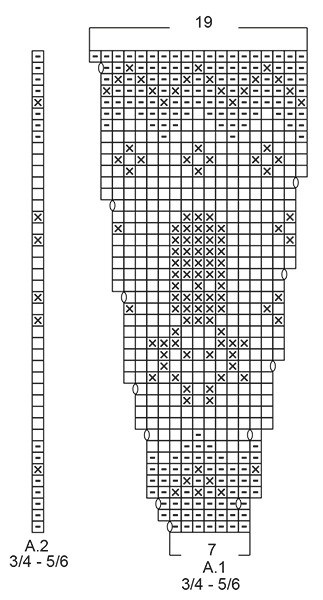
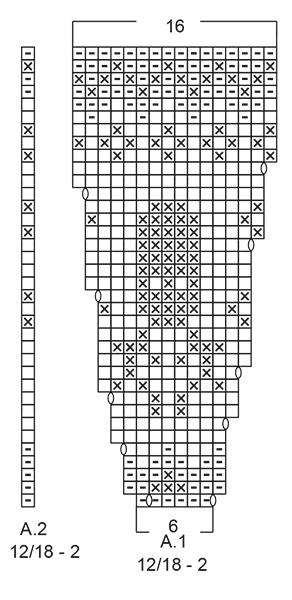
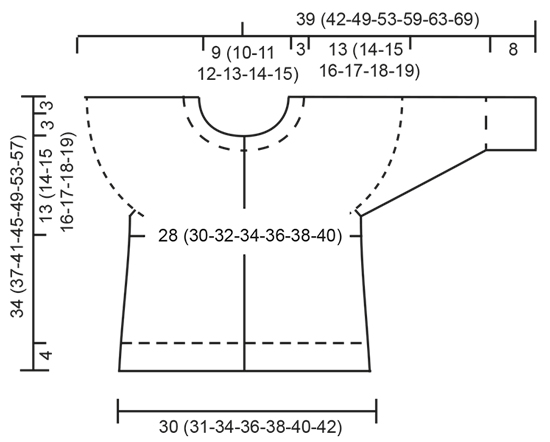
Knitted jacket for babies and children with round yoke in DROPS Merino Extra Fine. The piece is worked top down, with Nordic pattern. Sizes 12 months – 12 years.
DROPS Children 32-9 |
|||||||||||||
|
------------------------------------------------------- EXPLANATIONS FOR THE PATTERN: ------------------------------------------------------- RIDGE/GARTER STITCH (worked back and forth): 1 ridge = Knit 2 rows. PATTERN: See diagrams A.1 and A.2. Choose diagram for your size. The whole pattern is worked in stockinette stitch. KNITTING TIP (for bands): The whole band is worked in red. In other words use 1 ball of red for each band where needed (i.e. on the rows where red is not part of the pattern). Change strand between band and yoke (so you do not get a change of strands outermost on band). When changing strands, twist the strands together so that the stitches stay together. DECREASE/INCREASE TIP: To work out when to decrease/increase on the row, count the total number of stitches on the needle (e.g. 84 stitches), minus the bands (= 74 stitches) and divide by the number of decreases/increases to be made (e.g. 7) = 10.6. In this example, decrease by alternately working together each 9th and 10th stitch and each 10th and 11th stitch (approx.), or increase alternately after each 10th and 11th stitch (approx.) by making 1 yarn over (the yarn overs are worked twisted on the next row to avoid holes – NOTE: Do not decrease/increase over bands). INCREASE TIP (for sides of body): Increase 1 stitch on each side of marker thread as follows: Start 2 stitches before marker thread, make 1 yarn over, work 4 stitches (marker thread sits in the middle of these 4 stitches), make 1 yarn over (= 2 stitches increased). Increase like this at both marker threads (= 4 stitches increased). On the next row work the yarn overs twisted to avoid holes. DECREASE TIP (for mid under sleeve): Decrease 1 stitch on each side of the marker thread as follows: Start 3 stitches before the marker thread, knit 2 together, knit 2 (marker thread sits between these 2 stitches), slip 1 stitch as if to knit, knit 1 and pass the slipped stitch over the knitted stitch (= 2 stitches decreased). ELEVATION (back of neck): Skip this section if you do not want an elevation. First row is worked from the right side Knit until there are 8 (8-8-10-10-12-12) stitches left on row, turn, tighten strand and purl until there are 8 (8-8-10-10-12-12) stitches left on the other side, turn, tighten strand and knit until there are 16 (16-16-18-18-20-20) stitches left, turn, tighten strand and purl until there are 16 (16-16-18-18-20-20) stitches left on other side. Continue by working 8 stitches less each time you turn, 2 more times in each side, turn, tighten strand and knit to end of row, then purl 1 row from the wrong side (bands worked in garter stitch). BUTTONHOLES: Work buttonholes on right band (when the garment is worn). 1 buttonhole = start from the wrong side and knit together stitches 2 and 3 from the edge, make 1 yarn over. On the next row knit the yarn over to leave a hole. The first buttonhole is worked after approx. 1½-2 cm = ½"-⅜" on the neck, then work the next 4 (5-5-5-6-6-7) buttonholes with approx. 6 (6-6½-7-6½-7-7) cm = 2⅜" (2⅜"-2½"-2¾"-2½"-2¾"-2¾") between each one. ------------------------------------------------------- START THE PIECE HERE: ------------------------------------------------------- JACKET - SHORT OVERVIEW OF THE PIECE: The piece is worked top down. The yoke is worked first and then divided for sleeves and body. The body is continued back and forth with circular needle. The sleeves are worked in the round with double pointed needles. NECK: Cast on 84 (88-92-96-100-108-112) stitches (including 5 band stitches in each side towards mid front) with circular needle size 3 mm = US 2,5 and red. Purl 1 row from the wrong side with 5 band stitches in GARTER STITCH – read description above, in each side. The next row is worked as follows from the right side: 5 band stitches in garter stitch, * knit 2, purl 2 *, work from *-* until there are 7 stitches left and finish with knit 2 and 5 band stitches in garter stitch. Continue this rib for 3 cm = 1⅛" – remember BUTTONHOLE on right band – read description above and finish after a row from the right side. YOKE: Change to circular needle size 4 mm = US 6. Purl 1 row from the wrong side with 5 band stitches in garter stitch in each side and decrease 7 (5-4-1-5-6-10) stitches evenly on row – read DECREASE/INCREASE TIP (purl 2 stitches together = 1 stitch decreased) = 77 (83-88-95-95-102-102) stitches. You can now work an elevation in back of neck so that the yoke is slightly higher at the back. This elevation can be left out; the neck will then be the same front and back – work ELEVATION – read description above or continue working. The next row is worked as follows from the right side: 5 band stitches in garter stitch, work pattern according to diagram A.1 until there are 6 stitches left on the row – NOTE: Choose diagram for your size (= 11 (12-11-12-12-13-13) repeats of 6 (6-7-7-7-7-7) stitches), work A.2 over the next stitch and finish with 5 band stitches in garter stitch. Continue this pattern and increase as shown in the diagram – read KNITTING TIP and REMEMBER THE KNITTING GAUGE! When A.1 and A.2 have been completed there are 187 (203-220-239-251-271-271) stitches on the needle. Continue with stockinette stitch, red and 5 band stitches in garter stitch in each side. On the next row from the right side increase 7 (7-10-7-3-0-11) stitches evenly on row (do not increase over bands) = 194 (210-230-246-254-271-282) stitches. When the piece measures 13 (14-15-16-17-18-19) cm = 5⅛" (5½"-6"-6¼"-6¾"-7"-7⅛") mid front (measured without the neck), divide the piece as follows: Work 29 (31-34-36-38-40-42) stitches as before (= front piece), place the next 42 (46-50-54-54-58-60) stitches on 1 thread for sleeve (without working them), cast on 6 new stitches, work 52 (56-62-66-70-75-78) stitches (= back piece), place the next 42 (46-50-54-54-58-60) stitches on 1 thread for sleeve (without working them), cast on 6 new stitches and work the remaining 29 (31-34-36-38-40-42) stitches as before (= front piece) = 122 (130-142-150-158-167-174) stitches. BODY: Insert 1 marker thread 32 (34-37-39-41-43-45) stitches in from each side (= 58 (62-68-72-76-81-84) stitches between marker threads on the back piece). THE PIECE IS NOW MEASURED FROM HERE! Continue back and forth with stockinette stitch and 5 band stitches in each side towards mid front - remember BUTTONHOLES on right band. When the piece measures 3 cm = 1⅛" from where body and sleeves were divided, increase on each side of both marker threads – read INCREASE TIP. Repeat this increase when the piece measures 8 cm = 3⅛" from where body and sleeves were divided = 130 (138-150-158-166-175-182) stitches. When the piece measures 11 (13-16-19-22-25-28) cm = 4⅜" (5⅛"-6¼"-7½"-7¾"-9¾"-11") from where body and sleeves were divided, increase 14 (14-14-14-14-13-14) stitches evenly on the next row from the right side (do not increase over bands) = 144 (152-164-172-180-188-196) stitches. Switch to circular needle size 3 mm = US 2,5. The next row is worked as follows from the right side: 5 band stitches in garter stitch, * knit 2 / purl 2* work from *-* until there are 7 stitches left on the row, knit 2 and finish with 5 band stitches in garter stitch. Continue this rib for 4 cm = 1½". Then bind off with garter stitch over garter stitch, knit over knit and purl over purl. The whole jacket measures approx. 34 (37-41-45-49-53-57) cm = 13⅜" (14½"-16⅛"-17¾"-19¼"-21"-22½"), measured from shoulder. SLEEVE: Place the stitches from the one thread on double pointed needles size 4 mm = US 6 and knit up 1 stitch in each of the 6 stitches cast on under the sleeve = 48 (52-56-60-60-64-66) stitches. Insert 1 marker thread in the middle of these 6 stitches (= mid under sleeve). THE PIECE IS NOW MEASURED FROM HERE! Work stockinette stitch in the round with red. When the sleeve measures 1 cm =3/8" from where body and sleeve were divided, decrease 2 stitches mid under sleeve – read DECREASE TIP. Decrease like this every 1½ (2-2-2½-3-3½-3½) cm = ½" (3/4"-¾"-1"-1⅛"-1⅜"-1⅜") a total of 6 (6-8-8-8-8-9) times = 36 (40-40-44-44-48-48) stitches. When the sleeve measures 10 (12-17-20-24-27-31) cm = 4" (4¾"-6¾"-8"-9½"-10⅝"-12¼") from where body and sleeve were divided, change to double pointed needles size 3 mm = US 2,5 and work rib in the round (= knit 2 / purl 2) for 8 cm = 3⅛" or to desired length. On the next round increase all purl 2 to purl 3 = 45 (50-50-55-55-60-60) stitches. Then bind off with knit over knit and purl over purl.. The sleeve measures a total of approx. 18 (20-25-28-32-35-39) cm = 7" (8"-9¾"-11"-12½"-12¾"-15¼") from where body and sleeve were divided. Work the other sleeve in the same way. NOSES: Crochet with red and hook size 3 mm = US C as follows: Work 4 chain stitches and 1 double crochet in the 4th chain stitch from the hook, cut and fasten the strand. Work 1 nose for each reindeer (= 11 (12-11-12-12-13-13) noses). Tie the noses to each reindeer and fasten the strands. ASSEMBLY: Sew buttons onto left band. |
|||||||||||||
Diagram explanations |
|||||||||||||
|
|||||||||||||
 |
|||||||||||||
 |
|||||||||||||
 |
|||||||||||||
 |
|||||||||||||
Have you finished this pattern?Tag your pictures with #dropspattern #littlerednosejacket or submit them to the #dropsfan gallery. Do you need help with this pattern?You'll find 35 tutorial videos, a Comments/Questions area and more by visiting the pattern on garnstudio.com. © 1982-2026 DROPS Design A/S. We reserve all rights. This document, including all its sub-sections, has copyrights. Read more about what you can do with our patterns at the bottom of each pattern on our site. |
|||||||||||||


With over 40 years in knitting and crochet design, DROPS Design offers one of the most extensive collections of free patterns on the internet - translated to 17 languages. As of today we count 324 catalogs and 12290 patterns - 12280 of which are translated into English (US/in).
We work hard to bring you the best knitting and crochet have to offer, inspiration and advice as well as great quality yarns at incredible prices! Would you like to use our patterns for other than personal use? You can read what you are allowed to do in the Copyright text at the bottom of all our patterns. Happy crafting!
Post a comment to pattern DROPS Children 32-9
We would love to hear what you have to say about this pattern!
If you want to leave a question, please make sure you select the correct category in the form below, to speed up the answering process. Required fields are marked *.