
Popular categories
Looking for a yarn?


Comments / Questions (151)
![]() Erika Reinhold wrote:
Erika Reinhold wrote:
Schal: Dann alle M. wieder zusammenstricken, indem man 1 M. von der Sicherheitsnadel und 1 M. von der Stricknadel zusammenstrickt = 24-26-28 (30-32) M. Das kann ja nicht stimmen, weil sowohl auf der Nadel, als auch auf der Sicherheitsnadel jeweils nur 13 Maschen sind. Die Maschen müssen einzeln abgestrickt werden
25.04.2024 - 17:57DROPS Design answered:
Liebe Frau Reinhold, ja genau, diese Maschen stricken Sie abwechslungsweise ohne sie zusammenzustricken, dh spiegelverkehr als am Anfang. Eine Korrektur erfolgt, danke für den Hinweis. Viel Spaß beim Stricken!
26.04.2024 - 07:42
![]() Rixt wrote:
Rixt wrote:
Hello I am relatively new to knitting, but already finished one of your beautiful baby sock patterns! Now I wanted to make something else for our baby, this hat with mittens, but looking at the wool I saw that you have the same amount of stitches in the gauge as with the socks I made, but almost the double amount of rows. (with the same needle size) How is that possible, somehow that does not make sense to me. Thank you very much for helping :)
23.01.2023 - 20:32DROPS Design answered:
Dear Mrs Rixt, your socks might have been worked in stocking stitch, while the hat is here worked in garter stitch, so that you will get another number of rows (you need more rows in garter stitch than in stocking stitch for the same height), ie you need here 52 rows (26 ridges) in garter stitch to get 10 cm. Happy knitting!
24.01.2023 - 12:02
![]() Gillian wrote:
Gillian wrote:
Can you advice pattern for Adult sizes please ?? As would like to make one for myself thanks Gillian
03.01.2023 - 08:59DROPS Design answered:
Dear Gillian, sure you will find all our patterns for similar hats here including patterns for adult, children and baby. Happy knitting!
03.01.2023 - 09:44
![]() Larissa wrote:
Larissa wrote:
Hallo! Ich stricke Schal für 6-monatiges Baby. Welche lange (ungefähr) hat der fertige Schal?
20.11.2022 - 12:54DROPS Design answered:
Liebe Larissa, in die 2. Größe ist der Schal ca 47 cm lang. Viel Spaß beim stricken!
21.11.2022 - 09:15
![]() Larissa wrote:
Larissa wrote:
Eine Frage, Habe ich richtig verstanden, nach dem falschen Knote man muß noch 42 cm stricken?
20.11.2022 - 11:08DROPS Design answered:
Liebe Larissa, Sie stricken bis der Schal 40-42-46 (50-54) cm insgesamt misst (die Anleitung wird korrigiert). Viel Spaß beim stricken !
21.11.2022 - 09:11
![]() Annette Lassen wrote:
Annette Lassen wrote:
Der står tubestrik øverst på opskriften... skal man starte og slutte på alle pinde?? Synes ikke at billederne viser dette nemlig...
15.11.2022 - 10:08DROPS Design answered:
Hej Annette, det tubestrikkede er kun til selve snoren under hagen. Se videoen nederst i opskriften hvordan man gør :)
16.11.2022 - 12:12
![]() Agnieszka wrote:
Agnieszka wrote:
Błąd rękawiczki roz.2 6 oczek zamknąć anie 4 przed ściągaczem. 3 cm ściągacza a nie od dołu robótki
24.05.2022 - 18:58DROPS Design answered:
Witaj Agnieszko, masz rację, dziękujemy za info. Wzór został już poprawiony i dodana została korekta. Pozdrawiamy!
25.05.2022 - 09:10
![]() Mette wrote:
Mette wrote:
Jeg vil kun strikke huen. Hvor meget garn skal der bruges til den?
28.03.2022 - 19:37DROPS Design answered:
Hej Mette, jeg kan se at det ikke står med i opskriften, men du bør kunne klare dig med 1 nøgle i den mindste størrelse. Husk at det findes en video nederst i opskriften :)
30.03.2022 - 15:09
![]() Elin Hofvind wrote:
Elin Hofvind wrote:
Hadde vært fint med et bilde av lua før montering så en ser st en har gjort rett eller feil.
20.02.2022 - 10:54
![]() Meike wrote:
Meike wrote:
Hi! Isn't there an error in the smallest size lengths for the English version? it's 5.5, 11, 15.5, 21, 25.5, and 31. that means the pieces are 5.5, 5.5, 4.5, 5.5, 4.5, and 5.5 cm long. But that means that the right part of the face becomes wider than the left part. Shouldn't it be 5.5, 5.5, 4.5, 4.5, 5.5, and 5.5? So the absolute lengths 5.5cm, then 11, then 15.5, then 20(!), and then 25.5 and 31? That way, the pieces with the slower in/decreases are the same size? Cheers!
09.11.2021 - 11:39DROPS Design answered:
Dear Meike, you are right, it should be 20 cm instead of 21 cm - as in this lesson. Thanks for your feedback. Happy knitting!
09.11.2021 - 13:21
|
|
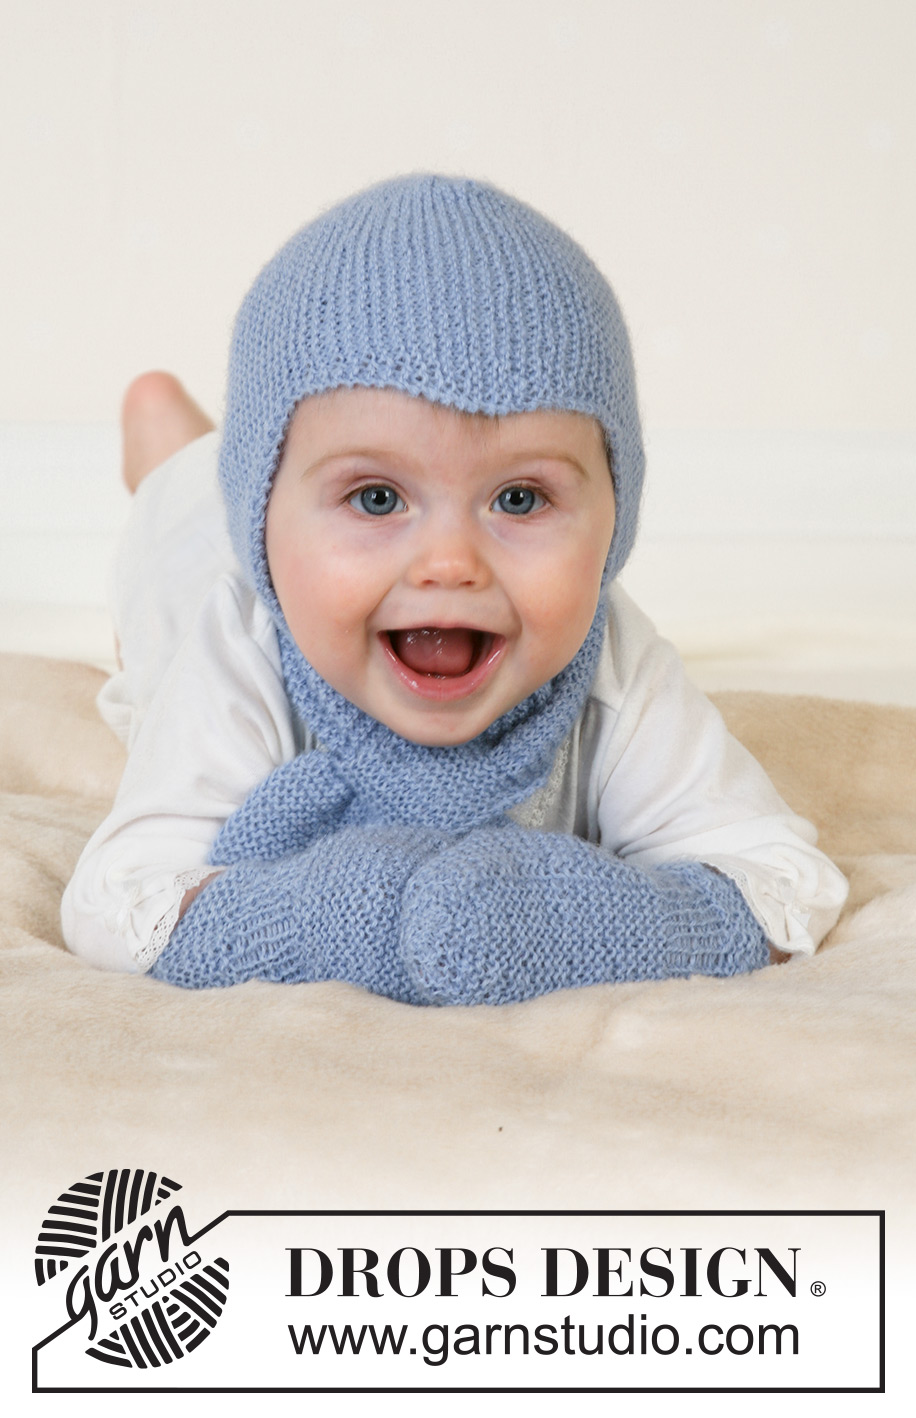
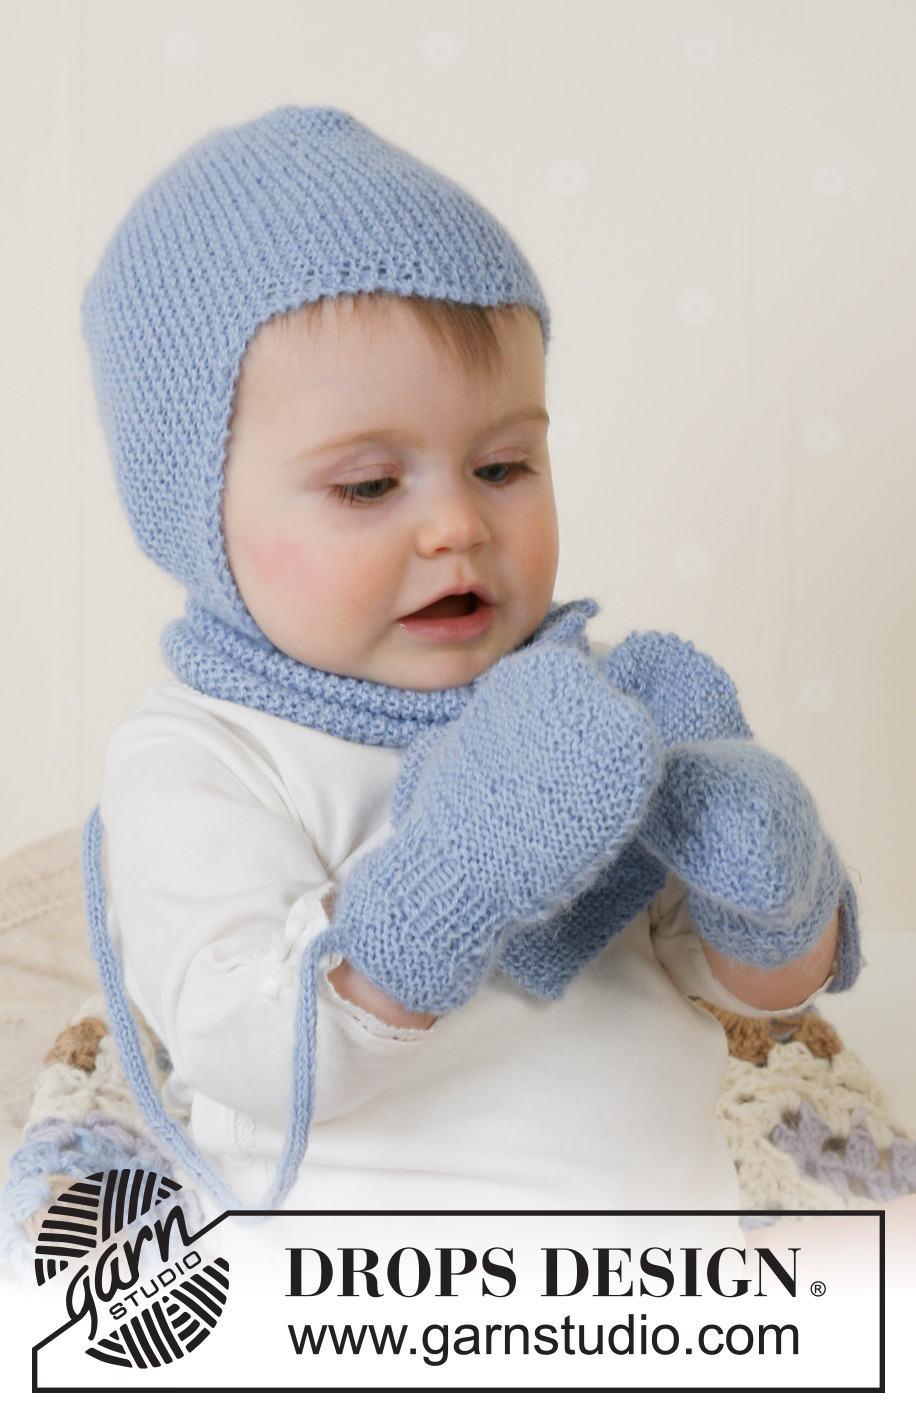
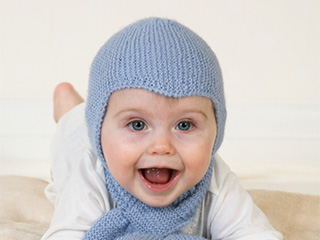
Baby Aviator Hat#babyaviatorhat |
|
 |
 |
Set of knitted helm hat, scarf and gloves for baby in DROPS Alpaca. Sizes from 1 month to 4 years.
DROPS Baby 14-16 |
|
|
Tube knitting: *K1, put thread in front of piece, slip 1 st as if to purl, put thread behind piece*, repeat from *-* on all rows. This creates a round string. HAT: Cast on 33-38-42 (46-50) sts on needle size 2.5 mm [US 1]. Knit garter sts, at the same time inc 1 st at the right side and dec 1 st at the left side as follows: 1st row (=right side): K2, yo (= 1 inc), knit until there are 4 sts left on row and K2 tog, K2. 2nd row (=wrong side): Knit (knit yo into back of st). Repeat these two rows until piece measures 5.5-6-6.5 (7-8) cm [2,2"- 2,4"- 2,6" (2,75"-2,2")]. Now dec 1 st at the right side and inc 1 st at the left side as follows: Right side: K1, slip 1 st as if to knit, K1, psso, knit until there are 2 sts left, yo, K2 Wrong side: Knit (knit yo into back of st). Repeat these two rows until piece measures 11-12-13 (14-16) cm [4,4"- 4,75"- 5,2" (5½"-6,25")]. Continue to inc 1 st at the right side on every 4th row and dec 1 st at the left side on every other row until piece measures 15.5-16.5-17.5 (18-19) cm [6,1"- 6½"- 6,9" (7"-7½")]. Insert a marking thread each side. Continue as follows: Dec 1 st at the right side on every 4th row and inc 1 st at the left side on every other row until piece measures 20-21-22 (22-22) cm [8"- 8,25"- 8,75" (8,75"-8,75")]. Now dec 1 st at the left side on every other row and inc 1 st at the right side on every other row until piece measures 25.5-27-28.5 (29-30) cm [10"- 10,6"- 11,2" (11,4"-11,75")]. Dec 1 st at the right side on every other row and inc 1 st at the left side on every other row until finished measurements. = 31-33-35 (36-38) cm [12,25"- 13"- 13,75" (14,25"-15")]. Bind off. Assembly: Back of hat = the side of piece with 2 whole points and 2 half points. The middle of the 3 whole points on the other side of the hat = point sitting at the middle of the forehead. Sew seams together with small, neat sts as follows: Sew tog back of hat by sewing tog the first half point with the first half of the first whole point. Now sew tog the other half of the first whole point with the first half of the second whole point. Now sew tog the other half of the second whole point with the last half of point. Sew hat tog mid back. String: Cast on 4 sts on needle size 2.5 mm [US 1]. Knit tube as described above. bind off when tube measures approx 16-18-20 (22-24) cm [6,25"- 7"- 8" (8,75"-9½")]. Knit another tube and attach strings to each side of hat. ________________________________________ SCARF: Cast on 4 sts on needle size 2.5 mm [US 1] and knit garter sts, at the same time increasing as follows: Right side: Knit 2 sts in first st Left side: Knit 2 sts in last but one st. Inc on every other row a total of 10-11-12 (13-14) times = 24-26-28 (30-32) sts. Knit garter sts until piece measures 8-9-10 (11-12) cm [3,2"- 3½"- 4" (4,4"-4,75")]. Knit next row as follows: *K1, put 1 st on safety pin (or cable needle) behind the piece*, repeat from *-* until the end of row. There are now 12-13-14 (15-16) sts on row and 12-13-14 (15-15) sts on safety pin/cable needle. Knit 4-4-4 (5-5) cm [1½"- 1½"- 1½" (2"-2")] garter sts over sts on needle and put these on a new safety pin/cable needle. Put sts from the first safety pin/cable needle back on needle and knit garter sts over these until this piece is of the same length. Put the 2 pieces together again by knitting 1 st from needle and 1 st from safety pin/cable needle alternately until all sts are back on needle = 24-26-28 (30-32) sts. Knit garter sts until piece measures 40-42-46 (50-54) cm [15,75"- 16½"- 18" (19,75"-21,25")]. Continue in garter stitch at the same time as decreasing in each side by knitting the 2 second outermost sts together. Dec like this on every 2nd row until there are 4 sts left on needle. Bind off. The scarf measures approx 44-47-51 (55-60) cm [17,25"- 18½"- 20" (21,6"-23,6")]. ________________________________________ MITTENS: Garter sts (on circular needle): Knit 1st round, purl 2nd row. The 3 bigger sizes with thumbs, the 2 smaller sizes without. The mitten is knitted round on double pointed needles. Loosely cast on 34-36-38 (40-42) sts with Alpaca on needles size 2.5 mm [US 1] and knit 12 rounds garter sts – see explanation above – at the same time on the last round dec evenly to 28-30-32 (34-36) sts. Continue in Rib with K1/P1. When piece measures 3-3-3 (4-4) cm [1,1"- 1,1"- 1,1" (1½"-1½")] knit garter sts, at the same time on 1st round increasing evenly to 30-33-36 (39-42) sts – insert a marker and measure piece from here from now on. The 3 bigger sizes: After 1 (2-3) cm [0,4" (0,75"-1,1")], put the last 5 (5-6) sts on round on a thread for thumb. Cast on 5 (5-6) new sts over the thread on next row. All sizes: When piece measures 6-7-8 (9-10) cm [2,4"- 2,75"- 3,1" (3½"-4")] dec as follows on next knitted round: *K1, K2 tog*, repeat from *-* until the end of round = 20-22-24 (26-28) sts. *Purl 1 round, on next round knit tog all sts 2 and 2*, repeat from *-* 1 more time. Pull a double strand of Alpaca through remaining sts, pull tight and sew. Thumb: Put the 5 (5-6) sts from thread back on double pointed needles size 2.5 mm [US 1] and pick up 6 (6-7) sts behind these = 11 (11-13) sts. Knit garter sts until thumb measures 3 (4-5) cm [1,1" (1½"-2")]. Now knit all sts tog 2 and 2. Pull thread through remaining sts and sew. Knit another mitten, but knit the thumb the other side (applies to the 3 bigger sizes). String: Cast on 4 sts using Alpaca on needles size 2.5 mm [US 1] and knit a tube as follows: *K1, put thread in front of piece, slip 1 st as if to purl, put thread behind piece*, repeat from *-* on all rows until string measures approx 62-67-74 (86-96) cm [24"- 26"- 29" (34"-38")] (length between child’s wrists). Bind off and attach string to each mitten. |
|
Have you finished this pattern?Tag your pictures with #dropspattern #babyaviatorhat or submit them to the #dropsfan gallery. Do you need help with this pattern?You'll find 19 tutorial videos, a Comments/Questions area and more by visiting the pattern on garnstudio.com. © 1982-2026 DROPS Design A/S. We reserve all rights. This document, including all its sub-sections, has copyrights. Read more about what you can do with our patterns at the bottom of each pattern on our site. |
|


With over 40 years in knitting and crochet design, DROPS Design offers one of the most extensive collections of free patterns on the internet - translated to 17 languages. As of today we count 325 catalogs and 12298 patterns - 12288 of which are translated into English (US/in).
We work hard to bring you the best knitting and crochet have to offer, inspiration and advice as well as great quality yarns at incredible prices! Would you like to use our patterns for other than personal use? You can read what you are allowed to do in the Copyright text at the bottom of all our patterns. Happy crafting!
Post a comment to pattern DROPS Baby 14-16
We would love to hear what you have to say about this pattern!
If you want to leave a question, please make sure you select the correct category in the form below, to speed up the answering process. Required fields are marked *.