
Popular categories
Looking for a yarn?


Comments / Questions (10)
![]() Bleue wrote:
Bleue wrote:
What is the finished measurements (cm) of the neck warmer; both neck, shoulder, and length?
13.01.2025 - 14:32DROPS Design answered:
Dear Bleue, we don't have these measurements, but just before the neck, there are 44-50 cm, so that it should be approx. 40-45 cm. Height is approx. 25-26 cm from shoulder down (see also under shoulders, front piece and back piece). Happy knitting!
14.01.2025 - 11:52
![]() Monika wrote:
Monika wrote:
Thank you for the answer. You should also correct the amount of the yarn for the cap which is 75g for 1 colour cap and should be 100g if I understand well. :)
09.01.2024 - 18:11
![]() Monika wrote:
Monika wrote:
I'm afraid I did not receive the answer to my question. I do not understand why I need more yarn when I want to use 4 threads of the same colour than when I use 4 different colours. And the difference is 2 balls of yarn - 150g vs. 100g.
09.01.2024 - 16:58DROPS Design answered:
Hi Monika, there is a mistake in the pattern. It should be 100 g when you work a neck warmer in only one colour. Thank you for noticing it. Happy knitting!
09.01.2024 - 17:15
![]() Monika wrote:
Monika wrote:
Could you please explain to me why I need more wool when I want to use one colour . Is it a mistake? 100g of 4 colours for a neck warmer and 150g if it is made of one colour.
08.01.2024 - 20:52DROPS Design answered:
Dear Monika, if you get the correct tension, that's the yarn amount you will need, note that you might require less than the 2 balls in each color for the hat, but 1 ball each color might not be enough due to the ribbing pattern. Happy knitting!
09.01.2024 - 07:44
![]() Laila wrote:
Laila wrote:
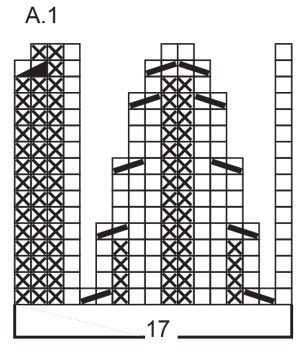
Hallo, Nun ab dem Rundenbeginn A.1 über alle Maschen stricken (= 4 Rapporte à 17 Maschen). Das versteh ich nicht. Ich Stricke mit dem Nadelspiel. 17maschen auf der Nadel ist der rapport,das heißt jeder Nadel die 17 Maschen laut A1 Stricken. Aber der Diagramm geht auch in der Höhe.Wie oft muss ich A1 Stricken? Mfg Laila----
31.12.2022 - 21:00DROPS Design answered:
Liebe Laila, wenn die Arbeit 25 cm mist stricken Sie A.1: wenn Sie 17 Maschen auf jeder Nadel haben, dann stricken Sie A.1 auf jede Nadel (= 4 x 17 = 68 Maschen); wenn A.1 fertig ist sind es nur noch 6 Maschen in jedem A.1/auf jede Nadel x 4 Rapporter = 24 maschen. Viel Spaß beim stricken!
02.01.2023 - 13:59
![]() Gudrun wrote:
Gudrun wrote:
I agree with Olena, it does not make sensse after the 12 cm and before the diagram, can you please explain, why the 3 purled ones, and then then what?
27.10.2022 - 23:31DROPS Design answered:
Dear Gudrun, you first work 12 cm rib K2, P2, then continue with rib like this: Knit 2, purl 2, knit 2, purl 2, knit 2, purl 2, knit 2, purl 3 *, repeat these 17 stitches, ie from *-* a total of 4 times = (17x4=68 sts). Happy knitting!
28.10.2022 - 11:32
![]() Lea wrote:
Lea wrote:
Cosa si intende quando si dice: "mettere in sospeso le 14 maglie successive per il collo (lavorarle prima)?" O le lascio in sospeso o le lavoro.. e come faccio a lavorare le 15 maglie prima e le ultime, lasciando in sospeso delle maglie in mezzo, resta il filo teso in mezzo.. forse vanno intrecciate per chiuderle le maglie del collo...
16.10.2022 - 15:25DROPS Design answered:
Buonasera Lea, deve lavorare le prime 15 maglie della spalla sinistra, poi lavorare le 14 maglie del collo e metterle in sospeso e infine proseguire con le 15 maglie della spalla destra. A questo punto deve mettere in sospeso anche le 15 maglie della spalla sinistra e proseguire con la spalla destra. Buon lavoro!
17.10.2022 - 23:46
![]() Barbara wrote:
Barbara wrote:
Cosa vuol dire, quando ci sono le diminuzioni A1 su tutte le maglie grazie
25.01.2022 - 15:47DROPS Design answered:
Buonasera Barbara, a quale parte del modello sta facendo riferimento? Buon lavoro!
26.01.2022 - 22:06
![]() Tasiana wrote:
Tasiana wrote:
Diagram does not correspond to the hat
09.10.2021 - 11:42DROPS Design answered:
Dear Tasiana, diagram does work over the hat, you were working ( Knit 2, purl 2, knit 2, purl 2, knit 2, purl 2, knit 2, purl 3) = 17 sts repeat from (to), and you will *Knit 1, knit the next K + the next purl stitch twisted together, then purl 1, knit 2, purl 2, knit 2, purl 1, knit the next purl + the next knit stitch together, knit 1, purl 3* = 17 sts decreased to 15 sts. Happy knitting!
11.10.2021 - 08:28
![]() Olena wrote:
Olena wrote:
I have a question to the following description: "Continue with rib until piece measures 12 cm from cast-on edge. Now work as follows: * Knit 2, purl 2, knit 2, purl 2, knit 2, purl 2, knit 2, purl 3 *, repeat *-* 4 times in total on round. Continue until piece measures 25 cm. Now work as follows – from beginning of round: A.1 over all stitches (= 4 repetitions of 17 stitches)." If I work as it said: *knit 2, purl 2, knit 2, purl 2, ...,, purl 3*, I can't follow the diagram A.1 then. ???
29.09.2021 - 14:47DROPS Design answered:
Dear Olena, sorry, you will find how to read knitting diagrams here, can this help or do I misunderstand your question?
30.09.2021 - 09:26
|
||||||||||||||||
Harvest Glow#harvestglowset |
||||||||||||||||
 |
 |
|||||||||||||||
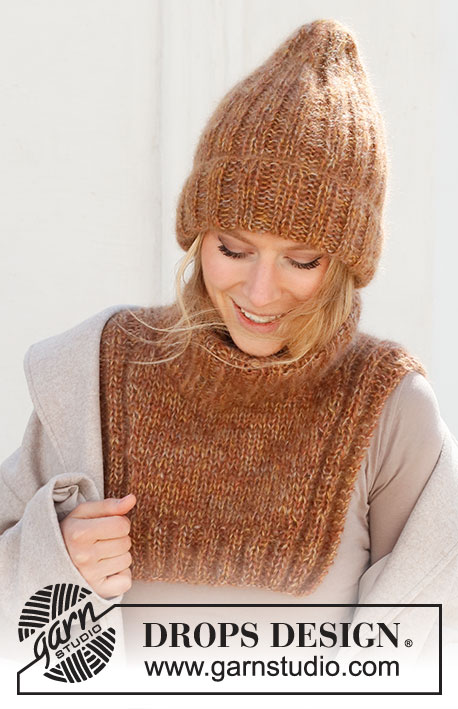
Knitted hat and neck warmer in 4 strands DROPS Kid-Silk. Piece is knitted with stockinette stitch and rib.
DROPS 225-5 |
||||||||||||||||
|
---------------------------------------------------------- EXPLANATION FOR THE PATTERN: ---------------------------------------------------------- GARTER STITCH (back and forth): Knit all rows. 1 ridge vertically = knit 2 rows. PATTERN (applies to hat): See diagram A.1. ---------------------------------------------------------- START THE PIECE HERE: ---------------------------------------------------------- NECK WARMER – SHORT SUMMARY OF PIECE: Work front piece back and forth on circular needle, bottom up. Bind off for neck, and finish each shoulder separately over shoulders. Then cast on new stitches towards the neck before slipping the shoulder stitches together and continue the back piece top and down. Finish by picking up stitches around the neck and work high collar in rib. NECK WARMER: Cast on 42-50 stitches on circular needle size 7 MM = US 10.75 with 1 strand of each color (= 4 strands). Work as follows - from right side: 2 edge stitches in GARTER STITCH - read explanation above - * purl 2, knit 2 *, repeat from *-* until 4 stitches remain on needle, purl 2 and 2 edge stitches in garter stitch. Continue like this until rib measures approx. 6 cm = 2⅜". Switch to circular needle size 8 MM = US 11. Work next row as follows from right side: Work as before over the first 8-8 stitches, work in stockinette stitch over the next 26-34 stitches, AT THE SAME TIME decrease 6-8 stitches evenly (= 20-26 stitches in stockinette stitch), work as before over the last 8-8 stitches = 36-42 stitches. Continue like this (rib and garter stitch over 8 stitches in each side, in stockinette stitch over the middle 20-26 stitches). REMEMBER THE KNITTING GAUGE! When piece measures 7 cm = 2¾", increase 1 stitch in each side, as follows from right side: Work as before over the first 9 stitches, make 1 yarn over, work as before until 9 stitches remain on needle, make 1 yarn over, work the rest of row. On next row work as before but yarn over twisted to avoid hole. Increase like this approx. every 3½ cm = 1¼" 4 times in total = 44-50 stitches. When piece measures 19-20 cm = 7½"-8", put stitches aside for neck on next row from right side as follows: Work the first 15-17 stitches as before, slip the next 14-16 stitches on a thread for neck (work them first), work the last 15-17 stitches. Slip the first 15-17 stitches on a thread for left shoulder. RIGHT SHOULDER: Begin from wrong side, and work as before. Then bind off stitches for neck on every row from right side as follows: 2 stitches 1 time and 1 stitch 2 times = 11-13 stitches. Work as before until piece measures 25-26 cm = 9¾"-10¼" from cast-on edge. Insert a marker in piece to measure from (= mid on top of shoulder). Work until piece measures 2 cm = ¾" from marker on shoulder. At the end of next row from wrong side, cast on 1 new stitch towards the neck = 12-14 stitches. Cut the yarn and slip stitches on a thread. Then work left shoulder as explained below. LEFT SHOULDER: Slip the 15-17 stitches from thread back on circular needle size 8 MM = US 11. Begin from right side, and work as before. Then bind off stitches for neck on every row from wrong side as follows: 2 stitches 1 time and 1 stitch 2 times = 11-13 stitches. Work as before until piece measures 25-26 cm = 9¾"-10¼" from cast-on edge. Insert a marker in piece to measure from (= mid on top of shoulder). Work until piece measures 2 cm = ¾" from marker on shoulder. On next row from right side, cast on 1 new stitch towards the neck = 12-14 stitches. Work 1 row from wrong side. At the end of next row, cast on 20-22 new stitches, then slip stitches from right shoulder piece back on needle= 44-50 stitches. BACK PIECE: Now work over all stitches as on front piece. When piece measures 7½-8½ cm = 2⅞"-3¼" from marker on shoulder (adjust so that this is the same length from shoulder as last increase on front piece), decrease stitches inside the outermost 9 stitches in each side as follows, from right side: Work pattern as before over the outermost 9 stitches, knit 2 together, work until 11 stitches remain on needle, slip 1 stitch knitwise, knit 1 and pass slipped stitch over stitch worked, work as before over the last 9 stitches. Repeat decrease inside the 9 outermost stitches approx. every 3½ cm = 1¼" until 4 decreases have been done in total = 36-42 stitches. Work as before piece measures 19-20 cm = 7½"-8" from marker on shoulder. Switch to circular needle size 7 MM = US 10.75. Work next row as follows, from right side: Work 2 edge stitches in garter stitch, knit 2, purl 2, knit 2, stockinette stitch over the next 20-26 stitches, AT THE SAME TIME increase 6-8 stitches evenly, knit 2, purl 2, knit 2, 2 edge stitch in garter stitch = 42-50 stitches. Work as follows from wrong side: Knit 2 edge stitches, * knit 2, purl 2 *, work from *-* until 4 stitches remain on the needle. Knit 2 and knit 2 edge stitches. Work rib like this until piece measures 25-26 cm = 9¾"-10¼" from shoulder - adjust so that front piece and back piece are the same length. Bind off stitches with knit over knit and purl over purl. NECK EDGE: Use a short circular needle 7 MM = US 10.75 and 1 strand of each color (= 4 strands), begin at marker on the shoulder and pick up approx. 64-68 stitches around the neck (number of stitches must be divisible by 4). Continue with rib (= knit 2/purl 2). Work until rib measures approx. 20 cm = 8". Bind off with knit over knit and purl over purl - read BIND-OFF TIP. ASSEMBLY: The neck edge can be folded and sewn into a double neck edge or use it as a high collar. If you want a double neck edge do the following: Fold rib at the top of neck down on inside of garment. Fasten rib to get a double neck edge. To avoid a tight neck edge that sticks out it is important to keep the seam elastic. ---------------------------------------------------------- HAT - SHORT OVERVIEW OF THE PIECE: Work hat in the round on a short circular needle/double pointed needles with rib. HAT: Cast on 68 stitches on a short circular needle size 7 MM = US 10.75 with 6 strands DROPS Kid-Silk (= 1 strand of each color + an extra strand curry and 1 extra strand with color rust). Then remove the 2 extra strands, now continue with 1 strand of each color (= 4 strands). Work rib (= knit 2/purl 2). Continue with rib until piece measures 12 cm = 4¾" from cast-on edge. Now work as follows: * Knit 2, purl 2, knit 2, purl 2, knit 2, purl 2, knit 2, purl 3 *, repeat *-* 4 times in total on round. Continue until piece measures 25 cm = 9¾". Now work as follows – from beginning of round: A.1 over all stitches (= 4 repetitions of 17 stitches). When A.1 has been worked 1 time vertically, there are 24 stitches on needles. On next round knit all stitches together 2 by 2 = 12 stitches. Cut the yarn and pull it through the last stitches, tighten together and fasten. Hat measures approx. 35 cm = 13¾" from top and down. Fold rib at the bottom so that fold is approx. 10 cm = 4". Hat measures approx. 25 cm = 9¾". |
||||||||||||||||
Diagram explanations |
||||||||||||||||
|
||||||||||||||||
 |
||||||||||||||||
Have you finished this pattern?Tag your pictures with #dropspattern #harvestglowset or submit them to the #dropsfan gallery. Do you need help with this pattern?You'll find 31 tutorial videos, a Comments/Questions area and more by visiting the pattern on garnstudio.com. © 1982-2026 DROPS Design A/S. We reserve all rights. This document, including all its sub-sections, has copyrights. Read more about what you can do with our patterns at the bottom of each pattern on our site. |
||||||||||||||||


With over 40 years in knitting and crochet design, DROPS Design offers one of the most extensive collections of free patterns on the internet - translated to 17 languages. As of today we count 324 catalogs and 12290 patterns - 12280 of which are translated into English (US/in).
We work hard to bring you the best knitting and crochet have to offer, inspiration and advice as well as great quality yarns at incredible prices! Would you like to use our patterns for other than personal use? You can read what you are allowed to do in the Copyright text at the bottom of all our patterns. Happy crafting!
Post a comment to pattern DROPS 225-5
We would love to hear what you have to say about this pattern!
If you want to leave a question, please make sure you select the correct category in the form below, to speed up the answering process. Required fields are marked *.