
Popular categories
Looking for a yarn?


Comments / Questions (52)
![]() Carole Montaigne wrote:
Carole Montaigne wrote:
Bonjour, J’ai du mal à comprendre la partie 1 de la capuche. Selon moi il faut tricoter 9 rangs supplémentaires en comptant les allers retours avant de rabattre le reste des mailles sur l’endroit. Ma question alors est : de quel fil se sert on afin de terminer les 9 rangs de la partie 2? Merci d’avance pour votre réponse
22.01.2026 - 11:47DROPS Design answered:
Bonjour Mme Montaigne, vous devez couper le fil à la fin de la partie-1 et le joindre à nouveau au début de la partie 2. Bon tricot!
23.01.2026 - 09:34
![]() FLORENCE wrote:
FLORENCE wrote:
Pouvez m'expliquer comment relever autant de mailles pour l'ouverture ? Merci
10.01.2026 - 00:49DROPS Design answered:
Bonjour Florence, vous reprenez les mailles en attente, vous relevez les mailles le long des deux côtés de l'ouverture, il vous faut suffisamment de mailles car vous utilisez les aiguilles 3,5 et que vous tricotez en côtes (les côtes resserrent l'ouvrage) Bon tricot!
12.01.2026 - 08:52
![]() FLORENCE wrote:
FLORENCE wrote:
Si vous voulez je peux vous envoyer une photo de mon tricot ?
08.01.2026 - 23:50DROPS Design answered:
Bonjour Florence, vous pouvez volontiers partager vos photos avec nous, il nous faut juste le lien de cette photo que vous aurez publié auparavant (Instagram, Facebook, blog, etc..). Utilisez alors le formulaire ici. Merci d'avance!
09.01.2026 - 10:58
![]() FLORENCE wrote:
FLORENCE wrote:
Bonjour, je n' arrive pas à relever les mailles. Mon ouverture me semble trop petite, elle mesure environ 10 cm su 10 cm je ne comprends pas pourquoi ? Cordialement
08.01.2026 - 22:02
![]() Heather wrote:
Heather wrote:
Hi! I'm having trouble understanding how to work the bind off for the hood. Do I bind off stitches mid-back for section 1 and 2 simultaneously, or should I bind off section 1 first and then move on to section 2? After reducing section 1, the pattern says to knit a row and then bind off all stitches in that section. Does that leave the yarn by the face? How do I then get the yarn over to the mid-back of section 2 to bind off that section?
06.01.2026 - 16:18DROPS Design answered:
Dear Heather, you work each section separately the one after the other, so you divide piece at the marker and work first part-1 as explained, binding off from RS. Then take stitches from 2nd part back on needle and work 2nd part as first part and binding off from RS. Then sew both parts together, sewing cast off stitches together on top of head. Happy knitting!
07.01.2026 - 07:43
![]() Carole Montaigne wrote:
Carole Montaigne wrote:
Bonjour, Si je respecte l’échantillon je dois tricoter avec des aiguilles de 5 mais je trouve le point plus joli en 4,5. Puis-je rester en 4,5 et tricoter la grande taille en espérant avoir une capuche plus petite mais pas complètement déformée ? Merci d’avance pour votre réponse
05.01.2026 - 10:48DROPS Design answered:
Bonjour Mme Montaigne, il va vous falloir calculer si vous obtiendrez ainsi, avec votre échantillon, les mesures de la taille S/M. Bon tricot!
05.01.2026 - 11:13
![]() Karoline wrote:
Karoline wrote:
I don't really follow this last part: Sticka avigmaskor över rätmaskor och rätmaskor över avigmaskor över dessa 17-19 maskorna, sedan stickas det upp ca 111 till 125 maskor innanför 1 maska runt öppningen fram = totalt ca 128 till 144 maskor. Do you have a tutorial I could follow? Thanks!
02.01.2026 - 01:56
![]() Palma wrote:
Palma wrote:
Buonasera, io uso questo filato e vorrei sapere se avete modelli di ballava con ferri diritti ( non circolari) , grazie
16.12.2025 - 14:43DROPS Design answered:
Buonasera Palma, può adattare il modello alla lavorazione in piano. Buon lavoro!
17.12.2025 - 22:20
![]() FLORENCE wrote:
FLORENCE wrote:
Bonjour C'est ma 1ère cagoule et je veux être sûre de bien comprendre Je suis rendue au début de la capuche J'ai 70 mailles et 17 mailles en attente au milieu du rang, je continue à tricoter ce rang avec les mailles en attente au centre ? Est-ce ce bien cela ? Le trou est très petit et je ne comprends pas non plus comment on peut y relever 111 mailles ensuite ? Cordialement
07.12.2025 - 08:53DROPS Design answered:
Bonjour Florence, continuez en allers et retours au point de riz sur toutes les 70 mailles jusqu'à ce que l'ouvrage mesure environ 26 cm depuis la séparation, milieu devant - 40 cm depuis le rang de montage (les mailles en attente au centre seront reprises lors de la realisation de la bordure autour du visage). Bon tricot!
07.12.2025 - 11:58
![]() Lyd wrote:
Lyd wrote:
I'm very confused with the part at the end of the hood, how come I bind off stitches mid-back? When on the next step it says to "continue with moss stitch". Do I bind off half and continue knitting the other half?
10.11.2025 - 19:33DROPS Design answered:
Dear Lyd, this will be done as explained just afterwards, this means at the end of section "hood" just divide piece at the marker and work now each part /half separately starting with part-1, you will cast off stitches at the beginning of each row starting from mid back (= from middle of piece). Then work part -2 the same way and sew cast off stitches together on top of hood/head. Happy knitting!
18.11.2025 - 12:19
|
|
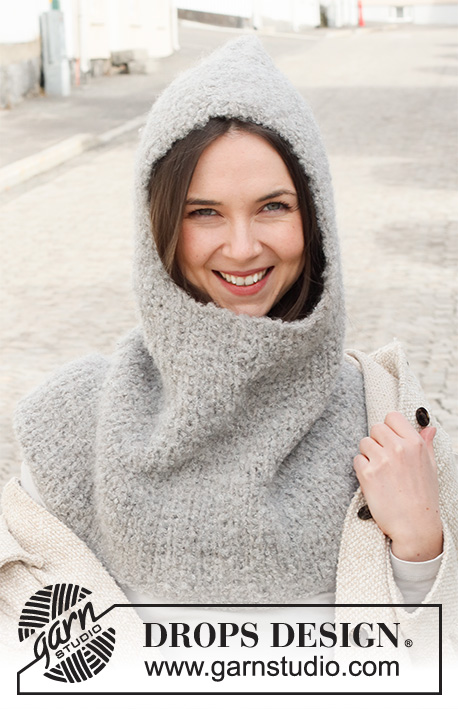
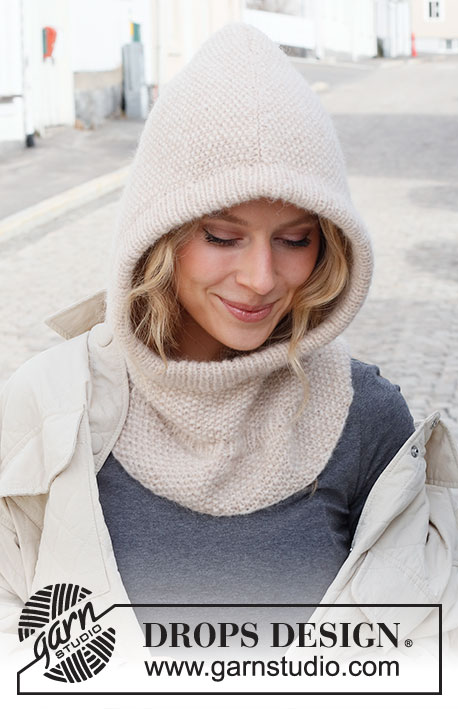
Frost Buster Balaclava#frostbusterbalaclava |
|
 |
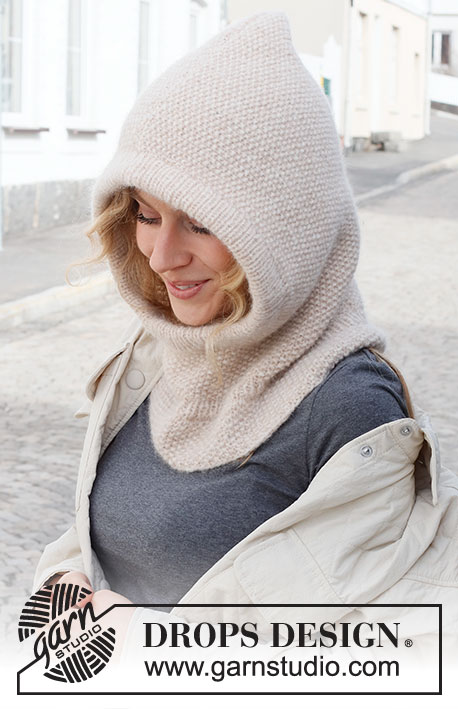 |
Knitted hat / balaclava in DROPS Air. The piece is worked with moss stitch and ribbed edges
DROPS 225-7 |
|
|
------------------------------------------------------- EXPLANATIONS FOR THE PATTERN: ------------------------------------------------------- RIDGE/GARTER STITCH (worked back and forth): Knit all rows. 1 ridge = knit 2 rows. MOSS STITCH: Round/row 1: * Knit 1, purl 1 *, work from *-* to end of round/row. Round/row 2: Purl over knit and knit over purl. Repeat round/row 2 onwards. DECREASE TIP (evenly spaced): To work out how to decrease evenly, count the total number of stitches on needle (e.g. 115 stitches) and divide by the number of decreases to be made (e.g. 23) = 5. In this example decrease by knitting together each 4th and 5th stitch. BINDING-OFF TIP: To avoid the bind-off edge being tight you can bind off with a larger size needle. If the edge is still tight, make 1 yarn over after approx. each 4th stitch at the same time as binding off; the yarn overs are bind off as normal stitches. ------------------------------------------------------- START THE PIECE HERE: ------------------------------------------------------- BALACLAVA – SHORT OVERVIEW OF THE PIECE: The piece is worked in the round with circular needle, bottom up. Stitches are slipped on a thread for the face-opening and the piece finished back and forth. The hood is sewn together at the top. A ribbed double edge is worked around the face-opening. BALACLAVA: Cast on, slightly loosely, 115-127 stitches with circular needle size 4.5 MM = US 7 and DROPS Air. Work 1 round of stockinette stitch, then work MOSS STITCH – read description above. Remember the KNITTING GAUGE! When the piece measures 6 cm = 2⅜", work 2 rounds of stockinette stitch – AT THE SAME TIME on the first round decrease 23-25 stitches evenly spaced – read DECREASE TIP = 92-102 stitches. Change to circular needle size 3.5 MM = US 4. Work 4 rounds of rib (knit 1, purl 1). After this rib, change back to circular needle size 4.5 mm = US 7 and knit 1 round where you decrease 5-5 stitches evenly spaced – remember DECREASE TIP = 87-97 stitches. Continue with moss stitch in the round until the piece measures 14 cm = 5½" from the cast-on edge in both sizes. On the next round place the middle 17-19 stitches mid-front on a thread, leaving an opening mid front = 70-78 stitches on the needle. Insert 1 marker in the middle of the row (= mid-back). Allow the marker to follow your work onwards – it will be used when dividing the piece at the top. Now work the hood as described below. HOOD: Continue back and forth with moss stitch over all stitches. Continue working until the piece measures 40-42 cm = 15¾"-16½" from the cast-on edge (the piece measures approx. 26-28 cm = 10¼"-11" from the division mid-front). There is approx. 3 cm = 1⅛" left to finished length; try the balaclava on and continue to desired length. Now bind off stitches mid-back. Divide the piece at the marker and complete each section separately as described below. SECTION 1: = 35-39 stitches. Continue with moss stitch back and forth and bind off at the beginning of each row from mid-back as follows: Bind off 1 stitch 1 time, 2 stitches 2 times and 3 stitches 1 time = 27-31 stitches left. Knit 1 row from the right side. Bind off with knit from the right side. The piece measures approx. 43-45 cm = 17"-17¾" from the top down. SECTION 2: Work in the same way as Section 1. ASSEMBLY: Sew the balaclava together at the top, inside the bind-off edge. EDGE AROUND FACE-OPENING: Place the stitches from the thread mid-font on circular needle size 3.5 MM = US 4. Purl over knit and knit over purl over these 17-19 stitches, then knit up 111 to 125 stitches inside 1 stitch around the whole opening = 128 to 144 stitches. The number of stitches should be divisible by 2. Work rib in the round (knit 1, purl 1) for 6-7 cm = 2⅜"-2¾". Loosely bind off with knit over knit and purl over purl – read BINDING-OFF TIP. Fold the ribbed edge double to the inside and sew down. To avoid the edge being tight and rolling outwards, it is important that the seam is elastic. |
|
Have you finished this pattern?Tag your pictures with #dropspattern #frostbusterbalaclava or submit them to the #dropsfan gallery. Do you need help with this pattern?You'll find 22 tutorial videos, a Comments/Questions area and more by visiting the pattern on garnstudio.com. © 1982-2026 DROPS Design A/S. We reserve all rights. This document, including all its sub-sections, has copyrights. Read more about what you can do with our patterns at the bottom of each pattern on our site. |
|


With over 40 years in knitting and crochet design, DROPS Design offers one of the most extensive collections of free patterns on the internet - translated to 17 languages. As of today we count 324 catalogs and 12290 patterns - 12280 of which are translated into English (US/in).
We work hard to bring you the best knitting and crochet have to offer, inspiration and advice as well as great quality yarns at incredible prices! Would you like to use our patterns for other than personal use? You can read what you are allowed to do in the Copyright text at the bottom of all our patterns. Happy crafting!
Post a comment to pattern DROPS 225-7
We would love to hear what you have to say about this pattern!
If you want to leave a question, please make sure you select the correct category in the form below, to speed up the answering process. Required fields are marked *.