
Populaire categorieën
Op zoek naar garen?


Opmerkingen / Vragen (73)
![]() SandraB schreef:
SandraB schreef:
Hallo! Ik wil graag dit patroon maken. Heb nog niet zovaak kleren gehaakt. Daarom begrijp ik de tweede tekening met de maten niet zo goed. Hoe moet ik die zien?
01.07.2017 - 08:37DROPS Design antwoorde:
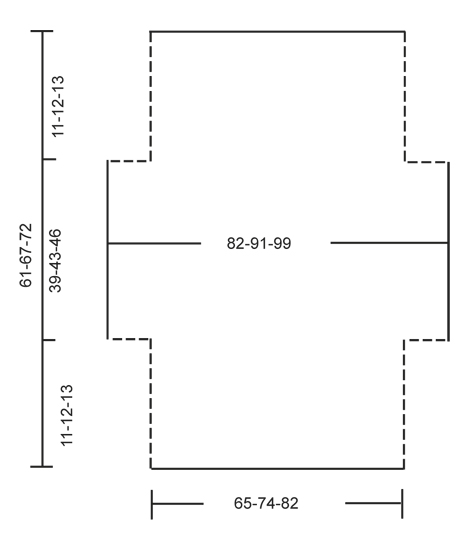
Hoi Sandra, In de tweede tekening zie je het werk wanneer je klaar bent met haken, maar nog niet in elkaar genaaid hebt. Het kledingstuk wordt op de horizontale lijn dubbel gevouwen en op op de stippellijnen aan elkaar gehaakt.
01.07.2017 - 12:01
![]() Elizabeth Baker schreef:
Elizabeth Baker schreef:
I have finished my 21 1/2 inches and pattern says to not work 12 stitches on either side how then do I start my next row
21.05.2017 - 19:07DROPS Design antwoorde:
Dear Mrs Baker, work next row until 12 sts remain, turn and work next row until 12 sts remain, turn and work next row. You will have now 12 sts unworked on each side. Happy crocheting!
22.05.2017 - 09:54
![]() Elizabeth Baker schreef:
Elizabeth Baker schreef:
I have finished my 21 1/2 inches and pattern says to not work 12 stitches on either side, how do I start next row?
20.05.2017 - 19:02
![]() Elizabeth Baker schreef:
Elizabeth Baker schreef:
After I have finished row 8 to continue do I start with A1 or A2 to repeat
01.05.2017 - 16:43DROPS Design antwoorde:
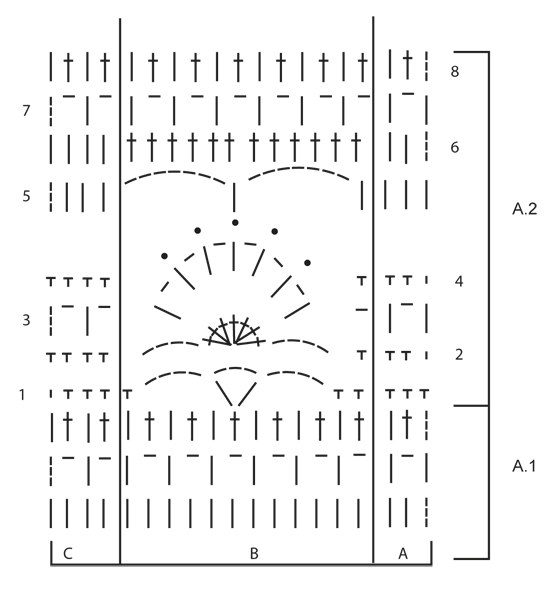
Dear Mrs Baker, after you have worked A.2 1 time in height, repeat A.2 from row 1. Happy croccheting!
02.05.2017 - 11:48
![]() Elizabeth Baker schreef:
Elizabeth Baker schreef:
After I have finished row 8 do I start with row A1 or A2
01.05.2017 - 16:20DROPS Design antwoorde:
Dear Elizabeth, after row 8, you should continue and repeat pattern A.2. I hope this helps. Happy crocheting!
06.05.2017 - 11:06
![]() GB schreef:
GB schreef:
Hi, in the pattern directions it says the picot has a DC in the first of the chain 3s, but the video shows a sc instead. Could you clarify please? Thanks!
15.04.2017 - 17:14DROPS Design antwoorde:
Dear GB, you should work 1 dc in 1st of the 3 ch as explained in the pattern and not 1 sc as worked in the video, thanks for noticing. Happy crocheting!
19.04.2017 - 15:24
![]() Mary Ancira schreef:
Mary Ancira schreef:
The letter sizes, (example- S, M, L,) are not showing what size the bust is like it normally does. Should I assume the sizes are the same on all the patterns?
03.04.2017 - 10:24DROPS Design antwoorde:
Dear Mrs Ancira, you will find at the bottom of the pattern a measurement chart with measurements for each size in cm, taken flat from side to side. Compare these to a similar garment you have and like the shape to find out the matching size. Read more about sizing and convert into inches here. Happy crocheting!
03.04.2017 - 11:25
![]() Stephanie schreef:
Stephanie schreef:
Bonjour je ne comprends pas l'augmentation, au rang 6 avec l'ajout de maille en l'air que l'on crochete apres avec une bride un ml une bride et ensuite crochete le reste comment ? c'est la que je saisis pas , parce que logiquement on serait sur le rang 7 mais ensuite encore au rang 7 ,pouvez vous m'expliquer merci
14.02.2017 - 00:10DROPS Design antwoorde:
Bonjour Stéphanie, la 1ère augmentation sur le côté se fait à la fin du rang 5 (= le rang suivant sera le rang 6), on crochète 14 ml à la fin de ce rang, on tourne, on crochète 11B, puis le rang 6 de A.2 et on crochète 15 ml à la fin du rang 6, on tourne, on crochète 1B, 1 ml sur les nouvelles ml et on continue le rang 7 comme A.2. Puis on continue A.2 sur toutes les mailles. Bon crochet!
14.02.2017 - 09:32
![]() Jasmine schreef:
Jasmine schreef:
Dear Jasmine, "on row 1 in A.1 work 1 dc in each st," So since I have 92 stitches in A.1 I need to do 92 DC stitches all the way across?
21.01.2017 - 03:45DROPS Design antwoorde:
Dear Jasmine, you should have 92 dc on first row, then work: A.1A (= 4 sts), repeat A.1B a total of 7 times (= 7 x 12 sts), and finish with A.1C (= 4 sts), ie: 3 + (x12=84) + 4= 91 sts. Happy crocheting!
23.01.2017 - 09:29Leonore schreef:
This pattern doesnt make any sence. Row one is clear to work. From there on i dont understand anything! Please write out the pattern. I dont work with diagrams or whatever this confusuon is called. Please help!
17.12.2016 - 18:45DROPS Design antwoorde:
Dear Leonore, there is only diagram to this pattern, start reading diagram from the bottom corner on the right side and read towards the left from RS and from left to right from WS. Each symbol represents 1 st/group of sts. work A.1A (= 3 sts), then repeat A.1B (= 12 sts) and finish with A.1C (= 4 sts). You are welcome to contact your DROPS store for any further individual assistance. Happy crocheting!
19.12.2016 - 09:17
|
||||||||||||||||
Blue Wonder#bluewondershoulderpiece |
||||||||||||||||
 |
 |
|||||||||||||||
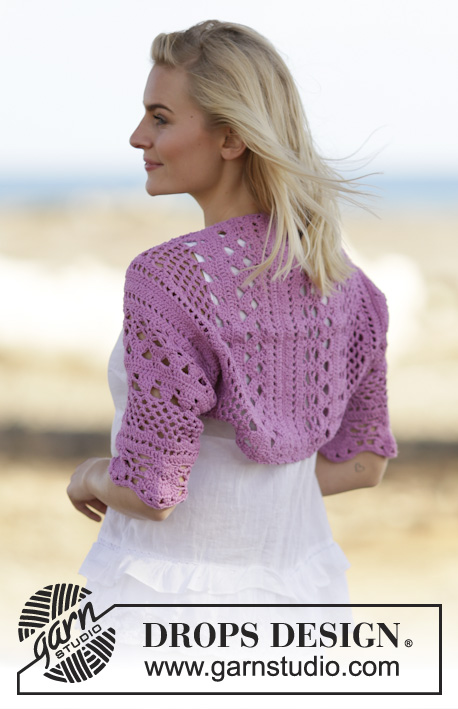
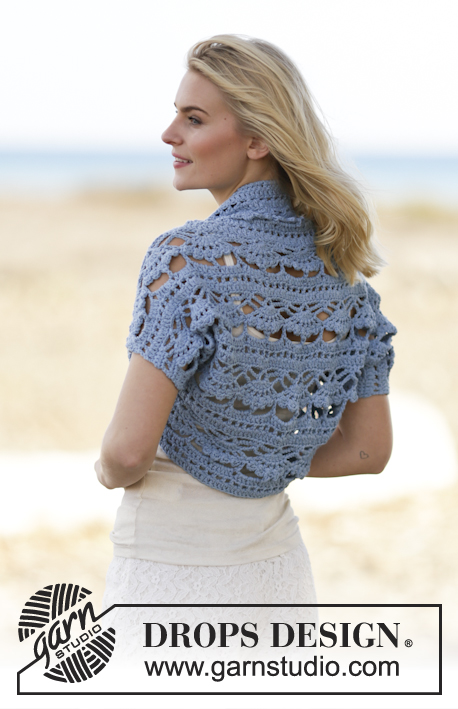
Gehaakte DROPS bolero van "Paris". Maat S - XXXL.
DROPS 162-34 |
||||||||||||||||
|
PATRONEN: zie telpatroon A.1 en A.2 BOLERO: Haak 110-125-139 l met haaknld 5 mm en Paris. TOER 1: keer en haak 1 stk in vierde l vanaf haak (= 2 stk), haak 1 stk in elke van de volgende 4-1-3 l, * sla 1 l over, 1 stk in elke van de volgende 5 l *, herhaal van *-* = 91-103-115 stk. TOER 2: haak dan volgens telpatroon A.1 als volgt: A.1 A, A.1 B 7-8-9 keer in totaal en eindig met A.1 C. Als A.1 een keer in de hoogte is gehaakt, herhaal dan A.2 in de hoogte. Haak TEGELIJKERTIJD bij een hoogte van ongeveer 11-12-13 cm (pas zo aan dat de volgende toer een 6e toer in A.2 is) 14 l aan het einde van de toer (= toer 5). Keer en haak 1 stk in vierde l vanaf haak, haak dan 1 stk in elke van de volgende 10 nieuwe l. Ga verder met 6e toer in A.2 en haak aan het einde van de toer 15 nieuwe l. Keer en haak 1 stk in de zesde l vanaf de haak, * haak 1 l, sla 1 l over, 1 stk in volgende l *, herhaal van *-* over de volgende 9 nieuwe l, eindig met 1 l. Haak de rest van de toer volgens A.2. Haak de volgende toer als eerder tot de nieuwe st aan het eind van de toer, haak 1 stk in elke l-lus en 1 stk in elk stk. Er zijn 12 nieuwe stk aan elke kant = 115-127-139 stk. Ga dan verder op toer 8 als volgt: A.2 A, A.2 B 9-10-11 keer in totaal en eindig met A.2 C. Haak bij een hoogte van ongeveer 50-55-59 cm (pas zo aan dat de volgende toer een 7e toer is) niet over 12 stk aan elke zijkant = 91-103-115 stk. Ga verder en haak als volgt: A.2 A, A.2 B 7-8-9 keer in totaal, eindig met A.2 C. Ga verder tot een totale hoogte van ongeveer 61-67-72 cm – pas zo aan dat het na een hele herhaling van A.2 is. Hecht af. AFWERKING: Naai de zij- en onderarmnaden dicht naast de kant st. |
||||||||||||||||
Uitleg van het telpatroon |
||||||||||||||||
|
||||||||||||||||
 |
||||||||||||||||
 |
||||||||||||||||
 |
||||||||||||||||
Heeft u dit patroon gemaakt?Tag dan uw afbeeldingen met #dropspattern #bluewondershoulderpiece of stuur ze naar de #dropsfan galerij. Heeft u hulp nodig voor dit patroon?U vind 7 instructievideo's, een commentaar/vragengedeelte en nog veel meer, als u naar het patroon gaat op garnstudio.com © 1982-2026 DROPS Design A/S. Alle rechten voorbehouden. Op dit document, inclusief alle subdocumenten, rust copyright. Lees meer over wat u kunt doen met onze patronen onderaan elk patroon op onze site |
||||||||||||||||


Met meer dan 40 jaar ervaring in brei- en haakdesign biedt DROPS Design één van de meest uitgebreide collecties van gratis patronen aan op internet vertaald in 324 talen. Tot en met vandaag hebben wij 12290 boeken en 11997 patronen gepubliceerd.
Wij werken hard om u het beste van haken en breien te bieden; patronen, inspiratie, advies en natuurlijk garens van uitstekende kwaliteit voor de allerbeste prijzen! Wilt u onze patronen gebruiken voor meer dan privégebruik? U kunt lezen wat wel en niet is toegestaan is in de Copyright tekst, die u onderaan elk patroon kunt vinden. Veel handwerkplezier!
Laat een opmerking achter voor DROPS 162-34
Wij horen graag wat u vindt van dit patroon!
Wilt u een vraag stellen, kies dan de juiste categorie in het formulier hieronder om sneller een antwoord te krijgen. Verplichte velden zijn gemarkeerd met een *.