
Popular categories
Looking for a yarn?


Comments / Questions (50)
![]() Satu wrote:
Satu wrote:
Hihojen lisäyksestä, teenkö ensin vasemmalle kallistuvan lisäyksen ja sitten oikealle? Vai toisinpäin?
27.04.2026 - 08:34DROPS Design answered:
Hei, tee 1. ja 3. merkin jälkeen lisäys siten, että lisätty silmukka kallistuu vasemmalle ja tee ennen 2. ja 4. merkkiä lisäys siten, että lisätty silmukka kallistuu oikealle.
27.04.2026 - 12:56
![]() Fatma wrote:
Fatma wrote:
Bonsoir je voudrais tricoter un pull homme avec des manches marteau est ce que je peux utiliser ce modèles en sachant que je voudrais utiliser des aiguilles numéro 3,5 .si c est pas possible pouvais vous me conseillé un modèle.merci
20.08.2025 - 19:20DROPS Design answered:
Bonjour Fatma, retrouvez ici tous les modèles de pulls homme avec manches marteau - retrouvez également sous l'onglet "FAQ" en haut de page, quelques astuces pour adapter un pull femme pour homme, ce qui vous laisse un choix plus large. Bon tricot!
22.08.2025 - 14:53
![]() Anne wrote:
Anne wrote:
Hallo, werden die Zunahmen für die Sattelschulter wirklich in jeder Runde wiederholt? In der Videoanleitung sieht es aus als würde in jd. 2. Reihe zugenommen. Danke und Liebe Grüße Anne
14.01.2025 - 21:25DROPS Design answered:
Liebe Anna, das Video zeigt die Technik, dh wie man für eine Sattelschulter zunimmt, aber immer die Anleitung genau folgen, dh hier in jeder Runde zunehmen. Viel Spaß beim Stricken!
15.01.2025 - 08:57
![]() Janson wrote:
Janson wrote:
Wo ist bitte das Diagramm fürs Muster ?
17.08.2024 - 16:49DROPS Design answered:
Hallo, das Diagramm fürs Muster finden Sie unter dem Muster-text, neben der Skizze des Pullovers.
18.08.2024 - 16:24
![]() Kathy wrote:
Kathy wrote:
Also, once I have 104 stitches finished on the Yoke section, do I knit 1 round, first, before doing any chart pattern or shoulder increases, while doing ktbl to close the yarn overs, then do the following instruction to create increases each side of the shoulder stitches? I\\\'m only used to reading American patterns without charts, so please forgive my ignorance.
29.06.2024 - 09:43DROPS Design answered:
Dear Kathy, after you have worked the first round on yoke including increases, just work the next round knitting all stitches as before + working 2nd row in A.1 as shown in diagram (every odd row in diagram will be worked: P1, K2, P1). Happy knitting!
01.07.2024 - 08:26
![]() Kathy wrote:
Kathy wrote:
I'm going to knit this in size S. I don't understand how to read Chart A during the YOKE section. Do I read Chart A bottom row (p1, k2tog, p1) for only 16 stitches (insert M1), before doing the increases over 12 stitches (k3+1yo x 4) and inserting M2? Then do I read the next row up from the bottom in Chart A for the 36 stitches (p1, sl1 knitwise, k1, psso, p1 x 9) or continue with the bottom row of the chart (doing k2tog between the purls)?
29.06.2024 - 01:15DROPS Design answered:
Dear Kathy, there is no M.2 in this pattern, you work the sleeves for sleeves in stocking stitch and the stitches for front/back piece with pattern M.1 -read each row the one after the other (from the bottom up) and repeat the 4 sts in A.1. In case I'm misunderstanding your question, you might find the answer in this lesson where you can read more about diagrams. Happy knitting!
01.07.2024 - 08:19
![]() TAN wrote:
TAN wrote:
Follow the Fjord pas de diagramme dans l explication merci
06.05.2024 - 05:13DROPS Design answered:
Bonjour Mme Tan, vous trouverez le diagramme A.1 à droite du schéma des mesures, sous la manche. Bon tricot!
06.05.2024 - 09:25
![]() Bernet wrote:
Bernet wrote:
Je trouve ce modèle très joli mais du fait que le col est haut et que le devant est pareil que le dos ,quand je mets le pull ça fait une bosse devant juste en dessous du col J’ai démonter le col et en refaire un que j ai recousu sur l’encolure
13.03.2024 - 09:07
![]() Patricia Ribeiro wrote:
Patricia Ribeiro wrote:
Je tricote le modèle 215-21. Je viens de terminer le col : 104 mailles taille M. J’ai un problème pour réaliser l’empiècement. En effet sur le patron, il est indiqué : tricoter A1 = 4 mailles augmentations 1/2 dos ; toujours A1 augmenter 4 mailles épaule gauche ; idem 8 mailles devant ; à nouveau 4 mailles épaules droite et 4 mailles pour le second 1/2 dos soit au total 24 augmentations. 104 mailles du col + 24 augmentations = 128 mailles correspondant à la taille XL.
04.02.2024 - 21:12DROPS Design answered:
Bonjour Mme Ribeiro, tricotez ainsi: 20 m de A.1 pour le demi-dos + (12+4) m pour la manche + 40 m de A.1 pour le devant + (12+4) pour la manche + 20 m de A.1 pour le demi-dos soit: 20+16+40+16+20=112 m (vous aviez 104 m et avez augmenté 2 x 4 m, soit 104 + 8 = 112). Bon tricot!
05.02.2024 - 09:37
![]() Lia De Wind wrote:
Lia De Wind wrote:
Een vraag over de stekenverhouding: Van welke naald gaan jullie uit. Dit staat er namelijk niet bij Vriendelijke groet
01.04.2023 - 19:19DROPS Design answered:
Dag Lia,
Het proeflapje wordt met naald 4,5 gebreid of de dikste naald. Naald 3,5 is alleen voor de boorden.
05.04.2023 - 10:22
|
||||||||||||||||||||||||||||
Follow the Fjord#followthefjordsweater |
||||||||||||||||||||||||||||
 |
 |
|||||||||||||||||||||||||||
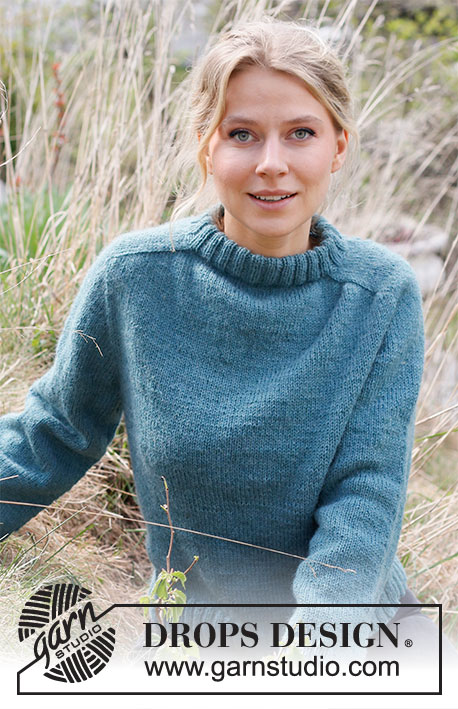
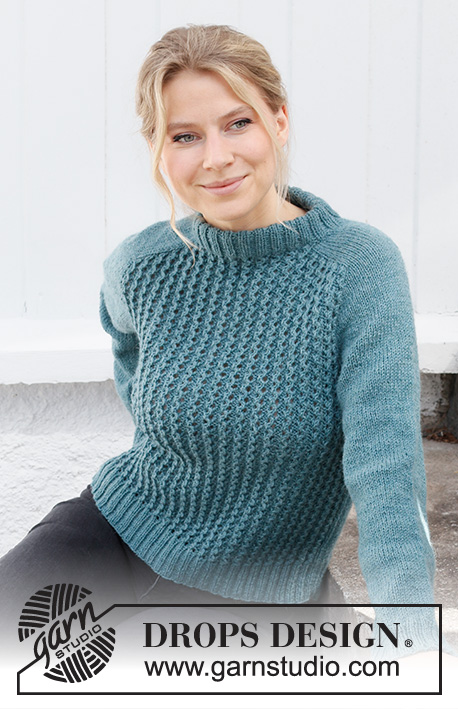
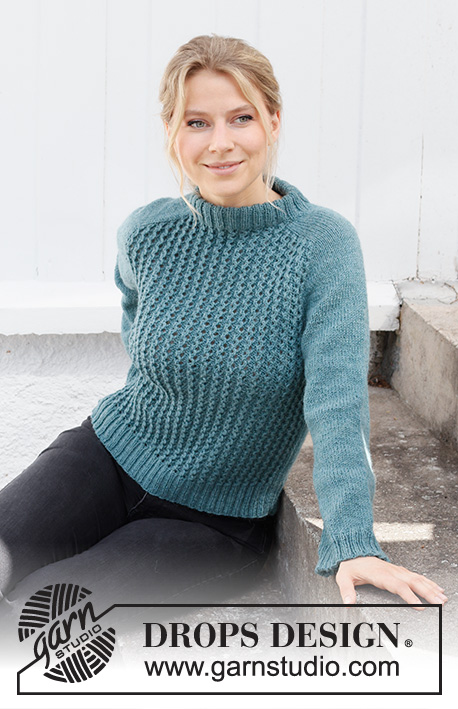
Knitted sweater in DROPS Karisma. The piece is worked top down with saddle shoulders and lace pattern. Sizes S - XXXL.
DROPS 215-21 |
||||||||||||||||||||||||||||
|
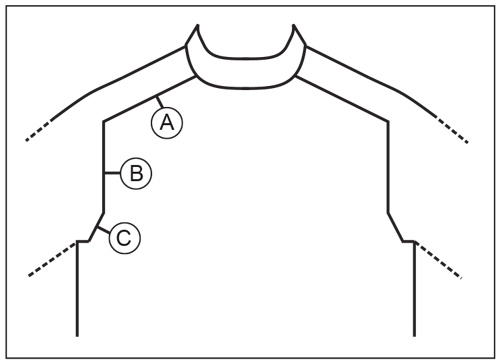
------------------------------------------------------- EXPLANATIONS FOR THE PATTERN: ------------------------------------------------------- PATTERN: See diagram A.1. INCREASE TIP-1 (evenly spaced): To work out how to increase evenly, count the total number of stitches on the needle (e.g. 12 stitches) and divide by the number of increases to be made (e.g. 4) = 3. In this example, increase by making 1 yarn over after each 3rd stitch. On the next round work the yarn overs twisted to avoid holes. INCREASE TIP-2: BEFORE MARKER: The new stitch will be twisted, leaning towards the right. Use left needle to pick up strand between 2 stitches from the round below, pick up strand from behind and knit stitch in front loop. AFTER MARKER: The new stitch will be twisted, leaning towards the left. Use left needle to pick up strand between 2 stitches from the round below, pick up strand from the front and knit stitch in back loop. DECREASE TIP (for sleeves): Decrease 1 stitch on either side of the marker as follows: Work until there are 3 stitches left before the marker, knit 2 together, knit 2 (marker thread sits between these 2 stitches), slip 1 stitch as if to knit, knit 1 and pass the slipped stitch over the knitted stitch. BINDING-OFF TIP: To avoid the bind-off edge being tight you can bind off with a larger size needle. If the edge is still tight, make 1 yarn over after approx. each 4th stitch at the same time as binding off; the yarn overs are bind off as normal stitches ------------------------------------------------------- START THE PIECE HERE: ------------------------------------------------------- SWEATER – SHORT OVERVIEW OF THE PIECE: The piece is worked in the round, top down. Stiches are increased on the yoke for the shoulders front and back, then stitches are increased for the sleeves. The yoke is divided for the body and sleeves; the body is continued in the round. The sleeves are worked in the round with double pointed needles, top down. NECK: Cast on 96-104-104-112-120-128 stitches with circular needle size 3.5 mm = US 4 and Karisma. Knit 1 round. Then work rib as follows: Purl 1, * knit 2, purl 2 *, work from *-* until there are 3 stitches left, knit 2 and purl 1. Continue this rib for 8½ cm = 3¼". Change to circular needle size 4.5 mm = US 7. Insert a marker at the beginning of the round (mid-back). Leave the marker there; THE PIECE IS MEASURED FROM THE MARKER! YOKE: On the next round you increase stitches, work pattern and insert 4 markers (between stitches) as follows: Work A.1 (= 4 stitches) over 16-20-20-20-20-24 stitches (= 4-5-5-5-5-6 times in width = half back piece), insert marker 1, knit 12-12-12-12-16-16 and increase 4-4-8-8-8-8 stitches evenly over these stitches – read INCREASE TIP-1, insert marker 2 (= shoulder), A.1 over the next 36-40-40-44-44-48 stitches (= 9-10-10-11-11-12 times in width = front piece), insert marker 3, knit 12-12-12-12-16-16 and increase 4-4-8-8-8-8 stitches evenly over these stitches, insert marker 4 (= shoulder) and A.1 over the last 20-20-20-24-24-24 stitches (= 5-5-5-6-6-6 times in width = half back piece) = 104-112-120-128-136-144 stitches. SADDLE SHOULDER INCREASE: Work stockinette stitch over the shoulder stitches and pattern A.1 over the front and back pieces. On the next round increase for saddle shoulders as follows: Increase 1 stitch BEFORE markers 1 and 3 and 1 stitch AFTER markers 2 and 4 - read INCREASE TIP-2 (= 4 stitches increased). I.e. there are increases on back piece and front piece, and number of shoulder stitches remain the same. The increased stitches are worked into A.1 as you go. Pattern A.1 is repeated in height. Increase like this every round a total of 20-20-24-24-28-28 times = 184-192-216-224-248-256 stitches. The piece measures approx. 8-8-9-9-11-11 cm = 3⅛"-3⅛"-3½"-3½"-4⅜"-4⅜" from the marker on the neck. REMEMBER THE KNITTING GAUGE! SLEEVE INCREASE: Now increase for the sleeves as follows: Increase 1 stitch AFTER markers 1 and 3 and 1 stitch BEFORE markers 2 and 4 (= 4 stitches increased). I.e. increase in shoulder stitches, number of stitches in front piece and back piece remains the same. Increase like this every 2nd round a total of 14-11-13-12-12-14 times = 240-236-268-272-296-312 stitches. The piece measures approx. 19-16-19-18-20-22 cm = 7½"-6¼"-7½"-7"-8"-8¾" from the marker. Continue with stockinette stitch and pattern as before without further increases until the piece measures 19-17-19-19-20-22 cm = 7½"-6¾"-7½"-7½"-8"-8¾". YOKE INCREASE: Now increase 1 stitch on each side of the marker as follows: Work until 1 stitch remain before markers 1 and 3, increase 1 stitch BEFORE marker, work 1 stitch, move the marker to the right needle and increase 1 stitch AFTER marker. Work until markers 2 and 4, increase 1 stitch BEFORE marker, move the marker to the right needle, work one stitch and increase 1 stitch AFTER marker (= 8 stitches increased). The increased stitches on the front and back pieces are worked into pattern A.1 and the increased stitches on the sleeves are worked in stockinette stitch (stitches between markers 1 and 2 and markers 3 and 4). Increase like this every 2nd round a total of 8-12-12-16-16-16 times = 304-332-364-400-424-440 stitches. When all the increases are finished, the piece measures 25-26-28-30-32-34 cm = 9¾"-10¼"-11"-11¾"-12½"-13⅜" from the marker on the neck. Now divide the piece for body and sleeves on the next round as follows: Work the first 44-52-56-60-64-68 stitches (= half back piece), place the next 60-62-70-76-80-84 stitches on a thread for the sleeve, cast on 8-8-8-8-8-12 stitches under the sleeve, work 92-104-112-124-132-136 stitches (= front piece), place the next 60-62-70-76-80-84 stitches on a thread for the sleeve, cast on 8-8-8-8-8-12 stitches under the sleeve and work the last 48-52-56-64-68-68 stitches (= half back piece). Body and sleeves are finished separately. BODY: = 200-224-240-264-280-296 stitches. Continue with pattern A.1 as before with stockinette stitch over the 8-8-8-8-8-12 stitches cast on under each sleeve. A.1 is repeated 23-26-28-31-33-34 times in width on both the front and the back piece. When the body measures 22-23-23-23-23-23 cm = 8¾"-9"-9"-9"-9"-9", change to circular needle size 3.5 mm = US 4 and work rib as follows: Purl over purl and knit over the lace pattern and over the 8-8-8-8-8-12 stockinette stitches under the sleeves work as follows: Purl 1, * knit 2, purl 2 *, work from *-* 1-1-1-1-1-2 times, knit 2 and purl 1. You now have a rib with knit 2, purl 2 over all stitches. When the rib measures 7 cm = 2¾", bind off with knit over knit and purl over purl – read BINDING-OFF TIP! SLEEVE: Place the 60-62-70-76-80-84 stitches from the thread on the one side of the piece on double pointed needles size 4.5 mm = US 7 and knit up 1 stitch in each of the 8-8-8-8-8-12 stitches cast on under the sleeve = 68-70-78-84-88-96 stitches. Insert a marker in the middle of the new stitches under the sleeve. This will be used when decreasing under the sleeve. Work stockinette stitch in the round. When the piece measures 3 cm = 1⅛" from the division, decrease 1 stitch on each side of the marker – read DECREASE TIP. Repeat this decrease every 6-5-3-2-2-1½ cm = 2⅜"-2"-1⅛"-¾"-¾"-½" a total of 5-5-8-10-11-14 times = 58-60-62-64-66-68 stitches. Continue with stockinette stitch until the body measures 33-32-31-30-30-28 cm = 13"-12½"-12¼"-11¾"-11¾"-11" from the division. Knit 1 round where you increase 18-16-18-16-18-16 stitches evenly spaced = 76-76-80-80-84-84 stitches. Change to circular needle size 3.5 mm = US 4. Work rib (= knit 2, purl 2) for 5 cm = 2". Bind off with knit over knit and purl over purl – remember BINDING-OFF TIP. Work the other sleeve in the same way. ASSEMBLY: Fold the neck double to the inside and sew down. To avoid the neck being tight and rolling outwards, it is important that the seam is elastic. |
||||||||||||||||||||||||||||
Diagram explanations |
||||||||||||||||||||||||||||
|
||||||||||||||||||||||||||||
 |
||||||||||||||||||||||||||||
 |
||||||||||||||||||||||||||||
Have you finished this pattern?Tag your pictures with #dropspattern #followthefjordsweater or submit them to the #dropsfan gallery. Do you need help with this pattern?You'll find 27 tutorial videos, a Comments/Questions area and more by visiting the pattern on garnstudio.com. © 1982-2026 DROPS Design A/S. We reserve all rights. This document, including all its sub-sections, has copyrights. Read more about what you can do with our patterns at the bottom of each pattern on our site. |
||||||||||||||||||||||||||||


With over 40 years in knitting and crochet design, DROPS Design offers one of the most extensive collections of free patterns on the internet - translated to 17 languages. As of today we count 325 catalogs and 12298 patterns - 12288 of which are translated into English (US/in).
We work hard to bring you the best knitting and crochet have to offer, inspiration and advice as well as great quality yarns at incredible prices! Would you like to use our patterns for other than personal use? You can read what you are allowed to do in the Copyright text at the bottom of all our patterns. Happy crafting!
Post a comment to pattern DROPS 215-21
We would love to hear what you have to say about this pattern!
If you want to leave a question, please make sure you select the correct category in the form below, to speed up the answering process. Required fields are marked *.