
Popular categories
Looking for a yarn?


Comments / Questions (34)
![]() Caroline wrote:
Caroline wrote:
Bonjour, je suis arrivée à la fin du corps de mon pull. Je dois faire 3 côtes mousses. Est-ce que je tricote simplement en mousse ou je fais des côtes 1/1? Merci d'avance pour votre réponse ☺️🙏🏻
08.04.2026 - 13:07DROPS Design answered:
Bonjour Caroline, le pull se termine ici par 3 côtes mousse, autrement dit, on tricote 3 fois (1 tour endroit, 1 tour envers), si vous voulez tricoter des côtes à la place, pensez à ajuster le nombre de mailles si besoin pour éviter que les côtes ne resserrent le bas du pull (les côtes des manches sont des côtes 2/2). Bon tricot!
09.04.2026 - 10:06
![]() Caroline wrote:
Caroline wrote:
Bonjour, je suis à la séparation des manches, je dois monter 8 mailles mais je bloque, je ne comprends pas à quel niveau je dois les monter ni comment faire... Pouvez vous m'aider s'il vous plaît? Merci d'avance 🙏🏻🙏🏻
30.03.2026 - 19:59DROPS Design answered:
Bonjour Caroline, regardez la video DROPS ICI a partir de 6 min 50 sec. Bon tricot!
30.03.2026 - 20:52
![]() Johanna wrote:
Johanna wrote:
Ich würde mir den Pullover so gern stricken, habe aber Größe XS. Könntet ihr die Anleitung auch für diese Größe schreiben?
29.03.2026 - 15:05DROPS Design answered:
Liebe Johanna, hier finden Sie alle unsere Pullover für Größe XS, sicher kann das Ihnen helfen bzw inspirieren. Viel Spaß beim Stricken!
07.04.2026 - 13:05
![]() Caroline wrote:
Caroline wrote:
Bonjour, j'ai oublié de faire mes augmentations de la flèche 5, et j'ai tricoté 19rangs depuis le rang où j'aurais dû les faire. Est-ce que je peux les faire à la fin du jacquard ou je dois absolument défaire ce que j'ai tricoter pour les faire au bon endroit? Merci pour votre réponse
25.03.2026 - 21:07DROPS Design answered:
Bonjour Caroline, il vaudrait peut être mieux défaire pour faire ces augmentations à la flèche -5 et ainsi conserver la bonne circonférence au bon endroit, mais si vous voulez en avoir le coeur net, glissez toutes les mailles en attente sur un fil et enfilez le pull, vous pourrez ainsi voir si vous devez plutôt défaire ou bien si vous pouvez faire les augmentations au niveau où vous en êtes. Bon tricot!
26.03.2026 - 09:23
![]() Caroline wrote:
Caroline wrote:
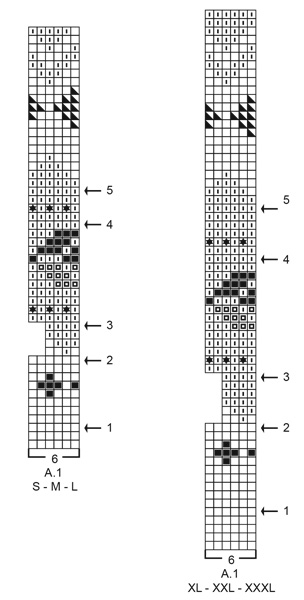
Bonjour, sur le diagramme de l'empiècement aux rangs12 à 15 (taille L) il n'y a que 4mailles d'indiquées sur les 6 initiales. Du coup de quelle couleur sont les mailles non indiquées s'il vous plaît? Merci d'avance
19.03.2026 - 10:01DROPS Design answered:
Bonjour Caroline, après la flèche 2, on va répéter A.1 sur 4 mailles tout le tour (et plus sur 6 mailles comme avant) - répétez simplement les 4 mailles du diagramme tout le tour, au tour avec la flèche-3 vous augmentez à nouveau et vous répétez de nouveau A.1 sur 6 mailles tout le tour. Bon tricot!
19.03.2026 - 16:19
![]() Pamela wrote:
Pamela wrote:
A qué se refiere " A.1A " en el párrafo que explica los aumentos en el canesú? What does " A.1A " means wheres increases are explained? The second A confused me! Thank you.
04.03.2026 - 04:08DROPS Design answered:
Hola Pamela, parece que se trata de un error, quiere decir el diagrama A.1, la A sobra.
08.03.2026 - 23:54
![]() Julie Morley wrote:
Julie Morley wrote:
I’m knitting this sweater for someone who wants super wash Is Merino extra fine the best substitute for sky? Thanks
15.10.2024 - 14:15DROPS Design answered:
Dear Mrs Morley, use the yarn converter to find all possible alternatives, if it needs to be a superwash, then Merino Extra Fine, Karisma, Cotton Merino or Fiesta could work - see superwash yarns from yarn group B here. Happy knitting!
15.10.2024 - 16:57
![]() Kerrie Carter wrote:
Kerrie Carter wrote:
I am not a spammer! Can you post Drop Sky wool to Australia?
19.03.2024 - 21:43DROPS Design answered:
Dear Carrie, we cannot ship, but if you search teh stores that carry out yarns, you can find ones that have worldwide shipping ( HERE. I hope this helps. Happy Knitting!
20.03.2024 - 01:12
![]() Kerrie Carter wrote:
Kerrie Carter wrote:
Why don’t you ship to Australia? I can’t source the wool here or online
19.03.2024 - 04:50DROPS Design answered:
Dear Mrs Carter, please find list of DROPS stores shipping worldwide here. Happy knitting!
19.03.2024 - 11:35
![]() LLP Syl wrote:
LLP Syl wrote:
Merci pour ce beau modèle que j'ai effectué sans difficulté avec votre belle laine toute douce ! Il fait sensation !! Syl
07.03.2024 - 16:57
|
||||||||||||||||||||||
After Midnight Sweater#aftermidnightsweater |
||||||||||||||||||||||
 |
 |
|||||||||||||||||||||
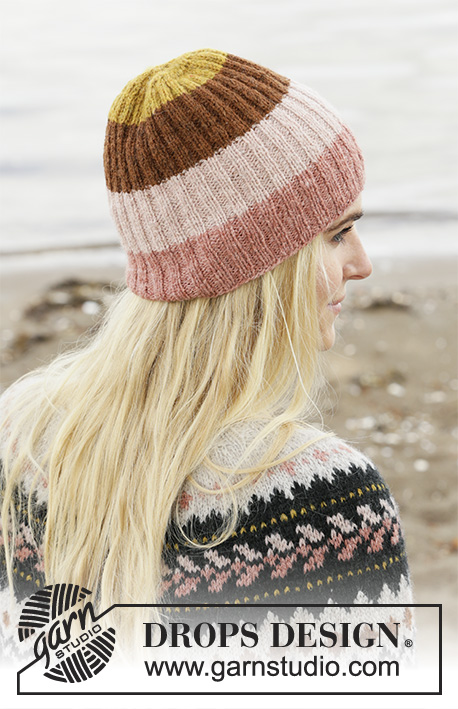
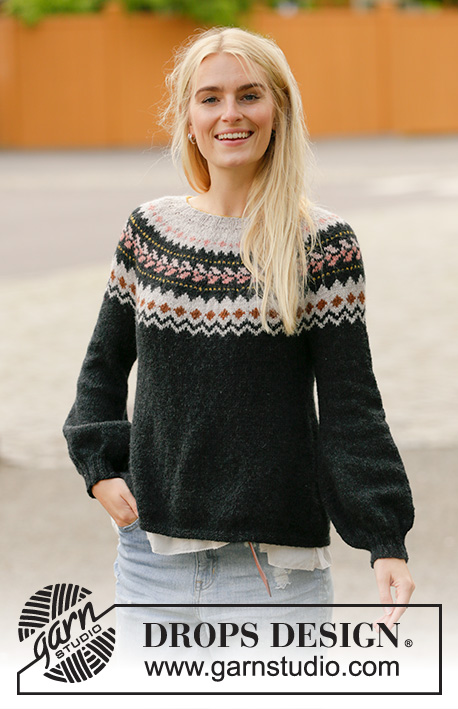
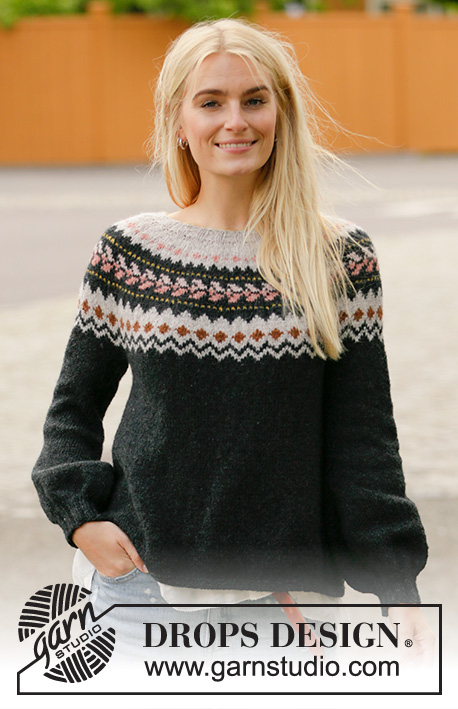
Knitted sweater in DROPS Sky. The piece is worked top down with round yoke and Nordic pattern on the yoke. Sizes S - XXXL.
DROPS 205-27 |
||||||||||||||||||||||
|
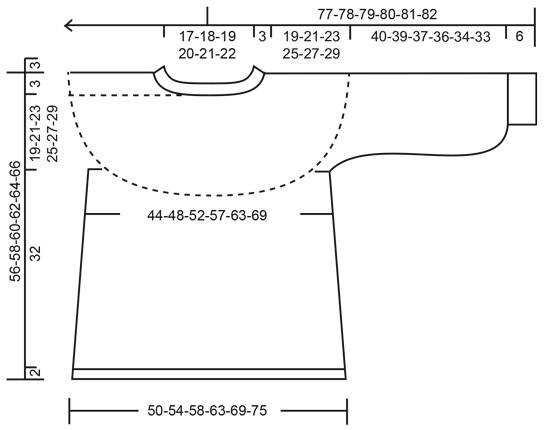
------------------------------------------------------- EXPLANATIONS FOR THE PATTERN: ------------------------------------------------------- RIDGE/GARTER STITCH (worked in the round): 1 ridge in height = 2 rounds; Knit 1 round and purl 1 round. ELEVATION (back of neck): So the sweater is slightly higher at the back of the neck when working a round yoke, you can work an elevation as described here. Skip this section if you do not want an elevation. Insert a marker thread at the beginning of the round (mid back). Start from the right side with light beige and knit 14-15-16-16-17-18 stitches past the marker thread, turn, tighten strand and purl 28-30-32-32-34-36 stitches. Turn, tighten strand and knit 42-45-48-48-51-54 stitches, turn, tighten strand and purl 56-60-64-64-68-72 stitches. Turn, tighten strand and knit 70-75-80-80-85-90 stitches, turn, tighten strand and purl 84-90-96-96-102-108 stitches. Turn, tighten the strand and knit to mid back. Then work YOKE as described in the text PATTERN: See diagram A.1. Choose diagram for your size. The whole pattern is worked in stockinette stitch. KNITTING TIP: To avoid the knitting gauge becoming tighter when working pattern it is important that the strands at the back are not tight. Use a size larger needle when working pattern if this is a problem. INCREASE TIP-1 (evenly spaced): To work out how to increase evenly, count the total number of stitches on the needle (e.g. 92 stitches) and divide by the number of increases to be made (e.g. 40) = 2.3. In this example, increase by making 1 yarn over after approx. each 2nd stitch. On the next round knit the yarn overs twisted to avoid holes. INCREASE TIP-2 (for sides of body and mid under sleeves): Work until there are 3 stitches left before the marker thread, make 1 yarn over, knit 6 (marker thread sits between these 6 stitches) make 1 yarn over (= 2 stitches increased). On the next round knit the yarn overs twisted to avoid holes. The new stitches are worked in stockinette stitch. DECREASE TIP (for mid under sleeves): Work until there are 5 stitches left before the marker thread, knit 2 together, knit 6 (marker thread sits between these 6 stitches), slip 1 stitch as if to knit, knit 1 and pass the slipped stitch over the knitted stitch (= 2 stitches decreased). BINDING OFF TIP: To avoid the bind-off edge being tight you can bind off with a double strand or a larger size needle. ------------------------------------------------------- START THE PIECE HERE: ------------------------------------------------------- SWEATER - SHORT OVERVIEW OF THE PIECE: The neck and the yoke are worked in the round with circular needle from mid back and top down. The yoke is divided for body and sleeves. The body is continued in the round with circular needle. The sleeves are worked in the round with short circular needle/double pointed needles, top down NECK: Cast on 92-96-100-104-108-112 stitches with circular needle size 3.5 mm = US 4 and curry. Knit 1 round. Change to light beige. Then work rib in the round (= knit 2 / purl 2) for 3 cm = 1⅛". Knit 1 round where you increase 40-42-44-46-48-50 stitches evenly spaced – read INCREASE TIP-1 = 132-138-144-150-156-162 stitches. Insert 1 marker in the middle of the round (mid front); the yoke will be measured from this marker. Change to circular needle size 4.5 mm = US 7. Knit 1 round (the yarn overs are knitted twisted). Now you can work an ELEVATION in the back of the neck – read description above. If you do not want an elevation, go straight to YOKE. YOKE: Work A.1 in the round (= 22-23-24-25-26-27 repeats of A.1 with 6 stitches). Continue this pattern. REMEMBER THE KNITTING GAUGE! AT THE SAME TIME on each round marked with an arrow in A.1, increase stitches evenly spaced as described below – read INCREASE TIP-1! Arrow-1: Increase 42-48-48-54-60-60 stitches evenly spaced = 174-186-192-204-216-222 stitches (there is now room for 29-31-32-34-36-37 repeats of A.1A with 6 stitches). Arrow-2: Increase 38-42-48-52-52-58 stitches evenly spaced = 212-228-240-256-268-280 stitches (there is now room for 53-57-60-64-67-70 repeats of A.1A with 4 stitches). Arrow-3: Increase 28-30-36-44-50-50 stitches evenly spaced = 240-258-276-300-318-330 stitches (there is now room for 40-43-46-50-53-55 repeats of A.1A with 6 stitches). Arrow-4: Increase 18-24-30-30-36-42 stitches evenly spaced = 258-282-306-330-354-372 stitches (there is now room for 43-47-51-55-59-62 repeats of A.1A with 6 stitches). Arrow-5: Increase 12-18-18-24-24-36 stitches evenly spaced = 270-300-324-354-378-408 stitches (there is now room for 45-50-54-59-63-68 repeats of A.1A with 6 stitches). When A.1 has been completed in height the piece measures approx. 19-19-19-25-25-25 cm = 7½"-7½"-7½"-9¾"-9¾"-9¾" from the marker on the neck. Continue with stockinette stitch and black until the piece measures 19-21-23-25-27-29 cm = 7½"-8¼"-9"-9¾"-10⅝"-11⅜" from the marker on the neck. Now divide the yoke for body and sleeves, working the next round with black as follows: Work 40-44-47-52-57-63 stitches in stockinette stitch (= ½ back piece), place the next 54-61-67-72-74-77 stitches on 1 thread for sleeve, cast on 6-6-8-8-10-10 new stitches on the needle (= in side under sleeve), work 81-89-95-105-115-127 stitches in stockinette stitch (= front piece), place the next 54-61-67-72-74-77 stitches on 1 thread for sleeve, cast on 6-6-8-8-10-10 new stitches on the needle (= in side under sleeve) and work the remaining 41-45-48-53-58-64 stitches in stockinette stitch (= ½ back piece). Body and sleeves are finished separately. THE PIECE IS NOW MEASURED FROM HERE! BODY: = 174-190-206-226-250-274 stitches. Insert 1 marker thread in each side of the body, in the middle of the 6-6-8-8-10-10 stitches cast on under each sleeve. Allow the threads to follow your work onwards; they will be used when increasing in the sides. Start the round at one of the marker threads and work stockinette stitch in the round using black. When the piece measures 5 cm = 2" from the division in all sizes, increase 1 stitch on each side of both marker threads – read INCREASE TIP-2 (= 4 stitches increased). Increase like this every 5 cm = 2" a total of 6 times on each side = 198-214-230-250-274-298 stitches. Continue working until the piece measures 32 cm = 12½" from the division in all sizes (there is approx. 2 cm = ¾" left to finished length; you can try the sweater on and work to desired length). Change to circular needle size 3.5 mm = US 4 and work 3 RIDGES - read description above. Bind off with knit– read BINDING OFF TIP! The sweater measures approx. 56-58-60-62-64-66 cm = 22"-22¾"-23⅝"-24⅜"-25¼"-26" from the shoulder down. SLEEVE: Place the 54-61-67-72-74-77 stitches from the thread on the one side of the piece on short circular needle/double pointed needles size 4.5 mm = US 7 and knit up 1 stitch in each of the 6-6-8-8-10-10 stitches cast on under the sleeve = 60-67-75-80-84-87 stitches. Insert 1 marker thread in the middle of the 6-6-8-8-10-10 new stitches. Allow the thread to follow your work onwards; it will be used when decreasing and increasing mid under sleeve. Start the round at the marker thread and work stockinette stitch in the round with black. When the sleeve measures 2 cm = ¾" from the division in all sizes decrease 2 stitches mid under sleeve – read DECREASE TIP. Decrease like this every 3½-2-1½-1-1-1 cm = 1¼"-¾"-½"-⅜"-⅜"-⅜" a total of 4-6-7-8-9-8 times = 52-55-61-64-66-71 stitches. Work until the piece measures 16-16-16-13-13-12 cm = 6¼"-6¼"-6¼"-5⅛"-5⅛"-4¾" from the division (shorter measurements in larger sizes due to wider neck and longer yoke). Now increase 2 stitches mid under sleeve – read INCREASE TIP-2. Increase as follows every 1 cm = ⅜" a total of 18-16-17-20-20-20 times = 88-87-95-104-106-111 stitches. Continue working until the sleeve measures 39-38-36-35-33-32 cm = 15¼"-15"-14¼"-13¾"-13"-12½" from the division. Knit 1 round where you decrease 0-0-0-0-2-0 stitches evenly spaced = 88-87-95-104-104-111 stitches. The next round is worked as follows: Knit 0-1-1-0-0-1, * knit 2 together *, work from *-* to end of round = 44-44-48-52-52-56 stitches left. Change to double pointed needles size 3.5 mm = US 4 and work rib (= knit 2 / purl 2) for 6 cm = 2⅜". Bind off with knit over knit and purl over purl – remember BINDING OFF TIP. The sleeve measures approx. 46-45-43-42-40-39 cm = 18"-17¾"-17"-16½"-15¾"-15¼" from the division. Work the other sleeve in the same way. |
||||||||||||||||||||||
Diagram explanations |
||||||||||||||||||||||
|
||||||||||||||||||||||
 |
||||||||||||||||||||||
 |
||||||||||||||||||||||
Have you finished this pattern?Tag your pictures with #dropspattern #aftermidnightsweater or submit them to the #dropsfan gallery. Do you need help with this pattern?You'll find 30 tutorial videos, a Comments/Questions area and more by visiting the pattern on garnstudio.com. © 1982-2026 DROPS Design A/S. We reserve all rights. This document, including all its sub-sections, has copyrights. Read more about what you can do with our patterns at the bottom of each pattern on our site. |
||||||||||||||||||||||


With over 40 years in knitting and crochet design, DROPS Design offers one of the most extensive collections of free patterns on the internet - translated to 17 languages. As of today we count 324 catalogs and 12290 patterns - 12280 of which are translated into English (US/in).
We work hard to bring you the best knitting and crochet have to offer, inspiration and advice as well as great quality yarns at incredible prices! Would you like to use our patterns for other than personal use? You can read what you are allowed to do in the Copyright text at the bottom of all our patterns. Happy crafting!
Post a comment to pattern DROPS 205-27
We would love to hear what you have to say about this pattern!
If you want to leave a question, please make sure you select the correct category in the form below, to speed up the answering process. Required fields are marked *.