
Popular categories
Looking for a yarn?


Comments / Questions (210)
![]() Ingvild wrote:
Ingvild wrote:
Hei! når det skal felles til hals på høyre forstykke står det; fell på begynnelsen av hver pinne fra midt foran. Vil det si at man skal felle på retten, slik at fellingen skjer på høgre side ved knapphullene, og ikke på begynnelsen av pinnen på retten og vrangen? Også: videre står det at man skal felle 2 masker 1 gang og 1 maske 2 ganger. Vil dette da si 2 masker rett sammen 2 ganger etter hverandre, neste pinne; 2 masker rett sammen 1 gang, neste pinne; 2 masker rett sammen 1 gang?
13.11.2020 - 00:48DROPS Design answered:
Hei Ingvild, Du feller bare på begynnelsen av pinnen fra halsen (bare fra retten) på den sida du har knapphullene. Du skal felle av 2 maske (ikke strikke sammen) 1 gang og felle av 1 maske 2 ganger, så 2 x pinne fra retten. Håper dette hjelper og god fornøyelse!
17.11.2020 - 12:46
![]() Nathalie wrote:
Nathalie wrote:
Je voudrais savoir s'il est possible d'acheter ce modèle tout fait en 6-9 mois et en gris clair !??? Et à quel prix s'il vous plaît ? ? ? Ma petite fille arrive très bientôt et je ne me sens pas capablé de le faire à temps ! 😟 Mais ce modèle plaît énormément à ma belle-fille !!!! Mais je n'aurais pas le temps d'essayer ! S'il vous plaît !!! Dites moi comment faire ! Merci d'avance !
09.11.2020 - 01:05DROPS Design answered:
Bonjour Nathalie, demandez à votre magasin DROPS, peut-être pourra-t'on vous aider? Vous pouvez également demander à une autre tricoteuse via notre groupe DROPS Workshop. Bon tricot!
09.11.2020 - 11:40
![]() Anna wrote:
Anna wrote:
Hallo, meine Wolle ist da und ich habe direkt die erste Frage: Wenn ich die Beine in Hin und Rückreihen stricke und nicht als Runden, muss ich jedes einzelne Bein erst zusammen nähen, bevor ich linkes und rechtes Bein auf die gleiche Nadel zusammen füge? Vielen Dank!
28.10.2020 - 16:08DROPS Design answered:
Liebe Anna, die Beinen werden am Ende zusammengenäht - siehe unter FERTIGSTELLEN. Viel Spaß beim stricken!
28.10.2020 - 16:16
![]() Joelle wrote:
Joelle wrote:
Avez-vous le 1er patron en français ?
28.10.2020 - 09:04DROPS Design answered:
Bonjour Joelle, tous nos modèles sont disponibles en français, cliquez sur le menu déroulant sous la photo pour changer la langue. Bon tricot!
28.10.2020 - 15:23
![]() Ville wrote:
Ville wrote:
Pour faire suite à ma précédente question, à quel moment doit-on reprendre les 9 mailles de l'encolure ? Ou à quel moment doit-on les arrêter ? Merci pour votre réponse
26.10.2020 - 11:44DROPS Design answered:
Bonjour Mme Ville, ces 9 mailles seront reprises lorsque l'on va relever les mailles pour la capuche: on reprend ces 9 mailles, on relève les mailles le long de l'encolure et on termine par reprendre les 9 m de l'autre devant. Bon tricot!
26.10.2020 - 12:46
![]() Lauren wrote:
Lauren wrote:
I am making size 1/3 months and am stumped on the right leg at this line "Then work the next 2 rows as follows, begin from right side: Work as before over all stitches and cast on (3) 3-3-5-5 (7-7) new stitches at the end of row (= mid back)." A.1A and A.1B are both worked with an even number but the cast on is an odd number. Do I continue using this chart even though the pattern won't line up?
26.10.2020 - 01:42DROPS Design answered:
Dear Lauren, continue working all stitches in pattern, ie adjust the new stitches so that pattern continue as before. ie if the first stitch in pattern has to be worked with K2, then work the new stitches cast on before these sts: K1, P2 then work K2 over the the K2 on needle as before etc. Hope this helps. Happy knitting!
26.10.2020 - 09:31
![]() Ville wrote:
Ville wrote:
Bonjour, je tricote la combinaison en 1-3 mois. J'en suis au devant-droit, lors de l'encolure: 1 fois 2 mailles et (1) 1-2-2-2 (3-3) fois 1 maille = il reste (35) 45-53-57-63 (75-87) mailles. Sachant qu'il y a 66 mailles, je ne comprends pas comment je passes de 66 mailles à 53 mailles en enlevant seulement 4 mailles. Serait-il possible de m'expliquer la diminution de l'encolure ? Merci d'avance
25.10.2020 - 15:53DROPS Design answered:
Bonjour Mme Ville, quand l'ouvrage mesure 32 cm depuis le marqueur/49 cm depuis le rang de montage, au début du rang suivant sur l'endroit, vous tricotez les 9 premières mailles et les glissez en attente pour l'encolure, vous rabattrez ensuite 1 x 2 m et 2x1 m côté encolure = 66 - 9 - 2 - 2= 53 m. Bon tricot!
26.10.2020 - 08:43
![]() Hei wrote:
Hei wrote:
Etu- ja takakappale kohdassa sanotaan näin: "Kun työn pituus uudesta merkistä mitattuna on (15) 20-24-27-28 (32-36) cm (lue NEULOMISVINKKI), eli kun työn pituus luomisreunasta mitattuna on (28) 33-41-51-60 (65-72) cm, jaa työ sivuista." En löydä tuota "NEULOMISVINKKIÄ" ohjeesta. Mitä tuo "jaa työ sivuista tarkoittaa?
21.10.2020 - 21:00
![]() Marianne Falch-Nielsen wrote:
Marianne Falch-Nielsen wrote:
Klar for montering, men usikker på samme sying av skuldersømmene, hardere bilde av hvordan det blir? Skal rillene være som en kant på skuldra?
15.10.2020 - 12:34DROPS Design answered:
Hej Marianne. Ja det stämmer, du ser på ena ärmen på bilden att det blir en kant av rillene. Mvh DROPS Design
16.10.2020 - 09:31
![]() Charleen wrote:
Charleen wrote:
Hallo, ich bin beim rechten Vorderteil und verstehe den Teil mit dem abketten nicht ganz. Die ersten 11 M (6-9 Monate) sind stillgelegt. Dann in den nächsten Hinreihen Kette ich 2 M 1 mal ab und 1 M 2 mal? Ich weiß nicht wie ich eine Masche zwei mal abkette. Vielleicht gibt es auch ein Video zu diesem Teil. Vielen Dank schonmal für die Hilfe!
13.10.2020 - 22:17DROPS Design answered:
Liebe Charleen, bei einer Hinreihe stricken Sie die ersten 11 M und legen Sie sie still, dann stricken Sie bis zur Ende, wenden und Rückreihe stricken. Am Anfang der nächste Reihe ketten Sie 2 Maschen ab, Reihe bis zur Ende stricken, wenden und Rückreihe stricken. Am Anfang der nächste Reihe ketten Sie 1 Masche ab, Reihe bis zur Ende stricken, wenden und Rückreihe stricken. Diese 2 Reihen noch einmal stricken = alle Maschen für Halsausschnitt sind jetzt abgekettet. Viel Spaß beim stricken!
14.10.2020 - 08:00
|
|||||||
Truly Wooly#trulywoolyonesie |
|||||||
 |
 |
||||||
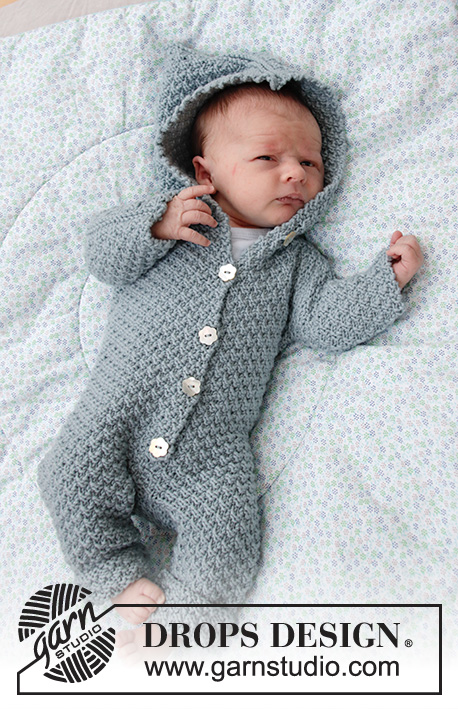
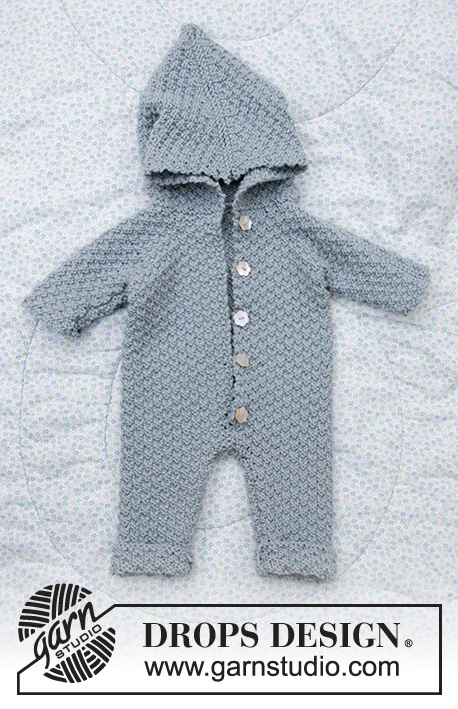
Knitted suit for baby in DROPS Merino Extra Fine. Piece is knitted with textured pattern and hood. Size premature - 4 years
DROPS Baby 33-8 |
|||||||
|
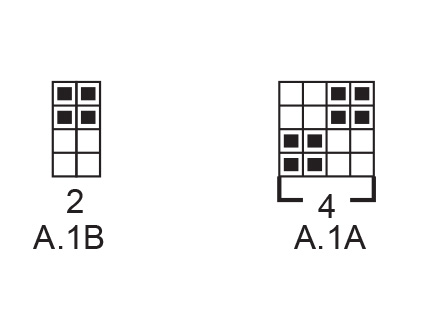
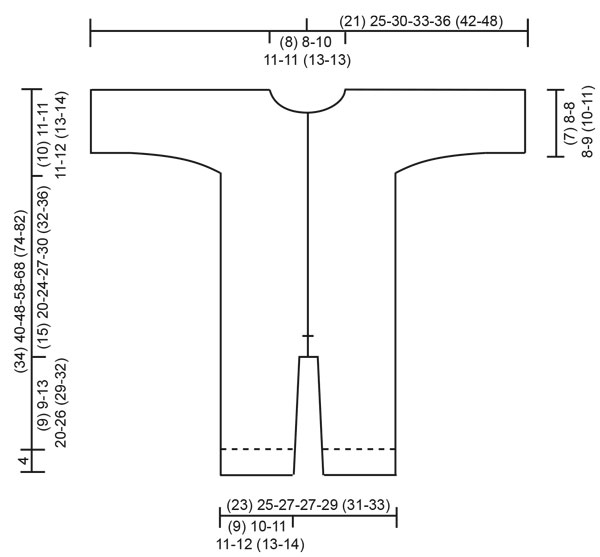
---------------------------------------------------------- EXPLANATION FOR THE PATTERN: ---------------------------------------------------------- GARTER STITCH (back and forth): 1 ridge = knit 2 rows. 1 edge stitch in garter stitch = knit stitch from right side and knit stitch from wrong side. PATTERN: See diagram A.1. Diagrams show all rows in pattern seen from the right side. INCREASE TIP-1: Increase 1 stitch inside 1 edge stitch in garter stitch by making 1 yarn over. On next row work yarn overs twisted to avoid holes. Work the increased stitches in A.1. INCREASE TIP-2 (evenly): To calculate how to increase evenly, use the total number of stitches on row (e.g. 44 stitches) and divide stitches by number of increases to be done (e.g. 14) = 3.1. In this example increase by making 1 yarn over after approx. every 3rd stitch. On next row knit yarn overs twisted to avoid holes. BUTTONHOLES (bottom up): Decrease for buttonholes on right band. 1 BUTTONHOLE = knit third and fourth stitch from edge together and make 1 yarn over. On next row purl or knit yarn over (depending on where in the diagram you are) to make holes. Decrease for buttonholes when piece measures (measured from where legs where put together): (premature): 5, 10, 15 and 20 cm = 2", 4", 6" and 8" 0/1 months: 6, 11, 16, 21 and 26 cm = 2⅜", 4⅜", 6¼", 8¼" and 10¼" 1/3 months: 5, 10, 15, 20, 25 and 30 cm = 2", 4", 6", 8", 9¾" and 11¾" 6/9 months: 6, 12, 17, 22, 27 and 32 cm = 2⅜", 4¾", 6¾", 8¾", 10⅝" and 12½" 12/18 months: 6, 12, 18, 24, 30 and 36 cm = 2⅜", 4¾", 7", 9½", 11¾" and 14¼" 2 years: 9, 15, 21, 27, 33 and 39 cm = 3½", 6", 8¼", 10⅝", 13" and 15¼" 3/4 years: 7, 13, 19, 25, 31, 37 and 43 cm = 2¾", 5⅛", 7½", 9¾", 12¼", 14½" and 17" ---------------------------------------------------------- START THE PIECE HERE: ---------------------------------------------------------- SUIT - SHORT OVERVIEW OF THE PIECE: Work each leg back and forth on circular needle, bottom up. Place legs together and work back and forth on circular needle from mid front up to sleeves. Then cast on new stitches for sleeves in each side and finish front pieces and back piece separately. Sew piece together on the shoulder. Finish by picking up stitches around the neck and work a hood. RIGHT LEG (when suit is worn): Cast on (40) 44-48-48-52 (56-60) stitches on circular needle size 4 MM = US 6 with Merino Extra Fine. Work first row as follows from right side: 1 edge stitch in GARTER STITCH – read explanation above, work A.1A until 3 stitches remain on row (= 9-10-11-11-12 (13-14) repetitions of 4 stitches), work A.1B (= 2 stitches) and finish with 1 edge stitch in garter stitch. Continue pattern like this. REMEMBER THE KNITTING GAUGE! When piece measures 4 cm = 1½", insert 1 marker in piece (marks fold). When piece measures (5) 5-7-8-10 (12-14) cm = (2") 2"-2¾"-3⅛"-4" (4¾"-5½") increase 1 stitch in each side – read INCREASE TIP-1. Repeat increase when piece measures (8) 8-12-18-20 (22-24) cm = (3⅛") 3⅛"-4¾"-7"-8" (8¾"-9½") = (44) 48-52-52-56 (60-64) stitches on needle. Work until piece measures (12) 12-16-23-31 (32-35) cm = (4¾") 4¾"-6¼"-9"-12¼" (12½"-13¾") from cast-on edge, adjust so that next row is worked from right side. Bind off 1 stitch at beginning of the next 2 rows (i.e. bind off edge stitches) = (42) 46-50-50-54 (58-62) stitches. Then work the next 2 rows as follows, begin from right side: Work as before over all stitches and cast on 3 new stitches at the end of row (= mid back). Turn piece, work A.1 as before over all stitches, but make sure to continue pattern correctly, then cast on (4) 4-4-4-4 (4-4) stitches at the end of row from wrong side (= mid front). There are now (49) 53-57-57-61 (65-69) stitches on needle and piece measures approx. (13) 13-17-24-30 (33-36) cm = (5⅛") 5⅛"-6¾"-9½"-11¾" (13"-14¼") from cast-on edge. Put piece aside and work left leg as explained below. LEFT LEG (when suit is worn): Cast on (40) 44-48-48-52 (56-60) stitches on circular needle size 4 MM = US 6 and work first row as follows from right side: 1 edge stitch in garter stitch, work A.1A until 3 stitches remain on row (=9-10-11-11-12 (13-14) repetitions of 4 stitches), work A.1B (= 2 stitches) and finish with 1 edge stitch in garter stitch. Continue pattern like this. When piece measures 4 cm = 1½", insert 1 marker in piece (marks fold). When piece measures (5) 5-7-8-10 (12-14) cm = (2") 2"-2¾"-3⅛"-4" (4¾"-5½") increase 1 stitch in each side – remember INCREASE TIP-. Repeat increase when piece measures (8) 8-12-18-20 (22-24) cm = (3⅛") 3⅛"-4¾"-7"-8" (8¾"-9½") = (44) 48-52-52-56 (60-64) stitches on needle. Work until piece measures (12) 12-16-23-31 (32-35) cm = (4¾") 4¾"-6¼"-9"-12¼" (12½"-13¾") from cast-on edge, adjust so that next row is worked from right side. Bind off 1 stitch at beginning of the next 2 rows (i.e. bind off edge stitches) = (42) 46-50-50-54 (58-62) stitches. Then work the next 2 rows as follows, begin from right side: Work as before over all stitches and cast on 4 new stitches at the end of row (= mid front). Turn piece, work A.1 as before over all stitches, but make sure to continue pattern correctly, then cast on 3 stitches at the end of row from wrong side (= mid back). There are now (49) 53-57-57-61 (65-69) stitches on needle and piece measures approx. (13) 13-17-24-30 (33-36) cm = (5⅛") 5⅛"-6¾"-9½"-11¾" (13"-14¼") from cast-on edge. Cut the yarn. Now place the parts together as explained below. BODY: Place right leg and left leg on same circular needle with right leg first. Begin from right side on right leg, work 1 edge stitch in garter stitch, continue A.1 as before over the remaining stitches on right leg (make sure to continue pattern correct according to finish on leg), then continue pattern over the first (48) 52-56-56-60 (64-68) stitches on left leg (make sure to continue pattern correct) and finish with 1 edge stitch in garter stitch = (98) 106-114-114-122 (130-138) stitches on needle. Insert another marker in piece! NOW MEASURE PIECE FROM THIS MARKER! Continue A.1 back and forth with 1 edge stitch in garter stitch in each side towards mid front. When piece measures (3) 3-3-3-4 (5-5) cm = (1⅛") 1⅛"-1⅛"-1⅛"-1½" (2"-2") from marker (adjust to work next row from right side) bind off 1 stitch at beginning of the next 2 rows (i.e. bind off edge stitches). Then work the next 2 rows as follows, begin from right side: Work as before over all stitches and cast on 4 new stitches at the end of row (= left band at the front). Turn piece, work A.1 as before over all stitches (make sure to continue pattern correctly) and cast on 4 new stitches at the end of row from wrong side (= right band at the front). There are now (104) 112-120-120-128 (136-144) stitches on needle. Continue A.1 back and forth over all stitches (i.e. do not work edge stitches in garter stitch). Remember BUTTONHOLES on right band - read explanation above. When piece measures (15) 20-24-27-30 (32-36) cm = (6") 8"-9½"-10⅝"-11¾" (12½"-14¼") from the new marker, i.e. (28) 33-41-51-60 (65-72) cm = (11") 13"-16⅛"-20"-23⅝" (25½"-28⅜") from cast-on edge, divide the piece in each side. Finish front pieces and back piece separately as explained below. RIGHT FRONT PIECE: Begin from right side and work as before over the first (27) 29-31-31-33 (35-37) stitches, then cast on (7) 13-13-17-17 (21-25) new stitches for sleeve. Slip the remaining stitches on 1 stitch holder for back piece and left front piece. Continue A.1 back and forth as before but make sure that pattern fits over all stitches. AT THE SAME TIME cast on (6) 7-11-12-14 (18-21) new stitches for sleeve at the end of the next 2 rows from right side = (46) 56-66-72-78 (92-104) stitches on needle. Continue pattern back and forth over all stitches until piece measures (22) 28-32-35-38 (41-45) cm = (8¾") 11"-12½"-13¾"-15" (16⅛"-17¾") from marker, i.e. (35) 41-49-59-68 (74-81) cm = (13¾") 16⅛"-19¼"-23¼"-26¾" (29⅛"-32") from cast-on edge. At the beginning of next row from right side slip the first (8) 8-9-11-11 (12-12) stitches on 1 stitch holder for neck but to avoid cutting the yarn work them before slipping them on the stitch holder. Continue pattern back and forth as before and bind off for neck at the beginning of every row from mid front as follows: Bind off 2 stitches 1 time and 1 stitch (1) 1-2-2-2 (3-3) times = (35) 45-53-57-63 (75-87) stitches remain on needle. Then work until the entire suit measures approx. (24) 30-34-37-41 (44-49) cm = (9½") 11¾"-13⅜"-14½"-16⅛" (17¼"-19¼") from marker, i.e. (37) 43-51-61-71 (77-85) cm = (14½") 17"-20"-24"-28" (30⅜"-33½") from cast-on edge, but adjust so that next row is worked from right side. Work 1 ridge back and forth over all stitches. Then bind off by knitting from the right side. The entire suit measures approx. (38) 44-52-62-72 (78-86) cm = (15") 17¼"-20½"-24⅜"-28⅜" (30¾"-33⅞") from cast-on edge. Now work back piece as explained below. BACK PIECE: Slip the first (50) 54-58-58-62 (66-70) stitches on stitch holder (seen from right side) on circular needle size 4 MM = US 6 and continue A.1 back and forth over these stitches as before. AT THE SAME TIME cast on new stitches for sleeves at the end of every row in each side as follows: Cast on (7) 13-13-17-17 (21-25)stitches 1 time in each side and then (6) 7-11-12-14 (18-21) stitches 2 times in each side = (88) 108-128-140-152 (180-204) stitches on needle. Continue pattern back and forth over all stitches until piece measures (23) 29-33-36-40 (43-48) cm = (9") 11⅜"-13"-14¼"-15¾" (17"-19") from marker). On next row bind off the middle (14) 14-18-22-22 (26-26) stitches for neck and finish each shoulder/sleeve separately. Then bind off 2 stitches on next row from neck = (35) 45-53-57-63 (75-87) stitches remain on needle for shoulder/sleeve. Then work until the entire suit measures approx. (24) 30-34-37-41 (44-49) cm = (9½") 11¾"-13⅜"-14½"-16⅛" (17¼"-19¼") from marker, but adjust according to front piece and make sure that next row is from right side. Work 1 ridge back and forth over all stitches. Then bind off by knitting from the right side. Work the other shoulder/sleeve the same way. Then work left front piece as explained below. LEFT FRONT PIECE: Slip the remaining (27) 29-31-31-33 (35-37) stitches on stitch holder back on needle size 4 MM = US 6. Begin from right side and continue A.1 back and forth as before. AT THE SAME TIME cast on new stitches for sleeve at the end of the next 3 rows from wrong side as follows: Cast on (7) 13-13-17-17 (21-25) stitches 1 time and then (6) 7-11-12-14 (18-21) stitches 2 times = (46) 56-66-72-78 (92-104) stitches on needle. Continue pattern back and forth over all stitches until piece measures (22) 28-32-35-36 38 (41-45) cm = (8¾") 11"-12½"-13¾"-14¼" 15" (16⅛"-17¾") from marker, i.e. (35) 41-49-59-68 (74-81) cm = (13¾") 16⅛"-19¼"-23¼"-26¾" (29⅛"-32") from cast-on edge. At the beginning of next row from wrong side slip the first (8) 8-9-11-11 (12-12) stitches on 1 stitch holder for neck but to avoid cutting the yarn work them before slipping them on the stitch holder. Continue pattern back and forth as before and bind off for neck at the beginning of every row from mid front as follows: Bind off 2 stitches 1 time and 1 stitch (1) 1-2-2-2 (3-3) times = (35) 45-53-57-63 (75-87) stitches remain on needle. Then work until the entire suit measures approx. (24) 30-34-37-41 (44-49) cm = (9½") 11¾"-13⅜"-14½"-16⅛" (17¼"-19¼") from marker, i.e. (37) 43-51-61-71 (77-85) cm = (14½") 17"-20"-24"-28" (30⅜"-33½") from cast-on edge, but measure so that next row is worked from right side. Work 1 ridge back and forth over all stitches. Then bind off by knitting from the right side. The entire suit measures approx. (38) 44-52-62-72 (78-86) cm = (15") 17¼"-20½"-24⅜"-28⅜" (30¾"-33⅞") from cast-on edge. ASSEMBLY: Sew shoulder seams inside bind-off edges. Sew the seams under the sleeve. Sew seam on inside of both legs inside 1 edge stitch in each side. Sew seam mid front from bottom of band and down inside 1 edge stitch in each side. Sew together the opening between the legs. Fold the end of legs at the marker. Sew the buttons on to the left band. HOOD: Pick up from right side approx. 44 to 70 stitches around the neck (including stitches on stitch holders at the front). Knit 1 row from wrong side while increasing evenly to (58) 70-74-74-78 (86-86) stitches – read INCREASE TIP-2. Knit 1 row from right side and knit 1 row from wrong side. Work next row as follows from right side: Work A.1A until 2 stitches remain on needle and finish with A.1B (= 2 stitches). Continue pattern like this until piece measures (17) 18-19-20-21 (22-23) cm = (6¾") 7"-7½"-8"-8¼" (8¾"-9") from ridge in the neck, but adjust so that next row is from right side. Work 1 ridge back and forth over all stitches. Then bind off by knitting from the right side. Place the hood double and sew seam at the top inside bind-off edge. |
|||||||
Diagram explanations |
|||||||
|
|||||||
 |
|||||||
 |
|||||||
Have you finished this pattern?Tag your pictures with #dropspattern #trulywoolyonesie or submit them to the #dropsfan gallery. Do you need help with this pattern?You'll find 27 tutorial videos, a Comments/Questions area and more by visiting the pattern on garnstudio.com. © 1982-2026 DROPS Design A/S. We reserve all rights. This document, including all its sub-sections, has copyrights. Read more about what you can do with our patterns at the bottom of each pattern on our site. |
|||||||


With over 40 years in knitting and crochet design, DROPS Design offers one of the most extensive collections of free patterns on the internet - translated to 17 languages. As of today we count 325 catalogs and 12298 patterns - 12288 of which are translated into English (US/in).
We work hard to bring you the best knitting and crochet have to offer, inspiration and advice as well as great quality yarns at incredible prices! Would you like to use our patterns for other than personal use? You can read what you are allowed to do in the Copyright text at the bottom of all our patterns. Happy crafting!
Post a comment to pattern DROPS Baby 33-8
We would love to hear what you have to say about this pattern!
If you want to leave a question, please make sure you select the correct category in the form below, to speed up the answering process. Required fields are marked *.