
Popular categories
Looking for a yarn?


Comments / Questions (210)
![]() Marian wrote:
Marian wrote:
Trabajar 1 pliegue de ida y vuelta sobre todos los puntos. Después rematar de derecho por el lado derecho. En este caso que se repite en ambos delanteros, de cuantos puntos debe ser el pliegue. Posiblemente sea una pregunta absurda, pero por más vueltas que le dé, sigo estancada en este preciso momento. Gracias
28.04.2026 - 14:48DROPS Design answered:
Hola Marian, el pliegue se trabaja sobre todos los puntos restantes en el hombro, antes de rematar. Como no se han cerrado más pts desde que se cerró para el cuello, deberías tener: (35) 45-53-57-63 (75-87) pts en cada hombro (dependiendo de la talla). Así que trabajas el pliegue sobre todos estos puntos.
11.05.2026 - 00:33
![]() Nadine Brüchmann wrote:
Nadine Brüchmann wrote:
Hallo danke für die Beantwortung. Ich weiss welches das rückenteil ist. Ich weiss nur nicht wo ich anfangen zu stricken. Auf der Seite wo der ärmel (also echts fertig ist)und schon die 17 maschen mit oder erst die M einmal rüberstricken und dann das erste Mal die 17M aufnehmen. Ich wriss auch das i h das auf beiden Seiten machen muss,nur wann das 1. Mal?
17.04.2026 - 14:49DROPS Design answered:
Liebe Nadine, Sie schlagen direkt in der ersten Reihe, in der Sie die stillgelegten Maschen wieder stricken, am Ende der Reihe die neuen Maschen an. Ob das die Reihe in Richtung rechtes Vorderteil oder linkes Vorderteil ist, spielt keine Rolle. Viel Spaß beim Stricken!
21.04.2026 - 09:05
![]() Nadine Brüchmann wrote:
Nadine Brüchmann wrote:
Hallo danke für die Beantwortung. Nun habe ich schon wieder eine Verständnisfrage - und zwar woanders ich das Rückenteil an? An der Seite wo der Arm schon fertig ist die 58 M stricken? Und die 17 madchen gleich am Anfang derReihe aufnehmen? Oder da wo der Faden abgeschnitten ist?
16.04.2026 - 15:07DROPS Design answered:
Ich hatte Ihre Frage vielleicht falsch verstanden (siehe unten), in die 4. Größe ist das Rückenteil nach den ersten 31 Maschen, die Sie für das rechte Vorderteil gestrickt haben, die letzen 31 Maschen der Reihe sind für das Linke Vorderteil. Viel Spaß beim Stricken!
16.04.2026 - 17:07
![]() Nadine Brüchmann wrote:
Nadine Brüchmann wrote:
Hallo danke für die Beantwortung. Nun habe ich schon wieder eine Verständnisfrage - und zwar woanders ich das Rückenteil an? An der Seite wo der Arm schon fertig ist die 58 M stricken? Und die 17 madchen gleich am Anfang derReihe aufnehmen?
16.04.2026 - 14:56DROPS Design answered:
Liebe Frau Brüchmann, für das Rückenteil wird man beidseitig für die Ärmel zunehmen, so wird man (4. Größe) am Ende der 2 ersten Reihen 17 Maschen anschlagen (= 17 M 1 Mal beidseitig), dann wird man 12 Maschen am Ende der 4 nächsten Reihen anschlagen (= 12 M 2 Mal beidseitig), so haben Sie insgesamt: 12+12+17+58+17+12+12=140 Maschen. Viel Spaß beim Stricken!
16.04.2026 - 17:04
![]() Nadine Brüchmann wrote:
Nadine Brüchmann wrote:
Bin jetzt bei den 11 Maschen still legen und dann das abketten rechtes vorderteil. Ich weiss nicht wie denn die 11 Maschen still legen, abketten? Wenn nicht was passiert damit.? Bitte um schnelle verständliche Antwort
14.04.2026 - 18:33DROPS Design answered:
Liebe Frau Brüchmann, beim rechten Vorderteil stricken Sie die ersten 11 Maschen am Anfang einer Hinreihe und legen Sie diese Maschen still, stricken Sie die restlichen Maschen der Reihe wie zuvor, wenden und die Rückreihe stricken. Jetzt ab Anfang jeder Hinreihe 2 Maschen 1 Mal und 1 Masche 2 Mal abketten. Die stillgelegten Maschen stricken Sie später für die Kapuze. Beim linken Vorderteil sind die ersten 11 Maschen am Anfang einer Rückreihe. Viel Spaß beim Stricken!
15.04.2026 - 07:42
![]() Annett wrote:
Annett wrote:
Jeg forstår ikke rigtig mønsteret
14.04.2026 - 15:32DROPS Design answered:
Hej Annett, se videoen som viser hvordan mønsteret strikkes, du finder den ved at klikke på Video øverst i opskriften :)
15.04.2026 - 13:58
![]() Dina wrote:
Dina wrote:
I am working on the truly woolly design in 6 to 9 months. I am at the back where it says slipped the first 58 stitches onto a stitch holder and go back-and-forth at the same time cast on 17 stitches one time each side and then 14 stitches two times each side and it’s saying it should equal 140 stitches while I’m starting with the 31 stitches because the 58 stitches are on a stitch holder. It’s not coming out correctly. Can you help me?
31.03.2026 - 19:44DROPS Design answered:
Dear Dina, when dividing piece you should have 31 sts for each front piece and 58 sts for back piece, after you have worked the right front piece, slip all stitches of back piece back onto needle and work as before casting on stitches for back piece, you cast on the new stitches at the end of each row on each side, this means at the end of a row from RS as well as from WS: 58+(17+17)+(12 sts x 2 x 2 sleeves) = 140 sts. Can this help or did I misunderstand your question?
07.04.2026 - 15:45
![]() Anna-Maria wrote:
Anna-Maria wrote:
Hello! I’ve compared Estonian and English instructions, but the Estonian one hasn’t been updated. For example the mistakes about the left leg.
21.03.2026 - 13:56
![]() Katharina wrote:
Katharina wrote:
Liebes Drops Design-Team, vielen Dank für diese wunderbare Anleitung. Ist es möglich, die Beine separat in Runden zu stricken und dann zusammenzuführen? Was muss ich in dem Fall beachten? Vielen Dank für Ihre Antwort. Herzliche Grüße Katharina
16.03.2026 - 11:11DROPS Design answered:
Liebe Katharina, dann brauchen Sie keine Randmasche - die Zunahmen stricken Sie beidseitig aber dann sollen Sie die Zunahmen so stricken, damit das Muster nicht verschoben wird, und dann schlagen Sie die neuen Maschen am hinteren Mitte/Vorne wie erklärt. Viel Spaß beim Stricken!
16.03.2026 - 16:14
![]() Sirpa Pylkkänen wrote:
Sirpa Pylkkänen wrote:
Hei vaikka silmukoita on parillinen määrä ei kuvio täsmää, koska tilanteessa jossa reunasilmukka päätettiin se oli reunimmainen kuvio silmukka. Missä siis teen virheen vai onko ohjeessa virhe?
14.03.2026 - 07:19DROPS Design answered:
Hei, reunasilmukoilla ei neulota mallineuletta piirroksen mukaan, vaan niillä neulotaan jokaisella kerroksella ainaoikeaa. Kun reunasilmukat päätetään, kuvio jatkuu kuten aiemmin, mutta reunoissa ei enää neulota ainaoikeaa.
16.03.2026 - 17:49
|
|||||||
Truly Wooly#trulywoolyonesie |
|||||||
 |
 |
||||||
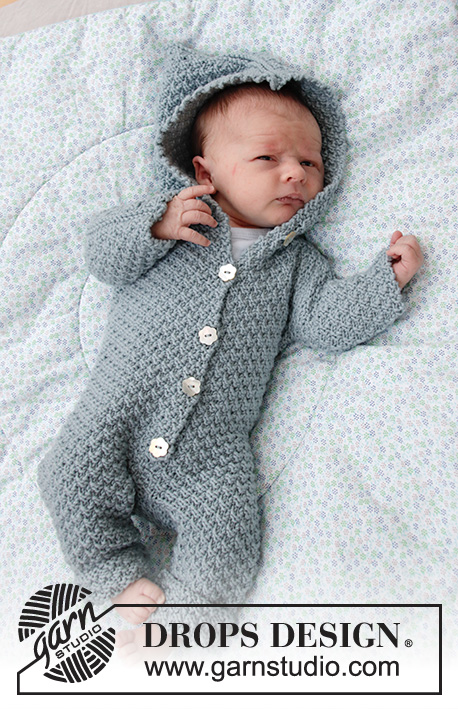
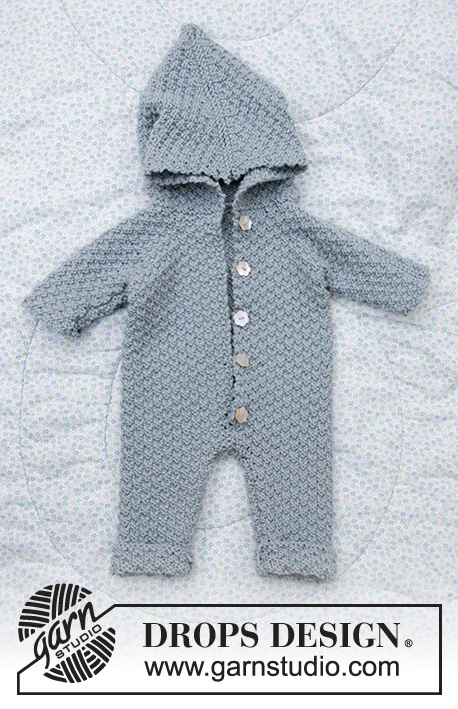
Knitted suit for baby in DROPS Merino Extra Fine. Piece is knitted with textured pattern and hood. Size premature - 4 years
DROPS Baby 33-8 |
|||||||
|
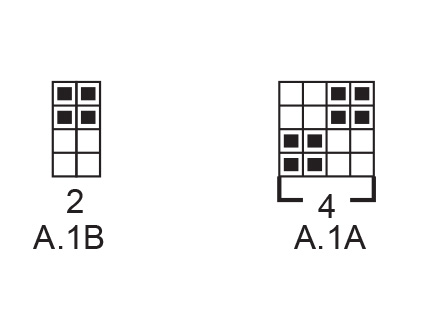
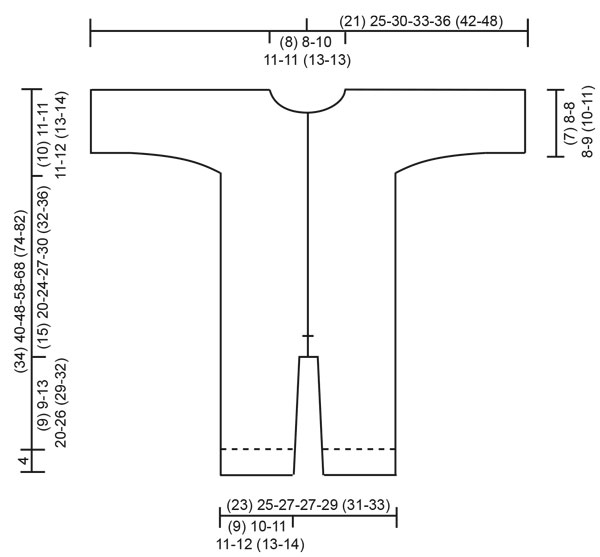
---------------------------------------------------------- EXPLANATION FOR THE PATTERN: ---------------------------------------------------------- GARTER STITCH (back and forth): 1 ridge = knit 2 rows. 1 edge stitch in garter stitch = knit stitch from right side and knit stitch from wrong side. PATTERN: See diagram A.1. Diagrams show all rows in pattern seen from the right side. INCREASE TIP-1: Increase 1 stitch inside 1 edge stitch in garter stitch by making 1 yarn over. On next row work yarn overs twisted to avoid holes. Work the increased stitches in A.1. INCREASE TIP-2 (evenly): To calculate how to increase evenly, use the total number of stitches on row (e.g. 44 stitches) and divide stitches by number of increases to be done (e.g. 14) = 3.1. In this example increase by making 1 yarn over after approx. every 3rd stitch. On next row knit yarn overs twisted to avoid holes. BUTTONHOLES (bottom up): Decrease for buttonholes on right band. 1 BUTTONHOLE = knit third and fourth stitch from edge together and make 1 yarn over. On next row purl or knit yarn over (depending on where in the diagram you are) to make holes. Decrease for buttonholes when piece measures (measured from where legs where put together): (premature): 5, 10, 15 and 20 cm = 2", 4", 6" and 8" 0/1 months: 6, 11, 16, 21 and 26 cm = 2⅜", 4⅜", 6¼", 8¼" and 10¼" 1/3 months: 5, 10, 15, 20, 25 and 30 cm = 2", 4", 6", 8", 9¾" and 11¾" 6/9 months: 6, 12, 17, 22, 27 and 32 cm = 2⅜", 4¾", 6¾", 8¾", 10⅝" and 12½" 12/18 months: 6, 12, 18, 24, 30 and 36 cm = 2⅜", 4¾", 7", 9½", 11¾" and 14¼" 2 years: 9, 15, 21, 27, 33 and 39 cm = 3½", 6", 8¼", 10⅝", 13" and 15¼" 3/4 years: 7, 13, 19, 25, 31, 37 and 43 cm = 2¾", 5⅛", 7½", 9¾", 12¼", 14½" and 17" ---------------------------------------------------------- START THE PIECE HERE: ---------------------------------------------------------- SUIT - SHORT OVERVIEW OF THE PIECE: Work each leg back and forth on circular needle, bottom up. Place legs together and work back and forth on circular needle from mid front up to sleeves. Then cast on new stitches for sleeves in each side and finish front pieces and back piece separately. Sew piece together on the shoulder. Finish by picking up stitches around the neck and work a hood. RIGHT LEG (when suit is worn): Cast on (40) 44-48-48-52 (56-60) stitches on circular needle size 4 MM = US 6 with Merino Extra Fine. Work first row as follows from right side: 1 edge stitch in GARTER STITCH – read explanation above, work A.1A until 3 stitches remain on row (= 9-10-11-11-12 (13-14) repetitions of 4 stitches), work A.1B (= 2 stitches) and finish with 1 edge stitch in garter stitch. Continue pattern like this. REMEMBER THE KNITTING GAUGE! When piece measures 4 cm = 1½", insert 1 marker in piece (marks fold). When piece measures (5) 5-7-8-10 (12-14) cm = (2") 2"-2¾"-3⅛"-4" (4¾"-5½") increase 1 stitch in each side – read INCREASE TIP-1. Repeat increase when piece measures (8) 8-12-18-20 (22-24) cm = (3⅛") 3⅛"-4¾"-7"-8" (8¾"-9½") = (44) 48-52-52-56 (60-64) stitches on needle. Work until piece measures (12) 12-16-23-31 (32-35) cm = (4¾") 4¾"-6¼"-9"-12¼" (12½"-13¾") from cast-on edge, adjust so that next row is worked from right side. Bind off 1 stitch at beginning of the next 2 rows (i.e. bind off edge stitches) = (42) 46-50-50-54 (58-62) stitches. Then work the next 2 rows as follows, begin from right side: Work as before over all stitches and cast on 3 new stitches at the end of row (= mid back). Turn piece, work A.1 as before over all stitches, but make sure to continue pattern correctly, then cast on (4) 4-4-4-4 (4-4) stitches at the end of row from wrong side (= mid front). There are now (49) 53-57-57-61 (65-69) stitches on needle and piece measures approx. (13) 13-17-24-30 (33-36) cm = (5⅛") 5⅛"-6¾"-9½"-11¾" (13"-14¼") from cast-on edge. Put piece aside and work left leg as explained below. LEFT LEG (when suit is worn): Cast on (40) 44-48-48-52 (56-60) stitches on circular needle size 4 MM = US 6 and work first row as follows from right side: 1 edge stitch in garter stitch, work A.1A until 3 stitches remain on row (=9-10-11-11-12 (13-14) repetitions of 4 stitches), work A.1B (= 2 stitches) and finish with 1 edge stitch in garter stitch. Continue pattern like this. When piece measures 4 cm = 1½", insert 1 marker in piece (marks fold). When piece measures (5) 5-7-8-10 (12-14) cm = (2") 2"-2¾"-3⅛"-4" (4¾"-5½") increase 1 stitch in each side – remember INCREASE TIP-. Repeat increase when piece measures (8) 8-12-18-20 (22-24) cm = (3⅛") 3⅛"-4¾"-7"-8" (8¾"-9½") = (44) 48-52-52-56 (60-64) stitches on needle. Work until piece measures (12) 12-16-23-31 (32-35) cm = (4¾") 4¾"-6¼"-9"-12¼" (12½"-13¾") from cast-on edge, adjust so that next row is worked from right side. Bind off 1 stitch at beginning of the next 2 rows (i.e. bind off edge stitches) = (42) 46-50-50-54 (58-62) stitches. Then work the next 2 rows as follows, begin from right side: Work as before over all stitches and cast on 4 new stitches at the end of row (= mid front). Turn piece, work A.1 as before over all stitches, but make sure to continue pattern correctly, then cast on 3 stitches at the end of row from wrong side (= mid back). There are now (49) 53-57-57-61 (65-69) stitches on needle and piece measures approx. (13) 13-17-24-30 (33-36) cm = (5⅛") 5⅛"-6¾"-9½"-11¾" (13"-14¼") from cast-on edge. Cut the yarn. Now place the parts together as explained below. BODY: Place right leg and left leg on same circular needle with right leg first. Begin from right side on right leg, work 1 edge stitch in garter stitch, continue A.1 as before over the remaining stitches on right leg (make sure to continue pattern correct according to finish on leg), then continue pattern over the first (48) 52-56-56-60 (64-68) stitches on left leg (make sure to continue pattern correct) and finish with 1 edge stitch in garter stitch = (98) 106-114-114-122 (130-138) stitches on needle. Insert another marker in piece! NOW MEASURE PIECE FROM THIS MARKER! Continue A.1 back and forth with 1 edge stitch in garter stitch in each side towards mid front. When piece measures (3) 3-3-3-4 (5-5) cm = (1⅛") 1⅛"-1⅛"-1⅛"-1½" (2"-2") from marker (adjust to work next row from right side) bind off 1 stitch at beginning of the next 2 rows (i.e. bind off edge stitches). Then work the next 2 rows as follows, begin from right side: Work as before over all stitches and cast on 4 new stitches at the end of row (= left band at the front). Turn piece, work A.1 as before over all stitches (make sure to continue pattern correctly) and cast on 4 new stitches at the end of row from wrong side (= right band at the front). There are now (104) 112-120-120-128 (136-144) stitches on needle. Continue A.1 back and forth over all stitches (i.e. do not work edge stitches in garter stitch). Remember BUTTONHOLES on right band - read explanation above. When piece measures (15) 20-24-27-30 (32-36) cm = (6") 8"-9½"-10⅝"-11¾" (12½"-14¼") from the new marker, i.e. (28) 33-41-51-60 (65-72) cm = (11") 13"-16⅛"-20"-23⅝" (25½"-28⅜") from cast-on edge, divide the piece in each side. Finish front pieces and back piece separately as explained below. RIGHT FRONT PIECE: Begin from right side and work as before over the first (27) 29-31-31-33 (35-37) stitches, then cast on (7) 13-13-17-17 (21-25) new stitches for sleeve. Slip the remaining stitches on 1 stitch holder for back piece and left front piece. Continue A.1 back and forth as before but make sure that pattern fits over all stitches. AT THE SAME TIME cast on (6) 7-11-12-14 (18-21) new stitches for sleeve at the end of the next 2 rows from right side = (46) 56-66-72-78 (92-104) stitches on needle. Continue pattern back and forth over all stitches until piece measures (22) 28-32-35-38 (41-45) cm = (8¾") 11"-12½"-13¾"-15" (16⅛"-17¾") from marker, i.e. (35) 41-49-59-68 (74-81) cm = (13¾") 16⅛"-19¼"-23¼"-26¾" (29⅛"-32") from cast-on edge. At the beginning of next row from right side slip the first (8) 8-9-11-11 (12-12) stitches on 1 stitch holder for neck but to avoid cutting the yarn work them before slipping them on the stitch holder. Continue pattern back and forth as before and bind off for neck at the beginning of every row from mid front as follows: Bind off 2 stitches 1 time and 1 stitch (1) 1-2-2-2 (3-3) times = (35) 45-53-57-63 (75-87) stitches remain on needle. Then work until the entire suit measures approx. (24) 30-34-37-41 (44-49) cm = (9½") 11¾"-13⅜"-14½"-16⅛" (17¼"-19¼") from marker, i.e. (37) 43-51-61-71 (77-85) cm = (14½") 17"-20"-24"-28" (30⅜"-33½") from cast-on edge, but adjust so that next row is worked from right side. Work 1 ridge back and forth over all stitches. Then bind off by knitting from the right side. The entire suit measures approx. (38) 44-52-62-72 (78-86) cm = (15") 17¼"-20½"-24⅜"-28⅜" (30¾"-33⅞") from cast-on edge. Now work back piece as explained below. BACK PIECE: Slip the first (50) 54-58-58-62 (66-70) stitches on stitch holder (seen from right side) on circular needle size 4 MM = US 6 and continue A.1 back and forth over these stitches as before. AT THE SAME TIME cast on new stitches for sleeves at the end of every row in each side as follows: Cast on (7) 13-13-17-17 (21-25)stitches 1 time in each side and then (6) 7-11-12-14 (18-21) stitches 2 times in each side = (88) 108-128-140-152 (180-204) stitches on needle. Continue pattern back and forth over all stitches until piece measures (23) 29-33-36-40 (43-48) cm = (9") 11⅜"-13"-14¼"-15¾" (17"-19") from marker). On next row bind off the middle (14) 14-18-22-22 (26-26) stitches for neck and finish each shoulder/sleeve separately. Then bind off 2 stitches on next row from neck = (35) 45-53-57-63 (75-87) stitches remain on needle for shoulder/sleeve. Then work until the entire suit measures approx. (24) 30-34-37-41 (44-49) cm = (9½") 11¾"-13⅜"-14½"-16⅛" (17¼"-19¼") from marker, but adjust according to front piece and make sure that next row is from right side. Work 1 ridge back and forth over all stitches. Then bind off by knitting from the right side. Work the other shoulder/sleeve the same way. Then work left front piece as explained below. LEFT FRONT PIECE: Slip the remaining (27) 29-31-31-33 (35-37) stitches on stitch holder back on needle size 4 MM = US 6. Begin from right side and continue A.1 back and forth as before. AT THE SAME TIME cast on new stitches for sleeve at the end of the next 3 rows from wrong side as follows: Cast on (7) 13-13-17-17 (21-25) stitches 1 time and then (6) 7-11-12-14 (18-21) stitches 2 times = (46) 56-66-72-78 (92-104) stitches on needle. Continue pattern back and forth over all stitches until piece measures (22) 28-32-35-36 38 (41-45) cm = (8¾") 11"-12½"-13¾"-14¼" 15" (16⅛"-17¾") from marker, i.e. (35) 41-49-59-68 (74-81) cm = (13¾") 16⅛"-19¼"-23¼"-26¾" (29⅛"-32") from cast-on edge. At the beginning of next row from wrong side slip the first (8) 8-9-11-11 (12-12) stitches on 1 stitch holder for neck but to avoid cutting the yarn work them before slipping them on the stitch holder. Continue pattern back and forth as before and bind off for neck at the beginning of every row from mid front as follows: Bind off 2 stitches 1 time and 1 stitch (1) 1-2-2-2 (3-3) times = (35) 45-53-57-63 (75-87) stitches remain on needle. Then work until the entire suit measures approx. (24) 30-34-37-41 (44-49) cm = (9½") 11¾"-13⅜"-14½"-16⅛" (17¼"-19¼") from marker, i.e. (37) 43-51-61-71 (77-85) cm = (14½") 17"-20"-24"-28" (30⅜"-33½") from cast-on edge, but measure so that next row is worked from right side. Work 1 ridge back and forth over all stitches. Then bind off by knitting from the right side. The entire suit measures approx. (38) 44-52-62-72 (78-86) cm = (15") 17¼"-20½"-24⅜"-28⅜" (30¾"-33⅞") from cast-on edge. ASSEMBLY: Sew shoulder seams inside bind-off edges. Sew the seams under the sleeve. Sew seam on inside of both legs inside 1 edge stitch in each side. Sew seam mid front from bottom of band and down inside 1 edge stitch in each side. Sew together the opening between the legs. Fold the end of legs at the marker. Sew the buttons on to the left band. HOOD: Pick up from right side approx. 44 to 70 stitches around the neck (including stitches on stitch holders at the front). Knit 1 row from wrong side while increasing evenly to (58) 70-74-74-78 (86-86) stitches – read INCREASE TIP-2. Knit 1 row from right side and knit 1 row from wrong side. Work next row as follows from right side: Work A.1A until 2 stitches remain on needle and finish with A.1B (= 2 stitches). Continue pattern like this until piece measures (17) 18-19-20-21 (22-23) cm = (6¾") 7"-7½"-8"-8¼" (8¾"-9") from ridge in the neck, but adjust so that next row is from right side. Work 1 ridge back and forth over all stitches. Then bind off by knitting from the right side. Place the hood double and sew seam at the top inside bind-off edge. |
|||||||
Diagram explanations |
|||||||
|
|||||||
 |
|||||||
 |
|||||||
Have you finished this pattern?Tag your pictures with #dropspattern #trulywoolyonesie or submit them to the #dropsfan gallery. Do you need help with this pattern?You'll find 27 tutorial videos, a Comments/Questions area and more by visiting the pattern on garnstudio.com. © 1982-2026 DROPS Design A/S. We reserve all rights. This document, including all its sub-sections, has copyrights. Read more about what you can do with our patterns at the bottom of each pattern on our site. |
|||||||


With over 40 years in knitting and crochet design, DROPS Design offers one of the most extensive collections of free patterns on the internet - translated to 17 languages. As of today we count 325 catalogs and 12298 patterns - 12288 of which are translated into English (US/in).
We work hard to bring you the best knitting and crochet have to offer, inspiration and advice as well as great quality yarns at incredible prices! Would you like to use our patterns for other than personal use? You can read what you are allowed to do in the Copyright text at the bottom of all our patterns. Happy crafting!
Post a comment to pattern DROPS Baby 33-8
We would love to hear what you have to say about this pattern!
If you want to leave a question, please make sure you select the correct category in the form below, to speed up the answering process. Required fields are marked *.