
Popular categories
Looking for a yarn?


|
|||||||
Truly Wooly |
|||||||
 |
 |
||||||
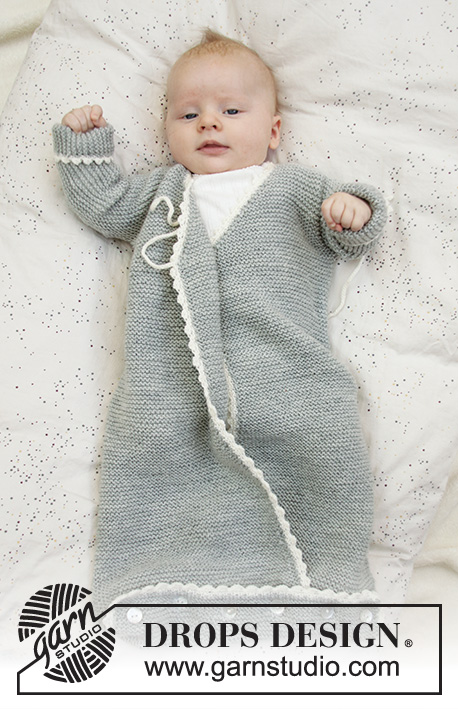
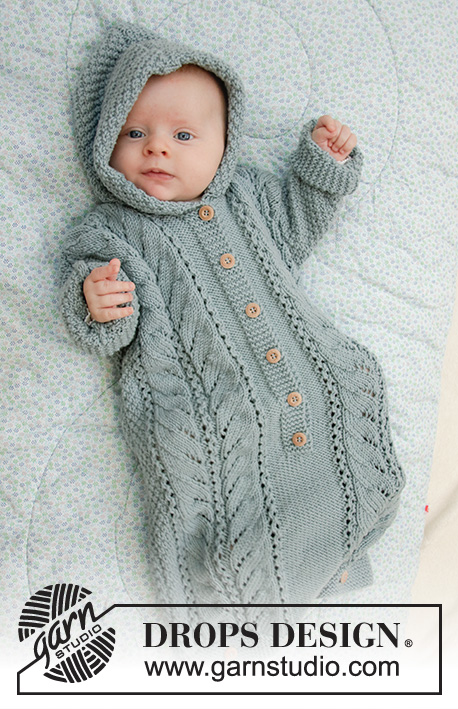
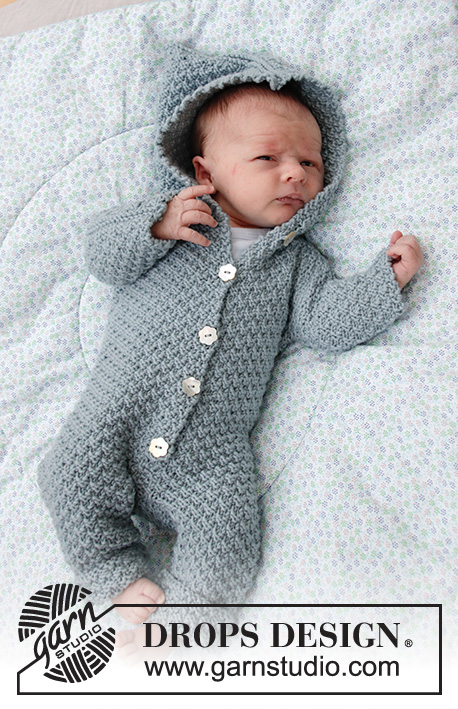
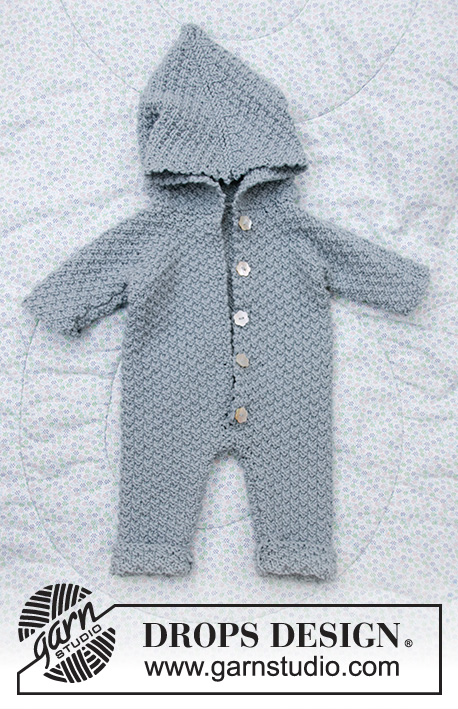
Knitted suit for baby in DROPS Merino Extra Fine. Piece is knitted with textured pattern and hood. Size premature - 4 years
DROPS Baby 33-8 |
|||||||
|
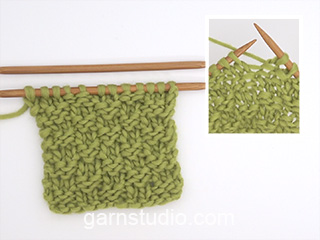
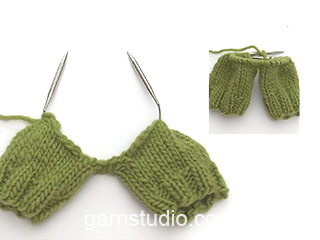
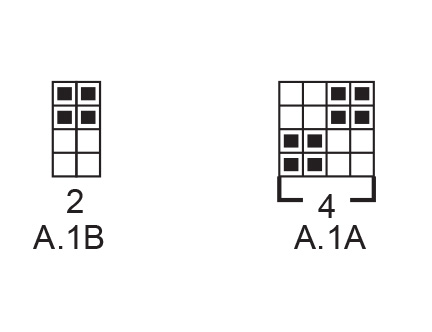
---------------------------------------------------------- EXPLANATION FOR THE PATTERN: ---------------------------------------------------------- GARTER STITCH (back and forth): 1 ridge = knit 2 rows. 1 edge stitch in garter stitch = knit stitch from right side and knit stitch from wrong side. PATTERN: See diagram A.1. Diagrams show all rows in pattern seen from the right side. INCREASE TIP-1 (applies to legs in size 3/4 years): Increase 1 stitch inside 1 edge stitch in garter stitch by making 1 yarn over. On next row work yarn overs twisted to avoid holes. Work the increased stitches in A.1. INCREASE TIP-2 (evenly): To calculate how to increase evenly, use the total number of stitches on row (e.g. 44 stitches) and divide stitches by number of increases to be done (e.g. 14) = 3.1. In this example increase by making 1 yarn over after approx. every 3rd stitch. On next row knit yarn overs twisted to avoid holes. BUTTONHOLES (bottom up): Decrease for buttonholes on right band. 1 BUTTONHOLE = knit third and fourth stitch from edge together and make 1 yarn over. On next row purl or knit yarn over (depending on where in the diagram you are) to make holes. Decrease for buttonholes when piece measures (measured from where legs where put together): (<0): 5, 10, 15 and 20 cm = 2", 4", 6" and 8" 0/1 months: 6, 11, 16, 21 and 26 cm = 2⅜",4⅜", 8¼" and 10¼" 1/3 months: 5, 10, 15, 20, 25 and 30 cm = 2", 4", 6", 8", 9¾" and 11¾" . 6/9 months: 6, 12, 17, 22, 27 and 32 cm = 2⅜", 4¾", 6¾", 8¾", 10⅝" and 12½". 12/18 months: 6, 12, 17, 23, 28 and 34 cm = 2⅜", 4¾", 6¾", 9", 13⅜". 2 years: 9, 15, 21, 27, 33 and 39 cm = 3½", 6", 8¼", 9½", 10⅝" and 15¼". 3/4 years: 7, 13, 19, 25, 31, 37 and 43 cm = 2¾", 5⅛", 7½", 9¾", 12¼", 14½" and 17" ---------------------------------------------------------- START THE PIECE HERE: ---------------------------------------------------------- SUIT - SHORT OVERVIEW OF THE PIECE: Work each leg back and forth on circular needle, bottom up. Place legs together and work back and forth on circular needle from mid front up to sleeves. Then cast on new stitches for sleeves in each side and finish front pieces and back piece separately. Sew piece together on the shoulder. Finish by picking up stitches around the neck and work a hood. RIGHT LEG (when suit is worn): Cast on (32) 36-40-40-44 (44-48) stitches on circular needle size 4 mm = US 6 with Merino Extra Fine. Work first row as follows from right side: 1 edge stitch in GARTER STITCH – read explanation above, work A.1A until 3 stitches remain on row (= 7-8-9-9-10 (10-11) repetitions of 4 stitches), work A.1B (= 2 stitches) and finish with 1 edge stitch in garter stitch. Continue pattern like this. REMEMBER THE KNITTING GAUGE! When piece measures 4 cm = 1½", insert 1 marker in piece (marks fold). When piece measures 14 cm = 5½" (only applies to size 3/4 years) increase 1 stitch in each side – read INCREASE TIP-1 (do not increase in the other sizes). Repeat increase in size 3/4 years when piece measures 24 cm = 9½" = (32) 36-40-40-44 (44-52) stitches on needle. Work until piece measures (12) 12-16-23-31 (32-35) cm = (4¾") 4¾"-6¼"-9"-12¼" (12½"-12¾") from cast-on edge, adjust so that next row is worked from right side. Bind off 1 stitch at beginning of the next 2 rows (i.e. bind off edge stitches) = (30) 34-38-38-42 (42-50) stitches. Then work the next 2 rows as follows, begin from right side: Work as before over all stitches and cast on (3) 3-3-5-5 (7-7) new stitches at the end of row (= mid back). Turn piece, work A.1 as before over all stitches, but make sure to continue pattern correctly, then cast on (4) 4-4-6-6 (8-8) stitches at the end of row from wrong side (= mid front). There are now (37) 41-45-49-53 (57-65) stitches on needle and piece measures approx. (13) 13-17-24-32 (33-36) cm = (5⅛") 5⅛"-6¾"-9½"-12½" (13"-14¼") from cast-on edge. Put piece aside and work left leg as explained below. LEFT LEG (when suit is worn): Cast on (32) 36-40-40-44 (44-48) stitches on circular needle size 4 mm = US 6 and work first row as follows from right side: 1 edge stitch in garter stitch, work A.1A until 3 stitches remain on row (= 7-8-9-9-10 (10-11) repetitions of 4 stitches), work A.1B (= 2 stitches) and finish with 1 edge stitch in garter stitch. Continue pattern like this. When piece measures 4 cm = 1½", insert 1 marker in piece (marks fold). When piece measures 14 cm = 5½" (only applies to size 3/4 years) increase 1 stitch in each side – remember INCREASE TIP-1 (do not increase in the other sizes). Repeat increase in size 3/4 years when piece measures 24 cm = 9½" = (32) 36-40-40-44 (44-52) stitches on needle. Work until piece measures (12) 12-16-23-31 (32-35) cm = (4¾") 4¾"-6¼"-9"-12¼" (12½"-12¾") from cast-on edge, adjust so that next row is worked from right side. Bind off 1 stitch at beginning of the next 2 rows (i.e. bind off edge stitches) = (30) 34-38-38-42 (42-50) stitches. Then work the next 2 rows as follows, begin from right side: Work as before over all stitches and cast on (4) 4-4-6-6 (8-8) new stitches at the end of row (= mid front). Turn piece, work A.1 as before over all stitches, but make sure to continue pattern correctly, then cast on (3) 3-3-5-5 (7-7) stitches at the end of row from wrong side (= mid back). There are now (37) 41-45-49-53 (57-65) stitches on needle and piece measures approx. (13) 13-17-24-32 (33-36) cm = (5⅛") 5⅛"-6¾"-9½"-12½" (13"-14¼") from cast-on edge. Cut the yarn. Now place the parts together as explained below. BODY: Place right leg and left leg on same circular needle with right leg first. Begin from right side on right leg, work 1 edge stitch in garter stitch, continue A.1 as before over the remaining stitches on right leg (make sure to continue pattern correct according to finish on leg), then continue pattern over the first (36) 40-44-48-52 (56-64) stitches on left leg (make sure to continue pattern correct) and finish with 1 edge stitch in garter stitch = (74) 82-90-98-106 (114-130) stitches on needle. Insert another marker in piece! NOW MEASURE PIECE FROM THIS MARKER! Continue A.1 back and forth with 1 edge stitch in garter stitch in each side towards mid front. When piece measures (3) 3-3-3-4 (5-5) cm = (1⅛") 1⅛"-1⅛"-1⅛"-1½" (2"-2") from marker (adjust to work next row from right side) bind off 1 stitch at beginning of the next 2 rows (i.e. bind off edge stitches). Then work the next 2 rows as follows, begin from right side: Work as before over all stitches and cast on 3 new stitches at the end of row (= left band at the front). Turn piece, work A.1 as before over all stitches (make sure to continue pattern correctly) and cast on 3 new stitches at the end of row from wrong side (= right band at the front). There are now (78) 86-94-102-110 (118-134) stitches on needle. Continue A.1 back and forth over all stitches (i.e. do not work edge stitches in garter stitch). Remember BUTTONHOLES on right band - read explanation above. When piece measures (15) 20-24-27-28 (32-36) cm = (6") 8"-9½"-10⅝"-11" (12½"-12¼") from the new marker, i.e. (28) 33-41-51-60 (65-72) cm = (11") 12"-16⅛"-20"-23⅝" (25½"-28¾") from cast-on edge, divide the piece in each side. Finish front pieces and back piece separately as explained below. RIGHT FRONT PIECE: Begin from right side and work as before over the first (21) 23-25-27-29 (31-35) stitches, then cast on (9) 13-13-17-17 (21-25) new stitches for sleeve. Slip the remaining stitches on 1 stitch holder for back piece and left front piece. Continue A.1 back and forth as before but make sure that pattern fits over all stitches. AT THE SAME TIME cast on (8) 10-14-14-16 (20-22) new stitches for sleeve at the end of the next 2 rows from right side = (46) 56-66-72-78 (92-104) stitches on needle. Continue pattern back and forth over all stitches until piece measures (22) 28-32-35-36 (41-45) cm = (8¾") 11"-12½"-12¾"-14¼" (16⅛"-17¾") from marker, i.e. (35) 41-49-59-68 (74-81) cm = (13¾") 16⅛"-19¼"-23¼" (29⅛"-32" from cast-on edge. At the beginning of next row from right side slip the first (8) 8-9-11-11 (12-12) stitches on 1 stitch holder for neck but to avoid cutting the yarn work them before slipping them on the stitch holder. Continue pattern back and forth as before and bind off for neck at the beginning of every row from mid front as follows: Bind off 2 stitches 1 time and 1 stitch (1) 1-2-2-2 (3-3) times = (35) 45-53-57-63 (75-87) stitches remain on needle. Then work until the entire suit measures approx. (24) 30-34-37-39 (44-49) cm = (9½") 11⅜"-13⅜"-14½"-15¼" (17¼"-19¼") from marker, i.e. (37) 43-51-61-71 (77-85) cm = (14½") 17"-20"-24"-28" (30⅜"-33½") from cast-on edge, but adjust so that next row is worked from right side. Work 1 ridge back and forth over all stitches. Then bind off by knitting from the right side. The entire suit measures approx. (38) 44-52-62-72 (78-86) cm = (15") 17¼"-20½"-24⅜"-28⅜" (30¾"-33⅞") from cast-on edge. Now work back piece as explained below. BACK PIECE: Slip the first (36) 40-44-48-52 (56-64) stitches on stitch holder (seen from right side) on circular needle size 4 mm = US 6 and continue A.1 back and forth over these stitches as before. AT THE SAME TIME cast on new stitches for sleeves at the end of every row in each side as follows: Cast on (9) 13-13-17-17 (21-25) stitches 1 time in each side and then (8) 10-14-14-16 (20-22) stitches 2 times in each side = (86) 106-126-138-150 (178-202) stitches on needle. Continue pattern back and forth over all stitches until piece measures (23) 29-33-36-38 (43-48) cm = (9") 11⅜"-13"-14¼"-15" (17"-19") from marker). On next row bind off the middle (12) 12-16-20-20 (24-24) stitches for neck and finish each shoulder/sleeve separately. Then bind off 2 stitches on next row from neck = (35) 45-53-57-63 (75-87) stitches remain on needle for shoulder/sleeve. Then work until the entire suit measures approx. (24) 30-34-37-39 (44-49) cm = (9½") 11¾"-13⅜"-14½"-15¼" (17¼"-19¼") from marker, but adjust according to front piece and make sure that next row is from right side. Work 1 ridge back and forth over all stitches. Then bind off by knitting from the right side. Work the other shoulder/sleeve the same way. Then work left front piece as explained below. LEFT FRONT PIECE: Slip the remaining (21) 23-25-27-29 (31-35) stitches on stitch holder back on needle size 4 mm = US 6. Begin from right side and continue A.1 back and forth as before. AT THE SAME TIME cast on new stitches for sleeve at the end of the next 3 rows from wrong side as follows: Cast on (9) 13-13-17-17 (21-25) stitches 1 time and then (8) 10-14-14-16 (20-22) stitches 2 times = (46) 56-66-72-78 (92-104) stitches on needle. Continue pattern back and forth over all stitches until piece measures the same as right front piece. At the beginning of next row from wrong side slip the first (8) 8-9-11-11 (12-12) stitches on 1 stitch holder for neck but to avoid cutting the yarn work them before slipping them on the stitch holder. Continue pattern back and forth as before and bind off for neck at the beginning of every row from mid front as follows: Bind off 2 stitches 1 time and 1 stitch (1) 1-2-2-2 (3-3) times = (35) 45-53-57-63 (75-87) stitches remain on needle. Then work until the entire suit measures approx. (24) 30-34-37-39 (44-49) cm = (9½") 11¾"-13⅜"-14½"-15¼" (17¼"-19¼") from marker, i.e. (37) 43-51-61-71 (77-85) cm = (14½") 17"-20"-24"-28" (30⅜"-33½") from cast-on edge, but measure so that next row is worked from right side. Work 1 ridge back and forth over all stitches. Then bind off by knitting from the right side. The entire suit measures approx. (38) 44-52-62-72 (78-86) cm = (15") 17¼"-20½"-24⅜"-28⅜" (30¾"-33⅞") from cast-on edge. ASSEMBLY: Sew shoulder seams inside bind-off edges. Sew the seams under the sleeve. Sew seam on inside of both legs inside 1 edge stitch in each side. Sew seam mid front from bottom of band and down inside 1 edge stitch in each side. Sew together the opening between the legs. Fold the end of legs at the marker. Sew the buttons on to the left band. HOOD: Pick up from right side approx. 44 to 70 stitches around the neck (including stitches on stitch holders at the front). Knit 1 row from wrong side while increasing evenly to (58) 70-74-74-78 (86-86) stitches – read INCREASE TIP-2. Knit 1 row from right side and knit 1 row from wrong side. Work next row as follows from right side: Work A.1A until 2 stitches remain on needle and finish with A.1B (= 2 stitches). Continue pattern like this until piece measures (17) 18-19-20-21 (22-23) cm = (6¾") 7"-7½"-8"-8¼" (8¼"-9") from ridge in the neck, but adjust so that next row is from right side. Work 1 ridge back and forth over all stitches. Then bind off by knitting from the right side. Place the hood double and sew seam at the top inside bind-off edge. |
|||||||
Diagram explanations |
|||||||
|
|||||||
|
|||||||

|
|||||||
|
Have you made this or any other of our designs? Tag your pictures in social media with #dropsdesign so we can see them! Do you need help with this pattern?You'll find tutorial videos, a Comments/Questions area and more by visiting the pattern on garnstudio.com. © 1982-2024 DROPS Design A/S. We reserve all rights. This document, including all its sub-sections, has copyrights. Read more about what you can do with our patterns at the bottom of each pattern on our site. |
|||||||


With over 40 years in knitting and crochet design, DROPS Design offers one of the most extensive collections of free patterns on the internet - translated to 17 languages. As of today we count 304 catalogs and 11422 patterns - 11417 of which are translated into English (US/in).
We work hard to bring you the best knitting and crochet have to offer, inspiration and advice as well as great quality yarns at incredible prices! Would you like to use our patterns for other than personal use? You can read what you are allowed to do in the Copyright text at the bottom of all our patterns. Happy crafting!
Comments / Questions (170)
Hallo, habe meinen schönen Anzug gewaschen. Jetzt ist er viel größer. Er wirkt fast wie ausgeleiert, obwohl ich sehr fest gestrickt habe? Wie kann das sein? Habe ihn im Wollwaschgang bei 30 Grad und mit Wollwaschmittel gewaschen. Bin für einenAntwort sehr dankbar!
24.01.2023 - 21:53DROPS Design answered:
Liebe Carolin, schauen Sie mal mit Ihrem DROPS Händler, wie Sie den Anzug gewaschen haben, so kann man Ihnen dort gerne - auch per E-Mail oder per Telefon - weiterhelfen.
25.01.2023 - 12:18I am at the end of the front-right side and gave reached the part where it says "work 1 ridge back and forth over all stitches". What does this mean and does "all stitches" include the ones on the stitches holder? Thank you 😊
21.01.2023 - 15:20DROPS Design answered:
Hi Catherine, 1 ridge is 2 rows of garter stitch (2 knitted rows worked back and forth). This does not include the stitches on the holder. Happy knitting!
22.01.2023 - 08:31Teen oikeaa etukappaletta mutta en hahmota miten silmukat päätetään pääntietä varten. ”Jatka mallineuletta kuten aiemmin ja päätä keskeltä edestä joka 2.kerros pääntietä varten näin:” Mitä tuo keskeltä tarkoittaa? Keskeltä silmukkarivistöäkö?
13.12.2022 - 13:11DROPS Design answered:
Hei, keskeltä edestä tarkoittaa kapppaleen etureunaa (keskietua). Eli silmukat päätetään pääntien reunasta.
06.01.2023 - 14:31Hi, I am working on the back piece. When the pattern says "Then cast off 2 stitches on next row from neck = (35) 45-53-57-63 (75-87)", is that one stitch on each side of the stitches I cast off for the neck?
11.12.2022 - 19:19DROPS Design answered:
Dear Sophie, you decrease 2 stitches on each side. Happy knitting!
11.12.2022 - 23:21I have completed both legs and am preparing to begin knitting the body, but I'm unsure about what yarn to use. I knit each leg using a separate 50g skein of yarn which is still attached to each leg. When I join the legs on one needle, which yarn skein should I knit from and what do I do with the other one?
01.12.2022 - 23:15DROPS Design answered:
Dear Catherine, when working both legs together you start from the right side with the sleeves of the right leg, so you can use the ball you left on right leg and you will have to cut the yarn of the ball you kept at the end of left leg. Happy knitting!
02.12.2022 - 08:13Hi there! I've just reached the portion in the right back piece where I am casting on new stitches for the sleeves. Just want to make sure, am I knitting the sleeves flat? And they will be at the start/end of my row while the back/left stitches are on my stitch holder? Thanks in advance, this is my first time knitting a piece that needs seaming at the end
21.11.2022 - 11:51DROPS Design answered:
Dear Sophie, you mean here right front piece not right back piece right? Then yes, you cast on the new stitches for sleeve at the end of the row from RS (at the end of the row from WS on the left front piece and at the end of both from RS + WS on back piece). Happy knitting!
21.11.2022 - 16:14Are there instructions for 3-6 month size (62cm)? Or is there a way to adjust the pattern lengths to fit this size? At the pace I am knitting I won't be finished while my baby is in the 1-3 month size but the 6-9 month size will fit him in the summer, which is the wrong season! I would love to knit for that in-between size but I'm not comfortable trying to adjust on my own.
08.11.2022 - 16:32DROPS Design answered:
Dear Catherine, sorry this pattern is available only in size 1/3 months or in size 6/9 months - maybe ask your yarn store or any knitting forum for any assistance to adjust the pattern to the required measurements/size. Happy knitting!
08.11.2022 - 16:56Ich habe Probleme mit den Anfang vom rechten Vorderteil… wenn ich in der Hinreise beginne wo muss ich mit den Zunahmen für den Ärmel beginnen? Lese ich es richtig das ich damit mitten in der Arbeiten beginne?
07.11.2022 - 08:05DROPS Design answered:
Liebe Martina, die Maschen für die Ärmel werden am Ende der 1. Hinreihe angeschlagen = bei einer Hinreihe stricken Sie die (21) 23-25-27-29 (31-35) Maschen wie zuvor (alle andere Maschen legen Sie für Rückenteil und 2. Vorderteil still), dann schlagen Sie 9 bis 25 Maschen, Viel Spaß beim stricken!
07.11.2022 - 10:09Hallo, Ich habe eine Frage zu den Knopflöchern. Sowie sie in der Anleitung gestrickt werden (kleine Knopflöcher) sind sie für meine Knöpfe zu klein. Kann ich auch nach Ihrer Anleitung für mittlere Knopflöcher arbeiten, oder stimmt dann die ganze restliche Anleitung nicht?
23.10.2022 - 14:10DROPS Design answered:
Liebe Bella, gerne können Sie die Knopflöcher so anpassen, damit sie Ihre Knöpfe passen. Viel Spaß beim stricken!
24.10.2022 - 08:30Hallo :) Gibt es einen Tipp, mit welcher Technik ich die Ärmelnähte schließen kann? Hier treffen ja linke auf rechte Maschen... Vielen Dank schonmal für Ihre Hilfe!
11.10.2022 - 10:23DROPS Design answered:
Liebe Katharina, Sie können entweder diese Technik folgen, oder mit linken und rechten Maschen wie bei diesem Video nähen. Viel Spaß beim fertigstellen!
11.10.2022 - 13:09