
Popular categories
Looking for a yarn?


Comments / Questions (23)
![]() Chris wrote:
Chris wrote:
Hallo, ich habe eine Frage zu der Erhöhung; dazu steht am Ende: "Die nächste Runde (d.h. an der Passe) nach den ersten 6-6-6-7-7-8 Maschen der Runde beginnen." Das verstehe ich nicht; ich bin doch wieder in der Rundenmitte, und die Maschenanzahl verändert sich nicht (im Vgl. zum Stricken ohne Erhöhung). Wie verstehe ich das? Vielen Dank im Voraus :)
09.01.2020 - 17:17DROPS Design answered:
Liebe Chris, nach dem Kragen bzw nach der Erhöhung beginnen die Runden nicht mehr bei der hinteren Mitte aber mit der Raglan-linie = mit A.1, deshalb wir die 1. Runde nach der Erhöhung nach den ersten 6-7-8 Maschen beginnen. Viel Spaß beim stricken!
10.01.2020 - 08:30
![]() Ana wrote:
Ana wrote:
El inicio del canesú no entiendo lo siguiente: 1 revés, 2 derechos en cada uno de los siguientes 3 puntos (trabajar en ambos bucles, posterior y anterior = 3 puntos aumentados),. Cuando aumentas los tres puntos? Tejes uno del revés y aumentas 1 y luego 2 del derecho y aumentas un punto por punto que tejes?.
19.06.2019 - 05:56DROPS Design answered:
Hola Ana. Trabajar 2 derechos en cada uno de los siguientes 3 puntos, es decir, después de trabajar estos 3 puntos tenemos 6 puntos ( 3 puntos aumentados)
20.06.2019 - 23:02
![]() Maria Enrica wrote:
Maria Enrica wrote:
Buonasera. Mi piacciono i vostri modelli ma, avendo una certa età, sono abituata ad usare i vecchi ferri e ne ho di tutte le misure. Penso che mi troverei a disagio ad usare quelli circolari. Potreste mettere le spiegazioni per i ferri non circolari? Anche il fatto di iniziare dall'alto mi mette in difficoltà. Forse mi basterebbe che metteste i modelli dei vari pezzi. Grazie
27.02.2019 - 21:38DROPS Design answered:
Buonasera Maria Enrica, molti dei nostri modelli sono lavorati in piano e quindi è possibile lavorarli con i ferri dritti. I ferri circolari vengono utilizzati per avere più spazio a causa del numero di maglie elevato, e sono molto popolari nella cultura maglistica all'infuori dell'Italia. Può provare ad usare i nostri video tutorials per avvicinarsi alla lavorazione in tondo. Buon lavoro!
27.02.2019 - 23:23
![]() Daniela wrote:
Daniela wrote:
Buongiorno, vorrei sapere se possibile, perchè nel collo ci sono le diminuzioni. Grazie!
04.12.2018 - 10:51DROPS Design answered:
Buongiorno Daniela. Le coste tendono a stringere il lavoro. Le diminuzioni vengono proposte per evitare che il lavoro si allarghi troppo una volta terminata la lavorazione a coste. Buon lavoro!
04.12.2018 - 11:26
![]() Diana wrote:
Diana wrote:
Hi DD, I have a question about separating the parts. It's quite hard to write it down in English, sorry. Altough I have checked the English version it's still not clear for me when and how to separate the back and front in order to place the sleeves in it. Can you please elaborate on it? Where will be these two parts separated - when should I finish the knitting in round? Diana
16.11.2018 - 14:56DROPS Design answered:
Dear Diana, this video shows how to work a raglan jumper top down - but remember to follow the description of the pattern, ie working the stitches as explained in the pattern. Happy knitting!
16.11.2018 - 15:19
![]() Marion wrote:
Marion wrote:
Bonjour, j'ai un doute concernant la fin de la rehausse d'encolure. Une fois les rangs raccourcis terminés, il est écrit de "couper le fil et commencer le tour suivant après les x premières mailles du tour" Cela signifie que je dois sauter ces mailles et ne pas les tricoter ? Si oui, pourquoi ? Merci de votre aide
28.10.2018 - 23:50DROPS Design answered:
Bonjour Marion, les tours commencent au début au milieu dos, une fois que la réhausse est faite, on va couper le fil pour commencer l'empiècement après les 6-7-8 mailles (cf taille) après le début des tours précédent. Après avoir coupé le fil, glissez ces mailles sur l'aiguille droite sans les tricoter, décalez votre marqueur de début de tours et commencez comme indiqué (avant le point fantaisie du raglan). Bon tricot!
29.10.2018 - 08:54Zarrouk Hend wrote:
Bonjour, je vie en Tunisie et je ne trouve pas les aiguilles circulaires pour réaliser les différents modèles que vous publiez, en l’occurence Celui ci que j’adore. Pourriez vous m’aider à trouver un moyen pour pouvoir se les procurer Merci pour votre reponse
21.09.2018 - 12:33Monica Quintana Diaz wrote:
Hola, por favor me pueden comunicar si los patrones se traducirán al español en un futuro próximo.
20.08.2018 - 14:44DROPS Design answered:
Hola Mónica, los patrones de la nueva colección estarán traducidos para finales de mes.
20.08.2018 - 21:01
![]() Lisa wrote:
Lisa wrote:
Hej hvad gør jeg hvis jeres strikkefasthed er 12 pinde og 9 masker og min er 14 pinde og 11 masker på samme pind størrelse ?
03.08.2018 - 00:51
![]() Marie Jibbefors wrote:
Marie Jibbefors wrote:
Ser så mjuk och värmande ut som vackert mönster. En riktig vinterfavorit!
29.06.2018 - 19:02
|
||||||||||||||||
Warm Fall#warmfallsweater |
||||||||||||||||
 |
 |
|||||||||||||||
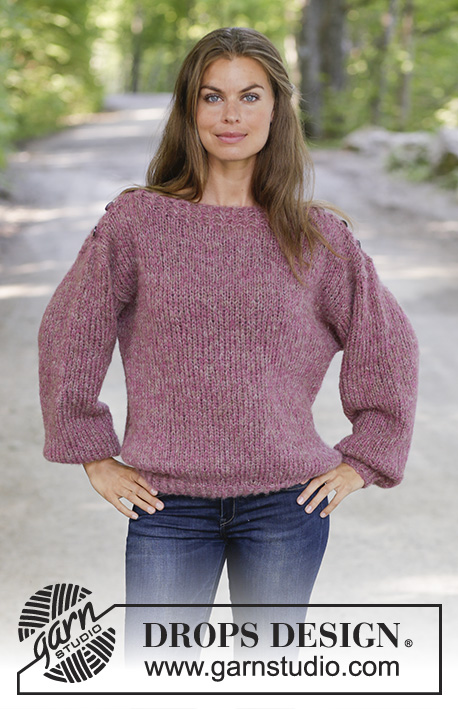
Knitted sweater with raglan in DROPS Snow. The piece is worked top down with lace pattern and high neck. Sizes S - XXXL.
DROPS 196-35 |
||||||||||||||||
|
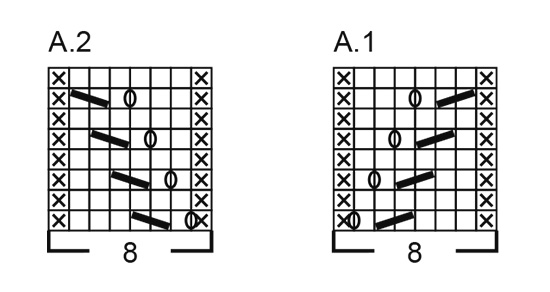
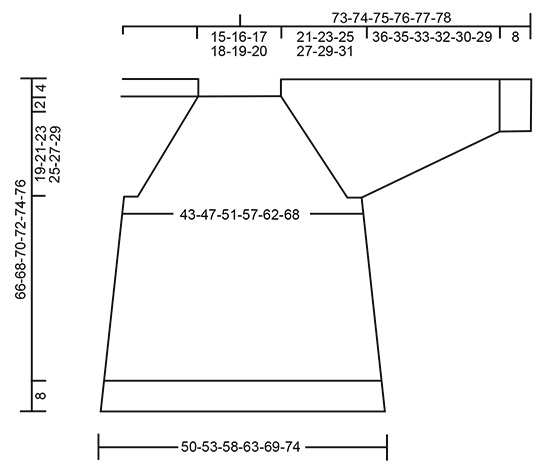
------------------------------------------------------- EXPLANATIONS FOR THE PATTERN: ------------------------------------------------------- RIDGE/GARTER STITCH (worked in the round): 1 ridge = 2 rounds. Knit 1 round and purl 1 round. DECREASE/INCREASE TIP (evenly spaced): To work out how to decrease/increase evenly, count the total number of stitches to be decreased/increased over (e.g. 56 stitches), and divide by the number of decreases/increases to be made (e.g. 12) = 4.7. In this example, decrease by knitting together alternately each 3rd and 4th stitch and each 4th and 5th stitch (approx.). When increasing evenly, make 1 yarn over alternately after each 4th and 5th stitch. On the next round knit the yarn overs twisted to avoid holes. PATTERN: See diagrams A.1 and A.2. The diagrams show all the rows in the pattern seen from the right side. RAGLAN: Increase 1 stitch on each side of A.1/A.2 in each transition between body and sleeves (= 8 stitches increased on the round). Increase 1 stitch by making 1 yarn over. On the next round knit the yarn overs twisted to avoid holes. Then work the new stitches in stockinette stitch. INCREASE TIP (for sides of body): Work until there are 2 stitches left before the marker thread, 1 yarn over, knit 4 (the marker thread sits in the middle of these 4 stitches), 1 yarn over. On the next round knit the yarn overs twisted to avoid holes. Then work the new stitches in stockinette stitch. DECREASE TIP (for sleeves): Decrease 1 stitch on each side of the marker thread as follows: Work until there are 3 stitches left before the marker thread, knit 2 together, knit 2 (the marker thread sits in the middle of these 2 stitches), slip 1 stitch as if to knit, knit 1, pass the slipped stitch over the knitted stitch. ------------------------------------------------------- START THE PIECE HERE: ------------------------------------------------------- SWEATER - SHORT OVERVIEW OF THE PIECE: The piece is worked in the round with double pointed needles/circular needle, top down. After the neck is finished, you can work an elevation in the back of the neck to give a better fit, so that the yoke is slightly higher at the back. This elevation can be left out; the neck will then be the same front and back – see description of elevation further down in the text. After the yoke, the body is worked in the round with circular needle. The sleeves are worked in the round with double pointed needles, top down. NECK: Cast on 56-56-60-60-64-64 stitches with double pointed needles size 10 mm / US 15 and Snow. Change to double pointed needles size 9 mm / US 13 and work rib (= knit 2 / purl 2) for 14 cm / 5½". Then work 2 RIDGES – read description above, AT THE SAME TIME on the third round (= a knitted round) decrease 12-10-14-12-14-12 stitches evenly on round – read DECREASE/INCREASE TIP = 44-46-46-48-50-52 stitches. Change back to double pointed needles size 10 mm / US 15. Now you can either work an elevation in the back of the neck or go straight to working the yoke if you do not want an elevation. ELEVATION IN BACK OF NECK: Skip this section if you do not want an elevation. Insert 1 marker at the beginning of the round = mid back. Start from the right side and knit 6-6-7-7-7-8 stitches past the marker, turn, tighten the strand and purl 12-12-14-14-14-16 stitches from the wrong side, turn, tighten the strand and knit 18-18-21-21-21-24 stitches, turn, tighten the strand and purl 24-24-28-28-28-32 stitches, turn, tighten the strand and knit to mid back. Cut the strand. Start the next round (i.e. on the yoke) after the first 6-6-6-7-7-8 stitches on the round. YOKE: THE PIECE IS NOW MEASURED FROM HERE! Insert 1 marker at the beginning of the round and work the first round as follows: * Purl 1, knit 2 stitches in each of the next 3 stitches (knit in both front and back loops = 3 stitches increased), purl 1, knit 1 (= sleeve top), purl 1, knit 2 stitches in each of the next 3 stitches (= 3 stitches increased), purl 1, knit 11-12-12-13-14-15 (= front piece/back piece) *, work from *-* a total of 2 times = 56-58-58-60-62-64 stitches on the needle. The next round is worked as follows: * Work A.1 (= 8 stitches), make 1 yarn over, knit 1 (= sleeve top), make 1 yarn over, work A.2 (= 8 stitches), make 1 yarn over, knit 11-12-12-13-14-15 stitches (= front piece/back piece)), make 1 yarn over *, work from *-* a total of 2 times = 64-66-66-68-70-72 stitches. The first increase to RAGLAN – read description above, is now finished (= 8 stitches increased on the round). Continue this pattern and increase to raglan every 2nd round a total of 7-8-11-9-12-13 times (including the increase on the last round worked) and then every 4th round a total of 2-2-1-3-2-2 times. REMEMBER THE GAUGE! After the last increase to raglan there are 128-138-154-156-174-184 stitches on the needle. Continue the pattern as before but without increasing until the piece measures 21-23-25-27-29-31 cm / 8¼"-9"-9¾"-10⅝"-11⅜"-12¼" from the marker at the beginning of the yoke. The next round is worked as follows: Work 3-3-3-4-4-5 stitches in stockinette stitch (= on the back piece), place the next 29-31-35-33-37-37 stitches on 1 thread for sleeve, cast on 4-4-4-6-6-6 new stitches on the needle (= in side under sleeve), work stockinette stitch over the next 35-38-42-45-50-55 stitches (= front piece), place the next 29-31-35-33-37-37 stitches on 1 thread for sleeve, cast on 4-4-4-6-6-6 new stitches on the needle (= in side under sleeve), work stockinette stitch over the last 32-35-39-41-46-50 stitches (= back piece). The body and sleeves are now finished separately. THE PIECE IS NOW MEASURED FROM HERE! BODY: = 78-84-92-102-112-122 stitches. Insert 1 marker thread in the middle of the 4-4-4-6-6-6 stitches cast on under each sleeve. Start the round by one of the marker threads and allow the marker threads to follow your work onwards. Continue with stockinette stitch. When the piece measures 4 cm / 1½" from the division increase 1 stitch on each side of both marker threads – read INCREASE TIP- (= 4 stitches increased). Increase like this every 10 cm / 4" a total of 3 times = 90-96-104-114-124-134 stitches. When the piece measures 33 cm from the division (approx. 58-60-62-64-66-68 cm / 22¾"-23⅝"-24⅜"-25¼"-26"-26¾" from the shoulder) knit 1 round where you increase 14-16-16-22-20-26 stitches evenly on round – remember DECREASE/INCREASE TIP = 104-112-120-136-144-160 stitches. Change to circular needle size 9 mm / US 13 and work rib (= knit 2 / purl 2). When the rib measures 5 cm / 2", increase every other purl-2 to purl-3 = 117-126-135-153-162-180 stitches. Continue with knit over knit and purl over purl until the rib measures 8 cm / 3⅛". Loosely bind off with knit over knit and purl over purl. The sweater measures approx. 66-68-70-72-74-76 cm / 26"-26¾"-27½"-28⅜"-29⅛"-30" / 26"-26¾"-27½"-28⅜"-29⅛"-30" from the shoulder down. SLEEVE: Place the 29-31-35-33-37-37 stitches from the thread on the one side of the piece on double pointed needles size 10 mm / US 15. In addition, knit up 1 stitch in each of the 4-4-4-6-6-6 stitches cast on under the sleeve = 33-35-39-39-43-43 stitches. Insert 1 marker thread in the middle of the 4-4-4-6-6-6 stitches under the sleeve and start the round here. Work stockinette stitch in the round. When the piece measures 2 cm / ¾" from the division, decrease 2 stitches mid under sleeve – read DECREASE TIP. Decrease like this every 5-5-3½-4-3-3 cm/2"-2"-1¼"-1½"-1"-1" a total of 7-7-9-8-10-9 times = 19-21-21-23-23-25 stitches. Continue working until the piece measures 36-35-33-32-30-29 cm / 14⅛"-13 ¾"-13"-12 ½"-11 ¾"-11⅜" from the division (shorter measurements in the larger sizes due to longer yoke). Knit 1 round where you increase 5-3-3-5-5-7 stitches evenly on round = 24-24-24-28-28-32 stitches. Change to double pointed needles size 9 mm / US 13 and work rib (= knit 2 / purl 2) for 8 cm / 3⅛". The sleeve measures approx. 44-43-41-40-38-37 cm / 17¼"-17"-16⅛"-15¾"-15"-14½" from the division. Loosely bind off with knit over knit and purl over purl – to avoid the bind-off edge being tight, you can make 1 yarn over after each 4th stitch while binding off (the yarn overs are bind off as normal stitches). Work the other sleeve in the same way. |
||||||||||||||||
Diagram explanations |
||||||||||||||||
|
||||||||||||||||
 |
||||||||||||||||
 |
||||||||||||||||
Have you finished this pattern?Tag your pictures with #dropspattern #warmfallsweater or submit them to the #dropsfan gallery. Do you need help with this pattern?You'll find 34 tutorial videos, a Comments/Questions area and more by visiting the pattern on garnstudio.com. © 1982-2026 DROPS Design A/S. We reserve all rights. This document, including all its sub-sections, has copyrights. Read more about what you can do with our patterns at the bottom of each pattern on our site. |
||||||||||||||||


With over 40 years in knitting and crochet design, DROPS Design offers one of the most extensive collections of free patterns on the internet - translated to 17 languages. As of today we count 325 catalogs and 12298 patterns - 12288 of which are translated into English (US/in).
We work hard to bring you the best knitting and crochet have to offer, inspiration and advice as well as great quality yarns at incredible prices! Would you like to use our patterns for other than personal use? You can read what you are allowed to do in the Copyright text at the bottom of all our patterns. Happy crafting!
Post a comment to pattern DROPS 196-35
We would love to hear what you have to say about this pattern!
If you want to leave a question, please make sure you select the correct category in the form below, to speed up the answering process. Required fields are marked *.