
Popular categories
Looking for a yarn?


Comments / Questions (70)
![]() Dolfin wrote:
Dolfin wrote:
Merci pour votre réponse Je suis dans l'attente et bloquée pour terminer. A très vite. Merci
23.07.2019 - 15:38
![]() Dolfin wrote:
Dolfin wrote:
"MESURER DÉSORMAIS À PARTIR D\'ICI! Continuer comme avant au-dessus des 33 mailles restantes jusqu'à ce que l'ouvrage mesure 13-15-14-15-17-18 cm. Rabattre ensuite à droite, au début de chaque rang sur l'endroit, ainsi: 1 fois 17 mailles, 1 fois 2 mailles, 2 fois 1 maille = 12 mailles. Tricoter ces 12 mailles jusqu'à ce que l\'ouvrage mesure 20-22-23-24-26-27 cm." j'ai vérifié les mesures je suis ok, et cette bande est de trop pour moi je ne sais pas quoi en faire ?
23.07.2019 - 15:37
![]() DOLFIN wrote:
DOLFIN wrote:
Bonjour, je vous réitère ma question du 20/7. J'ai vérifié toutes les mesures je suis bon dans tout, mais les manches sont trop longues au niveau du col et je ne vois vraiment pas comment il faut faire sans rétrécir la manche.
23.07.2019 - 15:34DROPS Design answered:
Bonjour! Je vous envoie la photo de mon pull apres l'assemblage sur votre email. Cela va vous donner une image. Bon travail!
23.07.2019 - 18:32
![]() DOLFIN wrote:
DOLFIN wrote:
Bonjour, Je ne comprends pas comment on monte les manches : "Assembler les mailles rabattues des manches au milieu dos" : quelle partie exactement ? Je fais le modèle en L et mes manches font bien 77cm en HT et pourtant ça ne correspond pas. Merci pour votre aide. Bon week-end.
20.07.2019 - 21:04DROPS Design answered:
Bonjour Mme Dolfin! J’ai deja fait ce modele et il est superbe, mais pas tres facile. Voila la reponse - la plus longue partie en haut de la manche (partie arriere de la manche) doit etre cousue a la meme partie de l’autre manche (il s’agit de bord ou les mailles ont ete rabattues). Ces deux parties se joindront au milieu dos tout en constituant une sorte d’empiècement. Bon tricot!
23.07.2019 - 18:29
![]() Elodie wrote:
Elodie wrote:
Bonjour, je suis en train de terminer la 1ere manche et vous dite de diminuer de chaque côté 8fois 2 mailles et 6 fois une maille, mais je ne sais pas si c'est à chaque rang ou alors tous les 2 rangs ? Merci beaucoup
08.04.2019 - 15:07DROPS Design answered:
Bonjour Élodie, en taille M, on va rabattre 8 fois 2 m et 6 x 1 m de chaque côté (= au début de chaque rang sur l'endroit et sur l'envers), il va rester 33 m et vous aurez rabattu 16+6 = 22 m de chaque côté (44 m au total). Bon tricot!
08.04.2019 - 16:21
![]() Christ wrote:
Christ wrote:
Je voudrais savoir combien de mailles on a pour l'encolure et pour les épaules Pour le dos, comment je fais pour diminuer 18 m à intervalles réguliers = 96 m. Ces 96 m sont réparties en deux pour les épaules ? ou l'encolure ? Et pour le devant, 3m = 29 m ? et l'épaule ? je n'arrive pas à comprendre
18.03.2019 - 18:50DROPS Design answered:
Bonjour Christ, pour conserver la bonne largeur quand on rabat les torsades, on va diminuer (voir cette vidéo, donc pour le dos, on va diminuer dans les torsades de A.1, A.2 et A.3, il restera 86-115 m (cf taille). Les manches seront ensuite assemblées au milieu dos puis le long des mailles rabattues du dos et des épaules du devant (cf schéma). Le col sera tricoté en relevant les mailles le long du haut des manches et de l'encolure devant. Bon tricot!
19.03.2019 - 10:14
![]() Brigitte wrote:
Brigitte wrote:
Vos modèles sont vraiment chouette. Mais vous détaillez tellement vos explications que cela me perd pourtant je ne suis pas une débutante, j'ai 65 ans et je tricote depuis l'âge de 9 ans.
02.02.2019 - 18:33
![]() Elodie wrote:
Elodie wrote:
Bonjour, Je suis en train de commencer le diagramme A1. Je fais les 2 premières mailles et ensuite il faut mettre les 2 mailles suivantes sur une aiguille auxiliaire m, mais je ne sais pas si je dois tricoter les 2 mailles suivantes à l'envers ou a l'endroit et quand on remet les 2 mailles qui étaient sur l'aiguille auxiliaire, comment je dois les tricoter? En vers ou endroit? Merci d'avance
30.01.2019 - 18:21DROPS Design answered:
Bonjour Elodie, au 3ème rang de A.1, la torsade sur 4 mailles se tricote ainsi: glissez 2 mailles sur l'aiguille auxiliaire derrière l'ouvrage, tricotez 2 mailles endroit, reprenez les les 2 mailles de l'aiguille auxiliaire et tricotez-les à l'endroit - (cf vidéo, 2ème torsade, soit l'aiguille auxiliaire derrière l'ouvrage, on la mettra devant pour la torsade de A.3). Bon tricot!
31.01.2019 - 08:01
![]() Pat Ellis wrote:
Pat Ellis wrote:
So you can join the last twelve stitches on the sleeve needle using a Kirtchner stitch vs binding them off for a prettier center back?
30.01.2019 - 02:48DROPS Design answered:
Dear Mrs Ellis, yes you can also graft the 12 sts from each sleeve instead of casting them off and sewing them together on mid back. Happy knitting!
30.01.2019 - 08:11
![]() Pat Ellis wrote:
Pat Ellis wrote:
So on the sleeve cap, you decrease 2 stitches at the beginning of every row 12 times and then one stitch each side every row 16 times vs what the instructions say. The instructions read 1 stitch each row 4 times which does not leave yo?u with 33 stitches. Please clarify
26.01.2019 - 03:43DROPS Design answered:
Dear Mrs Ellis, yes that's how you will cast off for the sleeve cap to get the 33 sts. Happy knitting!
28.01.2019 - 09:48
|
|||||||||||||||||||||||||||||||
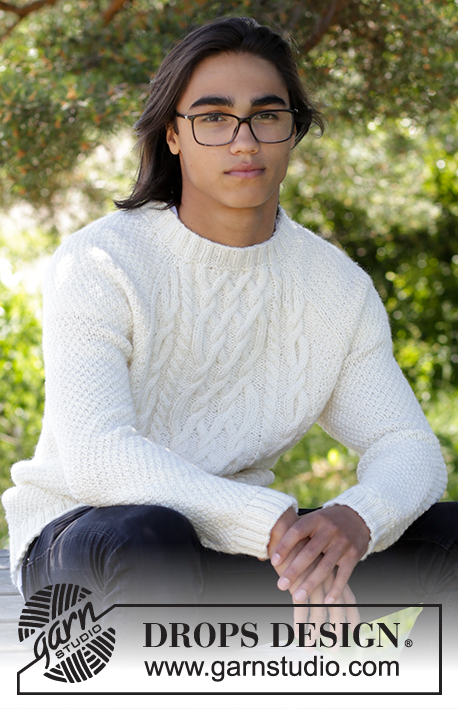
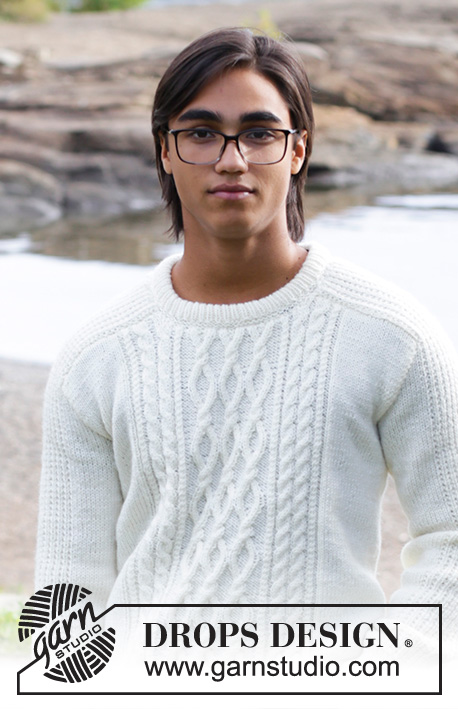
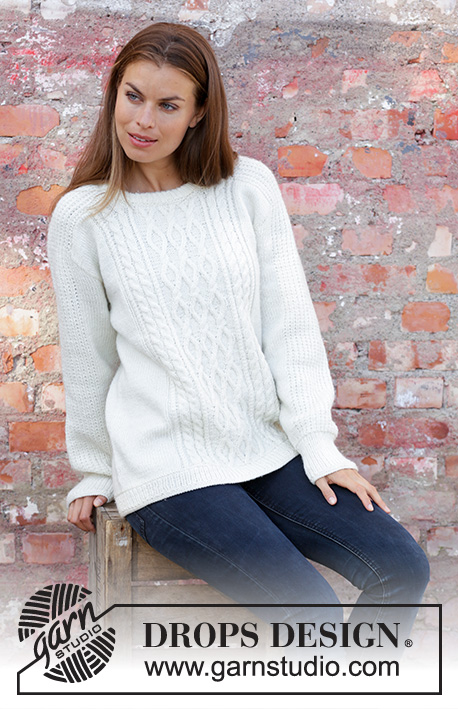
Waiting for Snow#waitingforsnowsweater |
|||||||||||||||||||||||||||||||
 |
 |
||||||||||||||||||||||||||||||
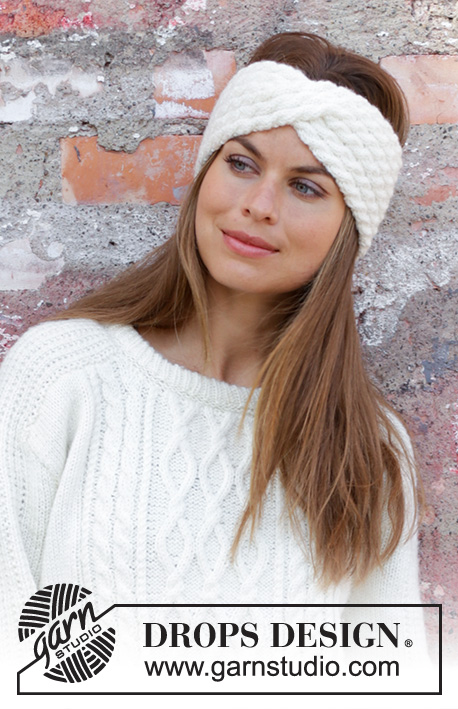
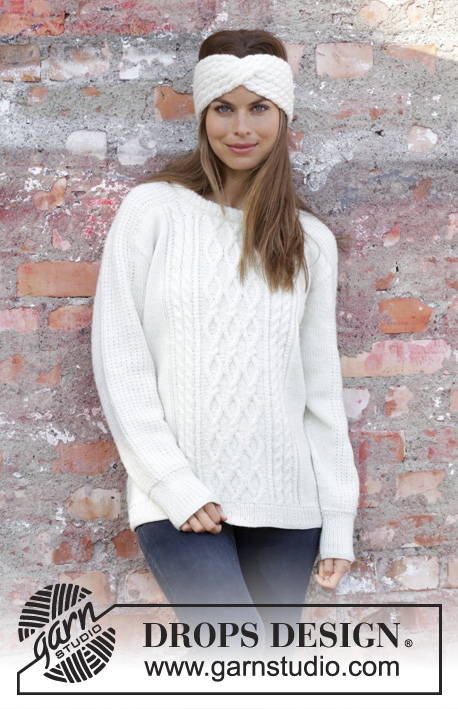
Knitted sweater in DROPS Merino Extra Fine or DROPS Karisma. Piece is knitted with cables and texture. Size: S - XXXL Knitted head band in DROPS Merino Extra Fine or DROPS Karisma. Piece is knitted back and forth with cables.
DROPS 195-1 |
|||||||||||||||||||||||||||||||
|
---------------------------------------------------------- EXPLANATION FOR THE PATTERN: ---------------------------------------------------------- GARTER STITCH (worked in the round): 1 ridge = 2 rounds. Knit 1 round and purl 1 round. GARTER STITCH (back and forth): 1 ridge = knit 2 rows. PATTERN: Sweater: See diagrams A.1 to A.4. Head band: See diagrams A.5 to A.7. Diagrams show all rows in pattern seen from the right side. INCREASE/DECREASE TIP (evenly): To calculate how to increase/decrease evenly, use the total number of stitches on row (e.g. 240 stitches) and divide stitches by number of increases/decreases to be done (e.g. 26) = 9.2. In this example increase after approx. every 9th stitch by making 1 yarn over. On next row work yarn overs twisted to avoid holes. To decrease evenly in this example knit approx. every 8th and 9th stitch together. INCREASE TIP (applies to sleeves): Work until 1 stitch remains before marker thread, make 1 yarn over, knit 2 (marker thread is in the middle of these two stitches), make 1 yarn over. On next round knit yarn overs twisted to avoid holes. Then work the new stitches in stockinette stitch. DECREASE TIP (applies to sleeves): Decrease 1 stitch on each side of marker thread as follows: Work until 3 stitches remain before marker thread and knit 2 together, knit 2 (marker thread is between these stitches), slip 1 stitch knitwise, knit 1, pass slipped stitch over stitch worked. ---------------------------------------------------------- START THE PIECE HERE: ---------------------------------------------------------- SWEATER - SHORT OVERVIEW OF THE PIECE: Worked in the round on circular needle up to armhole, then work front and back piece back and forth separately. Work sleeves in the round on double pointed needles up to armhole, then work shoulders back and forth. Then sew sleeves in armholes and shoulders on front and back piece. BODY: Cast on 214-230-246-266-286-308 stitches on circular needle size 3.5 mm / US 4 with Merino Extra Fine or Karisma. Work 2 ridges in GARTER STITCH in the round - read explanation above. Then work rib = knit 1/purl 1. When piece measures 5 cm / 2", work 1 ridge in garter stitch. Knit 1 round while increasing 26-26-26-30-30-36 stitches evenly - read INCREASE/DECREASE TIP = 240-256-272-296-316-344 stitches. Insert 2 marker threads in piece; one at the beginning of round and one after 120-128-136-148-158-172 stitches (= in each side). Switch to circular needle size 4 mm / US 6 and work pattern as follows: * Work 23-27-31-32-37-39 stitches in stockinette stitch, A.1 (= 22 stitches), A.2 (= 10 stitches) over the next 30-30-30-40-40-50 stitches (= 3-3-3-4-4-5 repetitions in width), A.3 (= 22 stitches), 23-27-31-32-37-39 stitches in stockinette stitch, marker is here *, work from *-* 1 more time. REMEMBER THE GAUGE! Continue the pattern like this and repeat diagrams vertically. When piece measures 41-42-43-44-45-46 cm / 16⅛"-16½"-17"-17¼"-17¾"-18", bind off 6 stitches for armholes in each side (bind off 3 stitches on each side of marker thread in each side), and finish each part separately. BACK PIECE: = 114-122-130-142-152-166 stitches. Then work back and forth on circular needle. Continue with pattern, stockinette stitch and 1 edge stitch in garter stitch in each side, AT THE SAME TIME bind off stitches on beginning of every row in each side for armholes as follows: bind off 2 stitches 2-2-3-3-4-5 times and 1 stitch 1-1-2-3-3-3 times = 104-112-114-124-130-140 stitches. When piece measures 51-53-55-57-59-61 cm / 20"-21"-21⅝"-22½"-23¼"-24", work 1 row while decreasing 18-18-18-22-22-25 stitches evenly over stitches in A.1, A.2 and A.3 = 86-94-96-102-108-115 stitches. Bind off. FRONT PIECE: = 114-122-130-142-152-166 stitches. Then work back and forth on circular needle. Continue with pattern, stockinette stitch and 1 edge stitch in garter stitch in each side, AT THE SAME TIME bind off stitches on beginning of every row in each side for armholes as on back piece = 104-112-114-124-130-140 stitches. When piece measures 48-50-52-54-56-58 cm / 19"-19¾"-20½"-21¼"-22"-22¾", decrease 10-10-12-12-12-12 stitches evenly over the middle 38-38-46-46-46-46 stitches on needle before slipping them on a stitch holder for neck (= 28-28-34-34-34-34 stitches on a stitch holder for neck) = 33-37-34-39-42-47 stitches for shoulder. Then finish each shoulder separately as follows: On next row from neck bind off 2 stitches = 31-35-32-37-40-45 stitches for shoulder. When piece measures 51-53-55-57-59-61 cm / 20"-21"-21⅝"-22½"-23¼"-24", work 1 row while decreasing 4-4-3-5-5-6 stitches evenly over stitches in pattern = 27-31-29-32-35-39 stitches. Bind off. Work the other shoulder the same way. RIGHT SLEEVE: Worked in the round on double pointed needles. Cast on 48-50-52-54-56-60 stitches on double pointed needles size 3.5 mm / US 4 with Merino Extra Fine or Karisma. Work 2 ridges. Then work rib = knit 1/purl 1 until piece measures 9 cm / 3½". Work 1 ridge. Knit 1 round while decreasing 1-1-1-1-1-1 stitch on round = 47-49-51-53-55-59 stitches. Insert 1 marker thread at beginning of round. Switch to double pointed needles size 4 mm / US 6 and work pattern as follows: Work in stockinette stitch over the first 7-8-9-10-11-13 stitches, work A.4 over the next 32 stitches, work first stitch in A.4, 7-8-9-10-11-13 stitches in stockinette stitch. Continue pattern upwards, AT THE SAME TIME when piece measures 10-10-10-12-11-10 cm / 4", increase 1 stitch on each side of marker thread - read INCREASE TIP! Increase like this approx. every 6th-5th-5th-4th-4th-4th round 16-17-18-19-20-20 times in total = 79-83-87-91-95-99 stitches. When piece measures 44-44-44-42-42-40 cm / 17 ¼"-17 ¼"-17 ¼"-16 ½"-16 ½"-15 ¾", bind off 6 stitches mid under sleeve (bind off 3 stitches on each side of marker thread) = 73-77-81-85-89-93 stitches. Then continue back and forth on circular needle and bind off for sleeve cap at the beginning of row in each side as follows: 2 stitches 6-8-10-10-12-12 times and 1 stitch 8-6-4-6-4-6 times = 33 stitches remain in all sizes. Piece now measures 54-54-54-53-53-52 cm / 21 ¼"-21 ¼"-21 ¼"-20⅞"-20⅞"-20⅜". NOW MEASURE PIECE FROM HERE! Continue with pattern over the remaining 33 stitches until piece measures 13-15-14-15-17-18 cm / 6 3/4-7". Continue to bind off in the right side, at the beginning of every row from right side as follows: 17 stitches 1 time, 2 stitches 1 time, 1 stitch 2 times = 12 stitches. Work over these 12 stitches until piece measures 20-22-23-24-26-27 cm / 7⅞"-8⅝"-9"-9⅜"-10 ¼"-10⅝". Bind off. The entire sleeve measures approx. 74-76-77-77-79-79 cm / 29⅛"-29⅞"-30 ¼"-30 ¼"-31"-31". LEFT SLEEVE: Work as right sleeve but bind off at the top in opposite side, i.e. at the beginning of every row from wrong side. ASSEMBLY: Sew sleeves together mid back inside bind-off edge on each sleeve. Sew sleeves to front and back piece on body in outermost stitch as follows: Sew seam from armhole and up along shoulder on back piece until mid back. Repeat in the other side. Sew the same way from armhole and up along shoulder on front piece up to neck. Repeat in the other side. NECK EDGE: Pick up 94-94-108-108-108-108-108 stitches around neck edge (including stitches from stitch holder) on a short circular needle size 3.5 mm / US 4 with Merino Extra Fine or Karisma. Work 2 ridges, AT THE SAME TIME on last row increase 22-22-26-26-26-26-26 stitches evenly = 116-116-134-134-134-134-134 stitches. Then work rib = knit 1/purl 1. When rib measures 8 cm / 3⅛", work 1 ridge in garter stitch. Bind off. Fold neck edge double and sew on the inside, ridge against ridge. ---------------------------------------------------------- HEAD BAND - SHORT OVERVIEW OF THE PIECE: Worked back and forth from mid back and sewn together when finished. HEAD BAND: Cast on 30 stitches on needle size 4 mm / US 6 with Merino Extra Fine or Karisma. Work 1 ridge in GARTER STITCH back and forth - read explanation above! Now work pattern as follows: Work A.5 (= 5 stitches on first row) 6 times in total on needle. After first row in A.5 there has been 6 stitches increased in total = 36 stitches. When A.5 has been worked, work A.6 (= 6 stitches) over every repetition of A.5. REMEMBER THE GAUGE! When piece measures 26 cm/10¼", work a cable mid front on head band as follows: Slip the first 18 stitches on cable needle, work the remaining 18 stitches and then the 18 stitches on cable needle. Continue with pattern A.6 back and forth until piece measures approx. 49 cm – adjust to finish after a whole repetition of A.6 vertically (approx. 3 cm / 1" remain until finished measurements). Now work A.7 over every repetition of A.6. When A.7 has been worked, there are 30 stitches on row. Work 1 ridge over all stitches. Bind off. Sew head band together mid back by sewing one and one stitch inside cast-on edge and bind-off edge. Fasten off. |
|||||||||||||||||||||||||||||||
Diagram explanations |
|||||||||||||||||||||||||||||||
|
|||||||||||||||||||||||||||||||
 |
|||||||||||||||||||||||||||||||
 |
|||||||||||||||||||||||||||||||
 |
|||||||||||||||||||||||||||||||
Have you finished this pattern?Tag your pictures with #dropspattern #waitingforsnowsweater or submit them to the #dropsfan gallery. Do you need help with this pattern?You'll find 36 tutorial videos, a Comments/Questions area and more by visiting the pattern on garnstudio.com. © 1982-2026 DROPS Design A/S. We reserve all rights. This document, including all its sub-sections, has copyrights. Read more about what you can do with our patterns at the bottom of each pattern on our site. |
|||||||||||||||||||||||||||||||


With over 40 years in knitting and crochet design, DROPS Design offers one of the most extensive collections of free patterns on the internet - translated to 17 languages. As of today we count 324 catalogs and 12290 patterns - 12280 of which are translated into English (US/in).
We work hard to bring you the best knitting and crochet have to offer, inspiration and advice as well as great quality yarns at incredible prices! Would you like to use our patterns for other than personal use? You can read what you are allowed to do in the Copyright text at the bottom of all our patterns. Happy crafting!
Post a comment to pattern DROPS 195-1
We would love to hear what you have to say about this pattern!
If you want to leave a question, please make sure you select the correct category in the form below, to speed up the answering process. Required fields are marked *.