
Popular categories
Looking for a yarn?


Comments / Questions (70)
![]() Maree Edmondson wrote:
Maree Edmondson wrote:
Hello I'm knitting the pattern, waiting for snow by Daniela Slovakia from the drops fan gallery. I'm confused in the diagrams of A2 which has 20 rows for the diagram, but the other diagrams of A1 and A3, only have 18 rows. What do I do with the extra rows from A2 please?
06.07.2022 - 06:01DROPS Design answered:
Hi Maree, When A.1 and A.3 are finished in height, repeat from the bottom and finish the 2 remaining rows in A.2, then repeat this diagram in height. The pattern in A.2 will then correspond to the patterns in A.1 and A.3. Happy knitting!
06.07.2022 - 06:50
![]() Cornelia wrote:
Cornelia wrote:
Hallo wordt het telpatroon ook op de rugpand gebreid of in tricot steek. Groetjes cornelia
19.04.2021 - 22:45DROPS Design answered:
Dag Cornelia,
Ja, het telpatroon wordt ook op het rugpand gebreid.
21.04.2021 - 12:59
![]() Lena Lindholm wrote:
Lena Lindholm wrote:
Hej igen, varför har mönster A2 20 varv och A1 18 varv?
25.12.2020 - 20:26DROPS Design answered:
Hej Lena. Du upprepar bara diagrammen till det mått som uppges i mönstret så det spelar ingen roll om det är olika antal varv i dem. Mvh DROPS Design
05.01.2021 - 12:08
![]() Lena Lindholm wrote:
Lena Lindholm wrote:
Hej. när skall jag byta till stickor nr 4 ? efter 4 varv rätsticknig eller...?
22.12.2020 - 14:50DROPS Design answered:
Hej Lena, efter ökningarna står det: Byt till rundsticka 4 och sticka mönster så här: Lycka till :)
23.12.2020 - 11:29
![]() Myriam Parra wrote:
Myriam Parra wrote:
Hei, jeg har prøvd flere ganger på pannebånd og får ikke det til. Jeg har en venninne som er god på strikking og får heller ikke det til.
25.11.2020 - 20:45DROPS Design answered:
Hej Myriam. Vad är det du har problem med, är det diagrammen? Om du förklarar lite mer så ska vi göra vårt bästa för att hjälpa dig. Mvh DROPS Design
26.11.2020 - 08:16
![]() Birgitta Hildestam wrote:
Birgitta Hildestam wrote:
Hej! Jag har börjat att sticka pannbandet och kan inte gå vidare då jag kommer till mitten och ska sticka det som är vridning. Har försökt att följa mönstret men det blir bara tokigt. Är tacksam att få mer utförlig beskrivning el om ni kan hänvisa till någon instruktionsvideo. Vänliga hälsningar och tack på förhand. Birgitta Hildestam
25.10.2020 - 14:49DROPS Design answered:
Hei Birgitta. Det skal bare strikkes som en vanlig flette. Sett de første 18 maskene på flettepinnen, strikk de resterende 18 maskene og deretter de 18 maskene på flettepinnen. Ta en evnt titt på video: Hvordan strikke pannebåndet i DROPS 173-8. Ikke samme diagram/mønster, men her ser du hvordan raden med fletten strikkes, se fra tiden ca 05:10 til 07.05. mvh DROPS design
26.10.2020 - 14:53
![]() Atine wrote:
Atine wrote:
Merci beaucoup pour votre réponse !
07.01.2020 - 16:25
![]() Atine wrote:
Atine wrote:
Je n'ai absolument rien compris aux explications du bandeau. Est-ce qu'il est double ? Un échantillon de cette laine (noté sur le descriptif) de 10 x10 = 21m x 28 rgs. Comment est-ce que ça peut correspondre à 30 m sur les explications alors qu'il est sensé faire justement 10 cm de large? Est-ce que quelqu'un l'a déjà fait en suivant les explications d'ici ?
02.01.2020 - 18:22DROPS Design answered:
Bonjour Aline, l'échantillon du bandeau est indiqué en jersey, or il se tricote ensuite avec des torsades (= A.5 puis A.6); et il faut plus de mailles pour la même largeur avec des torsades qu'en jersey. Si votre échantillon est juste en jersey et que vous conservez la même tension, alors vous aurez bien les bonnes mesures. Bon tricot!
03.01.2020 - 09:57
![]() Sára wrote:
Sára wrote:
Hello, could you please help me with the pattern of the head band? I´m stuck in the beginning... I´ve knitted the ridge, A5, A6 and by the instructions I should repeat A5,A6 until it measures 26 cm... but when I try to repeat A5 the cable pattern gets destroyed.. Am I doing something wrong? Have I not understood the instructions? Thank you.
31.10.2019 - 10:05DROPS Design answered:
Dear Sara, you first work A.5, then you will work (and repeat A.6) over A.5, ie A.5 is worked only one time in height = at the very beginning of piece, then you repeat A.6 (the first time you work A.6 over A.5, then repeat A.6 over previous A.6). Happy knitting!
04.11.2019 - 14:01
![]() Monika wrote:
Monika wrote:
Hallo ich glaube die Ärmel sind viel zu kurz. Mir fehlen bei Abnahme des Ärmels ca 10 cm bis zur Achsel. Kann das sein? MfG Monika Mankau
19.10.2019 - 20:20DROPS Design answered:
Liebe Monika, schauen Sie mal die fertigen Maßen in allen Größen in der Maßskizze - hier lesen Sie mehr über Ärmel - und wenn nötig können Sie immer die Ärmellänge anpassen. Viel Spaß beim stricken!
21.10.2019 - 10:14
|
|||||||||||||||||||||||||||||||
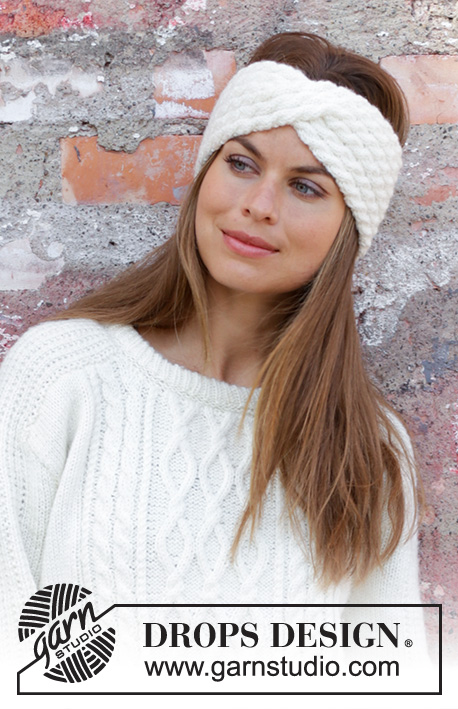
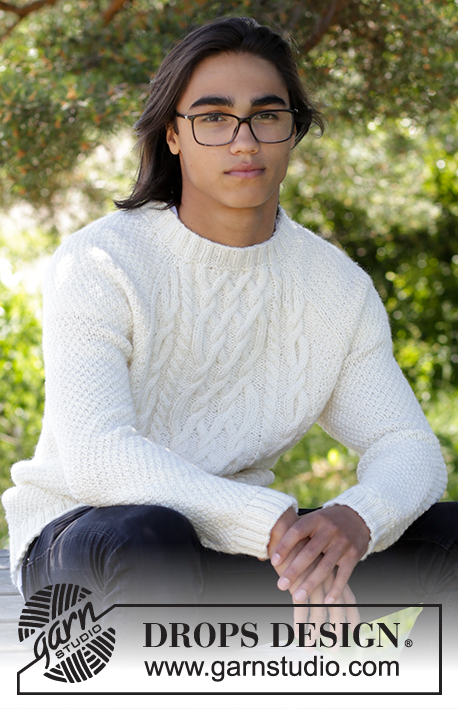
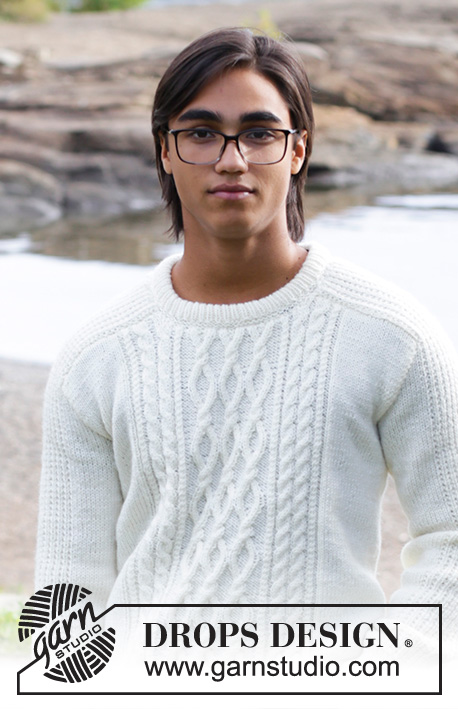
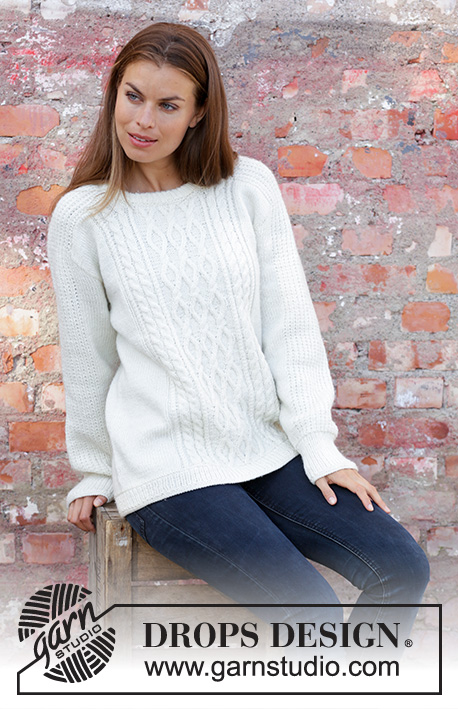
Waiting for Snow#waitingforsnowsweater |
|||||||||||||||||||||||||||||||
 |
 |
||||||||||||||||||||||||||||||
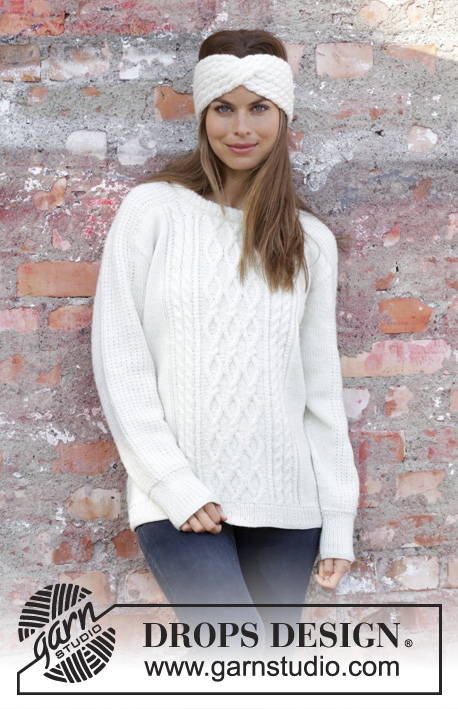
Knitted sweater in DROPS Merino Extra Fine or DROPS Karisma. Piece is knitted with cables and texture. Size: S - XXXL Knitted head band in DROPS Merino Extra Fine or DROPS Karisma. Piece is knitted back and forth with cables.
DROPS 195-1 |
|||||||||||||||||||||||||||||||
|
---------------------------------------------------------- EXPLANATION FOR THE PATTERN: ---------------------------------------------------------- GARTER STITCH (worked in the round): 1 ridge = 2 rounds. Knit 1 round and purl 1 round. GARTER STITCH (back and forth): 1 ridge = knit 2 rows. PATTERN: Sweater: See diagrams A.1 to A.4. Head band: See diagrams A.5 to A.7. Diagrams show all rows in pattern seen from the right side. INCREASE/DECREASE TIP (evenly): To calculate how to increase/decrease evenly, use the total number of stitches on row (e.g. 240 stitches) and divide stitches by number of increases/decreases to be done (e.g. 26) = 9.2. In this example increase after approx. every 9th stitch by making 1 yarn over. On next row work yarn overs twisted to avoid holes. To decrease evenly in this example knit approx. every 8th and 9th stitch together. INCREASE TIP (applies to sleeves): Work until 1 stitch remains before marker thread, make 1 yarn over, knit 2 (marker thread is in the middle of these two stitches), make 1 yarn over. On next round knit yarn overs twisted to avoid holes. Then work the new stitches in stockinette stitch. DECREASE TIP (applies to sleeves): Decrease 1 stitch on each side of marker thread as follows: Work until 3 stitches remain before marker thread and knit 2 together, knit 2 (marker thread is between these stitches), slip 1 stitch knitwise, knit 1, pass slipped stitch over stitch worked. ---------------------------------------------------------- START THE PIECE HERE: ---------------------------------------------------------- SWEATER - SHORT OVERVIEW OF THE PIECE: Worked in the round on circular needle up to armhole, then work front and back piece back and forth separately. Work sleeves in the round on double pointed needles up to armhole, then work shoulders back and forth. Then sew sleeves in armholes and shoulders on front and back piece. BODY: Cast on 214-230-246-266-286-308 stitches on circular needle size 3.5 mm / US 4 with Merino Extra Fine or Karisma. Work 2 ridges in GARTER STITCH in the round - read explanation above. Then work rib = knit 1/purl 1. When piece measures 5 cm / 2", work 1 ridge in garter stitch. Knit 1 round while increasing 26-26-26-30-30-36 stitches evenly - read INCREASE/DECREASE TIP = 240-256-272-296-316-344 stitches. Insert 2 marker threads in piece; one at the beginning of round and one after 120-128-136-148-158-172 stitches (= in each side). Switch to circular needle size 4 mm / US 6 and work pattern as follows: * Work 23-27-31-32-37-39 stitches in stockinette stitch, A.1 (= 22 stitches), A.2 (= 10 stitches) over the next 30-30-30-40-40-50 stitches (= 3-3-3-4-4-5 repetitions in width), A.3 (= 22 stitches), 23-27-31-32-37-39 stitches in stockinette stitch, marker is here *, work from *-* 1 more time. REMEMBER THE GAUGE! Continue the pattern like this and repeat diagrams vertically. When piece measures 41-42-43-44-45-46 cm / 16⅛"-16½"-17"-17¼"-17¾"-18", bind off 6 stitches for armholes in each side (bind off 3 stitches on each side of marker thread in each side), and finish each part separately. BACK PIECE: = 114-122-130-142-152-166 stitches. Then work back and forth on circular needle. Continue with pattern, stockinette stitch and 1 edge stitch in garter stitch in each side, AT THE SAME TIME bind off stitches on beginning of every row in each side for armholes as follows: bind off 2 stitches 2-2-3-3-4-5 times and 1 stitch 1-1-2-3-3-3 times = 104-112-114-124-130-140 stitches. When piece measures 51-53-55-57-59-61 cm / 20"-21"-21⅝"-22½"-23¼"-24", work 1 row while decreasing 18-18-18-22-22-25 stitches evenly over stitches in A.1, A.2 and A.3 = 86-94-96-102-108-115 stitches. Bind off. FRONT PIECE: = 114-122-130-142-152-166 stitches. Then work back and forth on circular needle. Continue with pattern, stockinette stitch and 1 edge stitch in garter stitch in each side, AT THE SAME TIME bind off stitches on beginning of every row in each side for armholes as on back piece = 104-112-114-124-130-140 stitches. When piece measures 48-50-52-54-56-58 cm / 19"-19¾"-20½"-21¼"-22"-22¾", decrease 10-10-12-12-12-12 stitches evenly over the middle 38-38-46-46-46-46 stitches on needle before slipping them on a stitch holder for neck (= 28-28-34-34-34-34 stitches on a stitch holder for neck) = 33-37-34-39-42-47 stitches for shoulder. Then finish each shoulder separately as follows: On next row from neck bind off 2 stitches = 31-35-32-37-40-45 stitches for shoulder. When piece measures 51-53-55-57-59-61 cm / 20"-21"-21⅝"-22½"-23¼"-24", work 1 row while decreasing 4-4-3-5-5-6 stitches evenly over stitches in pattern = 27-31-29-32-35-39 stitches. Bind off. Work the other shoulder the same way. RIGHT SLEEVE: Worked in the round on double pointed needles. Cast on 48-50-52-54-56-60 stitches on double pointed needles size 3.5 mm / US 4 with Merino Extra Fine or Karisma. Work 2 ridges. Then work rib = knit 1/purl 1 until piece measures 9 cm / 3½". Work 1 ridge. Knit 1 round while decreasing 1-1-1-1-1-1 stitch on round = 47-49-51-53-55-59 stitches. Insert 1 marker thread at beginning of round. Switch to double pointed needles size 4 mm / US 6 and work pattern as follows: Work in stockinette stitch over the first 7-8-9-10-11-13 stitches, work A.4 over the next 32 stitches, work first stitch in A.4, 7-8-9-10-11-13 stitches in stockinette stitch. Continue pattern upwards, AT THE SAME TIME when piece measures 10-10-10-12-11-10 cm / 4", increase 1 stitch on each side of marker thread - read INCREASE TIP! Increase like this approx. every 6th-5th-5th-4th-4th-4th round 16-17-18-19-20-20 times in total = 79-83-87-91-95-99 stitches. When piece measures 44-44-44-42-42-40 cm / 17 ¼"-17 ¼"-17 ¼"-16 ½"-16 ½"-15 ¾", bind off 6 stitches mid under sleeve (bind off 3 stitches on each side of marker thread) = 73-77-81-85-89-93 stitches. Then continue back and forth on circular needle and bind off for sleeve cap at the beginning of row in each side as follows: 2 stitches 6-8-10-10-12-12 times and 1 stitch 8-6-4-6-4-6 times = 33 stitches remain in all sizes. Piece now measures 54-54-54-53-53-52 cm / 21 ¼"-21 ¼"-21 ¼"-20⅞"-20⅞"-20⅜". NOW MEASURE PIECE FROM HERE! Continue with pattern over the remaining 33 stitches until piece measures 13-15-14-15-17-18 cm / 6 3/4-7". Continue to bind off in the right side, at the beginning of every row from right side as follows: 17 stitches 1 time, 2 stitches 1 time, 1 stitch 2 times = 12 stitches. Work over these 12 stitches until piece measures 20-22-23-24-26-27 cm / 7⅞"-8⅝"-9"-9⅜"-10 ¼"-10⅝". Bind off. The entire sleeve measures approx. 74-76-77-77-79-79 cm / 29⅛"-29⅞"-30 ¼"-30 ¼"-31"-31". LEFT SLEEVE: Work as right sleeve but bind off at the top in opposite side, i.e. at the beginning of every row from wrong side. ASSEMBLY: Sew sleeves together mid back inside bind-off edge on each sleeve. Sew sleeves to front and back piece on body in outermost stitch as follows: Sew seam from armhole and up along shoulder on back piece until mid back. Repeat in the other side. Sew the same way from armhole and up along shoulder on front piece up to neck. Repeat in the other side. NECK EDGE: Pick up 94-94-108-108-108-108-108 stitches around neck edge (including stitches from stitch holder) on a short circular needle size 3.5 mm / US 4 with Merino Extra Fine or Karisma. Work 2 ridges, AT THE SAME TIME on last row increase 22-22-26-26-26-26-26 stitches evenly = 116-116-134-134-134-134-134 stitches. Then work rib = knit 1/purl 1. When rib measures 8 cm / 3⅛", work 1 ridge in garter stitch. Bind off. Fold neck edge double and sew on the inside, ridge against ridge. ---------------------------------------------------------- HEAD BAND - SHORT OVERVIEW OF THE PIECE: Worked back and forth from mid back and sewn together when finished. HEAD BAND: Cast on 30 stitches on needle size 4 mm / US 6 with Merino Extra Fine or Karisma. Work 1 ridge in GARTER STITCH back and forth - read explanation above! Now work pattern as follows: Work A.5 (= 5 stitches on first row) 6 times in total on needle. After first row in A.5 there has been 6 stitches increased in total = 36 stitches. When A.5 has been worked, work A.6 (= 6 stitches) over every repetition of A.5. REMEMBER THE GAUGE! When piece measures 26 cm/10¼", work a cable mid front on head band as follows: Slip the first 18 stitches on cable needle, work the remaining 18 stitches and then the 18 stitches on cable needle. Continue with pattern A.6 back and forth until piece measures approx. 49 cm – adjust to finish after a whole repetition of A.6 vertically (approx. 3 cm / 1" remain until finished measurements). Now work A.7 over every repetition of A.6. When A.7 has been worked, there are 30 stitches on row. Work 1 ridge over all stitches. Bind off. Sew head band together mid back by sewing one and one stitch inside cast-on edge and bind-off edge. Fasten off. |
|||||||||||||||||||||||||||||||
Diagram explanations |
|||||||||||||||||||||||||||||||
|
|||||||||||||||||||||||||||||||
 |
|||||||||||||||||||||||||||||||
 |
|||||||||||||||||||||||||||||||
 |
|||||||||||||||||||||||||||||||
Have you finished this pattern?Tag your pictures with #dropspattern #waitingforsnowsweater or submit them to the #dropsfan gallery. Do you need help with this pattern?You'll find 36 tutorial videos, a Comments/Questions area and more by visiting the pattern on garnstudio.com. © 1982-2026 DROPS Design A/S. We reserve all rights. This document, including all its sub-sections, has copyrights. Read more about what you can do with our patterns at the bottom of each pattern on our site. |
|||||||||||||||||||||||||||||||


With over 40 years in knitting and crochet design, DROPS Design offers one of the most extensive collections of free patterns on the internet - translated to 17 languages. As of today we count 324 catalogs and 12290 patterns - 12280 of which are translated into English (US/in).
We work hard to bring you the best knitting and crochet have to offer, inspiration and advice as well as great quality yarns at incredible prices! Would you like to use our patterns for other than personal use? You can read what you are allowed to do in the Copyright text at the bottom of all our patterns. Happy crafting!
Post a comment to pattern DROPS 195-1
We would love to hear what you have to say about this pattern!
If you want to leave a question, please make sure you select the correct category in the form below, to speed up the answering process. Required fields are marked *.