
Popular categories
Looking for a yarn?


Comments / Questions (70)
![]() Johanna wrote:
Johanna wrote:
Hi, ich stricke gerade an den Ärmeln. Nach den Zunahmen komme ich nicht auf die angegebe Länge. Soll dann in runden einfach weiter gestrickt werden bis die Länge erreicht ist?
29.01.2025 - 11:31DROPS Design answered:
Liebe Johanna, ja ganz genau, stricken Sie wie zuvor aber ohne weiter Zunahme bis der Ärmel die gewüschnte Länge misst. Viel Spaß beim Stricken!
29.01.2025 - 13:51
![]() Camilla Eriksen wrote:
Camilla Eriksen wrote:
Jeg mangler diagram A5 A6 A7
26.01.2025 - 21:36
![]() Nicolle wrote:
Nicolle wrote:
Hello, one more question about the sleeves. When i knit the first part of the sleeve up to 44-40cm, do i measure this from the very beginning of the sleeve or from the part where i switched to 4mm needles? thank you
29.12.2024 - 11:21DROPS Design answered:
Hi Nicolle, The measurements are taken from the cast-on edge (beginning of sleeve). Happy New Year!
30.12.2024 - 12:31
![]() Nicolle wrote:
Nicolle wrote:
Hi, I would like to ask about the part where I finish knitting the body in the round on circular needles and start separating back and front piece. When i start knitting the back piece, what do I do exactly with the front piece? Do I put the front piece stitches on stitch holder while I knit the back, and then come back to them later? Or is there some other trick to it that I don´t know about? Thanks in advance for some advice..
19.06.2024 - 00:29DROPS Design answered:
Dear Nicolle, yes slip the stitches of the front piece on a thread or on a stitch holder or even on another needle and work first the back piece, then you will work the front piece afterwards. Happy knitting!
19.06.2024 - 08:13
![]() Maria wrote:
Maria wrote:
Buongiorno. Dopo aver posto una domanda 6 giorni fa, speravo di ricevere un cenno di risposta. Così non è stato. Grazie ugualmente.
06.03.2024 - 09:39DROPS Design answered:
Buonasera Maria, abbiamo risposto alla sua domanda: deve ripetere i diagrammi fino alla lunghezza indicata. Buon lavoro!
11.03.2024 - 23:50
![]() Maria wrote:
Maria wrote:
Buongiorno. I diagrammi A1 e A3 hanno 18 righe, mentre il diagramma A2 ne ha 20. Quindi, dopo la riga 18 riprendo dall'inizio A1 e A3, finendo nel contempo il diagramma A2. Ma poi come proseguo? Continuo A1 e A3 con la terza riga e A2 con la prima riga? Ma così facendo, i diagrammi non sono più allineati. Mi spiace, ma non capisco. Potete aiutarmi? Grazie.
29.02.2024 - 22:22DROPS Design answered:
Buonasera Maria, alla fine di A.2 deve ricominciare dalla 1° riga e lavorare fino alla lunghezza indicata. Buon lavoro!
11.03.2024 - 23:49
![]() Dumont wrote:
Dumont wrote:
Merci de votre réponse rapide. Je vous dois toutes mes excuses. Trop impatiente de voir le motif, je n'avais pas été jusqu'au bout du diagramme...
26.01.2024 - 07:40
![]() Dumont wrote:
Dumont wrote:
Bonjour, Je suis perplexe car mon dessin , fait à partir de vos grilles ne correspond pas à vos photos. Où ai je faux? Je ne vois pas de torsades indiquées sous les losanges comme sur vos photos. Merci
25.01.2024 - 13:16DROPS Design answered:
Bonjour Mme Dumont, notez que tous les rangs figurent dans les diagrammes, sur l'endroit, lisez tous les rangs de droite à gauche (sur l'envers, vous les lirez ensuite de gauche à droite). Les torsades avec les losanges (panneau central du pull) correspond au diagramme A.2 que l'on répète 3, 4 ou 5 fois en fonction de la taille, encadré ensuite par les torsades des diagrammes A.1 et A.3. Bon tricot!
26.01.2024 - 07:18
![]() Linda Svensson wrote:
Linda Svensson wrote:
Var hittar jag mönster till A5 och A6?
07.11.2022 - 06:42DROPS Design answered:
Hei Linda. Diagrammene finner du nederst på oppskriften. Om du ser til venstre for diagram A.3, vil du finne diagram A.5 og A.6, som er i samme diagram som A.7. mvh DROPS Design
07.11.2022 - 14:04
![]() Maree Edmondson wrote:
Maree Edmondson wrote:
Hello I'm knitting your Waiting for snow sweater pattern. I'm up to the sleeves but am not sure that I'm reading the pattern correctly? The Graff to me reads that it's a knit or purl pattern only, but when I look at the sleeve, it seems to have a hole pattern. Is there another part to the pattern, or is the sleeve pattern a knit and purl only. I actually can't see the sleeve pattern very well when I look at the picture, hence my question. Thanks Maree.
01.08.2022 - 03:02DROPS Design answered:
Hi Maree, The sleeves are knit and purl. Happy crafting!
01.08.2022 - 06:49
|
|||||||||||||||||||||||||||||||
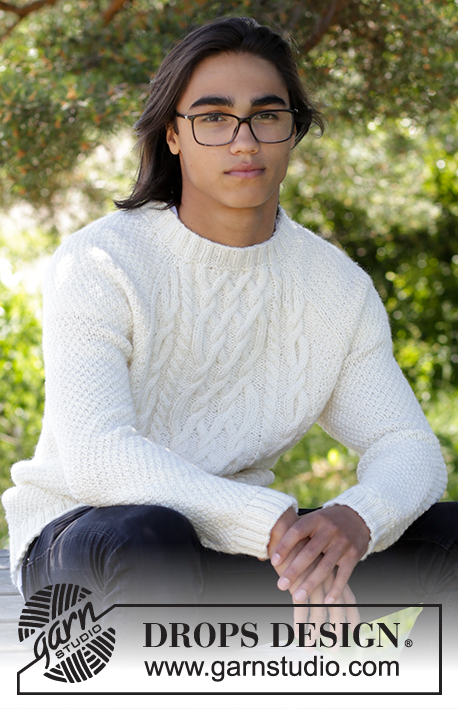
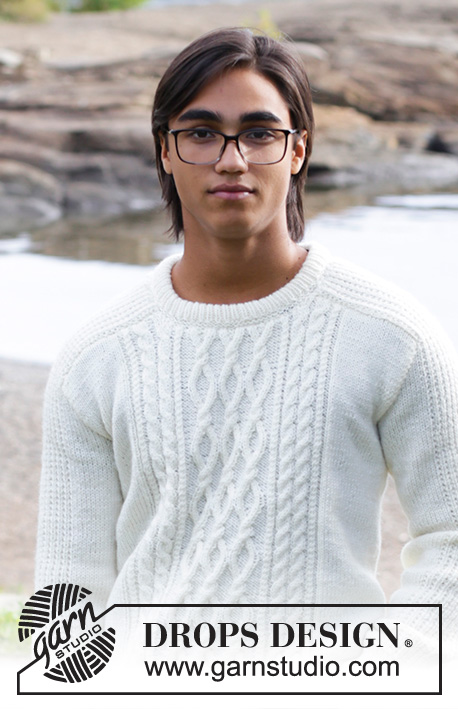
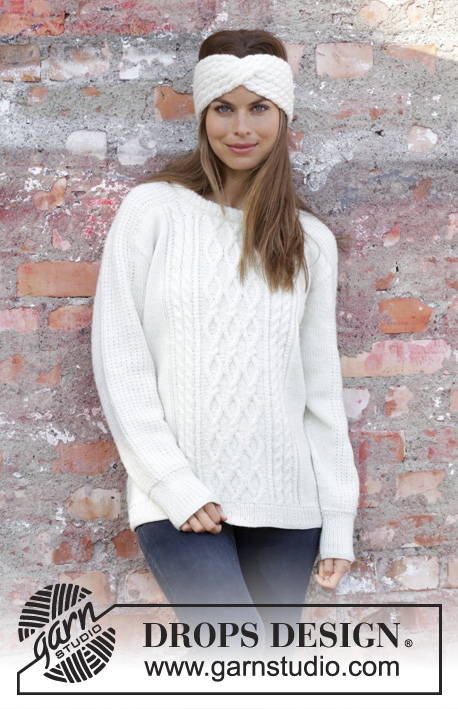
Waiting for Snow#waitingforsnowsweater |
|||||||||||||||||||||||||||||||
 |
 |
||||||||||||||||||||||||||||||
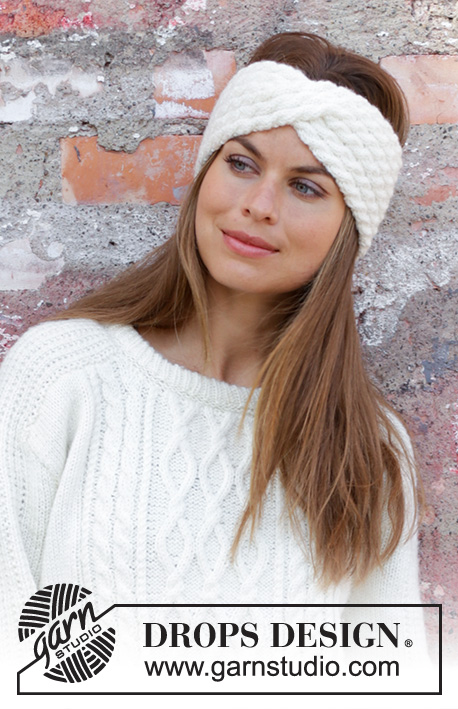
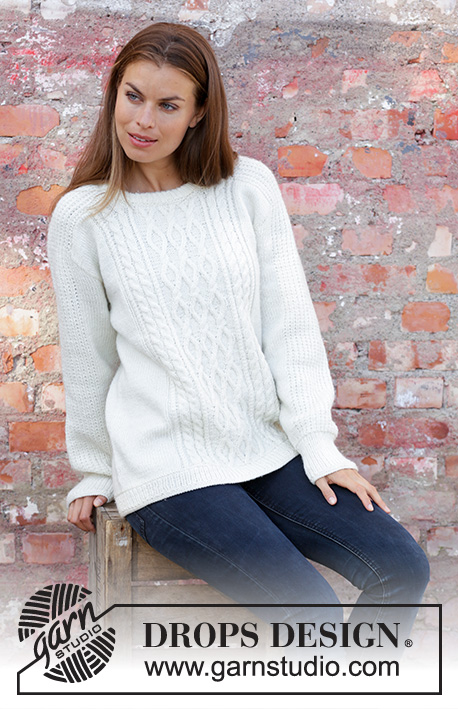
Knitted sweater in DROPS Merino Extra Fine or DROPS Karisma. Piece is knitted with cables and texture. Size: S - XXXL Knitted head band in DROPS Merino Extra Fine or DROPS Karisma. Piece is knitted back and forth with cables.
DROPS 195-1 |
|||||||||||||||||||||||||||||||
|
---------------------------------------------------------- EXPLANATION FOR THE PATTERN: ---------------------------------------------------------- GARTER STITCH (worked in the round): 1 ridge = 2 rounds. Knit 1 round and purl 1 round. GARTER STITCH (back and forth): 1 ridge = knit 2 rows. PATTERN: Sweater: See diagrams A.1 to A.4. Head band: See diagrams A.5 to A.7. Diagrams show all rows in pattern seen from the right side. INCREASE/DECREASE TIP (evenly): To calculate how to increase/decrease evenly, use the total number of stitches on row (e.g. 240 stitches) and divide stitches by number of increases/decreases to be done (e.g. 26) = 9.2. In this example increase after approx. every 9th stitch by making 1 yarn over. On next row work yarn overs twisted to avoid holes. To decrease evenly in this example knit approx. every 8th and 9th stitch together. INCREASE TIP (applies to sleeves): Work until 1 stitch remains before marker thread, make 1 yarn over, knit 2 (marker thread is in the middle of these two stitches), make 1 yarn over. On next round knit yarn overs twisted to avoid holes. Then work the new stitches in stockinette stitch. DECREASE TIP (applies to sleeves): Decrease 1 stitch on each side of marker thread as follows: Work until 3 stitches remain before marker thread and knit 2 together, knit 2 (marker thread is between these stitches), slip 1 stitch knitwise, knit 1, pass slipped stitch over stitch worked. ---------------------------------------------------------- START THE PIECE HERE: ---------------------------------------------------------- SWEATER - SHORT OVERVIEW OF THE PIECE: Worked in the round on circular needle up to armhole, then work front and back piece back and forth separately. Work sleeves in the round on double pointed needles up to armhole, then work shoulders back and forth. Then sew sleeves in armholes and shoulders on front and back piece. BODY: Cast on 214-230-246-266-286-308 stitches on circular needle size 3.5 mm / US 4 with Merino Extra Fine or Karisma. Work 2 ridges in GARTER STITCH in the round - read explanation above. Then work rib = knit 1/purl 1. When piece measures 5 cm / 2", work 1 ridge in garter stitch. Knit 1 round while increasing 26-26-26-30-30-36 stitches evenly - read INCREASE/DECREASE TIP = 240-256-272-296-316-344 stitches. Insert 2 marker threads in piece; one at the beginning of round and one after 120-128-136-148-158-172 stitches (= in each side). Switch to circular needle size 4 mm / US 6 and work pattern as follows: * Work 23-27-31-32-37-39 stitches in stockinette stitch, A.1 (= 22 stitches), A.2 (= 10 stitches) over the next 30-30-30-40-40-50 stitches (= 3-3-3-4-4-5 repetitions in width), A.3 (= 22 stitches), 23-27-31-32-37-39 stitches in stockinette stitch, marker is here *, work from *-* 1 more time. REMEMBER THE GAUGE! Continue the pattern like this and repeat diagrams vertically. When piece measures 41-42-43-44-45-46 cm / 16⅛"-16½"-17"-17¼"-17¾"-18", bind off 6 stitches for armholes in each side (bind off 3 stitches on each side of marker thread in each side), and finish each part separately. BACK PIECE: = 114-122-130-142-152-166 stitches. Then work back and forth on circular needle. Continue with pattern, stockinette stitch and 1 edge stitch in garter stitch in each side, AT THE SAME TIME bind off stitches on beginning of every row in each side for armholes as follows: bind off 2 stitches 2-2-3-3-4-5 times and 1 stitch 1-1-2-3-3-3 times = 104-112-114-124-130-140 stitches. When piece measures 51-53-55-57-59-61 cm / 20"-21"-21⅝"-22½"-23¼"-24", work 1 row while decreasing 18-18-18-22-22-25 stitches evenly over stitches in A.1, A.2 and A.3 = 86-94-96-102-108-115 stitches. Bind off. FRONT PIECE: = 114-122-130-142-152-166 stitches. Then work back and forth on circular needle. Continue with pattern, stockinette stitch and 1 edge stitch in garter stitch in each side, AT THE SAME TIME bind off stitches on beginning of every row in each side for armholes as on back piece = 104-112-114-124-130-140 stitches. When piece measures 48-50-52-54-56-58 cm / 19"-19¾"-20½"-21¼"-22"-22¾", decrease 10-10-12-12-12-12 stitches evenly over the middle 38-38-46-46-46-46 stitches on needle before slipping them on a stitch holder for neck (= 28-28-34-34-34-34 stitches on a stitch holder for neck) = 33-37-34-39-42-47 stitches for shoulder. Then finish each shoulder separately as follows: On next row from neck bind off 2 stitches = 31-35-32-37-40-45 stitches for shoulder. When piece measures 51-53-55-57-59-61 cm / 20"-21"-21⅝"-22½"-23¼"-24", work 1 row while decreasing 4-4-3-5-5-6 stitches evenly over stitches in pattern = 27-31-29-32-35-39 stitches. Bind off. Work the other shoulder the same way. RIGHT SLEEVE: Worked in the round on double pointed needles. Cast on 48-50-52-54-56-60 stitches on double pointed needles size 3.5 mm / US 4 with Merino Extra Fine or Karisma. Work 2 ridges. Then work rib = knit 1/purl 1 until piece measures 9 cm / 3½". Work 1 ridge. Knit 1 round while decreasing 1-1-1-1-1-1 stitch on round = 47-49-51-53-55-59 stitches. Insert 1 marker thread at beginning of round. Switch to double pointed needles size 4 mm / US 6 and work pattern as follows: Work in stockinette stitch over the first 7-8-9-10-11-13 stitches, work A.4 over the next 32 stitches, work first stitch in A.4, 7-8-9-10-11-13 stitches in stockinette stitch. Continue pattern upwards, AT THE SAME TIME when piece measures 10-10-10-12-11-10 cm / 4", increase 1 stitch on each side of marker thread - read INCREASE TIP! Increase like this approx. every 6th-5th-5th-4th-4th-4th round 16-17-18-19-20-20 times in total = 79-83-87-91-95-99 stitches. When piece measures 44-44-44-42-42-40 cm / 17 ¼"-17 ¼"-17 ¼"-16 ½"-16 ½"-15 ¾", bind off 6 stitches mid under sleeve (bind off 3 stitches on each side of marker thread) = 73-77-81-85-89-93 stitches. Then continue back and forth on circular needle and bind off for sleeve cap at the beginning of row in each side as follows: 2 stitches 6-8-10-10-12-12 times and 1 stitch 8-6-4-6-4-6 times = 33 stitches remain in all sizes. Piece now measures 54-54-54-53-53-52 cm / 21 ¼"-21 ¼"-21 ¼"-20⅞"-20⅞"-20⅜". NOW MEASURE PIECE FROM HERE! Continue with pattern over the remaining 33 stitches until piece measures 13-15-14-15-17-18 cm / 6 3/4-7". Continue to bind off in the right side, at the beginning of every row from right side as follows: 17 stitches 1 time, 2 stitches 1 time, 1 stitch 2 times = 12 stitches. Work over these 12 stitches until piece measures 20-22-23-24-26-27 cm / 7⅞"-8⅝"-9"-9⅜"-10 ¼"-10⅝". Bind off. The entire sleeve measures approx. 74-76-77-77-79-79 cm / 29⅛"-29⅞"-30 ¼"-30 ¼"-31"-31". LEFT SLEEVE: Work as right sleeve but bind off at the top in opposite side, i.e. at the beginning of every row from wrong side. ASSEMBLY: Sew sleeves together mid back inside bind-off edge on each sleeve. Sew sleeves to front and back piece on body in outermost stitch as follows: Sew seam from armhole and up along shoulder on back piece until mid back. Repeat in the other side. Sew the same way from armhole and up along shoulder on front piece up to neck. Repeat in the other side. NECK EDGE: Pick up 94-94-108-108-108-108-108 stitches around neck edge (including stitches from stitch holder) on a short circular needle size 3.5 mm / US 4 with Merino Extra Fine or Karisma. Work 2 ridges, AT THE SAME TIME on last row increase 22-22-26-26-26-26-26 stitches evenly = 116-116-134-134-134-134-134 stitches. Then work rib = knit 1/purl 1. When rib measures 8 cm / 3⅛", work 1 ridge in garter stitch. Bind off. Fold neck edge double and sew on the inside, ridge against ridge. ---------------------------------------------------------- HEAD BAND - SHORT OVERVIEW OF THE PIECE: Worked back and forth from mid back and sewn together when finished. HEAD BAND: Cast on 30 stitches on needle size 4 mm / US 6 with Merino Extra Fine or Karisma. Work 1 ridge in GARTER STITCH back and forth - read explanation above! Now work pattern as follows: Work A.5 (= 5 stitches on first row) 6 times in total on needle. After first row in A.5 there has been 6 stitches increased in total = 36 stitches. When A.5 has been worked, work A.6 (= 6 stitches) over every repetition of A.5. REMEMBER THE GAUGE! When piece measures 26 cm/10¼", work a cable mid front on head band as follows: Slip the first 18 stitches on cable needle, work the remaining 18 stitches and then the 18 stitches on cable needle. Continue with pattern A.6 back and forth until piece measures approx. 49 cm – adjust to finish after a whole repetition of A.6 vertically (approx. 3 cm / 1" remain until finished measurements). Now work A.7 over every repetition of A.6. When A.7 has been worked, there are 30 stitches on row. Work 1 ridge over all stitches. Bind off. Sew head band together mid back by sewing one and one stitch inside cast-on edge and bind-off edge. Fasten off. |
|||||||||||||||||||||||||||||||
Diagram explanations |
|||||||||||||||||||||||||||||||
|
|||||||||||||||||||||||||||||||
 |
|||||||||||||||||||||||||||||||
 |
|||||||||||||||||||||||||||||||
 |
|||||||||||||||||||||||||||||||
Have you finished this pattern?Tag your pictures with #dropspattern #waitingforsnowsweater or submit them to the #dropsfan gallery. Do you need help with this pattern?You'll find 36 tutorial videos, a Comments/Questions area and more by visiting the pattern on garnstudio.com. © 1982-2026 DROPS Design A/S. We reserve all rights. This document, including all its sub-sections, has copyrights. Read more about what you can do with our patterns at the bottom of each pattern on our site. |
|||||||||||||||||||||||||||||||


With over 40 years in knitting and crochet design, DROPS Design offers one of the most extensive collections of free patterns on the internet - translated to 17 languages. As of today we count 324 catalogs and 12290 patterns - 12280 of which are translated into English (US/in).
We work hard to bring you the best knitting and crochet have to offer, inspiration and advice as well as great quality yarns at incredible prices! Would you like to use our patterns for other than personal use? You can read what you are allowed to do in the Copyright text at the bottom of all our patterns. Happy crafting!
Post a comment to pattern DROPS 195-1
We would love to hear what you have to say about this pattern!
If you want to leave a question, please make sure you select the correct category in the form below, to speed up the answering process. Required fields are marked *.