
Popular categories
Looking for a yarn?


Comments / Questions (33)
![]() Věra wrote:
Věra wrote:
Dobry den..vubec mi neni jasne, zda plest svetr dokola pomoci mostku..nebo tam a zpět a vyplátat i z rubu?? V navodu jsem nenasla a neni to z navodu jasne.Diky za odpoved
11.01.2026 - 09:21DROPS Design answered:
Dobrý den, Věro, svetr se plete v řadách (tam a zpět) na kruhové jehlici, shora dolů, od jednoho předního okraje ke druhému. To znamená, že vzor vyplétáte i z rubové strany. Přejeme příjemné pletení.
11.01.2026 - 10:08
![]() Rachelle wrote:
Rachelle wrote:
I'm having difficulty working out the size, the diagram isn't showing on my PC in either Opera or Edge. What measurement for bust for size M & L please?
06.01.2026 - 07:58DROPS Design answered:
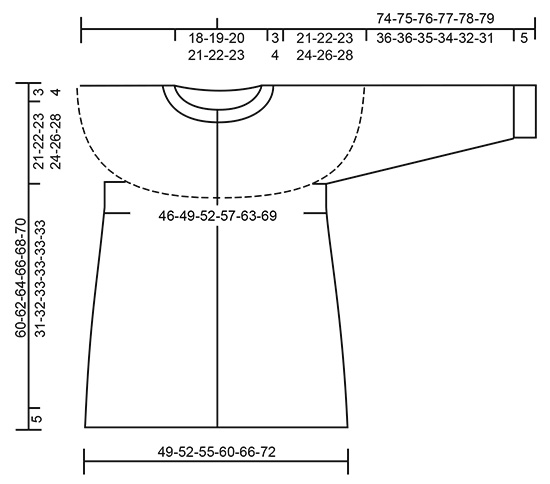
Hi Rachelle, the bust measurement in size M is 49 cm (x2) and in L is 52 cm (x2). Happy knitting!
06.01.2026 - 09:17
![]() Monica Hellström wrote:
Monica Hellström wrote:
Hej hittar inte diagrammet till mönster 181-1
05.01.2026 - 16:35
![]() Eleanor Wheeler wrote:
Eleanor Wheeler wrote:
I cannot decide which size to knit. Can you please give me some guidance on bust sizes to go with the S M L XL XXL XXXL.
01.12.2025 - 23:57DROPS Design answered:
Hi Eleanor, There is a size chart at the bottom of the pattern with all the measurements for the different sizes. Regards, Drops Team.
02.12.2025 - 06:10
![]() Mari wrote:
Mari wrote:
Denne er nydelig! Dessverre enda en ovenfra g ned- oppskrift. Jeg vet det skal gå an å snu det, men det er mye styr med det.
25.08.2023 - 15:25
![]() Tove Gjerde wrote:
Tove Gjerde wrote:
Er målene på skissen inkludert bevegelsesvidde?
23.03.2023 - 09:10DROPS Design answered:
Hei Tove, Ved å bruke målene i skissen får du snittet som er vist i bildet. God fornøyelse!
24.03.2023 - 06:51
![]() Tove Gjerde wrote:
Tove Gjerde wrote:
Jeg synes det er vanskelig å finne målene til de forskjellige størrelsene i oppskriftene. Hun som skal ha jakken er 89 cm rundt brystet og 91 cm rundt hoften. Hvilken Str tilsvarer det og hvordan ser jeg det.? Jeg har strikket siden jeg var 5 år og har normalt ikke problemer med oppskriftene. Hvorfor ikke sette målene sammen med Str ? Mvh Tove Gjerde
22.03.2023 - 16:03DROPS Design answered:
Hei Tove, Du finner en målskisse på bunnen av oppskriften, med alle målene til de forskjellige størrelser. God fornøyelse!
23.03.2023 - 08:31
![]() Martine wrote:
Martine wrote:
Volgens het patroon moet je voor het boord onderaan het vest steken meerderen. Dan wordt het boord bij mij veel te los, dan gaat het golven. Moet je niet minderen?
14.05.2021 - 10:02
![]() Marion Van Der Form wrote:
Marion Van Der Form wrote:
Staat op het telpatroon alleen de heengaande naald vermeld of ook de teruggaande naald? Kan het nl nergens vinden
21.10.2020 - 18:00DROPS Design answered:
Dag Marion,
In de telpatronen staan alle naalden aangegeven, dus zowel de heengaande als de teruggaande naalden.
22.10.2020 - 08:07
![]() TALLEMANT wrote:
TALLEMANT wrote:
Les dimensions ne collent pas avec les explications. La 1e partie de l'empiėcement (3A) en taille M qui fait 56 rangs devrait mesurer 20 cm et non 14 comme indiqué. De plus, quand le 2e dessin (A4) (62rgs) est fini, l'ouvrage est trop long de16 cm. Merci de me venir en aide. J'ai malheureusement déjà bien avancé.
13.05.2018 - 22:54DROPS Design answered:
Bonjour Mme Tallemant, avez-vous la bonne tension en hauteur? soit 30 rangs = 10 cm. A.3A en taille M ne fait que 27 rangs pas 56 (tous les rangs figurent dans le diagramme, ceux sur l'endroit et ceux sur l'envers). Bon tricot!
14.05.2018 - 11:17
|
||||||||||||||||||||||||||||||||||
Rosendal#rosendalset |
||||||||||||||||||||||||||||||||||
 |
 |
|||||||||||||||||||||||||||||||||
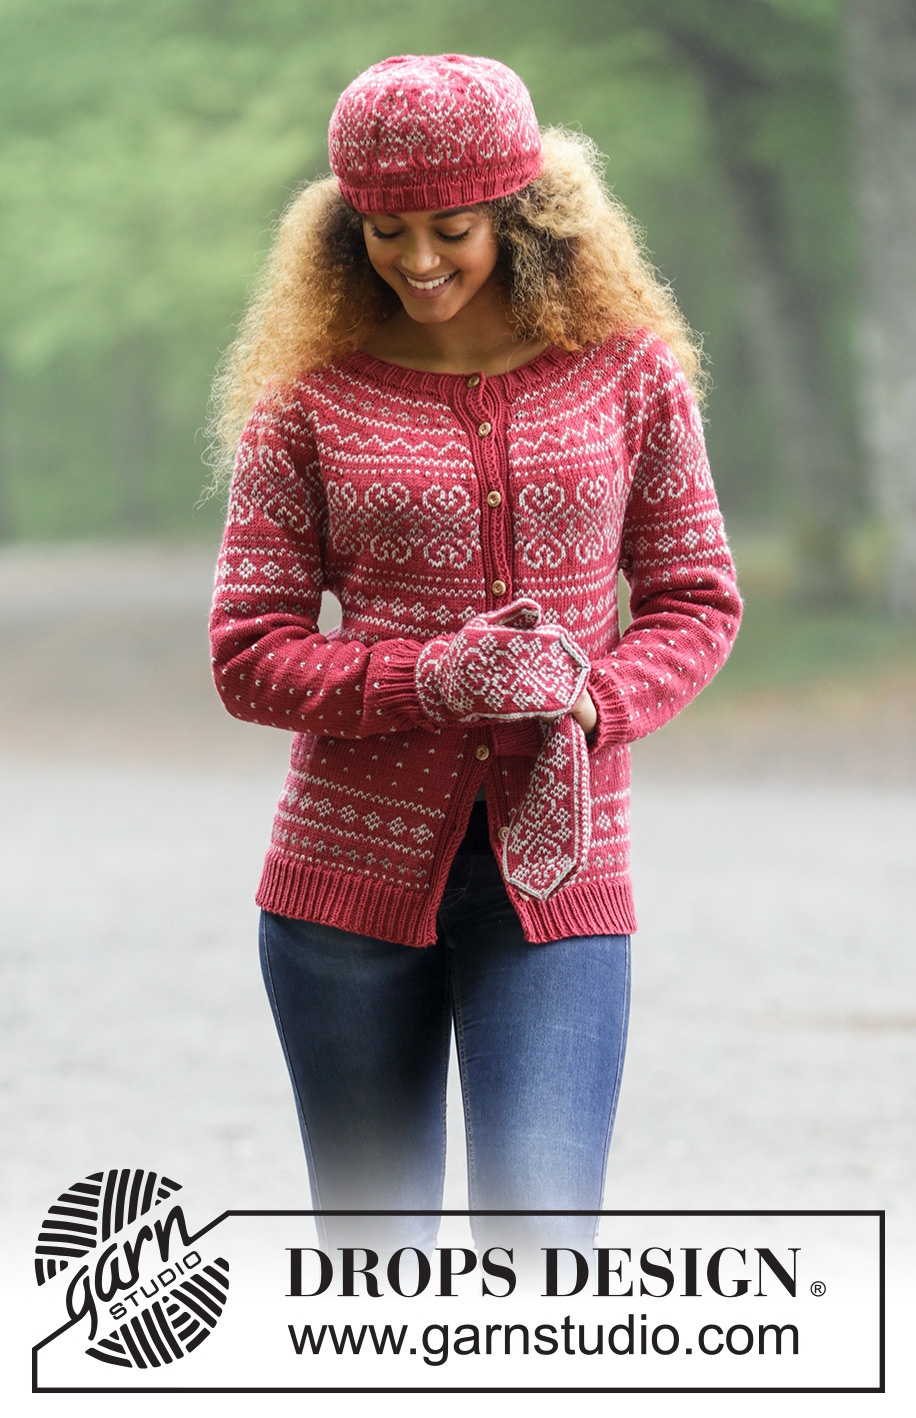
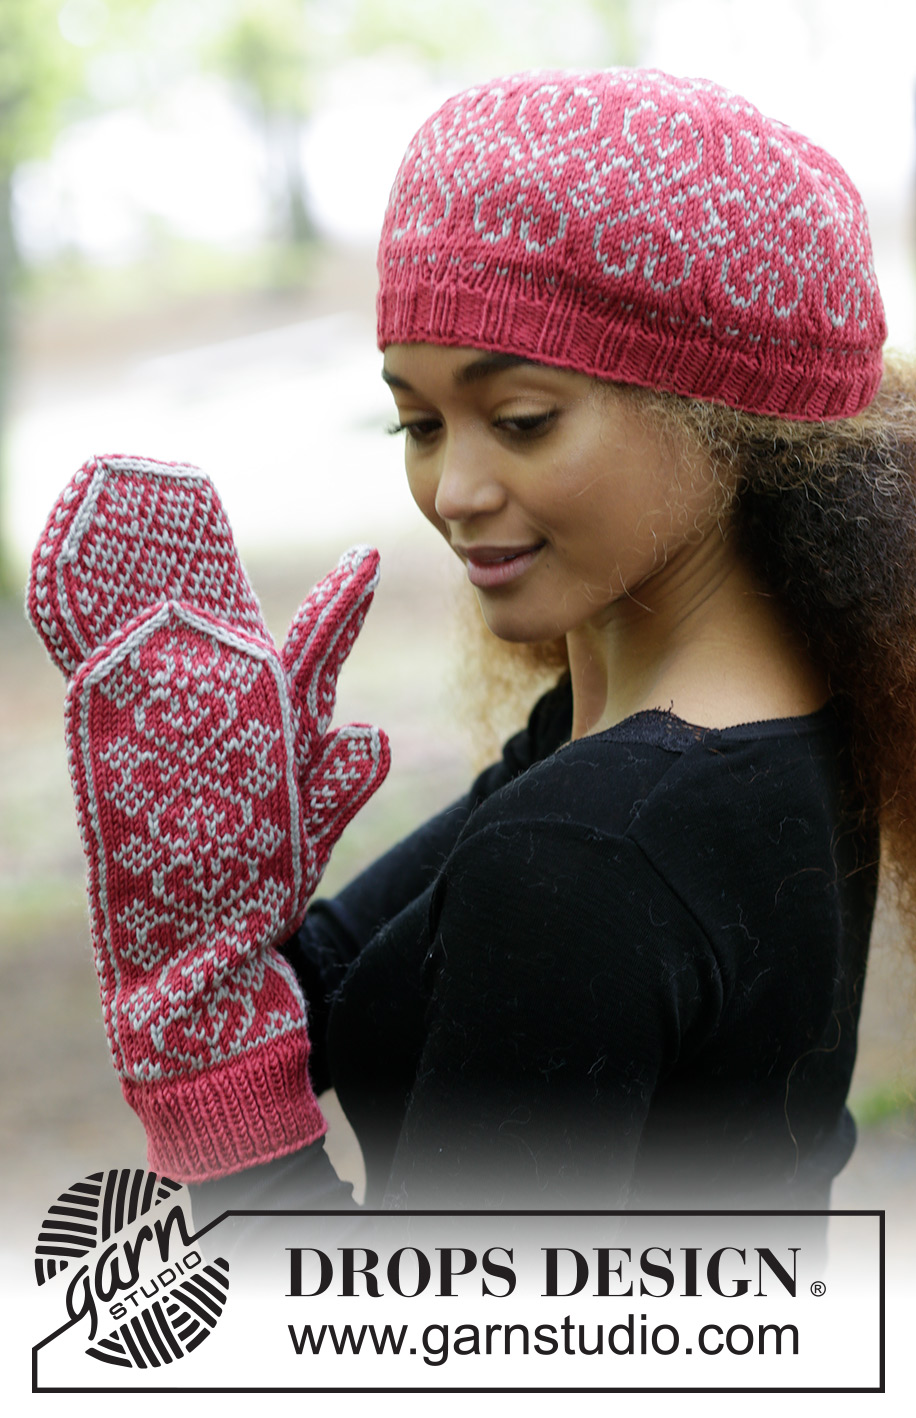
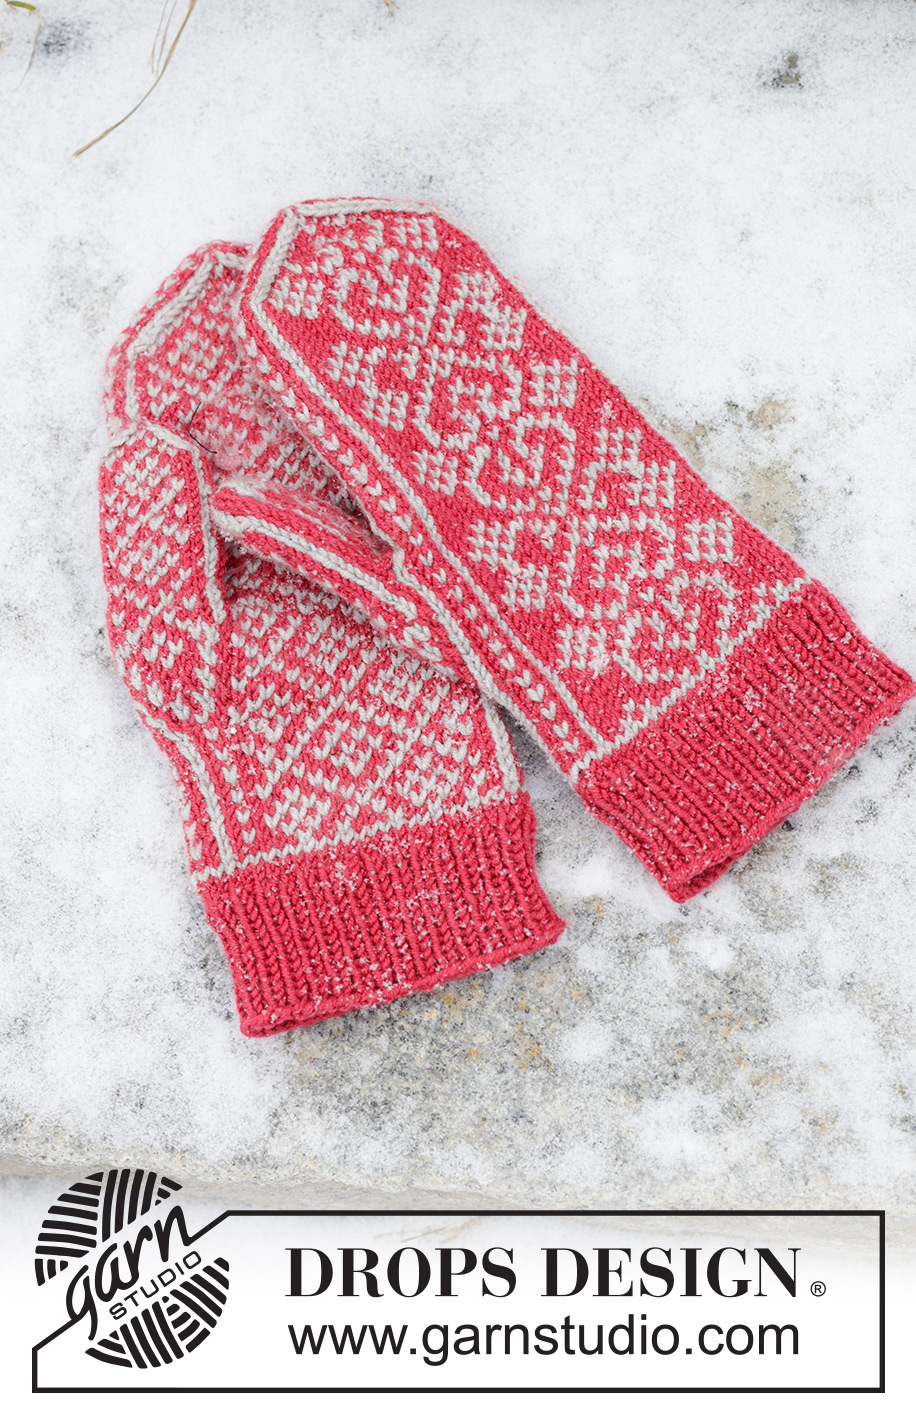
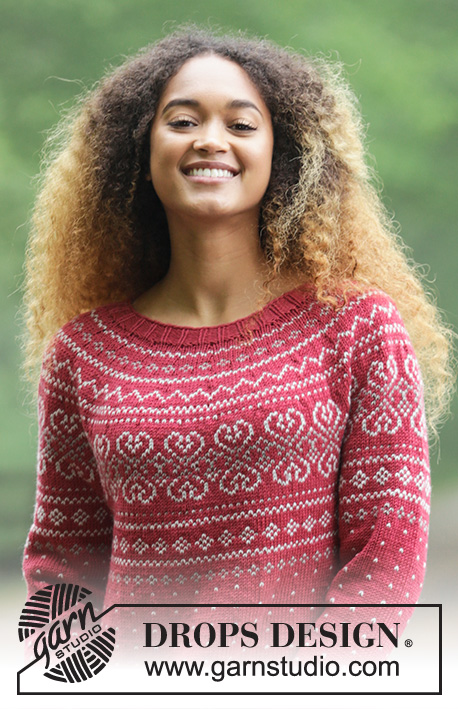
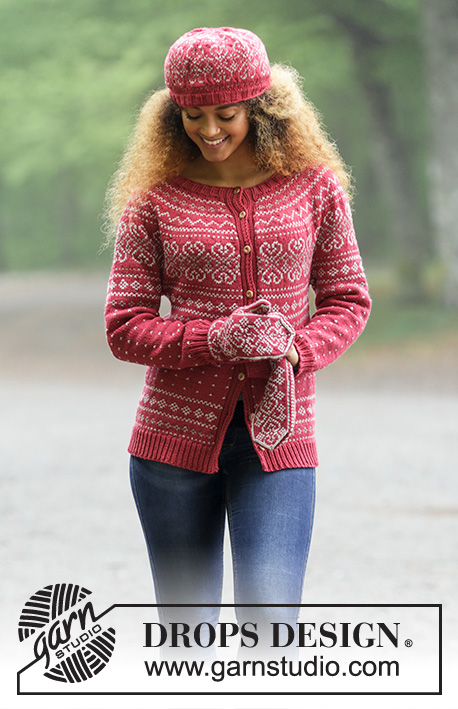
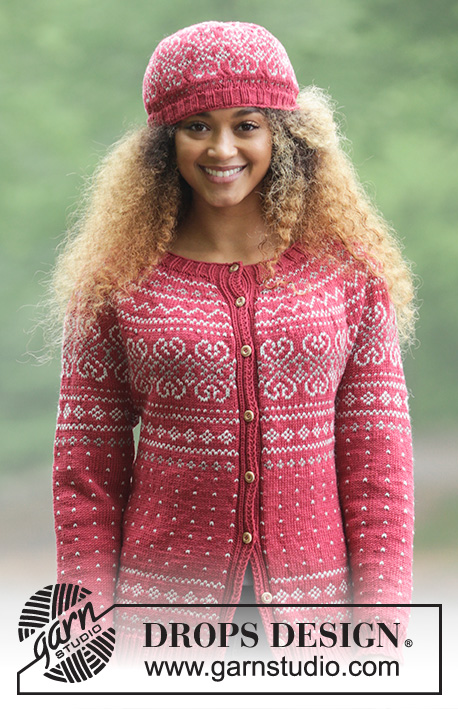
The set consists of: Knitted jacket with round yoke and multi-colored Norwegian pattern, worked top down. Sizes S - XXXL. Hat and mittens with multi-colored Norwegian pattern. The set is worked in DROPS Merino Extra Fine.
DROPS 181-1 |
||||||||||||||||||||||||||||||||||
|
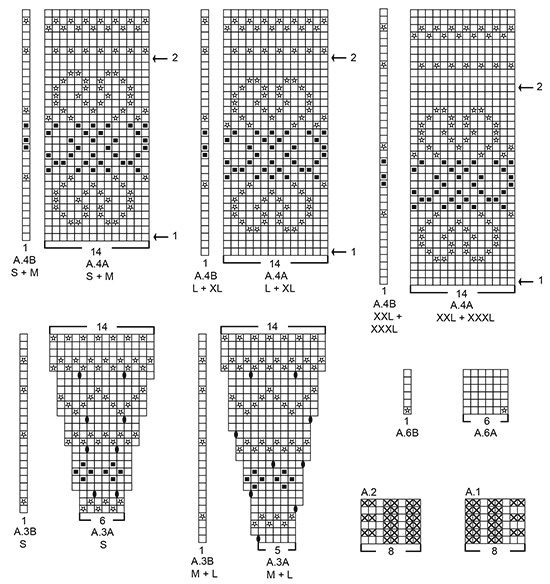
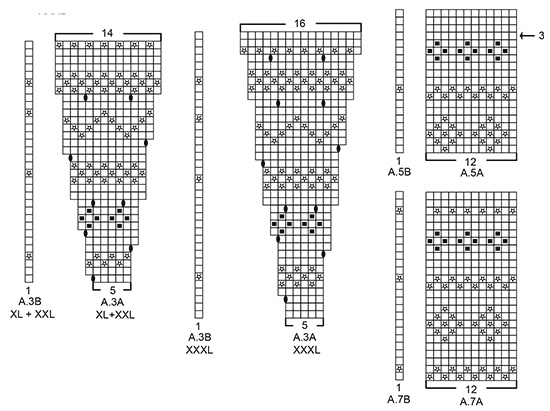
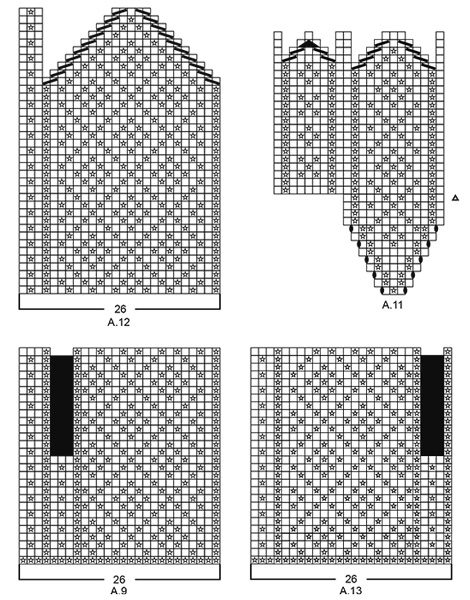
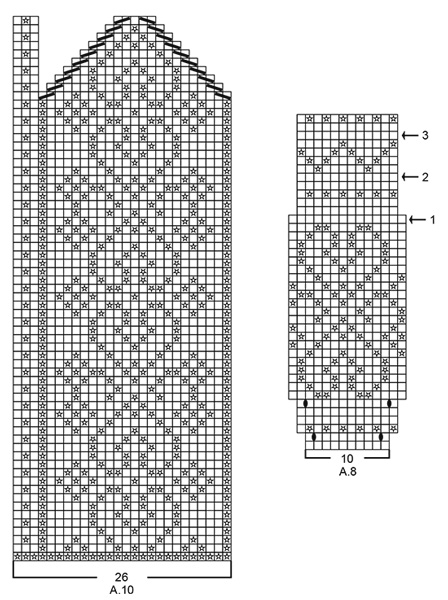
INFORMATION FOR THE PATTERN: INCREASE TIP (for the jacket): To work out how to increase evenly, count the total number of stitches on the row (e.g. 104 stitches), minus the bands (e.g. 16 stitches) and divide the remaining stitches by the number of increases to be made (e.g. 15) = 5.86. In this example, increase after approx. every 6th stitch by making 1 yarn over, on the next row work the yarn overs twisted to prevent holes. Do not increase over the bands. ELEVATION (for back of neck on jacket): Insert 1 marker in the middle stitch on the row (= mid back). Start from the right side and knit until you have worked 12-13-14-14-15-15 stitches past the marker, turn, tighten the strand and purl 24-26-28-28-30-30 stitches. Turn, tighten the strand and knit 36-39-42-42-45-45 stitches, turn, tighten the strand and purl 48-52-56-56-60-60 stitches. Turn, tighten the strand and knit 60-65-70-70-75-75 stitches, turn, tighten the strand and purl to end of row (the band is worked as before). KNITTING TIP-1: To avoid the knitting gauge becoming tighter when working pattern, it is important that the strands do not tighten at the back of the piece. You can increase a needle size when working pattern if you find it becomes tight. PATTERN: Jacket: See diagrams A.1 to A.7. Choose diagram for your size. Hat: See diagram A.8. Mittens: See diagrams A.9 to A.13. DECREASE TIP-1 (for mid under the sleeve on the jacket): Start 3 stitches before the marker thread, knit 2 stitches together, knit 2 (the marker thread sits in the middle of these 2 stitches), slip 1 stitch as if to knit, knit 1, pass the slipped stitch over the knitted stitch (= 2 stitches decreased). DECREASE TIP-2 (for hat): To work out how to decrease evenly, count the total number of stitches on the row (e.g. 104 stitches) and divide by the number of decreases to be made (e.g. 4) = 26. In this example, knit every 25th and 26th stitch together. BUTTONHOLE (for jacket): Decrease for buttonhole on right band (when the garment is worn). Work from the right side until there are 4 stitches left on the row, make 1 yarn over, knit 2 together and finish with knit 2. On the next row, knit the yarn over; there will be a hole. The first buttonhole is worked when the neckline measures approx. 1½-2 cm / ½", then work the next 7-7-7-7-8-8 buttonholes with approx. 7½-8-8-8½-7½-8 cm / 2⅞"-3"-3"-3¼"-2⅞"-3" between each. ---------------------------------------------------------- JACKET: The piece is worked back and forth with circular needle from mid front and top down. The sleeves are worked in the round with short circular needle, top down; change to double pointed needles when necessary. NECKLINE: Cast on 104-107-110-116-119-122 stitches (including 8 band stitches in each side towards mid front) with circular needle size 3.5 mm / US 4 and dark rose. Purl 1 row (= wrong side). The next row is worked as follows from the right side: Work A.1 (= 8 band stitches), * knit 1, purl 2 *, repeat from *-* until there are 9 stitches left on the row, knit 1 and finish with A.2 (= 8 band stitches). Continue rib in this way – remember BUTTONHOLE on right band – see description above. When the rib measures 3-3-3-4-4-4 cm / 1⅛"-1⅛"-1⅛"-1½"-1½"-1½" knit 1 row from the right side with 8 band stitches in each side as before, AT THE SAME TIME increase 15-15-17-16-18-15 stitches evenly on row – read INCREASE TIP = 119-122-127-132-137-137 stitches. Continue by working yoke as described below. YOKE: Change to circular needle size 4 mm / US 6 and purl 1 row from the wrong side with 8 band stitches in each side as before (the yarn overs from the previous row are purled twisted to prevent holes). For a better fit, you can now work an ELEVATION in the back of the neck – see description above. When the elevation has been completed, work the next row as follows from the right side: A.1 (= 8 stitches), work A.3A until there are 9 stitches left on row (= 17-21-22-23-24-24 repeats of 6-5-5-5-5-5 stitches), work A.3B (= 1 stitch) and finish with A.2 (= 8 stitches). Continue pattern in this way and increase as shown in the diagram. Read KNITTING TIP-1! REMEMBER THE GAUGE! When A.3 has been completed, there are 255-311-325-339-353-401 stitches on the row and the piece measures approx. 12-14-14-16-16-18 cm / 4¾"-5½"-5½"-6¼"-6¼"-7" from the cast-on edge, measured mid front. The next row is an increase row (marked with arrow-1 in A.4A) and is worked as follows from the right side: A.1 (= 8 stitches), work A.4A until there are 9 stitches left on the row and increase at the same time 28-14-14-28-42-22 stitches evenly over these stitches, work A.4B (= 1 stitch) and finish with A.2 (= 8 stitches) = 283-325-339-367-395-423 stitches. There is now room for 19-22-23-25-27-29 repeats of A.4A (of 14 stitches). Continue A.4A/A.4B with 8 band stitches in each side as before. On the row marked with arrow-2 in A.4A increase 16-2-20-28-24-16 stitches evenly on row (do not increase over the bands) = 299-327-359-395-419-439 stitches. When A.4 has been completed, the last row has been worked from the right side and the piece measures approx. 24-25-26-28-30-32 cm / 9½"-9¾"-10¼"-11"-11¾"-12½" from the cast-on edge measured mid front. The next row is worked as follows from the wrong side with dark rose: Continue A.2 over the band, purl 42-46-49-55-61-65 stitches (= front piece), place the next 58-64-74-80-80-82 stitches on a thread for sleeve, cast on 8-8-10-10-10-14 new stitches on the needle (= in the side under the sleeve), purl the next 83-91-97-109-121-129 stitches (= back piece), place the next 58-64-74-80-80-82 stitches on a thread for sleeve, cast on 8-8-10-10-10-14 new stitches on the needle (= in the side under the sleeve), purl 42-46-49-55-61-65 stitches and continue A.1 over the band (= front piece). The body and sleeves are now finished separately. THE PIECE IS NOW MEASURED FROM HERE! BODY: = 199-215-231-255-279-303 stitches. The first row is worked as follows from the right side with dark rose: Continue A.1 over the band, work stockinette stitch until there are 8 stitches left on the row and increase at the same time 10-6-2-2-2-2 stitches evenly over theses stitches, finish with A.2 over the band = 209-221-233-257-281-305 stitches. The next row is worked as follows from the wrong side: Continue A.2 over the band, work A.5B (= 1 stitch), work A.5A until there are 8 stitches left on the row (= 16-17-18-20-22-24 repeats of 12 stitches – NOTE: The diagram is read from left to right when working from the wrong side) and finish with A.1 over the band. Continue the pattern in this way On the row marked with arrow-3 in A.5A increase 12 stitches evenly on row in all sizes = 221-233-245-269-293-317 stitches. When A.5 has been completed, work the next row as follows from the right side: Continue A.1 over the band, work A.6A until there are 9 stitches left on the row (= 34-36-38-42-46-50 repeats of 6 stitches), work A.6B (= 1 stitch) and continue A.2 over the band. Continue the pattern in this way and repeat A.6 until the piece measures approx. 22-23-24-24-24-24 cm / 8¾"-9"-9½"-9½"-9½"-9½"-" from the separation for sleeves – adjust so that you have worked 3 or 5 rows with dark rose after a row of "dots". The next row is worked as follows from the right side: Continue A.1 over the band, work A.7A until there are 9 stitches left on the row (= 17-18-19-21-23-25 repeats of 12 stitches), work A.7B (= 1 stitch) and finish with A.2 over the band. When A.7 has been completed, purl 1 row from the wrong side with dark rose where you increase 42-48-48-54-60-66 stitches evenly on row = 263-281-293-323-353-383 stitches. Change to circular needle size 3.5 mm / US 4 and work the next row as follows from the right side: A.1 over the band, * knit 1, purl 2 *, repeat from *-* until there are 9 stitches left on the row, knit 1 and finish with A.2 over the band. Continue rib in this way for 5 cm / 2". Bind off with knit over knit and purl over purl, but to prevent the bind-off edge being tight you can make 1 yarn over after every 6th stitch at the same time as you bind off (the yarn overs are bind off as normal stitches). The jacket measures approx. 60-62-64-66-68-70 cm / 23⅝"-24⅜"-25¼"-26"-26¾"-27½" from the shoulder down. SLEEVE: Place the 58-64-74-80-80-82 stitches from the thread in the one side of the piece on a short circular needle size 4 mm / US 6 and, in addition, knit up 1 new stitch in each of the 8-8-10-10-10-14 stitches which were cast on under the sleeve with dark rose = 66-72-84-90-90-96 stitches. Insert 1 marker thread in the middle of the 8-8-10-10-10-14 stitches under the sleeve. Start the round by the marker thread and work A.5A in the round (= 5½-6-7-7½-7½-8 repeats of 12 stitches). When A.5A has been competed 1 time in height, continue by working A.6A in the same way, but make sure the dots are in the same place over A.5A as on the body. AT THE SAME TIME when the piece measures 2 cm / ¾" from the separation in all sizes, decrease 2 stitches mid under the sleeve – read DECREASE TIP-1. Decrease in this way a total of 9-12-18-18-18-21 times; in S: Every 11th round, in M: Every 8th round, in L + XL: Every 5th round, in XXL: Alternately every 4th and 5th round and in XXXL: Alternately every 3rd and 4th round = 48-48-48-54-54-54 stitches. Continue working A.6A until the piece measures approx. 36-36-35-34-32-31 cm / 14¼"-14¼"-13¾"-13½"-12½"-12¼" from the separation – adjust so that you have worked 2-4 rounds with dark rose after a round of "dots". Change to double pointed needles size 3.5 mm / US 4 and work rib in the round (= knit 1 / purl 2) for 5 cm / 2". Bind off with knit over knit and purl over purl, but to prevent the bind-off edge being tight, make 1 yarn over after every 6th stitch at the same time as you bind off (the yarn overs are bind off as normal stitches). The sleeve measures approx. 41-41-40-39-37-36 cm / 16"-16"-15¾"-15¼"-14"½-14¼" from the separation. Work the other sleeve in the same way. ASSEMBLY: Sew on the buttons. ---------------------------------------------------------- HAT: The piece is worked in the round with circular needle, bottom up. Change to double pointed needles when necessary. Cast on 104-112 stitches with short circular needle size 3 mm / US 2.5 and dark rose. Knit 1 round. Then work rib (= knit 2 /purl 2) for 3-4 cm / 1"-1½". Change to circular needle size 3.5 mm / US 4 and knit 1 round where you decrease 4-2 stitches evenly on round – read DECREASE TIP = 100-110 stitches. Work A.8 in the round (= 10-11 repeats of 10 stitches). REMEMBER THE GAUGE! After the increases in A.8 there are 140-154 stitches and 10-11 repeats of 14 stitches. On the round marked with arrow-1 in A.8 decrease 16-18 stitches evenly on round = 124-136 stitches. Continue the pattern. On the round marked with arrow-2 in A.8 decrease 16-16 stitches evenly on round = 108-120 stitches. Continue the pattern. On the round marked with arrow-3 in A.8 decrease 24 stitches evenly on round in both sizes = 84-96 stitches. Continue the pattern. When A.8 has been completed, the piece measures approx. 17-18 cm / 6 3/4-7". Work stockinette stitch onwards with dark rose. AT THE SAME TIME, on the first round after A.8, decrease 20-28 stitches evenly on round = 64-68 stitches. When the piece measures 19-20 cm / 7½"-8" work as follows: * Knit 1 round, on the next round knit while decreasing 16-17 stitches evenly on round *, repeat from *-* a total of 3 times, but for each round where you decrease, work 1 stitch less before 2 stitches are worked together = 16-17 stitches left. Knit 1 round. On the next round knit all stitches together 2 and 2 = 8-9 stitches left. Cut the strand, pull it through the remaining stitches, tighten the strand and fasten well. The hat measures approx. 21-22 cm / 8¼"-8¾" from top down. ---------------------------------------------------------- LEFT MITTEN: The piece is worked in the round with double pointed needles. Cast on 48 stitches with double pointed needles size 3 mm / US 2.5 and dark rose. Knit 1 round. Then work rib (= knit 1 /purl 1). When the rib measures 4 cm / 1½" knit 1 round where you increase 4 stitches evenly on round (increase 1 stitch after every 12th stitch by making 1 yarn over, on the next round knit the yarn overs twisted to prevent holes) = 52 stitches. Change to double pointed needles size 3.5 mm / US 4 and work the next round as follows: Work A.9 (= 26 stitches), then A.10 (= 26 stitches). Continue pattern in this way. REMEMBER THE GAUGE! When you have worked as far as the 3 black squares in the diagram, work A.11 onwards over these 3 stitches for the thumb gusset, the remaining stitches are continued as before in A.9 and A.10. When A.11 has been worked up to and including round 13 (marked with triangle in the diagram) and you have increased 5 times in each side on the thumb gusset as shown in the diagram, place the 13 thumb-gusset stitches on 1 thread, work to end of rnd = 49 stitches. The last round in A.9 is worked as follows: Work the first 19 stitches in A.9, cast on 3 new stitches on the needle over the stitches on the thread, work the last 4 stitches in A.9 and continue A.10 over the remaining 26 stitches = 52 stitches. The next round is worked as follows: Work A.12 over the first 26 stitches and continue A.10 over the next 26 stitches. Continue the pattern in this way and decrease as shown in the diagrams. After all the decreases, there are 12 stitches left on the needles. Cut the strands, pull them through the remaining stitches, tighten the strands and fasten well. The mitten measures approx. 26 cm / 10¼" from top down. THUMB: Place the 13 thumb-gusset stitches from the thread back on double pointed needles size 3.5 mm / US 4. In addition, knit up 9 stitches behind the thumb (i.e. knit up 1 stitch in each of the 3 stitches cast on and 3 stitches on each side of these) = 22 stitches. Continue A.11 in the round and decrease as shown in the diagram. After all the decreases, there are 8 stitches left on the needles. Cut the strands, pull them through the remaining stitches, tighten the strands and fasten well. RIGHT MITTEN: Cast on and work in the same way as for the left mitten until the rib has been completed and you have increased to 52 stitches. Change to double pointed needles size 3.5 mm / US 4 and work the next round as follows: Work A.10 (= 26 stitches), then A.13 (= 26 stitches). Continue the pattern in this way. When you have worked as far as the 3 black squares in the diagram, work A.11 onwards over these 3 stitches for the thumb gusset, the remaining stitches are continued as before in A.10 and A.13. When A.11 has been worked up to and including round 13 (marked with triangle in the diagram) and you have increased 5 times in each side on the thumb gusset as shown in the diagram, place the 13 thumb-gusset stitches on 1 thread, work to end of round = 49 stitches. The last round in A.13 is worked as follows: Continue A.10 over the first 26 stitches, work the first stitch in A.13, cast on 3 new stitches on the needle over the stitches on the thread and work the remaining 19 stitches in A.13 = 52 stitches. The next round is worked as follows: Continue A.10 over the first 26 stitches and work A.12 over the next 26 stitches. Continue the pattern in this way and decrease as shown in the diagrams. After all the decreases, there are 12 stitches left on the needles. Cut the strands, pull them through the remaining stitches, tighten the strands and fasten well. The mitten measures approx. 26 cm / 10¼" from top down. Knit thumb in the same way as for the left mitten. |
||||||||||||||||||||||||||||||||||
Diagram explanations |
||||||||||||||||||||||||||||||||||
|
||||||||||||||||||||||||||||||||||
 |
||||||||||||||||||||||||||||||||||
 |
||||||||||||||||||||||||||||||||||
 |
||||||||||||||||||||||||||||||||||
 |
||||||||||||||||||||||||||||||||||
 |
||||||||||||||||||||||||||||||||||
Have you finished this pattern?Tag your pictures with #dropspattern #rosendalset or submit them to the #dropsfan gallery. Do you need help with this pattern?You'll find 37 tutorial videos, a Comments/Questions area and more by visiting the pattern on garnstudio.com. © 1982-2026 DROPS Design A/S. We reserve all rights. This document, including all its sub-sections, has copyrights. Read more about what you can do with our patterns at the bottom of each pattern on our site. |
||||||||||||||||||||||||||||||||||


With over 40 years in knitting and crochet design, DROPS Design offers one of the most extensive collections of free patterns on the internet - translated to 17 languages. As of today we count 324 catalogs and 12290 patterns - 12280 of which are translated into English (US/in).
We work hard to bring you the best knitting and crochet have to offer, inspiration and advice as well as great quality yarns at incredible prices! Would you like to use our patterns for other than personal use? You can read what you are allowed to do in the Copyright text at the bottom of all our patterns. Happy crafting!
Post a comment to pattern DROPS 181-1
We would love to hear what you have to say about this pattern!
If you want to leave a question, please make sure you select the correct category in the form below, to speed up the answering process. Required fields are marked *.