
Popular categories
Looking for a yarn?


Comments / Questions (39)
![]() Ulrike wrote:
Ulrike wrote:
Für die Größe 92 - 98/104 waren bei mir 200g nicht ausreichend. Ich benötige mindestens 50g mehr.
21.07.2025 - 15:47
![]() Anne wrote:
Anne wrote:
Hei. Siis mistä kohtaa nuo raglanlisäykset tulee aloittaa?
28.04.2024 - 19:51
![]() Lucy Smith wrote:
Lucy Smith wrote:
I am confused by the crochet instructions: I’ve worked a row of double from the centre back and arrived at the front side of the cardigan. 1. Do I work ONE slip stitch and cut the yarn off and then do the other side from the middle and again finish with ONE slip stitch to finish OR 2. At the front work a row of slip stitch back to the middle, here change to double crochet and work to the front and then slip stitch back to the middle to finish? Thanks
02.10.2022 - 19:39DROPS Design answered:
Hi Lucy, The crochet edge is round the whole jacket; so start mid-back and work along the neck, down the first front piece, along the bottom, up the other front piece and to mid-back. Happy crafting!
03.10.2022 - 06:46
![]() Celine wrote:
Celine wrote:
Bonjour, Les mailles mises en attente pour les manches comprennent-elles les torsades ? Je ne comprends pas la phrase : "pour la manche, monter 7 m sous la manche" : où, sous la manche ? Merci de votre réponse
24.01.2022 - 22:45DROPS Design answered:
Bonjour Céline, cela peut varier en fonction de la taille, ce qui compte, c'est que vous ayez bien le bon nombre de mailles total après les augmentations, suivez bien ensuite le nombre de mailles de chaque partie. Cette leçon montre comment tricoter un pull de haut en bas; vous verrez à partir de la photo 8 comment diviser l'ouvrage pour les manches: comment mettre les mailles des manches en attente et monter les mailles (photo 11/14). Bon tricot!
25.01.2022 - 09:44
![]() Justine wrote:
Justine wrote:
Bonjour, je ne comprends pas bien le "y compris 4 mailles de bordure devant de chaque côté". Cela veut-il dire qu'il faille monter (pour la première taille par exemple) 72 m + 4 m + 4 m (=80 m) Ou bien que sur les 72 m il y a 4 m à droite et 4 m à gauche réservées pour la bordure ? Merci de votre réponse.
31.03.2021 - 21:48DROPS Design answered:
Bonjour Justine, les mailles de bordure des devants sont comprises dans le nombre de mailles à monter, autrement dit, vous n'avez pas à les monter en plus. Bon tricot!
06.04.2021 - 11:13
![]() Susanna wrote:
Susanna wrote:
Hei, olen vielä työn alussa tekemässä ensimmäisiä lisäyksiä (4. kerros ja 8 lisäystä). Minkälaisia lisäyksiä suosittelette ainaoikeinneuleelle ja miten seuraavalla kierroksella lisätyt silmukat neulotaan, jotta ne jäisivät mahdollisimman huomaamattomiksi?
23.05.2020 - 09:41DROPS Design answered:
Hei, voit tehdä lisäykset langankierroin. Kun neulot langankierrot seuraavalla kerroksella kiertäen, työhön ei jää reikiä ja lisäyskohdasta tulee siisti.
09.06.2020 - 18:26
![]() Elisabeth Bourguignon wrote:
Elisabeth Bourguignon wrote:
Je vous remercie. C'est ce que je pensais faire, à savoir, relever les mailles du dessous des manches et continuer comme dans les explications, les diminutions.
05.05.2020 - 16:02
![]() Elisabeth Bourguignon wrote:
Elisabeth Bourguignon wrote:
Bonjour, j'ai pratiquement fini le corps. Je vais m'attaquer à la première manche, je pensais la tricoter en rond en relevant les mailles sous le bras. Pensez-vous que ce se soit faisable? Merci pour votre réponse.
04.05.2020 - 16:20DROPS Design answered:
Bonjour Mme Bourguignon, à priori tout à fait, relevez 1 m dans chacune des 7 mailles montées sous la manche et tricotez en rond (1 tour end, 1 tour env pour du point mousse en rond), et diminuez de chaque côté de la maille du milieu sous la manche. Bon tricot!
04.05.2020 - 16:53
![]() Soosan wrote:
Soosan wrote:
I love all your patterns I wanted to ask if there is any way you can change the format of the written patterns? it is hard to follow when you are knitting. If they can be written for example Row 1, Row 2, Row 3 etc. It would make it easier to follow. Thank you so much.
10.04.2020 - 19:53DROPS Design answered:
Dear Soosan, we only have this format of pattern, but in order to help you to understand diagram, you will find how to read knitting diagrams here. Happy knitting!
14.04.2020 - 14:52
![]() Maria wrote:
Maria wrote:
Es tut mir leid, meine Frage von gestern hat sich erledigt. Meine Maschenzahl nach den Raglanzunahmen stimmt. Ich habe vergessen die 24 Zopfmaschen mitzuzählen.
27.01.2020 - 07:55
|
||||||||||
Little Explorer#littleexplorerjacket |
||||||||||
|
|
||||||||||
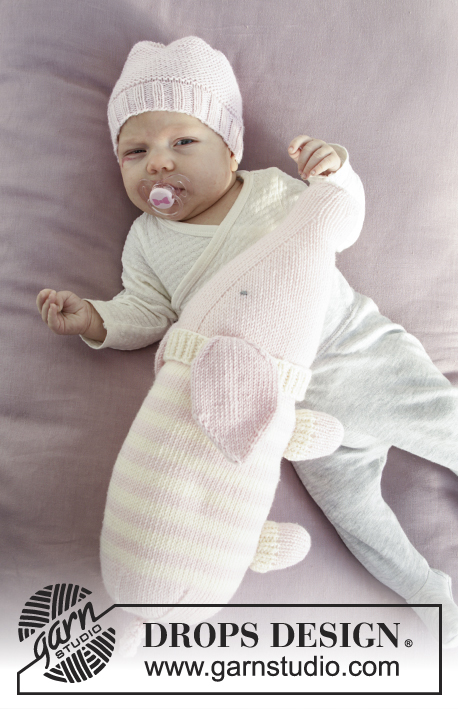
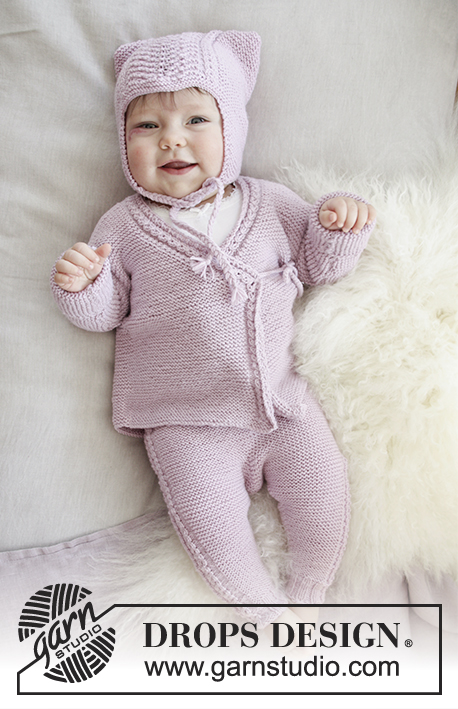
Knitted baby jacket with cables, garter stitch and raglan, worked top down. Sizes: premature – 4 years. The piece is worked in DROPS BabyMerino.
DROPS Baby 29-12 |
||||||||||
|
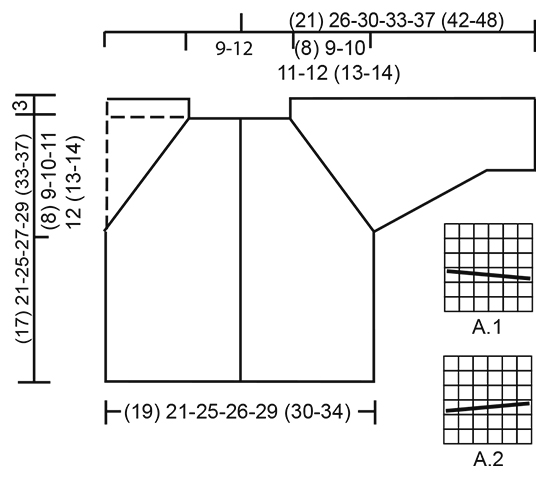
INFORMATION FOR THE PATTERN: RIDGE/GARTER STITCH (worked back and forth): 1 ridge = Knit 2 rows. PATTERN: See diagrams A.1 and A.2. The diagrams show all the rows in the pattern seen from the right side. RAGLAN: All the increases are made from the right side. Increase 8 stitches on a row as follows: Work to the first A.1, 1 yarn over, work A.1, 1 yarn over. Repeat by all A.1 and A.2 (= 2 stitches increased by each cable = 8 stitches in total on the row). On the next row, the yarn overs are knitted twisted to prevent holes. DECREASE TIP (for the sleeves): All decreases are made from the right side! Decrease 1 stitch in each side of the piece as follows: Work 1 stitch in garter stitch, slip 1 stitch as if to knit, knit 1, pass the slipped stitch over (= 1 stitch decreased), work in garter stitch until there are 3 stitches left, knit 2 together (= 1 stitch decreased) and finish with 1 stitch in garter stitch (= a total of 2 stitches decreased). BUTTONHOLES: The first buttonhole is made when the piece measures approx. 1 cm / ⅜", then make the next (3) 4-4-4-5 (5-5) with approx. 4 cm / 1½" between them. Decrease from the right side for the buttonholes on the right band (when the garment is worn) as follows: Work until there are 4 stitches left on the needle, make 1 yarn over, knit 2 together and knit 2. On the next row, knit the yarn overs. There will be holes. ---------------------------------------------------------- JACKET: The jacket is worked top down, back and forth on circular needle from mid front. The sleeves are worked back and forth on circular needle and are sewn together at the end. YOKE: Cast on (72) 72-80-80-80 (80-84) stitches (including 4 band stitches in each side towards mid front) with circular needle size 3 mm / US 2.5 and Baby Merino. Work 2 RIDGES – see description above and increase 8 stitches on the last row = (80) 80-88-88-88 (88-92) stitches. The next row is worked as follows from the right side – remember BUTTONHOLES on the band – see description above: Work (11) 11-13-13-13 (13-14) stitches in garter stitch (= left front piece), A.1 (= 6 stitches), work 10 stitches garter stitch (= left sleeve), A.2 (= 6 stitches), work (14) 14-18-18-18 (18-20) stitches in garter stitch (= back piece), A.1 over the next 6 stitches, work 10 stitches in garter stitch (= right sleeve), A.2 over the next 6 stitches, work (11) 11-13-13-13 (13-14) stitches in garter stitch (= right front piece). Work 1 row from the wrong side. Increase to RAGLAN – see description above – on each side of every A.1 and A.2 as follows: Increase 1 stitch on every 2nd row (0) 4-5-7-11 (12-16) times, then 1 stitch every 4th row (9) 8-9-9-8 (9-8) times = (152) 176-200-216-240 (256-284) stitches. REMEMBER THE GAUGE! The piece measures approx. (8) 9-10-11-12 (13-14) cm / (3") 3½"-4"-4⅜"-4¾" (5⅛"-5½") from the cast-on edge. The next row from the right side is worked as follows: (23) 26-30-32-35 (37-41) stitches in garter stitch, place the next (34) 40-44-48-54 (58-64) stitches on a thread for the sleeve, cast on 7 stitches under the sleeve, work (38) 44-52-56-62 (66-74) stitches in garter stitch, place the next (34) 40-44-48-54 (58-64) stitches on a thread for the sleeve, cast on 7 stitches under the sleeve, work (23) 26-30-32-35 (37-41) stitches in garter stitch = (98) 110-126-134-146 (154-170) stitches. Insert 1 marker in the piece, THE PIECE IS NOW MEASURED FROM HERE! Work garter stitch until the piece measures (9) 12-15-16-17 (20-23) cm / (3½") 4¾"-6"-6¼"-6¾" (8"-9") from the marker. Bind off. SLEEVE: Place the (34) 40-44-48-54 (58-64) stitches from the thread back on circular needle size 3 mm / US 2.5. Insert 1 marker in the piece, THE PIECE IS NOW MEASURED FROM HERE! Cast on 4 stitches at the end of the next 2 rows (= 4 new stitches in each side of the piece) = (42) 48-52-56-62 (66-72) stitches. Work garter stitch back and forth. When the piece measures 2 cm / ¾" from the separation, decrease 1 stitch in each side of the piece – READ DECREASE TIP. Decrease in this way every (10th) 8th-8th-6th-6th (8th-8th) row a total of (3) 5-7-9-11 (12-14) times = (36) 38-38-38-40 (42-44) stitches. Continue with garter stitch until the sleeve measures (10) 14-17-18-21 (24-29) cm / (4") 5½"-6¾"-7"-8¼" (9½"-11½"). Bind off. Work the other sleeve in the same way. ASSEMBLY: Sew together the sleeve seams inside the 1 edge stitch. Sew together the opening under the sleeves. Sew the buttons on to the left front piece. CROCHET EDGE: Crochet an edge along the entire opening of the jacket with hook size 3 mm / C as follows, begin mid back on neck: * 1 single crochet, 1 chain stitch, skip forward approx.0.5 cm / ¼" *, repeat from *-* and finish with 1 slip stitch in the first single crochet. |
||||||||||
Diagram explanations |
||||||||||
|
||||||||||
 |
||||||||||
Have you finished this pattern?Tag your pictures with #dropspattern #littleexplorerjacket or submit them to the #dropsfan gallery. Do you need help with this pattern?You'll find 24 tutorial videos, a Comments/Questions area and more by visiting the pattern on garnstudio.com. © 1982-2026 DROPS Design A/S. We reserve all rights. This document, including all its sub-sections, has copyrights. Read more about what you can do with our patterns at the bottom of each pattern on our site. |
||||||||||


With over 40 years in knitting and crochet design, DROPS Design offers one of the most extensive collections of free patterns on the internet - translated to 17 languages. As of today we count 325 catalogs and 12298 patterns - 12288 of which are translated into English (US/in).
We work hard to bring you the best knitting and crochet have to offer, inspiration and advice as well as great quality yarns at incredible prices! Would you like to use our patterns for other than personal use? You can read what you are allowed to do in the Copyright text at the bottom of all our patterns. Happy crafting!
Post a comment to pattern DROPS Baby 29-12
We would love to hear what you have to say about this pattern!
If you want to leave a question, please make sure you select the correct category in the form below, to speed up the answering process. Required fields are marked *.