DROPS Baby Merino
DROPS Baby Merino
100% Wool
from 4.55 $ /50g
Get the yarn to make this pattern from 13.65$.

The yarn cost is calculated from the pattern’s smallest size and the yarn’s cheapest product type. Looking for an even better price? You might find it on the DROPS Deals!

DROPS SS24

Little Explorer

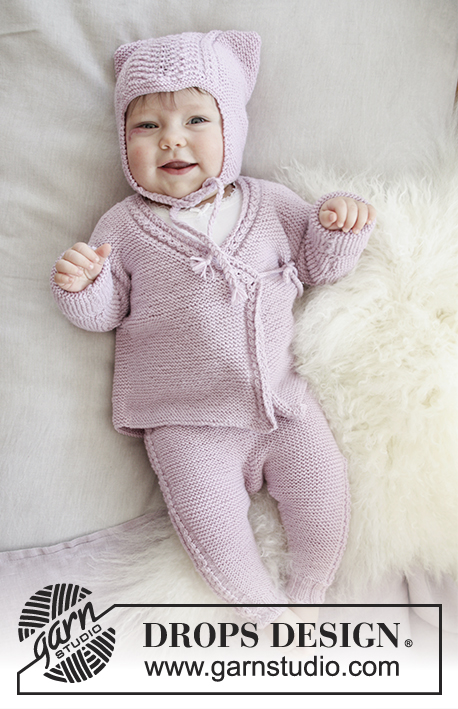
Knitted baby jacket with cables, garter stitch and raglan, worked top down. Sizes: premature – 4 years. The piece is worked in DROPS BabyMerino.

DROPS Baby 29-12
DROPS Design: Pattern no bm-073-by
Yarn group A
-----------------------------------------------------------
Sizes: (premature) 0/1 - 1/3 - 6/9 - 12/18 months (2 - 3/4) years

Materials:
DROPS BABY MERINO from Garnstudio
(150) 150-150-150-200 (200-200) g color 37, light lavender

The piece can also be worked with yarn from:
"Alternative yarn (Yarn group A)" – see the link below.

DROPS CIRCULAR NEEDLE (60 or 80 cm / 24" or 32") SIZE 3 mm/US 2.5 – or the size needed to get 24 stitches and 48 rows of garter stitch on 10 cm / 4" in width and 10 cm / 4" in height.

CROCHET HOOK SIZE 3 MM / C – for the edge.

DROPS CABLE NEEDLE – for the cables.

DROPS MOTHER OF PEARL BUTTONS, Arched (white) NO 521: (4) 5-5-5-6 (6-6) items.

-------------------------------------------------------

Alternative Yarn – See how to change yarns here
Yarn Groups A to F – Use the same pattern and change the yarn here
Yarn usage using an alternative yarn – Use our yarn converter here

-------------------------------------------------------

DROPS Baby Merino
DROPS Baby Merino
100% Wool
from 4.55 $ /50g
Get the yarn to make this pattern from 13.65$.

The yarn cost is calculated from the pattern’s smallest size and the yarn’s cheapest product type. Looking for an even better price? You might find it on the DROPS Deals!

Pattern instructions

NOTE: This pattern is written in American English. All measurements in charts are in cm. For conversion from inches to cm - click here. There are different terms for crocheting in American and British English. If this pattern includes crochet, click for "crochet terms" here. For this pattern in British English, please click here.
INFORMATION FOR THE PATTERN:

RIDGE/GARTER STITCH (worked back and forth):
1 ridge = Knit 2 rows.

PATTERN:
See diagrams A.1 and A.2. The diagrams show all the rows in the pattern seen from the right side.

RAGLAN:
All the increases are made from the right side. Increase 8 stitches on a row as follows:
Work to the first A.1, 1 yarn over, work A.1, 1 yarn over. Repeat by all A.1 and A.2 (= 2 stitches increased by each cable = 8 stitches in total on the row). On the next row, the yarn overs are knitted twisted to prevent holes.

DECREASE TIP (for the sleeves):
All decreases are made from the right side!
Decrease 1 stitch in each side of the piece as follows: Work 1 stitch in garter stitch, slip 1 stitch as if to knit, knit 1, pass the slipped stitch over (= 1 stitch decreased), work in garter stitch until there are 3 stitches left, knit 2 together (= 1 stitch decreased) and finish with 1 stitch in garter stitch (= a total of 2 stitches decreased).

BUTTONHOLES:
The first buttonhole is made when the piece measures approx. 1 cm / ⅜", then make the next (3) 4-4-4-5 (5-5) with approx. 4 cm / 1½" between them.
Decrease from the right side for the buttonholes on the right band (when the garment is worn) as follows: Work until there are 4 stitches left on the needle, make 1 yarn over, knit 2 together and knit 2. On the next row, knit the yarn overs. There will be holes.
----------------------------------------------------------

JACKET:
The jacket is worked top down, back and forth on circular needle from mid front. The sleeves are worked back and forth on circular needle and are sewn together at the end.

YOKE:
Cast on (72) 72-80-80-80 (80-84) stitches (including 4 band stitches in each side towards mid front) with circular needle size 3 mm / US 2.5 and Baby Merino. Work 2 RIDGES – see description above and increase 8 stitches on the last row = (80) 80-88-88-88 (88-92) stitches. The next row is worked as follows from the right side – remember BUTTONHOLES on the band – see description above: Work (11) 11-13-13-13 (13-14) stitches in garter stitch (= left front piece), A.1 (= 6 stitches), work 10 stitches garter stitch (= left sleeve), A.2 (= 6 stitches), work (14) 14-18-18-18 (18-20) stitches in garter stitch (= back piece), A.1 over the next 6 stitches, work 10 stitches in garter stitch (= right sleeve), A.2 over the next 6 stitches, work (11) 11-13-13-13 (13-14) stitches in garter stitch (= right front piece). Work 1 row from the wrong side.
Increase to RAGLAN – see description above – on each side of every A.1 and A.2 as follows: Increase 1 stitch on every 2nd row (0) 4-5-7-11 (12-16) times, then 1 stitch every 4th row (9) 8-9-9-8 (9-8) times = (152) 176-200-216-240 (256-284) stitches. REMEMBER THE GAUGE! The piece measures approx. (8) 9-10-11-12 (13-14) cm / (3") 3½"-4"-4⅜"-4¾" (5⅛"-5½") from the cast-on edge.
The next row from the right side is worked as follows: (23) 26-30-32-35 (37-41) stitches in garter stitch, place the next (34) 40-44-48-54 (58-64) stitches on a thread for the sleeve, cast on 7 stitches under the sleeve, work (38) 44-52-56-62 (66-74) stitches in garter stitch, place the next (34) 40-44-48-54 (58-64) stitches on a thread for the sleeve, cast on 7 stitches under the sleeve, work (23) 26-30-32-35 (37-41) stitches in garter stitch = (98) 110-126-134-146 (154-170) stitches.
Insert 1 marker in the piece, THE PIECE IS NOW MEASURED FROM HERE! Work garter stitch until the piece measures (9) 12-15-16-17 (20-23) cm / (3½") 4¾"-6"-6¼"-6¾" (8"-9") from the marker. Bind off.

SLEEVE:
Place the (34) 40-44-48-54 (58-64) stitches from the thread back on circular needle size 3 mm / US 2.5.
Insert 1 marker in the piece, THE PIECE IS NOW MEASURED FROM HERE! Cast on 4 stitches at the end of the next 2 rows (= 4 new stitches in each side of the piece) = (42) 48-52-56-62 (66-72) stitches. Work garter stitch back and forth.
When the piece measures 2 cm / ¾" from the separation, decrease 1 stitch in each side of the piece – READ DECREASE TIP. Decrease in this way every (10th) 8th-8th-6th-6th (8th-8th) row a total of (3) 5-7-9-11 (12-14) times = (36) 38-38-38-40 (42-44) stitches.
Continue with garter stitch until the sleeve measures (10) 14-17-18-21 (24-29) cm / (4") 5½"-6¾"-7"-8¼" (9½"-11½"). Bind off. Work the other sleeve in the same way.

ASSEMBLY:
Sew together the sleeve seams inside the 1 edge stitch. Sew together the opening under the sleeves. Sew the buttons on to the left front piece.

CROCHET EDGE:
Crochet an edge along the entire opening of the jacket with hook size 3 mm / C as follows, begin mid back on neck: * 1 single crochet, 1 chain stitch, skip forward approx.0.5 cm / ¼" *, repeat from *-* and finish with 1 slip stitch in the first single crochet.

Diagram

All measurements in charts are in cm.

symbols = knit from the right side, purl from the wrong side
symbols = Cable: Place 3 stitches on the cable needle behind the piece, knit 3, knit 3 from the cable needle
symbols = Cable: Place 3 stitches on the cable needle in front of the piece, knit 3, knit 3 from the cable needle
diagram

Each of our patterns has specific tutorial videos to help you.

Do you have a question? See a list of frequently asked questions (FAQ)

Knitting tension is what determines the final measurements of your work, and is usually measured per 10 x 10 cm. It is provided like so: number of stitches in width x number of rows in height - eg: 19 stitches x 26 rows = 10 x 10 cm.

The knitting tension is very individual; some people knit/crochet loosely while others work tightly. You adjust the knitting tension with the needle size, which is why the suggested needle size only serve as a guide! You need to adjust this (up or down) to ensure that YOUR knitting tension matches the knitting tension provided in the pattern. If you work with a different knitting tension than provided you will have a different yarn consumption, and your work will have different measurements than what the pattern suggests.

The knitting tension also determines which yarns can replace each other. As long as you achieve the same knitting tension you can replace one yarn with another.

See DROPS lesson: How to measure your tension/gauge

See DROPS video: How to make a gauge tension swatch

The required amount of yarn is provided in grams, eg: 450 g. To calculate how many balls you’ll need you first need to know how many grams are in 1 ball (25g, 50g or 100g). This information is available if you click on the individual yarn quality on our pages. Divide the amount required with the amount of each ball. For example, if each ball is 50g (the most common amount), the calculation will be as follows: 450 / 50 = 9 balls.

The important thing when changing from one yarn to another is that the knitting/crochet tension remains the same. This is so that the measurements of the finished piece will be the same as on the sketch provided. It is easier to achieve the same knitting tension using yarns from the same yarn group. It is also possible to work with multiple strands of a thinner yarn to achieve the knitting tension of a thicker one. Please try our yarn converter. We recommend you to always work a test swatch.

Please NOTE: when changing yarn the garment might have a different look and feel to the garment in the photo, due to individual properties and qualities of each yarn.

See DROPS lesson: Can I use a different yarn than the one mentioned in the pattern?

All our yarns are categorised into yarn groups (from A to F) according to thickness and knitting tension – group A contains the thinnest yarns and group F the thickest. This makes it easier for you to find alternative yarns to our patterns, should you wish to switch yarn. All yarns within the same group have a similar knitting tension and can easily replace each other. However, different yarn qualities have different structures and properties which will give the finished work a unique look and feel.

Click here for an overview of the yarns in each yarn group

At the top of all our patterns you’ll find a link to our yarn converter, which is a helpful tool should you wish to use a different yarn than suggested. By filling in the yarn quality you wish to replace, the amount (in your size) and number of strands, the converter will present good alternative yarns with the same knitting tension. Additionally it will tell you how much you’ll require in the new qualities and whether you’ll need to work with multiple strands. Most skeins are 50g (some are 25g or 100g).

If the pattern is worked with multiple colours, every colour will have to be converted separately. Similarly, if the pattern is worked with several strands of different yarns (for example 1 strand Alpaca and 1 strand Kid-Silk) you will have to find alternatives for each, individually.

Click here to see our yarn converter

Since different yarns have different qualities and textures we have chosen to keep the original yarn in our patterns. However, you can easily find options among our available qualities by using our yarn converter, or simply pick a yarn from the same yarn group.

It is possible that some retailers still have discontinued yarns in stock, or that someone has a few skeins at home that they would like to find patterns for.

The yarn converter will provide both alternative yarn as well as required amount in the new quality.

If you think it's hard to decide what size to make, it can be a good idea to measure a garment you own already and like the size of. Then you can pick the size by comparing those measures with the ones available in the pattern's size chart.

You'll find the size chart at the bottom of the pattern.

See DROPS lesson: How to read size chart

The needle size provided in the pattern serves only as a guide, the important thing is to follow the knitting tension. And since knitting tension is very individual, you will have to adjust the needle size to ensure that YOUR tension is the same as in the pattern – maybe you’ll have to adjust 1, or even 2 needle sizes, up or down to achieve the correct tension. For this, we recommend that you work test swatches.

Should you work with a different knitting tension than the one provided, the measurements of the finished garment might deviate from the measurement sketch.

See DROPS lesson: How to measure your tension/gauge

See DROPS video: How to make a gauge tension swatch

Working a garment top-down provides more flexibility and room for personal adjustment. For example it is easier to try the garment on while working, as well as making adjustments to length of yoke and shoulder caps.

The instructions are carefully explaining every step, in the correct order. Diagrams are adjusted to the knitting direction and are worked as usual.

The diagram depicts all rows/rounds, and every stitch seen from the right side. It is read from bottom to top, from right to left. 1 square = 1 stitch.

When working back and forth, every other row is worked from the right side and every other row is worked from the wrong side. When working from the wrong side, the diagram will have to be worked reversed: from left to right, knit stitches are purled, purl stitches are knit etc.

When working in the round every round is worked from the right side and the diagram are worked from right to left on all rounds.

See DROPS lesson: How to read knitting diagrams

The diagram depicts all rows/rounds, and every stitch seen from the right side. It is worked from bottom to top, from right to left.

When working back and forth every other row is worked from the right side: from right to left and every other row is worked from the wrong side: from left to right.

When working in the round, every row in the diagram are worked from the right side, from right to left.

When working a circular diagram you start in the middle and work your way outwards, counter clockwise, row by row.

The rows usually start with a given number of chain stitches (equivalent to the height of the following stitch), this will either be depicted in the diagram or explained in the pattern.

See DROPS lesson: How to read crochet diagrams

Instructions for working several diagrams after each other on the same row/round, will often be written like so: “work A.1, A.2, A.3 a total of 0-0-2-3-4 times". This means you work A.1 once, then A.2 is worked once, and A.3 is repeated (in width) the number of times provided for your size – in this case like so: S = 0 times, M = 0 times, L=2 times, XL= 3 times and XXL = 4 times.

The diagrams are worked as usual: begin with the first row in A.1, then work the first row in A.2 etc.

See DROPS lesson: How to read knitting diagrams

See DROPS lesson: How to read crochet diagrams

The total width of the garment (from wrist-to-wrist) will be larger in the larger sizes, despite the actual sleeves being shorter. The larger sizes have longer sleeve caps and wider shoulders, so there will be a good fit in all sizes.

The measurement sketch/schematic drawing provides information regarding the full length of the garment. If it’s a jumper or a jacket the length is measured from the highest point on the shoulder (usually closest to the neckline), and straight down to the bottom of the garment. It is NOT measured from the tip of shoulder. Similarly, the length of yoke is measured from the highest point on the shoulder and down to where yoke is split into body and sleeves.

See DROPS lesson: How to read a schematic drawing

Diagrams are often repeated on the round or in height. 1 repeat is the diagram the way it appears in the pattern. If it says to work 5 repeats of A.1 in the round, then you work A.1 a total of 5 times after/next to each other in the round. If it says to work 2 repeats of A.1 vertically/in height you work the entire diagram once, then begin again at the start and work the entire diagram one more time.

Chain stitches are slightly narrower than other stitches and to avoid working the cast-on edge too tight, we simply chain more stitches to begin with. The stitch count will be adjusted on the following row to fit the pattern and measurement sketch.

The rib edge is more elastic and will contract slightly compared to, for example, stocking stitch. By increasing before the rib edge, you avoid a visible difference in width between the rib edge and the rest of the body.

It’s very easy to cast off too tightly, and by making yarn overs while casting off (and simultaneously casting these off) you avoid a too tight cast off edge.

See DROPS video: How to bind off with yarn overs (yo)

To achieve an even increase (or decrease) you can increase on, for example: every 3rd and 4th row alternately, like so: work 2 rows and increase on the 3rd row, work 3 rows and increase on the 4th. Repeat this until the increase is complete.

See DROPS lesson: Increase or decrease 1 st on every 3rd and 4th row alternately

Should you prefer to work in the round instead of back and forth, you may of course adjust the pattern. You’ll need to add steeks mid-front (usually 5 stitches), and follow the instructions. When you would normally turn and work from the wrong side, simply work across the steek and continue in the round. At the end you’ll cut the piece open, pick up stitches to work bands, and cover the cut edges.

See DROPS video: How to knit steeks and cut open

Should you prefer to work back and forth instead of in the round, you may of course adjust the pattern so you work the pieces separately and then assemble them at the end. Divide the stitches for the body in 2, add 1 edge stitch in each side (for sewing) and work the front and back pieces separately.

See DROPS lesson: Can I adapt a pattern for circular needles into straight needles?

Pattern repeats can vary slightly in the different sizes, in order to get the correct proportions. If you’re not working the exact same size as the garment in the photo, yours might deviate slightly. This has been carefully developed and adjusted so that the complete impression of the garment is the same in all sizes.

Make sure to follow instructions and diagrams for your size!

If you have found a pattern you like which is available in women’s size it’s not very difficult to convert it to men’s size. The biggest difference will be the length of sleeves and body. Start working on the women size that you think would fit across the chest. The additional length will be worked right before you cast off for the armhole/sleeve cap. If the pattern is worked top-down you can add the length right after the armhole or before the first decrease on sleeve.

Regarding additional yarn amount, this will depend on how much length you add, but it is better with a skein too many than too few.

All yarns will have excess fibres (from production) that might come off as lint or shedding. Brushed yarns (ie hairier yarns) have more of these loose, excess fibres, causing more shedding.

Shedding also depends on what is worn under or over the garment, and whether this pulls at the yarn fibres. It’s therefore not possible to guarantee that there will be no shedding

Below are some tips on how to get the best result when working with hairier yarns:

1. When the garment is finished (before you wash it) shake it vigorously so the looser hairs come off. NOTE: do NOT use a lint roller, brush or any method that pulls at the yarn.

2. Place the garment in a plastic bag and put it in your freezer - the temperature will cause the fibres to become less attached to each other, and excess fibres will come off easier.

3. Leave in the freezer for a few hours before taking it out and shaking it again.

4. Wash the garment according to the instructions on the yarn label.

Pilling is a natural process that happens to even the most exclusive of fibers. It's a natural sign of wear and tear that is hard to avoid, and that is most visible in high friction areas of your garment like a sweater's arms and cuffs.

You can make your garment look as new by removing the pilling, using a fabric comb or a pill/lint remover.

Still can't find the answer you need? Then scroll down and leave your question so one of our experts can try to help you. This will be done normally within 5 to 10 working days.
In the meantime, you can read the questions and answers that others have left to this pattern or join the DROPS Workshop on Facebook to get help from fellow knitters/crocheters!

You might also like...

Little Explorer

Elisabeth Bourguignon, France

Little Explorer 2

Christine, Australia

Post a comment to pattern DROPS Baby 29-12

We would love to hear what you have to say about this pattern!

If you want to leave a question, please make sure you select the correct category in the form below, to speed up the answering process. Required fields are marked *.

Comments / Questions (40)

country flag Anita Holm wrote:

Hei. Det var veldig vanskelig for meg å forstå hvordan man skal øke ut på hver side av fletten. Ingenting passet. Jeg fikk fort alt for mange masker på pinnen. Lenge før disse 10 cm som oket skulle være. Så jeg ville ønske meg en video av akkurat dette. Å øke ut på oket.

21.01.2020 - 03:40

country flag Turi Strømberg wrote:

Skal strikke Little Explorer jakke. Hva menes med å strikke stikk 4 stolpemasker ?

15.01.2020 - 13:11

DROPS Design answered:

Hej Turi, hvor i opskriften står det?

15.01.2020 - 15:07

country flag Isa wrote:

Bonjour Peut on tricoter ce modèle sur 2 aiguilles , je n'ai pas l'habitude des aiguilles circulaires.... Vous seriez bien aimable de me dire comment procéder ! J'aime beaucoup vos modèles de layette mais ils ont l'air difficiles à réaliser D'avance merci !

06.01.2020 - 18:01

DROPS Design answered:

Bonjour Isa, je vous propose de regarder la lecon ICI. Bon travail!

06.01.2020 - 18:17

country flag Marie wrote:

Ved økning av 8 masker, hvor mange masker skal man strikke inn på siste pinnen før man øker med to kast rundt A1? Og hvor mange masker mellom hver økning på denne pinnen? Jeg leser i et gammelt spørsmål her at det er 9 m i str 0-1, men da blir jo ikke økningen jevnt fordelt blant de 72 maskene?

17.12.2019 - 14:57

DROPS Design answered:

Hej Marie, udtagningerne til raglan sker altid på hver side af A.1 og A.2. God fornøjelse!

15.01.2020 - 11:25

country flag Sally Lewis wrote:

I adore the look of drops baby patterns but I’m bitterly disappointed that they are all knitted on circular and Double pointed needles. I’m unable to use either. Please ,please can we have some patterns that are knitted on straight needles in the future or have some patterns that give instructions for both! Thank you

27.10.2019 - 14:49

DROPS Design answered:

Dear Mrs Lewis, sometimes - such as for this pattern - we are using circular needles but pattern will be worked in rows = back and forth on the circular needle. You will find how to adapt a pattern onto straight needles here. Happy knitting!

04.11.2019 - 12:30

country flag Manoa wrote:

Bonjour, je ne comprends pas bien : \r\n1. Les diagrammes : s\'ils représentent seulement l’endroit, ça signifie que les rangs sur l’envers sont tricotés à l’endroit (point mousse) sauf A1 et A2 tricotés à l’envers ?\r\n2. A quoi correspondent A1 et A2 une fois débutées les augmentations, svp ? (A1 et A2 = 8 mailles, puis 10mailles, etc. ? Où caler les augmentations ?)\r\nMerci de vos conseils !

23.04.2019 - 23:04

DROPS Design answered:

Bonjour Manoa, les diagrammes représentent tous les rangs des diagrammes vus sur l'endroit, A.1 et A.2 vont donc se tricoter en jersey endroit (= une case blanche = 1 m end sur l'endroit, env sur l'envers), et les torsades se feront au 3ème rang de A.1 /A.2. Les diagrammes se tricotent sur 6 mailles tous les 2. Vous augmentez avant et après ces diagrammes et tricotez les nouvelles mailles au point mousse - cf RAGLAN. Bon tricot!

24.04.2019 - 09:30

country flag Elísabet wrote:

Ég er að velta einu fyrir mér varðandi útaukningar. Talað er um að auka út í annari hverri umferð er þá átt við í hverri sléttri umferð og svo eftir það í annari hverri sléttri umferð?

21.02.2019 - 18:24

DROPS Design answered:

Blessuð. Eins og ég skil þetta þá er: Aukið út um 1 lykkju í annarri hverri umferð = slétt umferð (aukið út), brugðin umferð (ekki aukið út), slétt umferð (aukið út). Síðan 1 lykkju í 4. hverri umferð = slétt umferð (aukið út), brugðin umferð (ekki aukið út), slétt umferð (ekki aukið út), brugðin umferð (ekki aukið út), slétt umferð (aukið út). Vona að þetta hafi eitthvað hjálpað.

21.02.2019 - 22:42

country flag Denise wrote:

Hallo. Verstehe ich richtig, dass zwischen den beiden Raglanzunahmen jeweils 6 Maschen gestrickt werden?

20.01.2019 - 08:58

DROPS Design answered:

Liebe Denise, die Raglanzunahmen sind auf beiden Seiten A.1/A.2 gestrickt, dh zwischen den Raglanzunahmen haben Sie 6 Maschen (= diese 6 Maschen werden im A.1/A.2 gestrickt). Viel Spaß beim stricken!

21.01.2019 - 10:53

country flag Martina wrote:

Stickar strl 1-3 mån. Efter ökn. ska man dela upp maskorna jag får inte det att stämma för jag vet inte om flätan ska tillhöra fram, bakstycket eller ärmarna. När jag delar upp till framstycket delas flätan så att på mitten. Jag får inte det att stämma vid uppdelningen??

12.06.2018 - 23:36

DROPS Design answered:

Hej, det ska vara 1 fläta i varje raglanlinje. Vid uppdelningen sätts alltså de flesta av flätans maskor på en tråd till ärm.

13.06.2018 - 17:26