
Popular categories
Looking for a yarn?


Comments / Questions (22)
![]() Fia wrote:
Fia wrote:
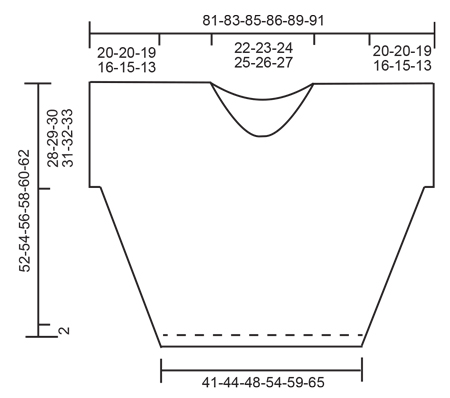
Jag har en fråga angående ökningarna. Jag stickar efter XL, och man ska då öka vart 4:e varv 8 ggr. Ska man öka vart 4:e rätt varv eller vart annat rätt varv? Är i skrivandets stund på varv 40, och jag tycker inte att längden på mitt arbete stämmer med måttet på skissen. Enligt skissen ska jag ha 60 cm från uppläggsvarvet till ökningen för ärmarna. Men jag har nu 18 cm och 11 varv kvar innan jag ska lägga upp för ärmar.
14.09.2025 - 20:46DROPS Design answered:
Hei Fia. Du skal øke på hver 4. pinne (1 pinne med økninger og 3 pinner uten økning), dette gjøres 8 ganger, deretter 10 ganger på hver 2. pinne. mvh DROPS Design
29.09.2025 - 10:51
![]() Fia wrote:
Fia wrote:
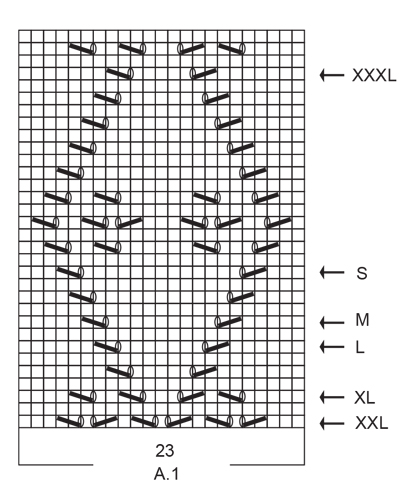
V ad menas med pilarna på diagram A.1? Jag förstår att det är olika storlekar, men XL är markerad på rad 3. Förstår inte riktigt vad som menas med detta. Snälla hjälp mig att förstå.
07.09.2025 - 17:26DROPS Design answered:
Hej Fia. Det är på det varvet du börjar diagrammet (står inskrivet i beskrivningen också). Så om du stickar XL så börjar du diagrammet på rad 3. Mvh DROPS Design
09.09.2025 - 08:35
![]() Gerbon Laetitia wrote:
Gerbon Laetitia wrote:
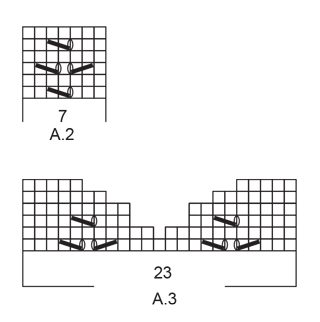
Bonsoir Je ne comprends pas la partie de l'encolure avec le schéma A3 je comprend pas comment je dois rabattre et a quel moment si vous voulez bien m'expliquer svp ou avoir une vidéo m'arrangerais. Merci
04.08.2025 - 21:48DROPS Design answered:
Bonjour Mme Gerbon, vous rabattez la maille centrale au 1er rang de A.3, puis vous terminez chaque côté de l'encolure séparément, en commençant par l'épaule gauche pour le dos; vous terminez A.3 et en même temps, vous rabattez en début de rang sur l'endroit (pour l'encolure): 8 x 2 m puis 2-5 x 1 m. Reprenez ensuite les mailles de l'épaule droite et rabattez les mailles de l'encolure de la même façon, mais en début de rang sur l'envers - n'oubliez pas de terminer A.3 en fin de rang sur l'endroit. Bon tricot!
05.08.2025 - 08:46
![]() Pernille Matras wrote:
Pernille Matras wrote:
Hvordan kan det være at i skrive man skal lave forstykket som bagstykket, når både billed og diagram viser noget andet på forstykket. Der må være en del flere indtagninger på forstykket som ikke står i opskrifter? Faktisk vises forstykket som en v udskæring. Jeg vil gerne have en forklaring på hvordan jeg strikker forstykket efter 3 hele diagram mønster. På forhånd tak Pernille Matras
30.05.2025 - 23:25
![]() Jacqueline VERRIELE wrote:
Jacqueline VERRIELE wrote:
Peux ton tricoter ce modèle avec des aiguilles droites
01.05.2024 - 16:54DROPS Design answered:
Bonjour Mme Verriele, tout à fait, car on tricote ici chaque partie séparément, en allers et retours sur aiguille circulaire pour avoir suffisamment de place pour toutes les mailles, vous pouvez donc utiliser des aiguilles droites, vos mailles seront juste plus serrées, pensez à bien conserver la bonne tension. Retrouvez ici plus d'infos sur les aiguilles circulaires. Bon tricot!
02.05.2024 - 08:13
![]() MARIANI DOMINIQUE wrote:
MARIANI DOMINIQUE wrote:
Bonjour, J'ai suivi scrupuleusement les indications et les mesures et je me retrouve quand même avec 3 pelotes de trop. Comment cela se fait-il?
23.05.2023 - 10:20DROPS Design answered:
Bonjour Mme Mariani, votre tension en largeur (nombre de mailles) et en hauteur (nombre de rangs) est-elle la même que pour l'échantillon? Si tel est bien le cas, merci de bien vouloir nous indiquer quelle taille vous avez tricoté, nos stylistes pourront ainsi vérifier, merci d'avance. Bon tricot!
23.05.2023 - 13:59
![]() MARIANI DOMINIQUE wrote:
MARIANI DOMINIQUE wrote:
Bonjour, sur le schéma l encolure dos n'est pas la même que celle du devant. Pourtant les explications disent de faire la même chose dos et devant
16.05.2023 - 20:00DROPS Design answered:
Bonjour Mme Mariani, le schéma utilisé ici est standard, raison pour laquelle l'encolure dos est différente, je vais transmettre le message à nos stylistes pour voir si elles peuvent le modifier), le dos et le devant de ce top sont identiques, comme indiqué dans les explications. Bon tricot!
17.05.2023 - 08:07
![]() Angelica wrote:
Angelica wrote:
Undrar över avmaskning till hals. Enligt beskrivningen är bakstycke och framstycke exakt lika, men enligt måttskissen ser det ut att vara V- hals fram och högre i nacken bak. Jag skulle vilja sticka den som den ser ut i måttskissen. Hur ska jag göra då?
02.05.2021 - 07:39DROPS Design answered:
Hej Angelica, det bliver en V-hals om du følger diagrammet. Men forstykke og bagstykke er ens med mindre du vælger at strikke bagstykket højere uden at følge diagrammet. Vi kan desværre ikke hjælpe med at skrive opskriften om. God fornøjelse!
06.05.2021 - 11:23
![]() Emanuela Verzani wrote:
Emanuela Verzani wrote:
Hi, I am following small side, I start the pattern on row 13 and where do I end it? at the end of the pattern? and then I repeat from row 23 again. OR do i start from row 13, do it all then start from row 1 at next repeat? thanks
02.04.2021 - 22:51DROPS Design answered:
Dear Mrs Verzani, finish diagram then start again from row 1 to last row. Happy knitting!
07.04.2021 - 08:42
![]() Torill Lehre wrote:
Torill Lehre wrote:
Hvor mange ganger sjal rapporten strikkes før det skal økes til ermer?
06.08.2020 - 19:20DROPS Design answered:
Hei Torill. Det kommer an på hvilken størrelse du strikker. Du øker i hver side slik: Øk på hver 4.pinne 0-0-0-8-12-14 ganger og på hver 2.pinne 23-23-24-10-3-0 ganger. Husk at du starter ved pilen i din størrelse i diagrammet. God Fornøyelse!
10.08.2020 - 11:45
|
|||||||||||||
Beach Day#beachdaytop |
|||||||||||||
|
|
|||||||||||||
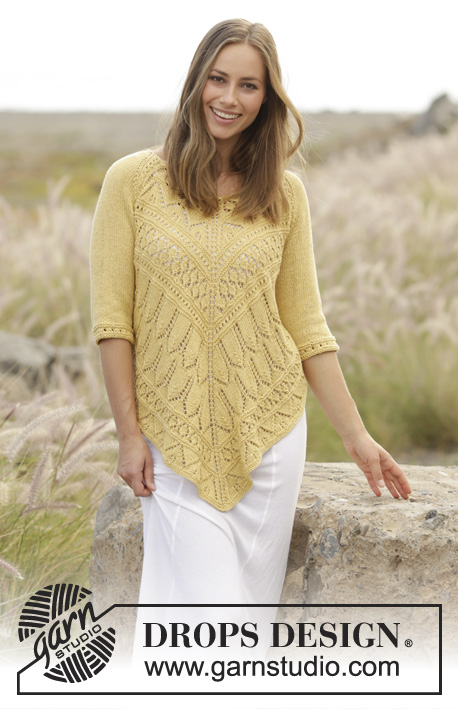
Top with lace pattern, worked bottom up in DROPS Paris. Sizes S - XXXL.
DROPS 176-8 |
|||||||||||||
|
RIDGE/GARTER STITCH (worked back and forth): 1 ridge = Knit 2 rows. PATTERN: See diagrams A.1 to A.3. The diagrams show all rows in the pattern from the right side. SEED STITCH: ROW 1: * Knit 1, purl 1 *, repeat from *-* until there is 1 stitch left, knit 1. ROW 2: Knit over purl and purl over knit. Repeat ROW 2 consecutively. INCREASE TIP: Increase 1 stitch by making a yarn over. On the next row purl the yarn overs twisted to prevent holes. The increased stitches are worked in stockinette stitch. ---------------------------------------------------------- TOP: The piece is worked in 2 sections which are sewn together at the end. BACK PIECE: Cast on 71-77-83-93-103-113 stitches with circular needle size 5 mm / US 8 and Paris. Work 4 rows SEED STITCH – see description above. Now work the pattern as follows from the right side: Work 1 edge stitch in GARTER STITCH – see description above, work 23-26-29-34-39-44 stitches stockinette stitch, start on the 13th-9th-7th-3rd-1st-29th row in the diagram and work A.1 (= 23 stitches), work 23-26-29-34-39-44 stitches stockinette stitch, 1 edge stitch in garter stitch. Continue the pattern in this way back and forth, on the next row from the right side increase 1 stitch inside the 1 edge stitch in garter stitch in each side – READ INCREASE TIP. Increase in this way every 4th row 0-0-0-8-12-14 times and every 2nd row 23-23-24-10-3-0 times. REMEMBER THE GAUGE! At the end of the next 2 rows, cast on 10-9-7-9-9-7 new stitches for the sleeves = 137-141-145-147-151-155 stitches. Now work the pattern as follows from the right side: Work 2 edge stitches in seed stitch, work A.2 (= 7 stitches), work stockinette stitch and A.1 as before until there are 9 stitches left on the needle, work A.2 and finish with 2 edge stitches in seed stitch. When the piece measures 40-42-43-45-46-48 cm / 15¾"-16½"-17"-17¾"-18"-19" and a complete repeat of A.1 has been worked in height the bind off for neck starts and each shoulder is finished separately. READ THE ENTIRE SECTION BEFORE CONTINUING! Work diagram A.3 above A.1, work as before over the other stitches, AT THE SAME TIME the middle stitch should be bind off for neck as shown in diagram (A.3 is then divided and shows the pattern on each side of the neck, the pattern in A.3 should be worked 1 time, then work in stoking stitch). Bind off stitches on each row from the neck as follows: bind off 2 stitches 8 times in all sizes and 1 stitch 2-3-3-4-4-5 times = 50-51-53-53-55-56 stitches on the shoulder. Work the other shoulder in the same way. FRONT PIECE: Cast on and work as for the back piece. ASSEMBLY: Sew the shoulder seams with graft stitches. Sew the sleeve seam. Sew the side seam inside the 1 edge stitch in garter stitch in each side. Repeat on the other side. NECKLINE: Crochet with hook size 5 mm / H/8 an edge around the neck as follows: Work 1 single crochet up on the shoulder, * work 1 chain stitch, skip approx. 1 cm / ⅜", 1 single crochet *, repeat from *-* around the whole neckline, finish with 1 chain stitch and 1 slip stitch in the single crochet from the beginning of the round. Cut and fasten the strand. |
|||||||||||||
Diagram explanations |
|||||||||||||
|
|||||||||||||
 |
|||||||||||||
 |
|||||||||||||
 |
|||||||||||||
Have you finished this pattern?Tag your pictures with #dropspattern #beachdaytop or submit them to the #dropsfan gallery. Do you need help with this pattern?You'll find 28 tutorial videos, a Comments/Questions area and more by visiting the pattern on garnstudio.com. © 1982-2026 DROPS Design A/S. We reserve all rights. This document, including all its sub-sections, has copyrights. Read more about what you can do with our patterns at the bottom of each pattern on our site. |
|||||||||||||


With over 40 years in knitting and crochet design, DROPS Design offers one of the most extensive collections of free patterns on the internet - translated to 17 languages. As of today we count 324 catalogs and 12290 patterns - 12280 of which are translated into English (US/in).
We work hard to bring you the best knitting and crochet have to offer, inspiration and advice as well as great quality yarns at incredible prices! Would you like to use our patterns for other than personal use? You can read what you are allowed to do in the Copyright text at the bottom of all our patterns. Happy crafting!
Post a comment to pattern DROPS 176-8
We would love to hear what you have to say about this pattern!
If you want to leave a question, please make sure you select the correct category in the form below, to speed up the answering process. Required fields are marked *.