
Popular categories
Looking for a yarn?


Comments / Questions (212)
![]() Tineke Van Rijn-Smits wrote:
Tineke Van Rijn-Smits wrote:
Ik brei maat 8/10 jaar en heb problemen met de mouwen. Na het samenbreien in M1 van de laatste steek in de eerste naald met de eerste steek op de eerste naald moet ik de markeerder ergens plaatsen. Is dat voor of na de laatste twee samengebreide steken? Klopt het dat de afkantingen in de mouwen in het gaatjespatroon plaatsvinden terwijl op het lijf de afkantingen boven het 'samenbrei'patroon plaatsvinden? Dank alvast voor uw antwoord.
28.04.2026 - 11:38
![]() Catherine SOTTO wrote:
Catherine SOTTO wrote:
Tricotage de la manche taille 5/7 ans Commencer par la 11eme-1ere-4eme-7eme maille du diagramme M1 à partir de la droite. Par quelle maille dois-je commencer ? Dois-je suivre le diagramme à partir de la 11e maille? Merci
23.04.2026 - 17:27DROPS Design answered:
Bonjour Mme Sotto, la taille 5/7 ans est la 2ème taille, vous commencez alors M.1 par la 1ère maille du diagramme à partir de la droite. Bon tricot!
24.04.2026 - 08:10
![]() Anna wrote:
Anna wrote:
Zamykanie oczek podkroju rękawków przy wykonywaniu rękawków i T/P , w rękawach - 7 oczek , przy wykonywaniu tył/ przód - 6 oczek. To chyba jest błąd , powinno być chyba po równo oczek
13.04.2026 - 20:47DROPS Design answered:
Witaj Aniu, zgodnie z opisem, w 3-cim rozmiarze powinnaś zamknąć po 6 oczek z każdej strony na podkroje rękawów: 'przerobić 34-37-41-44 o., zamknąć luźno 7-7-6-6 o. na podkrój rękawa, przerobić 58-65-72-79 o., zamknąć luźno 7-7-6-6 o. na podkrój rękawa i przerobić pozostałe oczka w rzędzie (= 34-37-41-44 o.). Odłożyć i przerabiać rękawy.' Pozdrawiamy!
14.04.2026 - 13:10
![]() Dorothee wrote:
Dorothee wrote:
Hallo! Ich habe das Gefühl das Muster M1 verschiebt sich nach re. Ich beginne: 5 re,* 2x2 re zusammen, 1re, 4xUmschlag mit 1re dazwischen (3 re), 1 re , 2x2 re zusammen* stricken. In der nächsten Reihe ebenso, aber trotz Überprüfung des M1 Diagrams verschiebt sich das Muster. Ich verzweifle!
11.03.2026 - 20:59DROPS Design answered:
Liebe Dorothee, Sie beschreiben das Muster korrekt, wobei Sie nach der ersten Reihe (mit dem Zusammenstricken und den Umschlägen) noch 1 Rück-Reihe links und 2 Reihen glatt rechts stricken und dann wieder die Loch-Reihe. Markieren Sie sich am besten jeden einzelnen Rapport mit Markierungsfäden, dann behalten Sie das Muster besser im Blick. Es müssen immer 13 Maschen in einem Rapport sein (plus je 5 Blenden-Maschen beidseitig). Gutes Gelingen!
11.03.2026 - 21:26
![]() Nadyne wrote:
Nadyne wrote:
Bonjour Je commence le M1 du gilet en muska Quand on enchaîne le M1 , faut il faire entre eux du coup : 4 fois 2 mailles ensemble ou que 2 fois 2 mailles ensembles ? Merci bien
05.03.2026 - 11:42DROPS Design answered:
Bonjour Nadyne, comme vous répétez M.1 en largeur, vous aurez automatiquement 4 x 2 m ens à l'endroit, car vous tricotez ainsi: (2 m ens à l'end x 2, (1 m end, 1 jeté)x4, 1 m end, 2 m ens à l'end x 2); n'hésitez pas à mettre un marqueur entre chaque M.1 (= toutes les 13 mailles), vous pourrez ainsi mieux vérifier votre nombre de mailles. Cette astuce pourra vous être utile pour l'empiècement (pour ne pas manquer les diminutions de M.2). Bon tricot!
05.03.2026 - 17:10
![]() Michaela Christ wrote:
Michaela Christ wrote:
Wie wird die Blende gearbeitet? Wie viele Maschen ?
23.02.2026 - 14:07DROPS Design answered:
Liebe Michaela, welche Blende meinen Sie? Die untere Blende stricken Sie nach dem Anschlagen der Maschen wie beschrieben. Die vorderen Blenden bestehen jeweils aus 5 kraus rechten Maschen. Die Halsblende stricken Sie ganz am Ende, es sind ein paar Reihen kraus rechts, dann ketten Sie ab. Viel Spaß beim Stricken!
24.02.2026 - 08:52
![]() Madame Fischer wrote:
Madame Fischer wrote:
Bonjour, je tricote le modèle 22/22 en taille 11/12 ans ,doit on commencer M2 à tricoter pour pouvoir intercaler les manches sur l aiguille circulaire avec le reste du tricot .Ou dois je mettre les manches avant de commencer M2 mais comment alors ? Cela est nouveau pour moi .Bonne journée et merci d'avance .
13.11.2025 - 11:44DROPS Design answered:
Bonjour Mme Fisher, lorsque vous tricotez l'empiècement, commencez M.2 au 1er rang en 11/12 ans et répétez le diagramme tout le rang; chaque M.2 doit venir se placer au-dessus de chaque M.1 des devants/des manches et du dos. Continuez ensuite M.2 tout simplement jusqu'à la fin (pensez éventuellement à placer des marqueurs entre chaque M.2 pour ne pas oublier des diminutions). Bon tricot!
13.11.2025 - 14:58
![]() Denise wrote:
Denise wrote:
I am making size 8/10. The bind off on the body (for the sleeve) is over the k2tog stitches. But the bind off on the sleeves is over the yo stitches. This means the pieces do not line up when putting the finished sleeves on the needle. Is this correct?
11.11.2025 - 22:18
![]() Madame Fischer wrote:
Madame Fischer wrote:
Bonjour je tricote le modèle children 22-22 en taille 11-12 ans ,en point vague .C' est la première fois que je tricote en rond avec des aiguilles doubles pointes .Est il normal pour la manche que mon endroit du tricot fait face à l' intérieur. Dans l'attente d'une réponse recevez mes salutations et mes remerciements
28.10.2025 - 19:12DROPS Design answered:
Bonjour Mme Fischer, lorsque l'on tricote en rond, on tricote toujours sur l'endroit, autrement dit, les cases blanches vont se tricoter à l'endroit et les cases avec un rond noir vont se tricoter à l'envers. Bon tricot!
30.10.2025 - 18:22
![]() Debaize wrote:
Debaize wrote:
Bonsoir,j'arrive aux dimensions de l'empiecement et là, je bloque totalement, comment fait-on ? Merci
13.10.2025 - 17:34DROPS Design answered:
Bonjour Mme Debaize, lorsque vous avez toutes les mailles sur la même aiguille circulaire, tricotez maintenant le diagramme M.2 avec 5 mailles point mousse de chaque côté; vous allez ainsi diminuer progressivement dans M.2 et vous passerez ainsi de 218-283 m à 90-115 m selon la taille quand le diagramme est terminé. Vous tricotez ensuite un dernier rang de diminutions sur l'endroit = 64-80 m, puis 3 ou 5 rangs endroit pour le col et vous rabattez toutes les mailles (n'oubliez pas les boutonnières). Bon tricot!
15.10.2025 - 08:47
|
|||||||||||||
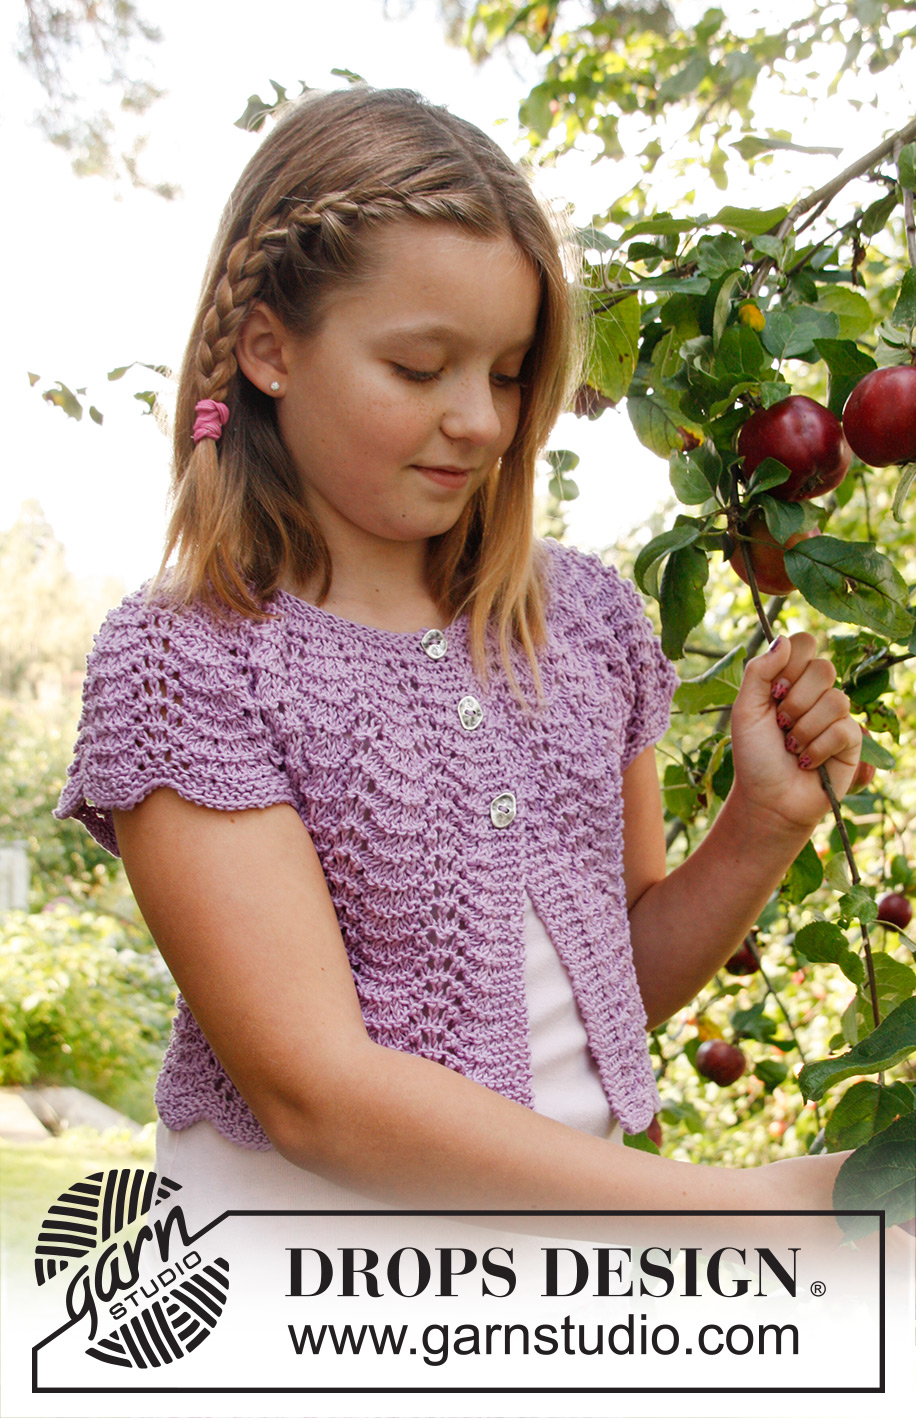
Wonder Wave#wonderwavecardigan |
|||||||||||||
|
|
|||||||||||||
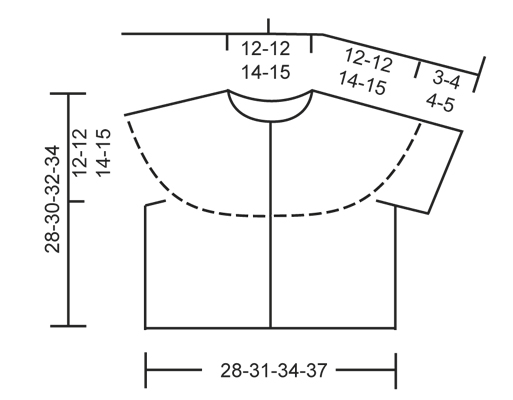
Knitted DROPS jacket with short sleeves, wavy pattern and round yoke in ”Muskat”. Size 3 - 12 years
DROPS Children 22-22 |
|||||||||||||
|
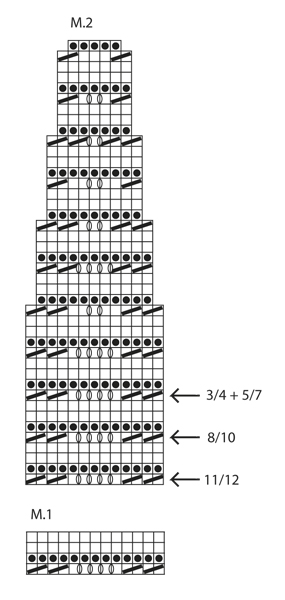
WAVY PATTERN: See diagrams M.1 and M.2. The diagrams show all rows in pattern seen from RS. GARTER ST (in the round on double pointed needles/circular needle): * K 1 round and P 1 round *, repeat from *-*. BUTTON HOLES: Bind off for button holes on right band from RS. 1 button hole = bind off 3rd band st from edge, on next row cast on 1 new st over the bound off st. Bind off for button holes when piece measures: SIZE 3/4 years: 18, 23 and 27 cm / 7", 8¾" and 10½" SIZE 5/7 years: 20, 25 and 29 cm / 8",9¾" and 11½" SIZE 8/10 years: 21, 27 and 31 cm / 8¼",10¼" and 12¼" SIZE 10/12 years: 23, 29 and 33 cm / 9", 11½" and 13" NOTE: Last button hole is bound off on row after diagram M.2 has been worked. --------------------------------------------------------- BODY: Worked back and forth on circular needle from mid front. Loosely cast on 152-166-180-194 sts (includes 5 band sts in each side) on circular needle size 4 mm / US 6 with Muskat. Work first row as follows from RS: * K 10, K 2 tog *, repeat from *-* until 8-10-12-14 sts remain, K these sts = 140-153-166-179 sts. Then K 3 rows back and forth. Continue with diagram M.1 with 5 band sts in each side in garter st until finished measurements. REMEMBER THE GAUGE! When piece measures approx. 16-18-18-19 cm / 6¼"-7"-7"-7½" (adjust so that 1 row remains of diagram M.1), work next row as follows (= WS): Work 34-37-41-44 sts, loosely bind off 7-7-6-6 sts for armhole, work 58-65-72-79 sts, loosely bind off 7-7-6-6 sts for armhole and work the rest of row (= 34-37-41-44 sts). Put piece aside and knit the sleeves. RIGHT SLEEVE: Worked in the round on double pointed needles. Cast on 59-59-74-74 sts on double pointed needles size 4 mm / US 6 with Muskat. Work first round as follows: * K 6, K 2 tog *, repeat from *-* until 3-3-2-2 sts remain, K these sts = 52-52-65-65 sts. Then P 1 round, K 1 round and P 1 round. Insert a marker at the beg of the round. Continue with diagram M.1 - beg in the 11th-1st-4th-7th sts in diagram, count from the right (in size 3/4 and 8/10 years, K first st, and at the end of round K this st tog with the last st on round). Continue working like this until piece measures approx. 3-4-4-5 cm / 1⅛"-1½"-1½"-2" (adjust so that 1 round of diagram M.1 remains). On next round bind off the FIRST 6-6-7-7 sts, work the rest of round = 46-46-58-58 sts. LEFT SLEEVE: Cast on and work as right sleeve but when piece measures 3-4-4-5 cm / 1⅛"-1½"-1½"-2", bind off like this: Size 3/4 and 8/10: bind off the FIRST 6-7 sts on round Size 5/7 and 11/12: bind off the LAST 6-7 sts on round (this is important to make the pattern correct on yoke). YOKE: Slip sleeves on to same circular needle as body where armholes were bind off = 218-231-270-283 sts. NOTE: It is very important that the right sleeve is inserted in the right side and the left sleeve is inserted in the left side so that the pattern fits onwards. Continue with diagram M.2 – start at the arrow for the correct size - with 5 band sts in garter st in each side (= 16-17-20-21 repetitions on the round). AT THE SAME TIME when piece measures 18-20-21-23 cm / 7"-8"-8¼"-9", bind off for BUTTON HOLES - see explanation above. When diagram M.2 has been worked vertically, 90-95-110-115 sts remain on needle. Work next row as follows from RS: K 5 (while at the same time casting/binding off for the last button hole), * K 2 tog, K 1 *, repeat from *-* until 7-6-6-5 sts remain, K these sts = 64-67-77-80 sts. K 3-3-5-5 rows back and forth, then bind off with K from RS. ASSEMBLY: Sew tog the openings under the sleeves and sew on buttons. |
|||||||||||||
Diagram explanations |
|||||||||||||
|
|||||||||||||
 |
|||||||||||||
 |
|||||||||||||
Have you finished this pattern?Tag your pictures with #dropspattern #wonderwavecardigan or submit them to the #dropsfan gallery. Do you need help with this pattern?You'll find 12 tutorial videos, a Comments/Questions area and more by visiting the pattern on garnstudio.com. © 1982-2026 DROPS Design A/S. We reserve all rights. This document, including all its sub-sections, has copyrights. Read more about what you can do with our patterns at the bottom of each pattern on our site. |
|||||||||||||


With over 40 years in knitting and crochet design, DROPS Design offers one of the most extensive collections of free patterns on the internet - translated to 17 languages. As of today we count 324 catalogs and 12291 patterns - 12281 of which are translated into English (US/in).
We work hard to bring you the best knitting and crochet have to offer, inspiration and advice as well as great quality yarns at incredible prices! Would you like to use our patterns for other than personal use? You can read what you are allowed to do in the Copyright text at the bottom of all our patterns. Happy crafting!
Post a comment to pattern DROPS Children 22-22
We would love to hear what you have to say about this pattern!
If you want to leave a question, please make sure you select the correct category in the form below, to speed up the answering process. Required fields are marked *.