DROPS Muskat
DROPS Muskat
100% Cotton
from 2.80 $ /50g
Get the yarn to make this pattern from 11.20$.

The yarn cost is calculated from the pattern’s smallest size and the yarn’s cheapest product type. Looking for an even better price? You might find it on the DROPS Deals!

DROPS SS24

Wonder Wave

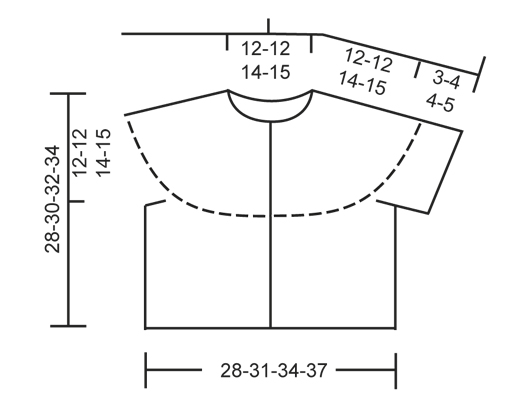
Knitted DROPS jacket with short sleeves, wavy pattern and round yoke in ”Muskat”. Size 3 - 12 years

DROPS Children 22-22
DROPS design: Pattern no R-030-bn
---------------------------------------------------------
Size: 3/4 - 5/7 - 8/10 - 11/12 years
Finished measurements:
Bust: 56-62-68-74 cm / 22"-24½"-26¾"-29"
Full length: 28-30-32-34 cm / 11"-11¾"-12½"-13½"

Materials: DROPS MUSKAT from Garnstudio
200-200-250-250 g color no 04, lilac

DROPS DOUBLE POINTED NEEDLES and CIRCULAR NEEDLE (80 cm / 32") SIZE 4 mm/US 6 - or size needed to get 23 sts x 28 rows in Wavy pattern = 10 x 10 cm / 4" x 4". 1 repetition of pattern should measure approx. 6 cm / 2⅜" in width.

DROPS Angular silver buttons no 534: 3 pieces

-------------------------------------------------------

Alternative Yarn – See how to change yarns here
Yarn Groups A to F – Use the same pattern and change the yarn here
Yarn usage using an alternative yarn – Use our yarn converter here

-------------------------------------------------------

DROPS Muskat
DROPS Muskat
100% Cotton
from 2.80 $ /50g
Get the yarn to make this pattern from 11.20$.

The yarn cost is calculated from the pattern’s smallest size and the yarn’s cheapest product type. Looking for an even better price? You might find it on the DROPS Deals!

Pattern instructions

NOTE: This pattern is written in American English. All measurements in charts are in cm. For conversion from inches to cm - click here. There are different terms for crocheting in American and British English. If this pattern includes crochet, click for "crochet terms" here. For this pattern in British English, please click here.
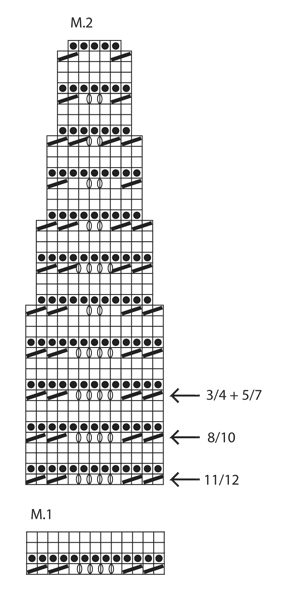
WAVY PATTERN:
See diagrams M.1 and M.2. The diagrams show all rows in pattern seen from RS.

GARTER ST (in the round on double pointed needles/circular needle):
* K 1 round and P 1 round *, repeat from *-*.

BUTTON HOLES:
Bind off for button holes on right band from RS.
1 button hole = bind off 3rd band st from edge, on next row cast on 1 new st over the bound off st.
Bind off for button holes when piece measures:
SIZE 3/4 years: 18, 23 and 27 cm / 7", 8¾" and 10½"
SIZE 5/7 years: 20, 25 and 29 cm / 8",9¾" and 11½"
SIZE 8/10 years: 21, 27 and 31 cm / 8¼",10¼" and 12¼"
SIZE 10/12 years: 23, 29 and 33 cm / 9", 11½" and 13"
NOTE: Last button hole is bound off on row after diagram M.2 has been worked.
---------------------------------------------------------

BODY:
Worked back and forth on circular needle from mid front.
Loosely cast on 152-166-180-194 sts (includes 5 band sts in each side) on circular needle size 4 mm / US 6 with Muskat. Work first row as follows from RS: * K 10, K 2 tog *, repeat from *-* until 8-10-12-14 sts remain, K these sts = 140-153-166-179 sts. Then K 3 rows back and forth.
Continue with diagram M.1 with 5 band sts in each side in garter st until finished measurements. REMEMBER THE GAUGE!
When piece measures approx. 16-18-18-19 cm / 6¼"-7"-7"-7½" (adjust so that 1 row remains of diagram M.1), work next row as follows (= WS): Work 34-37-41-44 sts, loosely bind off 7-7-6-6 sts for armhole, work 58-65-72-79 sts, loosely bind off 7-7-6-6 sts for armhole and work the rest of row (= 34-37-41-44 sts).
Put piece aside and knit the sleeves.

RIGHT SLEEVE:
Worked in the round on double pointed needles.
Cast on 59-59-74-74 sts on double pointed needles size 4 mm / US 6 with Muskat. Work first round as follows: * K 6, K 2 tog *, repeat from *-* until 3-3-2-2 sts remain, K these sts = 52-52-65-65 sts. Then P 1 round, K 1 round and P 1 round. Insert a marker at the beg of the round.
Continue with diagram M.1 - beg in the 11th-1st-4th-7th sts in diagram, count from the right (in size 3/4 and 8/10 years, K first st, and at the end of round K this st tog with the last st on round).
Continue working like this until piece measures approx. 3-4-4-5 cm / 1⅛"-1½"-1½"-2" (adjust so that 1 round of diagram M.1 remains).
On next round bind off the FIRST 6-6-7-7 sts, work the rest of round = 46-46-58-58 sts.

LEFT SLEEVE:
Cast on and work as right sleeve but when piece measures 3-4-4-5 cm / 1⅛"-1½"-1½"-2", bind off like this:
Size 3/4 and 8/10: bind off the FIRST 6-7 sts on round
Size 5/7 and 11/12: bind off the LAST 6-7 sts on round
(this is important to make the pattern correct on yoke).

YOKE:
Slip sleeves on to same circular needle as body where armholes were bind off = 218-231-270-283 sts. NOTE: It is very important that the right sleeve is inserted in the right side and the left sleeve is inserted in the left side so that the pattern fits onwards.
Continue with diagram M.2 – start at the arrow for the correct size - with 5 band sts in garter st in each side (= 16-17-20-21 repetitions on the round).
AT THE SAME TIME when piece measures 18-20-21-23 cm / 7"-8"-8¼"-9", bind off for BUTTON HOLES - see explanation above.
When diagram M.2 has been worked vertically, 90-95-110-115 sts remain on needle. Work next row as follows from RS: K 5 (while at the same time casting/binding off for the last button hole), * K 2 tog, K 1 *, repeat from *-* until 7-6-6-5 sts remain, K these sts = 64-67-77-80 sts. K 3-3-5-5 rows back and forth, then bind off with K from RS.

ASSEMBLY:
Sew tog the openings under the sleeves and sew on buttons.

This pattern has been corrected.

Updated online: 02.05.2012
LEFT SLEEVE: Cast on and work as right sleeve but when piece measures 3-4-4-5 cm / 1 1/8"-1½''-1½''-2'', bind off like this:
Size 3/4 and 8/10: bind off the FIRST 6-7 sts on round
Size 5/7 and 11/12: bind off the LAST 6-7 sts on round
(this is important to make the pattern correct on yoke).

Diagram

All measurements in charts are in cm.

symbols = K from RS, P from WS
symbols = K from WS
symbols = 1 YO between 2 sts
symbols = K 2 tog
diagram
diagram
Do you have a question? See a list of frequently asked questions (FAQ)

Knitting tension is what determines the final measurements of your work, and is usually measured per 10 x 10 cm. It is provided like so: number of stitches in width x number of rows in height - eg: 19 stitches x 26 rows = 10 x 10 cm.

The knitting tension is very individual; some people knit/crochet loosely while others work tightly. You adjust the knitting tension with the needle size, which is why the suggested needle size only serve as a guide! You need to adjust this (up or down) to ensure that YOUR knitting tension matches the knitting tension provided in the pattern. If you work with a different knitting tension than provided you will have a different yarn consumption, and your work will have different measurements than what the pattern suggests.

The knitting tension also determines which yarns can replace each other. As long as you achieve the same knitting tension you can replace one yarn with another.

See DROPS lesson: How to measure your tension/gauge

See DROPS video: How to make a gauge tension swatch

The required amount of yarn is provided in grams, eg: 450 g. To calculate how many balls you’ll need you first need to know how many grams are in 1 ball (25g, 50g or 100g). This information is available if you click on the individual yarn quality on our pages. Divide the amount required with the amount of each ball. For example, if each ball is 50g (the most common amount), the calculation will be as follows: 450 / 50 = 9 balls.

The important thing when changing from one yarn to another is that the knitting/crochet tension remains the same. This is so that the measurements of the finished piece will be the same as on the sketch provided. It is easier to achieve the same knitting tension using yarns from the same yarn group. It is also possible to work with multiple strands of a thinner yarn to achieve the knitting tension of a thicker one. Please try our yarn converter. We recommend you to always work a test swatch.

Please NOTE: when changing yarn the garment might have a different look and feel to the garment in the photo, due to individual properties and qualities of each yarn.

See DROPS lesson: Can I use a different yarn than the one mentioned in the pattern?

All our yarns are categorised into yarn groups (from A to F) according to thickness and knitting tension – group A contains the thinnest yarns and group F the thickest. This makes it easier for you to find alternative yarns to our patterns, should you wish to switch yarn. All yarns within the same group have a similar knitting tension and can easily replace each other. However, different yarn qualities have different structures and properties which will give the finished work a unique look and feel.

Click here for an overview of the yarns in each yarn group

At the top of all our patterns you’ll find a link to our yarn converter, which is a helpful tool should you wish to use a different yarn than suggested. By filling in the yarn quality you wish to replace, the amount (in your size) and number of strands, the converter will present good alternative yarns with the same knitting tension. Additionally it will tell you how much you’ll require in the new qualities and whether you’ll need to work with multiple strands. Most skeins are 50g (some are 25g or 100g).

If the pattern is worked with multiple colours, every colour will have to be converted separately. Similarly, if the pattern is worked with several strands of different yarns (for example 1 strand Alpaca and 1 strand Kid-Silk) you will have to find alternatives for each, individually.

Click here to see our yarn converter

Since different yarns have different qualities and textures we have chosen to keep the original yarn in our patterns. However, you can easily find options among our available qualities by using our yarn converter, or simply pick a yarn from the same yarn group.

It is possible that some retailers still have discontinued yarns in stock, or that someone has a few skeins at home that they would like to find patterns for.

The yarn converter will provide both alternative yarn as well as required amount in the new quality.

If you think it's hard to decide what size to make, it can be a good idea to measure a garment you own already and like the size of. Then you can pick the size by comparing those measures with the ones available in the pattern's size chart.

You'll find the size chart at the bottom of the pattern.

See DROPS lesson: How to read size chart

The needle size provided in the pattern serves only as a guide, the important thing is to follow the knitting tension. And since knitting tension is very individual, you will have to adjust the needle size to ensure that YOUR tension is the same as in the pattern – maybe you’ll have to adjust 1, or even 2 needle sizes, up or down to achieve the correct tension. For this, we recommend that you work test swatches.

Should you work with a different knitting tension than the one provided, the measurements of the finished garment might deviate from the measurement sketch.

See DROPS lesson: How to measure your tension/gauge

See DROPS video: How to make a gauge tension swatch

Working a garment top-down provides more flexibility and room for personal adjustment. For example it is easier to try the garment on while working, as well as making adjustments to length of yoke and shoulder caps.

The instructions are carefully explaining every step, in the correct order. Diagrams are adjusted to the knitting direction and are worked as usual.

The diagram depicts all rows/rounds, and every stitch seen from the right side. It is read from bottom to top, from right to left. 1 square = 1 stitch.

When working back and forth, every other row is worked from the right side and every other row is worked from the wrong side. When working from the wrong side, the diagram will have to be worked reversed: from left to right, knit stitches are purled, purl stitches are knit etc.

When working in the round every round is worked from the right side and the diagram are worked from right to left on all rounds.

See DROPS lesson: How to read knitting diagrams

The diagram depicts all rows/rounds, and every stitch seen from the right side. It is worked from bottom to top, from right to left.

When working back and forth every other row is worked from the right side: from right to left and every other row is worked from the wrong side: from left to right.

When working in the round, every row in the diagram are worked from the right side, from right to left.

When working a circular diagram you start in the middle and work your way outwards, counter clockwise, row by row.

The rows usually start with a given number of chain stitches (equivalent to the height of the following stitch), this will either be depicted in the diagram or explained in the pattern.

See DROPS lesson: How to read crochet diagrams

Instructions for working several diagrams after each other on the same row/round, will often be written like so: “work A.1, A.2, A.3 a total of 0-0-2-3-4 times". This means you work A.1 once, then A.2 is worked once, and A.3 is repeated (in width) the number of times provided for your size – in this case like so: S = 0 times, M = 0 times, L=2 times, XL= 3 times and XXL = 4 times.

The diagrams are worked as usual: begin with the first row in A.1, then work the first row in A.2 etc.

See DROPS lesson: How to read knitting diagrams

See DROPS lesson: How to read crochet diagrams

The total width of the garment (from wrist-to-wrist) will be larger in the larger sizes, despite the actual sleeves being shorter. The larger sizes have longer sleeve caps and wider shoulders, so there will be a good fit in all sizes.

The measurement sketch/schematic drawing provides information regarding the full length of the garment. If it’s a jumper or a jacket the length is measured from the highest point on the shoulder (usually closest to the neckline), and straight down to the bottom of the garment. It is NOT measured from the tip of shoulder. Similarly, the length of yoke is measured from the highest point on the shoulder and down to where yoke is split into body and sleeves.

See DROPS lesson: How to read a schematic drawing

Diagrams are often repeated on the round or in height. 1 repeat is the diagram the way it appears in the pattern. If it says to work 5 repeats of A.1 in the round, then you work A.1 a total of 5 times after/next to each other in the round. If it says to work 2 repeats of A.1 vertically/in height you work the entire diagram once, then begin again at the start and work the entire diagram one more time.

Chain stitches are slightly narrower than other stitches and to avoid working the cast-on edge too tight, we simply chain more stitches to begin with. The stitch count will be adjusted on the following row to fit the pattern and measurement sketch.

The rib edge is more elastic and will contract slightly compared to, for example, stocking stitch. By increasing before the rib edge, you avoid a visible difference in width between the rib edge and the rest of the body.

It’s very easy to cast off too tightly, and by making yarn overs while casting off (and simultaneously casting these off) you avoid a too tight cast off edge.

See DROPS video: How to bind off with yarn overs (yo)

To achieve an even increase (or decrease) you can increase on, for example: every 3rd and 4th row alternately, like so: work 2 rows and increase on the 3rd row, work 3 rows and increase on the 4th. Repeat this until the increase is complete.

See DROPS lesson: Increase or decrease 1 st on every 3rd and 4th row alternately

Should you prefer to work in the round instead of back and forth, you may of course adjust the pattern. You’ll need to add steeks mid-front (usually 5 stitches), and follow the instructions. When you would normally turn and work from the wrong side, simply work across the steek and continue in the round. At the end you’ll cut the piece open, pick up stitches to work bands, and cover the cut edges.

See DROPS video: How to knit steeks and cut open

Should you prefer to work back and forth instead of in the round, you may of course adjust the pattern so you work the pieces separately and then assemble them at the end. Divide the stitches for the body in 2, add 1 edge stitch in each side (for sewing) and work the front and back pieces separately.

See DROPS lesson: Can I adapt a pattern for circular needles into straight needles?

Pattern repeats can vary slightly in the different sizes, in order to get the correct proportions. If you’re not working the exact same size as the garment in the photo, yours might deviate slightly. This has been carefully developed and adjusted so that the complete impression of the garment is the same in all sizes.

Make sure to follow instructions and diagrams for your size!

If you have found a pattern you like which is available in women’s size it’s not very difficult to convert it to men’s size. The biggest difference will be the length of sleeves and body. Start working on the women size that you think would fit across the chest. The additional length will be worked right before you cast off for the armhole/sleeve cap. If the pattern is worked top-down you can add the length right after the armhole or before the first decrease on sleeve.

Regarding additional yarn amount, this will depend on how much length you add, but it is better with a skein too many than too few.

All yarns will have excess fibres (from production) that might come off as lint or shedding. Brushed yarns (ie hairier yarns) have more of these loose, excess fibres, causing more shedding.

Shedding also depends on what is worn under or over the garment, and whether this pulls at the yarn fibres. It’s therefore not possible to guarantee that there will be no shedding

Below are some tips on how to get the best result when working with hairier yarns:

1. When the garment is finished (before you wash it) shake it vigorously so the looser hairs come off. NOTE: do NOT use a lint roller, brush or any method that pulls at the yarn.

2. Place the garment in a plastic bag and put it in your freezer - the temperature will cause the fibres to become less attached to each other, and excess fibres will come off easier.

3. Leave in the freezer for a few hours before taking it out and shaking it again.

4. Wash the garment according to the instructions on the yarn label.

Pilling is a natural process that happens to even the most exclusive of fibers. It's a natural sign of wear and tear that is hard to avoid, and that is most visible in high friction areas of your garment like a sweater's arms and cuffs.

You can make your garment look as new by removing the pilling, using a fabric comb or a pill/lint remover.

Still can't find the answer you need? Then scroll down and leave your question so one of our experts can try to help you. This will be done normally within 5 to 10 working days.
In the meantime, you can read the questions and answers that others have left to this pattern or join the DROPS Workshop on Facebook to get help from fellow knitters/crocheters!

You might also like...

Wonder Wave

Sonja Eliassen, Norway

Wonder Wave

Becky, United Kingdom

Post a comment to pattern DROPS Children 22-22

We would love to hear what you have to say about this pattern!

If you want to leave a question, please make sure you select the correct category in the form below, to speed up the answering process. Required fields are marked *.

Comments / Questions (179)

country flag Chantal wrote:

Bonjour Je tricote ce gilet en taille 3/4 ans Pour la manche droite, pour commencer le point vague ( M1 ), vous indiquez de commencer par la 11 ème maille du diagramme, est ce que c'est pour la taille 3/4 ans ? Si oui, est ce que ça veut dire qu'il faut commencer par 3x2 mailles tricotées ensemble ?

08.06.2020 - 13:18

DROPS Design answered:

Bonjour Chantal, en taille 3/4 ans, commencez par 1 m end (= 11ème m du diagramme), tricotez le diagramme vers la gauche (= soit 2 m ens à l'end pour terminer le 1er motif) et répétez le (en lisant toutes les cases de droite à gauche) jusqu'à ce qu'il reste 1 m, terminez par tricoter ensemble à l'endroit cette maille (= la dernière du tour) et la 1ère maille. Bon tricot!

08.06.2020 - 16:03

country flag Sab wrote:

Bonjour, Serait-il possible d'avoir les explications de ce modèle pour les tailles adultes ? Merci

26.05.2020 - 18:09

DROPS Design answered:

Bonjour Sab, vous trouverez ici tous nos modèles de gilets femme au point de vagues. Bon tricot!

27.05.2020 - 08:31

country flag Shalini D'Souza wrote:

Is there a crochet pattern for this top. Can you please post

26.05.2020 - 16:27

DROPS Design answered:

Dear Mrs D'Souza, we do not have any crocheted version to this pattern - please find our crocheted jacket for children here. Happy crocheting!

26.05.2020 - 16:50

country flag Augusta wrote:

Jeg vil til at starte denne søde sommer kort bluse til mit barnebarn. Når man har slået op med 152 skal det første og det sidste 5 masker være ret hele vejen? på forhånd tak. Med venlig hilsen Augusta

16.05.2020 - 08:58

DROPS Design answered:

Hej Ja, du stickar de 5 första och de 5 sista m i retstrik hele vejen færdig mål (det är stolpem). Mvh DROPS Design

18.05.2020 - 12:24

country flag Lis Christensen wrote:

Jeg strikker den lille kortærmede trøje Wonder Wave i str. 3/4.\\r\\nHvordan skalærme mønsteret M1 strikkes, når jeg strikker på strømpepinde, hvor der ingen vrangpinde er?\\r\\nMønsteret er fint strikket frem og tilbage på rundpind. I diagrammet M1 strikkes vrang over vrang, hvad gør jeg på strømpepinde?\\r\\nHar læst kommentarerne, men kan desværre ikke finde svar der.\\r\\nPå forhånd tak for hjælpen\\r\\nVenlig hilsen Lis

16.05.2020 - 01:06

country flag Susanne wrote:

Jeg strikker blusen i str. 3-4 og er i gang med højre ærme. Jeg begynder omgangen på mønstret i 11. maske med 1 ret, 2 ret sammen osv. og så strikker jeg den første maske 2 ret sammen med den sidste maske på pinden. Men er denne maske så første eller sidste maske på pinden?

11.05.2020 - 11:30

DROPS Design answered:

Hej Susanne, jeg tror ikke jeg forstår dit spørgmål, de nye masker strikkes over ærmerne på samme måde som de masker du er kommet til i diagrammet, og som strikkes over de andre masker... håber det giver svar på dit spørgsmål :)

12.05.2020 - 15:45

country flag Suzanne wrote:

Bonjour Je reviens vers vous suite au diagramme M2 que je ne comprenais pas , mais après avoir bien observé celui-ci, j'ai réussi à comprendre les explications et j'ai terminé mon petit boléro et ravie de l avoir réussi ! Je vous prie de m'excuser pour cette question résolue maintenant. J'ai d'autres projets de tricots et crochets en cours, dans toutes vos collections variées. Vraiment , c'est un réel plaisir de créer avec tous vos jolis modèles. Bien cordialement

11.05.2020 - 09:28

country flag Suzanne wrote:

Bonjour J'adore tous les modèles tricot , crochet que vous présentez. En ce moment je tricote ce petit gilet que je trouve magnifique pour la taille 3/4 ans. Cependant, j'ai quelques difficultés pour insérer la manche tricotée sur des aiguilles à pointes, au dos et devant. Merci de m'expliquer..

04.05.2020 - 19:24

DROPS Design answered:

Bonjour Suzanne et merci. Cette vidéo montre comment insérer les manches tricotées en rond - les mailles rabattues de la manche contre celles rabattues pour les emmanchures. Les premiers rangs sont parfois un peu compliqués, n'hésitez pas à utiliser des aiguilles doubles pointes/une autre circulaire si besoin, après quelques rangs, le travail sera plus simple. Bon tricot!

05.05.2020 - 10:29

country flag Marie Louise Valentini wrote:

Bonjour je viens vers vous concernant le modèle en 3/4ans ci-dessus lorsque que je fais le diagramme m1 pour le dos et devant je me retrouve avec 20 en plus sur mon aiguille pourquoi cela .Je fais 10 m end 3×2m ens. 5×1jeté 1m end 3×2m ens tout le long 10m de bord. Merci pour votre réponse. Cordialement Mme Valentini

26.04.2020 - 11:09

DROPS Design answered:

Bonjour Mme Valentini, en taille 3/4 ans vous devez avoir 140 mailles que vous allez tricoter ainsi: 5 m point mousse, répétez 10 fois les 13 mailles de M.1 et terminez par 5 m point mousse, soit: 5 -130+5=140 m. Pensez à mettre un marqueur entre chaque diagramme pour bien pouvoir vérifier votre nombre de mailles à chaque fois. Bon tricot!

27.04.2020 - 09:11

country flag Iren wrote:

Hei. Jeg strikker erme, men lurer på om den første rette og den siste som strikkes sammen, blir den første i neste omgang? Skal denne felling gjøres i hver omgang, eller bare den første?

09.03.2020 - 13:48

DROPS Design answered:

Hej Iren, nej du feller kun på første omgang, så du har 52-52-65-65 m. Nu strikker du 1 omg vr osv ifølge opskriften. God fornøjelse!

10.03.2020 - 10:39