
Popular categories
Looking for a yarn?


Comments / Questions (186)
![]() Anna wrote:
Anna wrote:
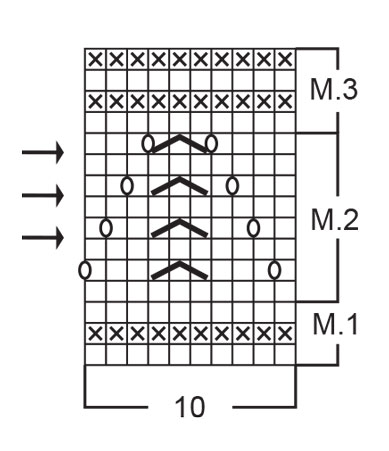
The first stich of the pattern is needed for symmetry.
26.05.2014 - 08:37
![]() Ivette Casiano wrote:
Ivette Casiano wrote:
I'm making the smallest size and don't understand how an odd number of stitches (189) can create a pattern of an even number of stitches(10) when the pattern is vertically even, not slanted.In M2, after I finish the eighth row, I should begin from the first row of M2 again until the desired measurement, correct?
26.05.2014 - 04:53DROPS Design answered:
Dear Mrs Casiano, you work 4 sts in garter st (front edge), repeat 18 times diagram M1, work 1st st in M1 (to make the pattern symetric on both sides), and finish with 4 sts in garter st (front edge). Happy knitting!
26.05.2014 - 09:53
![]() J Bas wrote:
J Bas wrote:
Als er staat dat patroon alleen van de goede kant getoond wordt, wat brei je dan de teruggaande naald?
28.04.2014 - 20:22DROPS Design answered:
Alle naalden zijn weergegeven, zowel de goede als de verkeerde kant. Het telpatroon onderaan is het vooraanzicht, dus zoals het eruit ziet als u het kledingstuk voor u hebt als het af is.
29.04.2014 - 21:15
![]() Marina Haug wrote:
Marina Haug wrote:
Sind die Bord Maschen mit der rsndmasche dabei. Ich habe 199 m ist da alles inkl. Bordm. und Randm Den jch komm nicht hin das Muster wären ja schon 190m
24.04.2014 - 13:59DROPS Design answered:
Liebe Frau Haug, eine zusätzliche Rand-M benötigen Sie nicht. Die M für die Blenden (= Bord-M) sind im Anschlag von 199 M enthalten. Sie haben beidseitig je 4 Blenden-M, also insgesamt 8 M, die Sie kraus re stricken. Somit bleiben noch 191 M für das Muster. Der Mustersatz besteht aus 10 M, d.h. Sie stricken das Muster 19 x und als letzte M (vor der Blende) dann die erste M des Musters, damit es auf beiden Seiten symmetrisch wird.
25.04.2014 - 11:25
![]() Renate Rameil wrote:
Renate Rameil wrote:
Komme nicht mit der rückreihe klar- werden sie gestrickt wie die Maschen erscheinen oder alles rechte Maschen?
19.04.2014 - 21:26DROPS Design answered:
Liebe Frau Rameil, die Rück-R des Musters werden glatt re gestrickt, d.h. links. Die Umschläge stricken Sie in der Rück-R auch links (nicht verschränkt), damit die Löcher des Musters entstehen. Sie stricken also immer abwechselnd eine Loch-R, d.h. eine R mit Umschlägen und Zusammenstricken (= Hin-R) und eine Reihe links (= Rück-R). Die beidseitig 4 Blenden-M jedoch stets kraus rechts stricken.
22.04.2014 - 11:03
![]() Kerstin wrote:
Kerstin wrote:
Ich möchte das Kleid gerne für meine Enkelin stricken. Mir würde es allerdings besser gefallen, wenn es unten geschlossen wäre. Kann ich das dann einfach in Runden stricken? ... zudem brauche ich es in Gr. 74/80 und die Maschenprobe ergibt bei mir 27M x 34R. ... wie rechne ich das nun um, damit es auch passt?
14.04.2014 - 13:36DROPS Design answered:
Liebe Kerstin, Sie sollten die Maschenzahl nicht umrechnen, sondern eine andere, größere Nadelstärke benutzen, sodass Sie die angegebene Maschenprobe erreichen, und dann mit den angegebenen Maschenzahlen stricken. Eine geschlossene Variante erfordert ein wenig Anpassung, da die Blende-M dann anders aufgeteilt werden müssen, am besten lassen Sie sich hierfür bei Ihrem Wollgeschäft beraten.
14.04.2014 - 21:45
![]() Margo wrote:
Margo wrote:
Ik snap Niet helemaal hoe....Moët je nou M1-M2breien tot het bovenstuk of M1-M2-M3?
20.03.2014 - 16:39DROPS Design answered:
Hoi Margo. Je breit eerst teltekening M.1 één keer in de hoogte en vervolgens door met M.2 (steeds herhalen) tot een hoogte van ca 22-31-33-35 cm en dan brei je M.3 één keer in de hoogte.
02.04.2014 - 11:40
![]() Anne-Catherine wrote:
Anne-Catherine wrote:
Har svårt att förstå M1, M2, M3:s text då den är norsk. Har försökt få hjälp av googles översättning men den översätter helt fel. vore mkt tacksam för hjälp. Sen är bilden väldigt suddig på mönstret.
19.03.2014 - 14:25DROPS Design answered:
Hej Anne-Cathrine. Den svenske oversaettelse staar nederst i mönstret under Diagram.
19.03.2014 - 17:00
![]() Lena Sirjany wrote:
Lena Sirjany wrote:
Det är fin modell och mönster matchar till sammans
13.10.2013 - 23:49
![]() Marie Danneels wrote:
Marie Danneels wrote:
Tip : maak een copie van het telpatroon en vergroot dit dan; doe ik altijd en is makkelijk te lezen.
02.08.2013 - 11:02
|
||||||||||||||||
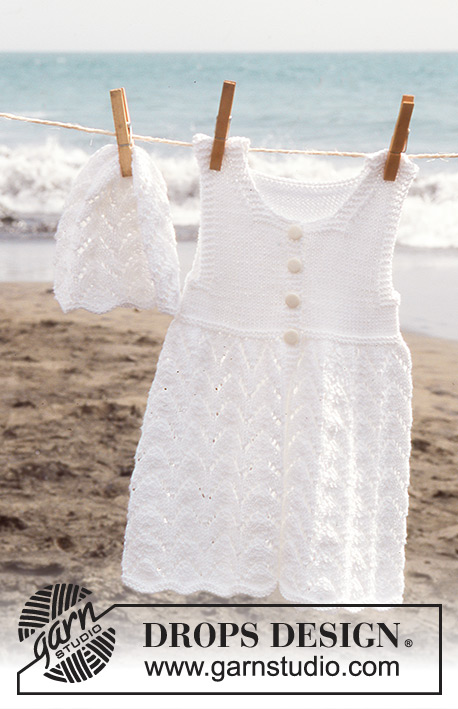
Beach Baby#beachbabydress |
||||||||||||||||
 |
 |
|||||||||||||||
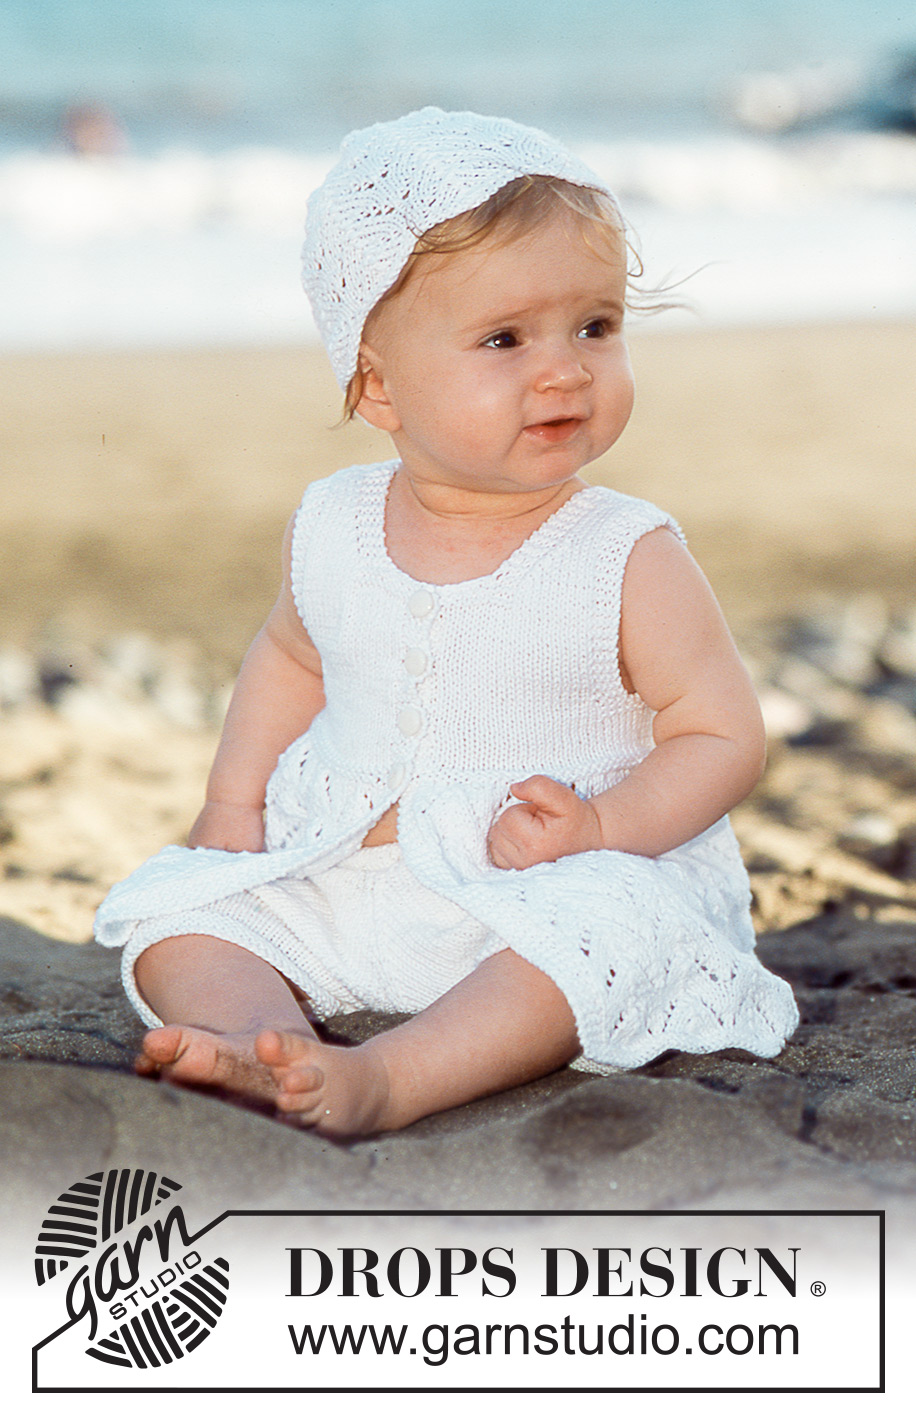
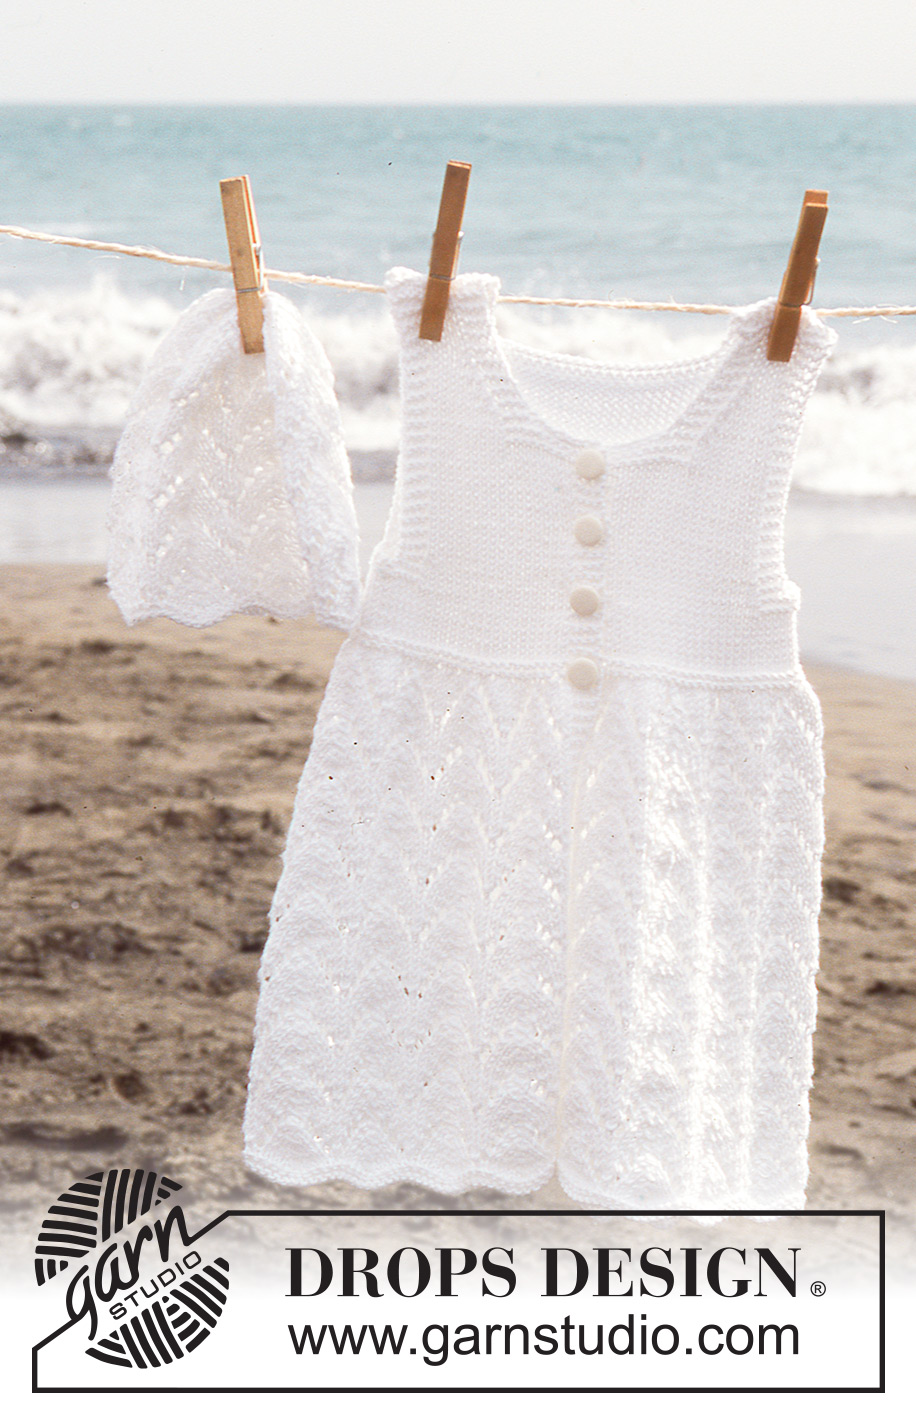
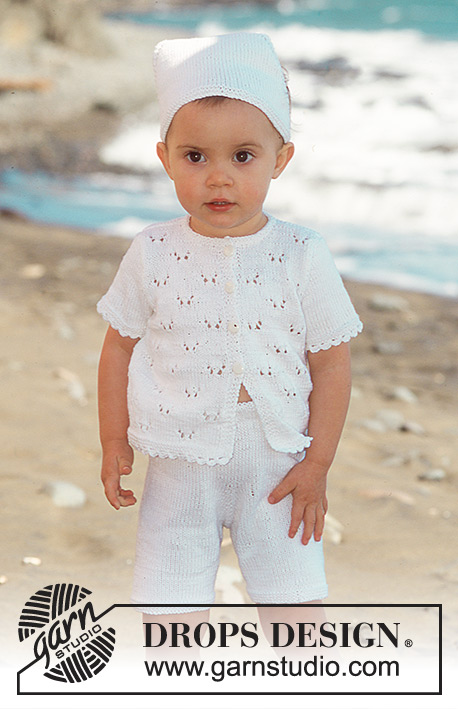
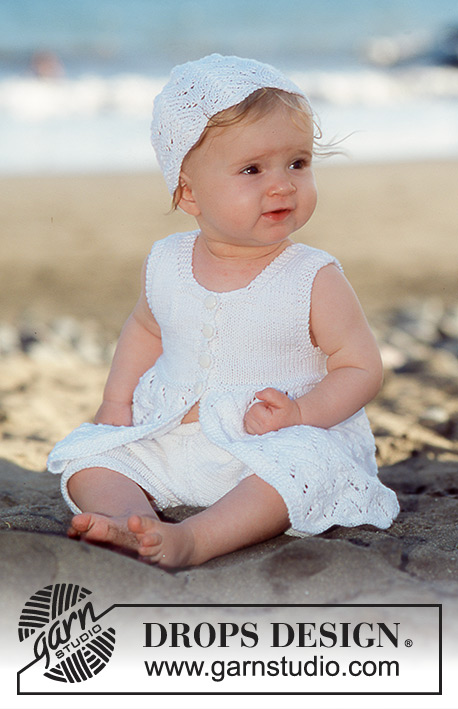
Short sleeved dress and hat in Safran
DROPS Baby 10-7 |
||||||||||||||||
|
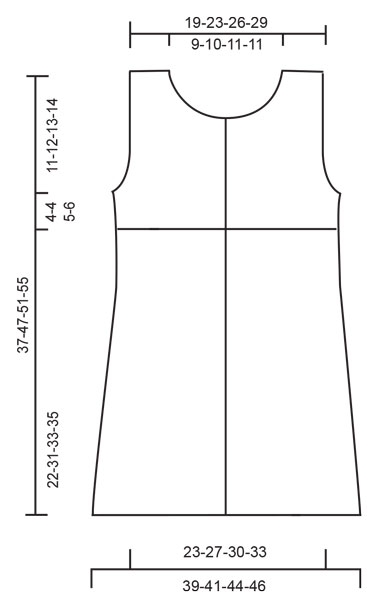
Garter sts (back and forth): Knit all rows Pattern: See diagrams M.1-M.3. The diagram shows the pattern from the right side. Buttonhole: Make buttonholes on right front band on the yoke from RS as follows: bind off 3rd st from edge and make a yo over bind off st on the return row. Make buttonholes as follows: Size 6/9 months: 22, 25, 28 and 31 cm / 8¾"-9¾"-11"-12¼" Size 12/18 months: 31, 34.5, 38 and 41 cm / 12¼"-13½"-15"-16⅛" Size 2 years: 33, 37, 40.5 and 44 cm / 13"-14½"-16"-17¼" Size 3/4 years: 36, 39.5, 44 and 48 cm / 14¼"-15½"-17¼"-19" Decreasing tips (apply to armhole and neck): All dec are done from the RS. Dec as follows before 4 garter sts: K2 tog Dec as follows after 4 garter sts: slip 1 st as if to knit, K1, psso _____________________________________________________________________ DRESS: The dress is knitted back and forth on circular needle from mid front. Cast on 189-199-209-219 sts (includes 4 edge sts each side = mid front, knitted in garter sts throughout) on needle size 3 mm / US 2½. Knit M.1 and continue in M.2. When piece measures 22-31-33-35 cm / 8¾"-12¼"-13"-13¾" knit M.3, at the same time dec 79-69-65-61 sts evenly on the first row (do not dec over edge sts each side) = 110-130-144-158 sts. After M.3 finish the piece in stockinette – edge sts in garter sts and remember buttonholes on right front band, see above. When piece measures 25-34-37-40 cm / 9¾"-13⅜"-14½"-15¾" insert 2 markers, 28-33-37-40 sts in from each side = 54-64-70-78 sts between markers = back piece. Continue with 4 rows in garter st over 6 sts each side of both markers (the remaining sts in stockinette sts) = 12 garter sts each side. On next row bind off the middle 4 of these 12 sts for armhole and complete each piece separately. Left front piece: = 26-31-35-38 sts. Continue in stockinette sts with 4 sts in garter sts towards front edge and towards armhole. Bind off for armhole at side on beg of every row from side: 1 st 2-2-2-2 times = 24-29-33-36 sts (continue with 4 sts in garter sts towards armhole). When piece measures 31-41-44-48 cm / 12¼"-16⅛"-17¼"-19" knit 4 rows with garter sts over 12-13-14-15 sts toward front edge (remaining sts in stockinette sts). On next row bind off 8-9-10-11 sts at front for neck, continue with 4 sts in garter sts towards front edge and bind off to shape the neckline in beg of every row from front: 1 st 4 times = 12-16-19-21 sts left on shoulder. Bind off when piece measures 37-47-51-55 cm / 14½"-18"-20"-21⅝". Right front piece: Like left front piece, but mirrored. Remember buttonholes on front band. Back piece: = 50-60-66-74 sts. Bind off for armhole each side as described for front piece = 46-56-62-70 sts. When piece measures 35-45-49-53 cm / 13¾"-17¾"-19¼"-21" knit 4 rows garter sts over the middle 30-32-32-36 sts (remaining sts in stockinette sts). On next row bind off the middle 22-24-24-28 sts for neck = 12-16-19-21 sts left on each shoulder. Work each shoulder separate and continue with 4 sts in garter sts each side until piece measures 37-47-51-55 cm / 14½"-18"-20"-21⅝" and then bind off. Assembly: Sew shoulder seams and sew on buttons. _____________________________________________________________________ HAT: Size: 6/12 months – 2/4 years To fit head circumference: 42-46 cm / 16½"-18" Cast on 90-100 sts on short circular needle size 3 mm / US 2½. Knit 4 rows garter sts and continue in M.2. Knit 5-6 vertical repeats of M.2 and now insert a marker in the first st in each horizontal repeat = 9-10 markers. Knit 1 more vertical repeat of M.2 and dec on the rows marked with an arrow in the diagram. Dec as follows: slip the st before the st with marker as if to knit, knit tog st with marker and the next st, psso. Repeat this dec in all horizontal repeats by the 3 arrows in diagram, i.e. a total dec of 54-60 sts = 36-40 sts left on needle. After the last round of M.2 knit 1 round in stockinette sts, at the same time knitting all sts tog 2 by 2 = 18-20 sts left. Cut the thread and pull through remaining sts. Sew tight. |
||||||||||||||||
Diagram explanations |
||||||||||||||||
|
||||||||||||||||
 |
||||||||||||||||
 |
||||||||||||||||
Have you finished this pattern?Tag your pictures with #dropspattern #beachbabydress or submit them to the #dropsfan gallery. Do you need help with this pattern?You'll find 21 tutorial videos, a Comments/Questions area and more by visiting the pattern on garnstudio.com. © 1982-2026 DROPS Design A/S. We reserve all rights. This document, including all its sub-sections, has copyrights. Read more about what you can do with our patterns at the bottom of each pattern on our site. |
||||||||||||||||


With over 40 years in knitting and crochet design, DROPS Design offers one of the most extensive collections of free patterns on the internet - translated to 17 languages. As of today we count 325 catalogs and 12298 patterns - 12288 of which are translated into English (US/in).
We work hard to bring you the best knitting and crochet have to offer, inspiration and advice as well as great quality yarns at incredible prices! Would you like to use our patterns for other than personal use? You can read what you are allowed to do in the Copyright text at the bottom of all our patterns. Happy crafting!
Post a comment to pattern DROPS Baby 10-7
We would love to hear what you have to say about this pattern!
If you want to leave a question, please make sure you select the correct category in the form below, to speed up the answering process. Required fields are marked *.