
Popular categories
Looking for a yarn?


Comments / Questions (83)
![]() Bénédicte wrote:
Bénédicte wrote:
Bonjour, Faut-il vraiment tricoter le col avec des aiguilles n°3 et les bordures d'emmanchures en 3,5 ? Ces aiguilles n'étant pas indiquées dans les fournitures, je me demande s'il ce n'est pas une erreur ... Merci de votre réponse
02.04.2026 - 20:06DROPS Design answered:
Bonjour Bénédicte, vous avez probablement raison, je transfère de suite à nos stylistes, mais je pense que vous pouvez tricoter le col en 3,5 comme la bordure des emmanchures. Bon tricot!
07.04.2026 - 17:18
![]() Lisa wrote:
Lisa wrote:
When decreasing for armhole it says decrease every 4th row. Do I do a decrease on my first row and then every 4th or do I do three plain rows then my first decrease row? I decided to do three rows before my first decrease but that would end up being a wrong side row and it says to decrease on the right side.
16.03.2026 - 02:26DROPS Design answered:
Hi Lisa, The first decrease in on the first row, then work 3 rows and work the 2nd decrease on the 5th row, etc. Regards, Drops Team.
16.03.2026 - 06:42
![]() Aldona wrote:
Aldona wrote:
Dziękuję raz jeszcze. Chyba już rozumiem 😊.
16.01.2026 - 12:49
![]() Aldona wrote:
Aldona wrote:
Dziękuję za odpowiedź. Jednak nadal nie wiem, kiedy dodać narzut, który wg schematu A3 ma być w rzędzie powyżej zamkniętych 3 oczek, ale opis narzutu mówi, że ma być zrobiony na lewej stronie robótki. Czy zamknięcie 3 oczek i narzut są w tym samym rzędzie ? Czy może narzut ma być w kolejnym lewym rzędzie ?
16.01.2026 - 10:19DROPS Design answered:
Witaj Aldono, zamknięcie oczek jest na prawej stronie robótki (rząd 1 schematu), a narzut jest na lewej stronie robótki (rząd 2 schematu). Pozdrawiamy!
16.01.2026 - 12:39
![]() Tawn wrote:
Tawn wrote:
Working the neck and 159 stitches on one side seems like too much. I only see 13-15 of the 4 rows pattern, which is 60 max not 159. Please help. I am stuck at this step.
15.01.2026 - 07:11DROPS Design answered:
Dear Tawn, 159 is the total number of stitches you need to pick up along whole neckline, ie along right front piece, back piece and down along left front piece. Then you work in rib like this (seen from RS): 1 edge stitch in garter stitch, A.1 (= knit 1 twisted, P2) repeat from (to) until 2 sts remain, finish with Knit 1 twisted, 1 edge stitch in garter stitch. Continue this rib (from WS, purl 1 twisted and knit 2 in rib) until rib measures 4 cm. Happy knitting!
16.01.2026 - 07:38
![]() Tawn wrote:
Tawn wrote:
Hello, I am at the neck now. I only have a small amount of edge stitches on one side. Can you tell me what I should do to add the 159- 192 stitches on one side. I am knitting a medium.
14.01.2026 - 05:20DROPS Design answered:
Dear Tawn, for neck you should pick up stitches inside 1 edge stitch along neck; starting at the bottom tip start picking up sts along right front piece, then along neckline on back piece then down along left front piece (see how to pick up sts here and here, turn and work the first row from the wrong side with A.1 and 1 edge stitch in garter stitch on each side, make sure your number of sts is divisible by 3 (adjust on first row if necessary), and finish with the first st A.1 to get a symmetrical pattern. Happy knitting!
15.01.2026 - 09:10
![]() Aldona wrote:
Aldona wrote:
Pytanie do schematów A3 i A4. ZAMYKANIE 2 mowi, że oczka należy zamykać na prawej stronie robótki. Schematy A3 i A4 to zamykanie 3 oczek na lewej stronie robótki- wg instrukcji wideo na lewej stronie robótki/lewe oczka. Jak w takim razie zrobić narzut, który też na być na lewej stronie ? Czy dodać go od razu za zamkniętymi oczami ?
13.01.2026 - 10:26DROPS Design answered:
Witaj Aldono, na video jest sama technika jak przerobić 3 oczka razem na lewo i jest to pokazane na lewej stronie robótki. Pamiętaj, że zawsze opis jest nadrzędny, a w opisie będziesz przerabiała 3 oczka razem na lewo wg schematów, na prawej stronie robótki - powstanie taki widoczny strukturalny efekt po zamknięciu tych oczek (ZAMYKANIE OCZEK-2). Pozdrawiamy!
16.01.2026 - 09:45
![]() Tawn wrote:
Tawn wrote:
And my length from bottom to top at 21 stitches is 56 cm. I started with 44 stitches in each side when I cast off the middle stich then decreased 2 on each 4 row (decrease tip 2 on each side - neck and arm). I did a gauge swatch and I have the correct gauge. My vest looks like the version in the picture but the measurements don’t match with the pattern
12.01.2026 - 10:34DROPS Design answered:
Dear Tawn, when all decreases for armholes and neck are done continue until piece measures 56 cm without any further decrease, then cast off all remaining stitches. Decrease for neck are worked over 32 rows (4 times every 4th row + 8 times every 2nd row) so approx. 12 cm + 32 cm before the first decrease for neck = 44 cm from Botton edge. Happy knitting!
14.01.2026 - 07:32
![]() Tawn wrote:
Tawn wrote:
I am knitting a medium. I am at the neck and and right shoulder. When I do only 8 of the decrease tip 2 on the neck side, I do not end up with 21 stitches left. I have to do 16 of the to get to 21 stitches on one shoulder. Can you tell me what I did wrong?
12.01.2026 - 10:26DROPS Design answered:
Dear Tawn, you have a total of 105 sts and cast off/decrease for neck: 5 sts on each side + 10 sts on each side, then slip 1 stitch on a thread (105-30=75-1=74/2 shoulders:37 sts, you decrease 2 sts 4 times in A.2 then 1 st 8 times in A.3 = 37-16= 21 sts left. Happy knitting!
14.01.2026 - 07:28
![]() Tawn wrote:
Tawn wrote:
Hello. I am at the front neck now. Do I start the Decrease tip 2 on the neck on that row?
10.01.2026 - 21:07DROPS Design answered:
Dear Tawn, yes, you follow the Decrease Tip-2 for the beginning of the V-neck decreases. Happy knitting!
11.01.2026 - 22:52
|
||||||||||||||||||||||
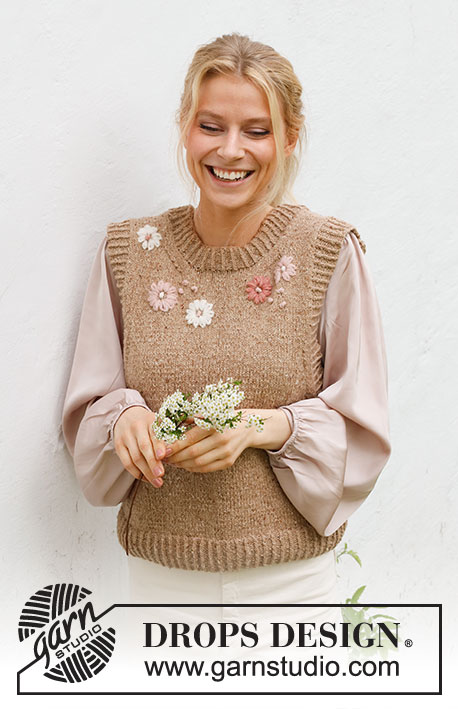
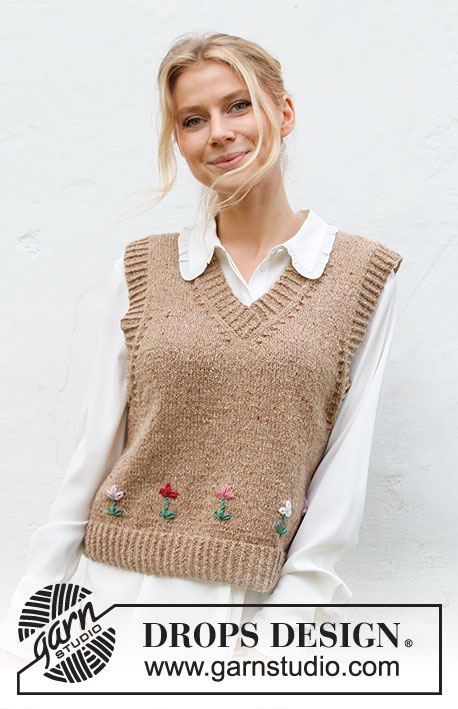
May Flowers Vest#mayflowersvest |
||||||||||||||||||||||
 |
 |
|||||||||||||||||||||
Knitted vest in DROPS Soft Tweed. The piece is worked with V-neck, ribbed edges and embroidered flowers. Sizes S - XXXL. Theme: Embroidery.
DROPS 222-42 |
||||||||||||||||||||||
|
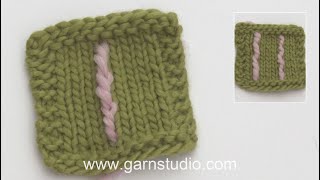
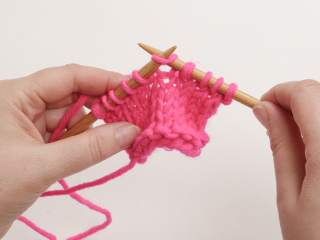
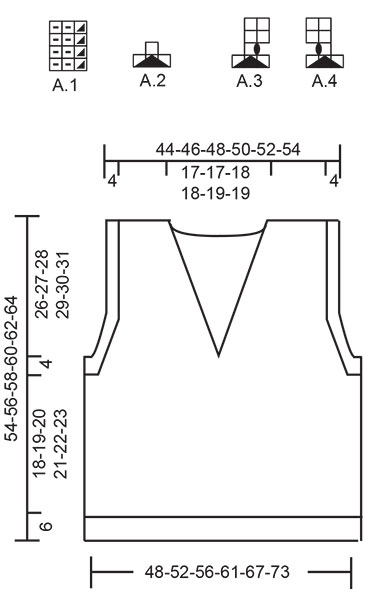
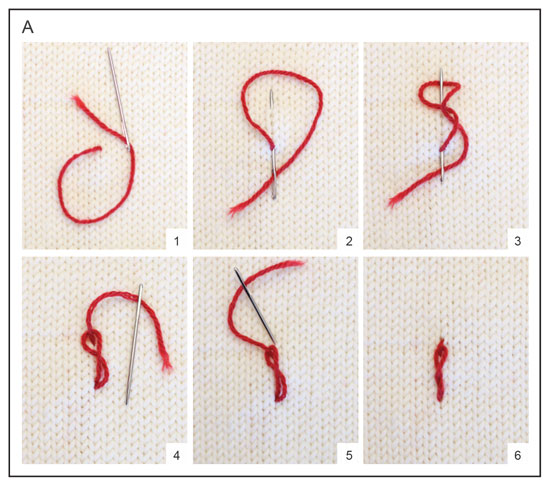
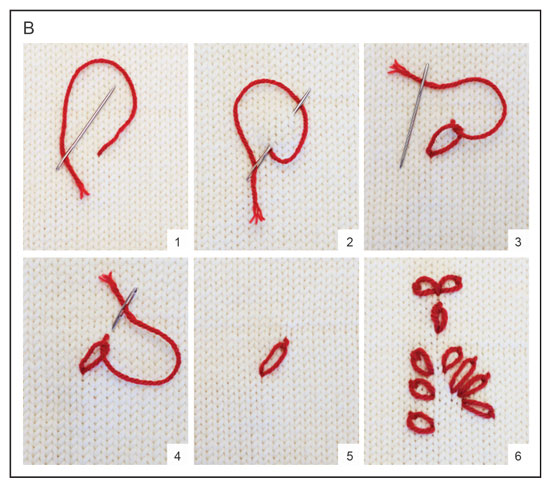
------------------------------------------------------- EXPLANATIONS FOR THE PATTERN ------------------------------------------------------- RIDGE/GARTER STITCH (worked back and forth): Knit all rows. 1 ridge = knit 2 rows. PATTERN: See diagrams A.1 to A.4. The diagrams show all rows in the pattern from the right side. DECREASE TIP-1 (evenly spaced): To work out how to decrease evenly, count the total number of stitches on needle (e.g. 111 stitches) minus the edge stitches (e.g. 2 stitches) and divide the remaining stitches by the number of decreases to be made (e.g. 14) = 7.7. In this example decrease by knitting together alternately each 6th and 7th stitch and each 7th and 8th stitch (approx.). DECREASE TIP-2 (for armholes and V-neck): All decreases are worked from the right side! Decrease 2 stitches at the beginning of the row as follows: Work 1 edge stitch in garter stitch, 2 stitches in stockinette stitch, A.2 over the next 3 stitches (= 2 stitches decreased). Decrease 2 stitches at the end of the row as follows: Work until there are 6 stitches left, work A.2 over the next 3 stitches (= 2 stitches decreased), 2 stitches in stockinette stitch, 1 edge stitch in garter stitch Decrease 1 stitch at the beginning of the row as follows: Work 1 edge stitch in garter stitch, 2 stitches in stockinette stitch, A.3 over the next 3 stitches (2 stitches decreased on the first row and 1 stitch increased on the second row in A.3 = 1 stitch decreased). Decrease 1 stitch at the end of the row as follows: Work until there are 6 stitches left, A.4 over the next 3 stitches (2 stitches decreased on the first row and 1 stitch increased on the second row in A.4 = 1 stitch decreased), 2 stitches in stockinette stitch, 1 edge stitch in garter stitch. ------------------------------------------------------- START THE PIECE HERE: ------------------------------------------------------- VEST – SHORT OVERVIEW OF THE PIECE: The front and back pieces are worked back and forth on circular needles. The pieces is then sewn together. Edges are worked in the round on circular needles around the armholes, and the neck edge is worked back and forth on circular needle. When the whole vest is finished flowers are embroidered on the front piece. BACK PIECE: Cast on 111-120-129-141-153-168 stitches with circular needle size 3.5 MM = US 4 and DROPS Soft Tweed. Work rib back and forth as follows: 1 edge stitch in GARTER STITCH – read description above, A.1 until there are 2 stitches left, work the first stitch in A.1 and 1 edge stitch in garter stitch. Continue this rib for 6 cm = 2⅜". Knit 1 row from the right side where you decrease 14-15-16-18-18-21 stitches evenly spaced – read DECREASE TIP-1 = 97-105-113-123-135-147 stitches. Change to circular needle size 4.5 MM = US 7. Purl 1 row from the wrong side (edge stitches are knitted). Continue with stockinette stitch back and forth with 1 edge stitch in garter stitch on each side until the piece measures 24-25-26-27-28-29 cm = 9½"-9¾"-10¼"-10⅝"-11"-11⅜". REMEMBER THE KNITTING GAUGE! At the beginning of the next 2 rows bind off 5-5-7-7-8-8 stitches for the armholes. Then decrease on each side as follows – read DECREASE TIP-2. Decrease 2 stitches as shown in A.2 every 4th row a total of 0-0-0-2-4-7 times, then decrease 1 stitch as shown in A.3/A.4 every 4th row 8-10-10-9-8-6 times (= 8-10-10-13-16-20 stitches decreased on each side) = 71-75-79-83-87-91 stitches. Continue with stockinette stitch and 1 edge stitch in garter stitch on each side. When the piece measures 52-54-56-58-60-62 cm = 20½"-21¼"-22"-22¾"-23⅝"-24⅜", bind off the middle 31-31-33-33-35-35 stitches for the neck and each shoulder is finished separately. On the next row from the neck bind off 1 stitch = 19-21-22-24-25-27 stitches on the shoulder. Continue with stockinette stitch and 1 edge stitch in garter stitch on each side until the piece measures 30-31-32-33-34-35 cm = 11¾"-12¼"-12½"-13"-13⅜"-13¾" from the bottom of the armhole. Bind off with knit (make sure the bind-off edge is not tight). The piece measures 54-56-58-60-62-64 cm = 21¼"-22"-22¾"-23⅝"-24⅜"-25¼" from the shoulder down. Work the other shoulder in the same way. FRONT PIECE: Cast on 111-120-129-141-153-168 stitches with circular needle size 3.5 MM = US 4 and DROPS Soft Tweed. Work rib back and forth as follows: 1 edge stitch in garter stitch, A.1 until there are 2 stitches left, work the first stitch in A.1, 1 edge stitch in garter stitch. Continue this rib for 6 cm = 2⅜". Knit 1 row from the right side where you decrease 14-15-16-18-18-21 stitches evenly spaced – read DECREASE TIP-1 = 97-105-113-123-135-147 stitches. Change to circular needle size 4.5 MM = US 7. Purl 1 row from the wrong side (edge stitches are knitted). Continue with stockinette stitch back and forth with 1 edge stitch in garter stitch on each side until the piece measures 24-25-26-27-28-29 cm = 9½"-9¾"-10¼"-10⅝"-11"-11⅜". OVERVIEW OF THE NEXT SECTION: You now decrease for the armholes and V-neck at the same time – read the next section before continuing. ARMHOLES: At the beginning of the next 2 rows bind off 5-5-7-7-8-8 stitches for the armholes. Then decrease stitches on each side as follows – remember DECREASE TIP-2. Decrease 2 stitches as shown in A.2 every 4th row 0-0-0-2-4-7 times, then decrease 1 stitch as shown in A.3/A.4 every 4th row 8-10-10-9-8-6 times = 8-10-10-13-16-20 stitches decreased on each side. V-NECK: When the piece measures 31-32-33-34-35-36 cm = 12¼"-12½"-13"-13⅜"-13¾"-14¼", bind off the middle stitch on the row and each shoulder is finished separately. Right shoulder: Continue back and forth and decrease for the neck at the beginning of each row from the right side (from the neck) – remember DECREASE TIP-2. Decrease 2 stitches as shown in A.2 every 4th row 4-4-4-4-4-4 times, then decrease 1 stitch as shown in A.3 every 4th row 8-8-9-9-10-10 times = 16-16-17-17-18-18 stitches decreased for the neck. When all the decreases for the neck and armhole are finished there are 19-21-22-24-25-27 stitches on the shoulder. Continue with stockinette stitch and 1 edge stitch in garter stitch on each side until the piece measures 30-31-32-33-34-35 cm = 11¾"-12¼"-12½"-13"-13⅜"-13¾" from the bottom of the armhole. Bind off with knit (make sure the bind-off edge is not tight). The piece measures 54-56-58-60-62-64 cm = 21¼"-22"-22¾"-23⅝"-24⅜"-25¼" from the shoulder down. Left shoulder: Continue back and forth and decrease for the neck at the end of each row from the right side (towards the neck) – remember DECREASE TIP-2. Decrease 2 stitches as shown in A.2 every 4th row 4-4-4-4-4-4 times, then decrease 1 stitch as shown in A.4 every 4th row 8-8-9-9-10-10 times = 16-16-17-17-18-18 stitches decreased for the neck. When all the decreases for the neck and armhole are finished there are 19-21-22-24-25-27 stitches on the shoulder. Continue with stockinette stitch and 1 edge stitch in garter stitch on each side until the piece measures 30-31-32-33-34-35 cm = 11¾"-12¼"-12½"-13"-13⅜"-13¾" from the bottom of the armhole. Bind off with knit (make sure the bind-off edge is not tight). The piece measures 54-56-58-60-62-64 cm = 21¼"-22"-22¾"-23⅝"-24⅜"-25¼" from the shoulder down. ASSEMBLY: Sew the shoulder seams with grafting stitches. Sew the side seams from the armholes down, inside the 1 edge stitch. NECK: Start from the bottom of the V-neck, use circular needle size 3,5 MM = US 4 and DROPS Soft Tweed. Knit up from the right side 159 to 192 stitches inside the 1 edge stitch around the neck. The number of stitches should be divisible by 3. Work pattern A.1 back and forth with 1 edge stitch in garter stitch on each side – make sure the pattern starts and finishes with the first stitch in A.1 inside the edge stitches, so the pattern is symmetrical on both sides. Continue back and forth like this for 4 cm = 1½". Bind off with knit over knit and purl over purl. Lay the right side of the neck on top of the left side mid-front. Sew the edge stitch neatly to the neck line. Repeat on the inside so the left side is sewn to the right side. SLEEVE EDGES: Start at the side seam under the sleeve with circular needle size 3.5 MM = US 4 and DROPS Soft Tweed. Knit up from the right side 144 to 168 stitches inside the 1 edge stitch around the armhole. The number of stitches should be divisible by 3. Work A.1 in the round for 3½ to 4 cm = 1¼" to 1½". Work 1 more round but in the first 5-5-6-6-7-7 repetitions and the last 6-6-7-7-8-8 repetitions of A.1 under the sleeve, decrease all purl-2 to purl-1 by purling the 2 stitches together. This gives a neater finish to the bottom of the sleeve edge. Bind off with knit over knit and purl over purl. Work the other sleeve edge in the same way. EMBROIDERING: Flowers are embroidered at the bottom of the front piece. Place the flowers in a row approx. 2 cm = ¾" above the rib and 8.5 – 9 cm = 3¼" – 3½" between each one. FLOWER – SHORT OVERVIEW OF THE PIECE: The flower measures approx. 4,5 – 5 cm = 1⅝" – 2" in height and approx. 2,5 cm = 1" in width. The flower consists of 2 leaves at the bottom, 1 stem and 1 flower. First embroider the leaves, then make the stem and finish with the flower itself. The hole flower is worked with twisted chain stitches and chain stitches. LEAVES: The leaves are embroidered with 1 strand color forest green and consist of 2 chain stitches starting from the same hole at the bottom of the flower. Start as follows: STITCH 1: Work 1 chain stitch of approx. 2 cm = ¾" in length, slightly diagonally up and to the right – see diagram B and diagram explanation. STITCH 2: Work the second chain stitch from the same hole, slightly diagonally up and to the left. The leaves are finished. STEM: The stem is embroidered with 1 strand of color forest green and consists of 2 twisted chain stitches in height. Start from the same hole as the leaves started from and work 1 twisted chain stitch of approx. 1.5 cm = ½" straight up between the 2 leaves - see diagram A and the diagram explanation. Work 1 more stitch in height. The stem is finished. Cut and fasten the strand. FLOWER: Each flower is worked with 2 strands and chain stitch, each with a different color: powder pink, dark rose, rose, off white and light pink. They consist of 3 chain stitches, all starting from the same hole where the stem finished. Start as follows: STITCH 1: Work a chain stitch of approx. 1.5 cm = ½", slightly diagonally up to the right – see diagram B and diagram explanation. STITCH 2: Work the second chain stitch from the same hole, slightly diagonally up to the left. STITCH 3: Work the third chain stitch from the same hole but straight up between the other 2 stitches. The flower is finished. Cut and fasten the strand. Work as many flowers as you wish, placing them as you feel is best. |
||||||||||||||||||||||
Diagram explanations |
||||||||||||||||||||||
|
||||||||||||||||||||||
 |
||||||||||||||||||||||
 |
||||||||||||||||||||||
 |
||||||||||||||||||||||
Have you finished this pattern?Tag your pictures with #dropspattern #mayflowersvest or submit them to the #dropsfan gallery. Do you need help with this pattern?You'll find 31 tutorial videos, a Comments/Questions area and more by visiting the pattern on garnstudio.com. © 1982-2026 DROPS Design A/S. We reserve all rights. This document, including all its sub-sections, has copyrights. Read more about what you can do with our patterns at the bottom of each pattern on our site. |
||||||||||||||||||||||


With over 40 years in knitting and crochet design, DROPS Design offers one of the most extensive collections of free patterns on the internet - translated to 17 languages. As of today we count 324 catalogs and 12290 patterns - 12280 of which are translated into English (US/in).
We work hard to bring you the best knitting and crochet have to offer, inspiration and advice as well as great quality yarns at incredible prices! Would you like to use our patterns for other than personal use? You can read what you are allowed to do in the Copyright text at the bottom of all our patterns. Happy crafting!
Post a comment to pattern DROPS 222-42
We would love to hear what you have to say about this pattern!
If you want to leave a question, please make sure you select the correct category in the form below, to speed up the answering process. Required fields are marked *.