
Popular categories
Looking for a yarn?


Comments / Questions (12)
![]() Carolscart wrote:
Carolscart wrote:
Монтировал водяной пол — просмотрел кучу советов в интернете. То пишут «делайте стn
27.08.2025 - 14:18
![]() Pat Merrithew wrote:
Pat Merrithew wrote:
I am looking for the "downlaod" link of the Incoming Tide jacket...where is it?
14.04.2021 - 23:43DROPS Design answered:
Dear Pat, to download the pattern, click on the PRINT icon below the list of tools and materials, then select print as PDF. Happy Knitting!
15.04.2021 - 02:54
![]() LASNE Marie-Andrée wrote:
LASNE Marie-Andrée wrote:
Nous sommes d'accord sur 1 point, 41 attaches.... donc 40 ponts de 7 brides! 1 bride à chaque extrémité, mais pour 2 attaches, il n'y a qu'un pont de 7 brides, pour 3, il y en a 2, etc.... merci mais je vais refaire mon volant plus court. Je continuerai à tricoter ou crocheter vos modèles, ils sont très jolis et variés, merci de votre attention et de vos réponses rapides
08.04.2021 - 06:14DROPS Design answered:
Bonjour Mme Lasne, regardez bien la vidéo pour attacher le volant, elle devrait vous permettre de l'attacher comme il faut avec le bon nombre d'attaches - Bonne continuation!
08.04.2021 - 08:00
![]() Marie-Andrée Lasne wrote:
Marie-Andrée Lasne wrote:
Bonjour, merci pour votre réponse mais elle ne correspond pas à mon problème:j'ai un volant trop long, pour 39 triangles, il faut faire 40 ponts de 7 brides, plus 1 bride pour fixer, plus 5 mailles qui font la première bride pour fixer l'autre côté, soit 7x40+1+5=286 m, or vous dites de monter 291 m...
04.04.2021 - 10:47DROPS Design answered:
Bonjour Mme Lasne, vous crochetez 291 ml et avez un total de 287 brides divisés par 7= 41 points d'attache ; vous les fixez sur le rang de A.4A-B-C soit 41 diminutions ( les 39 de A.4B + celle de A.4A et de A.4C). Bonne continuation!
07.04.2021 - 08:34
![]() Marie-Andrée Lasne wrote:
Marie-Andrée Lasne wrote:
Bonjour, je ne comprends pas comment on fixe le volant: j'ai crocheté en taille M les 291 m, j'ai fixé au crochet à la première diminution puis à chaque pointe des 39 triangles toutes les 7 brides... et j'ai trop de longueur de volant! Ai-je mal compris?Pourquoi ne pas crocheter directement le volant sur le gilet?p
28.03.2021 - 21:55
![]() PASCAL wrote:
PASCAL wrote:
Bonjour, merci pour votre réponse rapide. J’ai compris mon erreur. Je faisais deux fois consécutives 3 m ensembles. Tout est rentré dans l’ordre . Je prends note de votre explication qui éclaircit le diagramme. Merci à vous.
18.03.2021 - 05:27
![]() PASCAL wrote:
PASCAL wrote:
Bonjour, j’ai une difficulté au paragraphe Empiècement. À la partie A.3A - A.3C à tricoter 2 fois sur la hauteur, je n’obtiens pas les 247 mailles totales. En effet, le 3ème rang le diagramme A.3B montre qu’il faut tricoter 3 mailles ensembles, or ces 3 mailles sont à cheval sur les parties A et B et à cheval sur les parties B et C. Comment dois-je lire et tricoter cette partie ? Merci de votre aide.
17.03.2021 - 11:26DROPS Design answered:
Bonjour Pascal, au 3ème rang, vous allez tricoter la dernière maille de A.3A avec les 2 premières mailles de A.3 B (= on a toujours bien 3 m dans A); puis glissez la dernière m de A.3B et tricotez -la avec les 2 premières mailles du A.3B suivant et de A.3C à la fin du rang. Vous aurez ainsi le bon nombre de mailles; soit en S: 5 m point mousse, 1 m end, 3 m de A.3A, 228 m de A.3B (=38 foisx6m), 4 m de A.3c, 1 m end et 5 m point mousse. Bon tricot!
17.03.2021 - 13:16
![]() Jacqueline wrote:
Jacqueline wrote:
222-22 Bonjour je ne comprends pas le diagramme? Je ne vois pas où sont les motifs de 4 si chaque ligne correspond à un rang; c’est un point mousse, il y a juste une petite différence entre A 1 et A2, faut-il enchaîner les deux ou faire ran g 1 A1, rang 2 A2 etc? Merci
01.03.2021 - 15:29DROPS Design answered:
Bonjour Jacquleine, les diagrammes montrent les rangs sur l'endroit, A.1 et A.2 commencent effectivement par 4 rangs endroit (= 1 rang end sur l'end + 1 rang end sur l'env)x2 - 1 case blanche = 1 rang jersey endroit. Vous tricotez d'abord A.1 et terminez par A.2 pour que le motif soit symétrique; autrement dit: 5 m point mousse, répétez A.1, terminez par A.2 et 5 m point mousse. Bon tricot!
01.03.2021 - 16:08
![]() Astrid wrote:
Astrid wrote:
Verspieltes Jäcklein mit toller Schulterpartie sehr schön
11.01.2021 - 15:31
![]() Beate Marie Breili wrote:
Beate Marie Breili wrote:
"Sommerbris" må være et fint navn på denne. Nydelig design og min absolutte favoritt i år :) Gratulerer til designeren !
10.01.2021 - 19:01
|
||||||||||||||||||||||
Incoming Tide#incomingtidecardigan |
||||||||||||||||||||||
 |
 |
|||||||||||||||||||||
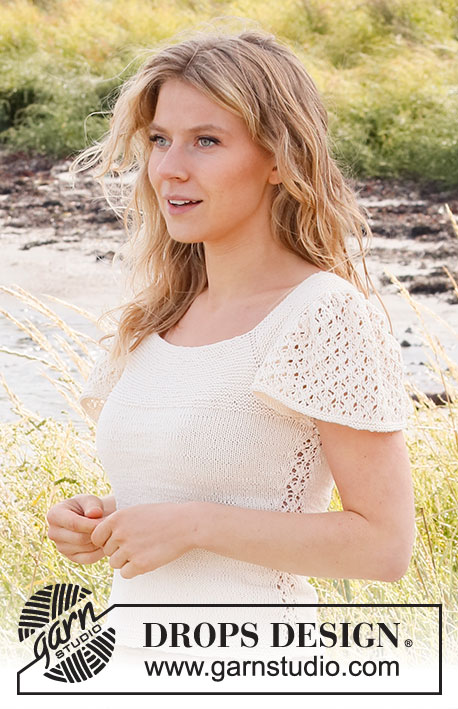
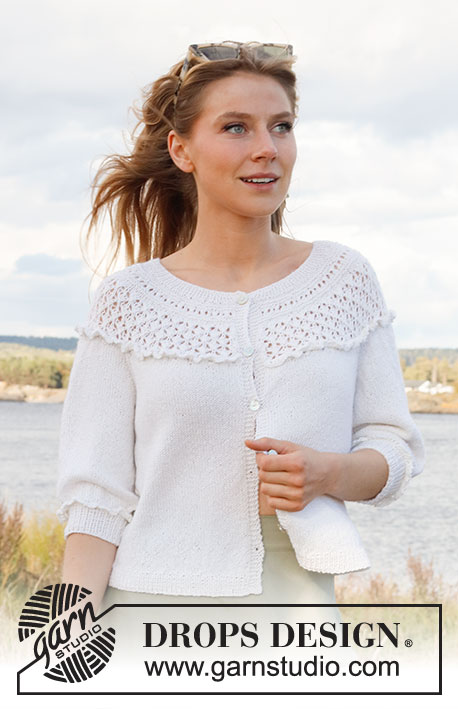
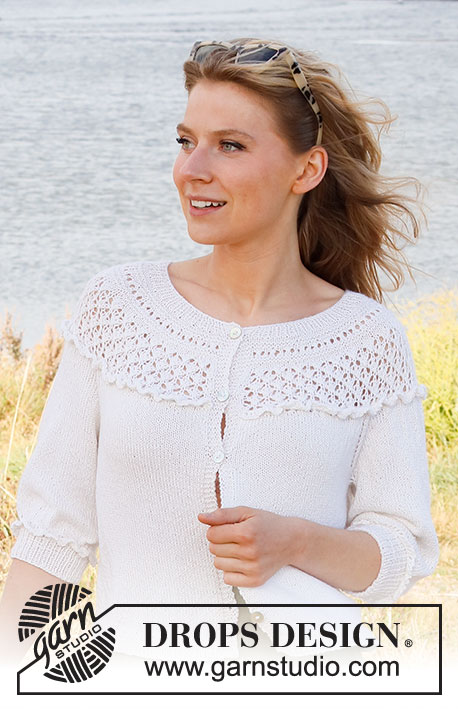
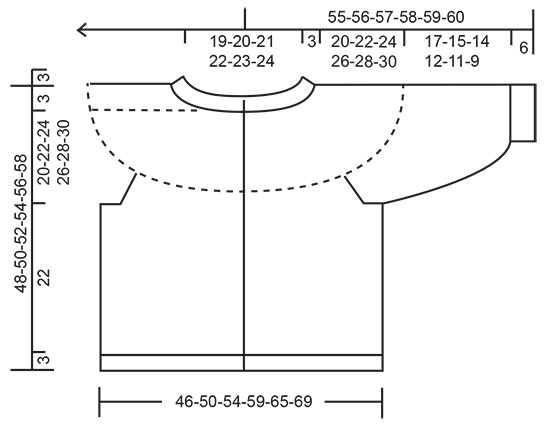
Knitted jacket in DROPS BabyAlpaca Silk. The piece is worked top down with round yoke, raglan, flounces, lace pattern and ¾-length sleeves. Sizes S - XXXL.
DROPS 222-22 |
||||||||||||||||||||||
|
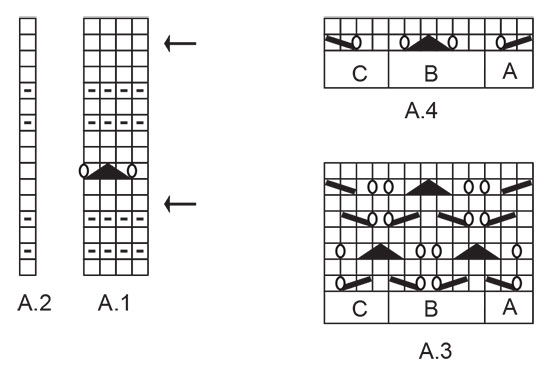
------------------------------------------------------- EXPLANATIONS FOR THE PATTERN: ------------------------------------------------------- RIDGE/GARTER STITCH (worked back and forth): Knit all rows. 1 ridge in height = Knit 2 rows. PATTERN: See diagrams A.1 to A.4. The diagrams show all rows in the pattern from the right side. INCREASE/DECREASE TIP (evenly spaced): To work out how to increase/decrease evenly, count the total number of stitches on needle (e.g. 131 stitches), minus the bands (e.g.10 stitches) and divide the remaining stitches by the number of increases/decreases to be made (e.g. 36) = 3.4. In this example, increase by making 1 yarn over after alternately each 3rd and 4th stitch (do not increase on the bands). On the next row work the yarn overs twisted to avoid holes. When decreasing, knit together alternately each 2nd and 3rd stitch and each 3rd and 4th stitch. RAGLAN: Increase 1 stitch on each side of the markers, in each transition between body and sleeves as follows: Work until there is 1 stitch left before marker, 1 yarn over, knit 2 (marker sits between these 2 stitches), 1 yarn over. On the next row (wrong side) purl the yarn overs twisted to avoid holes. Then work the new stitches in stockinette stitch. A total of 8 stitches increased on each increase-row. BUTTONHOLES: Work buttonholes on the right band (when the garment is worn). Work from the right side when there are 3 stitches left on the row as follows: Make 1 yarn over, knit 2 together and knit 1. On the next row (wrong side), knit the yarn over to leave a hole. The first buttonhole is worked when the rib on the neck measures approx. 2 cm = ¾". Then work the other 4-5-5-5-5-6 buttonholes with approx. 9-8-8½-9-9½-8 cm = 3½"-3⅛"-3¼"-3½"-3⅝"-3⅛" between each one. BINDING-OFF TIP: To avoid the bind-off edge being tight you can bind off with a larger size needle. If the edge is still tight, make 1 yarn over after approx. each 4th stitch at the same time as binding off; the yarn overs are bind off as normal stitches. ------------------------------------------------------- START THE PIECE HERE: ------------------------------------------------------- JACKET – SHORT OVERVIEW OF THE PIECE. The neck and yoke are worked back and forth with circular needle, from mid front and top down. The yoke is divided for body and sleeves and the body continued back and forth with circular needle. The sleeves are worked in the round with double pointed needles/short circular needle, top down. Flounce-edges are worked to finish and crocheted/sewn to the jacket and sleeves. NECK: Cast on 131-135-139-145-149-155 stitches (including 5 band stitches on each side towards mid front) with circular needle size 2.5 MM = US 1.5 and Baby Alpaca Silk. Purl 1 row (= wrong side). The next row is worked as follows from the right side: Work 5 band stitches in GARTER STITCH – read description above, * knit 1, purl 1 *, work from *-* until there are 6 stitches left on the row, knit 1 and finish with 5 band stitches in garter stitch. Continue this rib for 3 cm = 1⅛" – remember the BUTTONHOLES on the right band – read description above. When the rib is finished, knit 1 row from the right side where you increase 36-36-36-38-38-40 stitches evenly spaced – read INCREASE/DECREASE TIP = 167-171-175-183-187-195 stitches. Purl 1 row from the wrong side (yarn overs purled twisted and bands worked in garter stitch). Change to circular needle size 3 MM = US 2,5. Insert 1 marker after the band at the beginning of the row; the yoke is measured from this marker! YOKE: Now work pattern as follows: 5 band stitches in garter stitch, A.1 over the next 156-160-164-172-176-184 stitches (= 39-40-41-43-44-46 repeats of 4 stitches), A.2 over the next stitch, 5 band stitches in garter stitch. Continue back and forth like this. At the same time on the rows with arrows in A.1 increase stitches evenly as follows: Arrow-1: Increase 28-28-28-32-36-36 stitches = 195-199-203-215-223-231 stitches. Arrow-2: Increase 52-54-56-56-66-64 stitches = 247-253-259-271-289-295 stitches. REMEMBER THE KNITTING GAUGE! When A.1 and A.2 have been completed in height continue as follows: 5 band stitches in garter stitch, knit 1, A.3A over the next 3 stitches, A.3B over the next 228-234-240-252-270-276 stitches (= 38-39-40-42-45-46 repeats of 6 stitches), A.3C over the next 4 stitches, knit 1 and 5 band stitches in garter stitch. Continue this pattern back and forth until A.3A - A.3C have been worked 2-2-2-3-3-3 times in height, then work the first 6 rows in the diagrams. Now continue as follows: 5 band stitches in garter stitch, knit 1, A.4A over the next 3 stitches, A.4B over the next 228-234-240-252-270-276 stitches (= 38-39-40-42-45-46 repeats of 6 stitches), A.4C over the next 4 stitches, knit 1 and 5 band stitches in garter stitch. When A.4A to A.4B have been completed in height, the piece measures approx. 13-13-13-15-15-15 cm = 5⅛"-5⅛"-5⅛"-6"-6"-6" from the marker on the neck. On the next row (right side) increase 31-41-51-63-61-67 stitches evenly spaced = 278-294-310-334-350-362 stitches. Insert 4 markers without working the stitches as follows: Marker 1: Count 47-50-52-56-60-63 stitches, insert marker here (= in transition between left front piece and left sleeve). Marker 2: Count 50-52-56-60-60-60 stitches, insert marker here (= in transition between left sleeve and back piece). Marker 3: Count 84-90-94-102-110-116 stitches, insert marker here (= in transition between back piece and right sleeve). Marker 4: Count 50-52-56-60-60-60 stitches, insert marker here (= in transition between right sleeve and right front piece). There are 47-50-52-56-60-63 stitches left after marker 4 (= right front piece). Work stockinette stitch with 5 band stitches in garter stitch on each side. At the same time, on the next row from the right side begin to increase for RAGLAN – read description above. Increase like this every 2nd row (each row from the right side) a total of 10-11-14-15-18-19 times = 358-382-422-454-494-514 stitches. Continue working without further increases until the piece measures 20-22-24-26-28-30 cm = 8"-8¾"-9½"-10¼"-11"-11¾". Now divide the yoke for the body and sleeves on the next row as follows: Work the first 57-61-66-71-78-82 stitches (= front piece), place the next 70-74-84-90-96-98 stitches on a thread for the sleeve, cast on 6-8-8-10-10-12 stitches (= in side under sleeve), work the next 104-112-122-132-146-154 stitches (= back piece), place the next 70-74-84-90-96-98 stitches on a thread for the sleeve, cast on 6-8-8-10-10-12 stitches (= in side under sleeve), work the last 57-61-66-71-78-82 stitches. Body and sleeves are finished separately. THE PIECE IS NOW MEASURED FROM HERE. BODY: = 230-250-270-294-322-342 stitches. Work stockinette stitch back and forth with 5 band stitches in garter stitch on each side. When the piece measures 22 cm = 8¾" from the division, increase 45-49-53-59-65-69 stitches evenly spaced = 275-299-323-353-387-411 stitches. Change to circular needle size 2.5 MM = US 1.5 and work rib as follows: 5 band stitches in garter stitch, * knit 1, purl 1 *, work from *-* until there are 6 stitches left, knit 1 and finish with 5 band stitches in garter stitch. When the rib measures 3 cm = 1⅛", bind off with knit over knit and purl over purl - read BINDING-OFF TIP. The jacket measures approx. 48-50-52-54-56-58 cm = 19"-19¾"-20½"-21¼"-22"-22¾" from the shoulder down. SLEEVES: Place the 70-74-84-90-96-98 stitches from the thread on the one side of the piece on double pointed needles/short circular needle size 3 MM = US 2.5 and knit up 1 stitch in each of the 6-8-8-10-10-12 stitches cast on under the sleeve = 76-82-92-100-106-110 stitches. Start in the middle of the 6-8-8-10-10-12 stitches under the sleeve and work stockinette stitch in the round until the sleeve measures 17-15-14-12-11-9 cm = 6¾"-6"-5½"-4¾"-4⅜"-3½" from the division (there is approx. 6 cm = 2⅜" left to finished length, you can try the jacket on and work to desired length). NOTE: Shorter measurements in larger sizes due to wider neck and longer yoke. Knit 1 round where you decrease 14-18-24-30-34-36 stitches evenly spaced – read INCREASE/DECREASE TIP = 62-64-68-70-72-74 stitches. Change to double pointed needles size 2.5 MM = US 8 = US 1.5 and work rib in the round (knit 1, purl 1) for 6 cm = 2⅜". Bind off with knit over knit and purl over purl – remember BINDING-OFF TIP! The sleeve measures approx. 23-21-20-18-17-15 cm = 9"-8¼"-8"-7"-6¾"-6" from the division. Work the other sleeve in the same way. FLOUNCE-EDGE, YOKE: Crochet 284-291-298-312-333-340 chain stitches (including 5 chain stitches to turn) using crochet hook size 3.5 MM = US E/4 and Baby Alpaca Silk. Turn and work as follows: Work 1 double crochet in the 6th chain stitch from the hook, * 2 chain stitches, 1 double crochet in the next chain stitch *, work from *-* to end of row. Lay the flounce-edge on the right side of the piece so it lies evenly along the bottom edge of the lace pattern, i.e. A.4A - A.4C. Tack the flounce in place. The flounce should be attached with the chain stitch edge towards the right side of the garment and can either be sewn or crocheted to the yoke as follows: Attach with sewing: Work from the wrong side as follows: Fasten the thread in the outermost decrease towards the band (i.e. A.4A) and sew a stitch between the 2 outermost double crochets on the flounce, * baste along the bottom edge of the lace pattern (do not sew in the flounce) as far as the next decrease in the pattern (i.e. triangle in A.4B), sew a stitch around the decrease and between the 6th and 7th double crochet after the last time the flounce was fastened to the piece *, repeat from *-* as far as the band on the other side, finishing with a stitch in the last decrease before the band (= A.4C); it is important the seam is not tight as this will make the garment less elastic. Attach with crocheting: Work from the wrong side using hook size 3.5 MM = US E/4 as follows: Fasten the strand with a single crochet in the outermost decrease towards the band (i.e. A.4A), insert the hook through the garment (from the wrong side to the right side - the strand stays on the wrong side), then insert the hook between the 2 outermost double crochets on the flounce and then back through to the wrong side of the garment, make 1 yarn over and pull the strand through the loops on the hook so the flounce is attached to the yoke *, work 8 chain stitches (on the wrong side of the garment), skip to the next decrease on the yoke (triangle in A.4B), insert the hook through the garment (from the wrong side to the right side - the strand stays on the wrong side), then insert the hook between the 6th and 7th double crochet after the last time the flounce was attached to the garment, and then back to the wrong side of the garment, make 1 yarn over and pull the strand through the loops on the hook so the flounce is attached to the yoke *, repeat from *-* as far as to the band on the other side, finishing by fastening the strand in the last decrease before the band (= A.4C); it is important the seam is not tight as this will make the garment less elastic. FLOUNCE-EDGE, SLEEVE: Work 67-67-74-74-81-81 chain stitches (including 5 chain stitches to turn) using hook size 3.5 MM = US E/4 and Baby Alpaca Silk. Turn and work as follows: Work 1 double crochet in the 6th chain stitch from the hook, * 2 chain stitches, 1 double crochet in the next chain stitch *, work from *-* to the end of the row. The flounce can either be sewn or crocheted in the top round of rib on the sleeve. Sew or crochet in the same way as on the yoke, and skip 7 double crochets on the flounce and approx. 7 stitches between each time the flounce is fastened to the sleeve. The strand is fastened around a stitch rather than around a decrease as on the yoke. Make sure the seam is not tight. ASSEMBLY: Sew the buttons onto the left band. |
||||||||||||||||||||||
Diagram explanations |
||||||||||||||||||||||
|
||||||||||||||||||||||
 |
||||||||||||||||||||||
 |
||||||||||||||||||||||
Have you finished this pattern?Tag your pictures with #dropspattern #incomingtidecardigan or submit them to the #dropsfan gallery. Do you need help with this pattern?You'll find 34 tutorial videos, a Comments/Questions area and more by visiting the pattern on garnstudio.com. © 1982-2026 DROPS Design A/S. We reserve all rights. This document, including all its sub-sections, has copyrights. Read more about what you can do with our patterns at the bottom of each pattern on our site. |
||||||||||||||||||||||


With over 40 years in knitting and crochet design, DROPS Design offers one of the most extensive collections of free patterns on the internet - translated to 17 languages. As of today we count 324 catalogs and 12291 patterns - 12281 of which are translated into English (US/in).
We work hard to bring you the best knitting and crochet have to offer, inspiration and advice as well as great quality yarns at incredible prices! Would you like to use our patterns for other than personal use? You can read what you are allowed to do in the Copyright text at the bottom of all our patterns. Happy crafting!
Post a comment to pattern DROPS 222-22
We would love to hear what you have to say about this pattern!
If you want to leave a question, please make sure you select the correct category in the form below, to speed up the answering process. Required fields are marked *.