
Popular categories
Looking for a yarn?


Comments / Questions (33)
![]() Eldardom wrote:
Eldardom wrote:
Coin
12.11.2023 - 09:35
![]() Karen Hayden wrote:
Karen Hayden wrote:
Can this be knitted with 4ply yarn ? How many skeins would it require?
30.10.2023 - 17:25DROPS Design answered:
Dear Mrs Hayden, DROPS Air is a worsted yarn - ,read more here; you can use a 4ply yarn (= yarn group A) but you should then use 2 strands of yarn; use the yarn converter to see the alternatives and the new amount of yarn. Happy knitting!
30.10.2023 - 18:20
![]() Ann Steyn wrote:
Ann Steyn wrote:
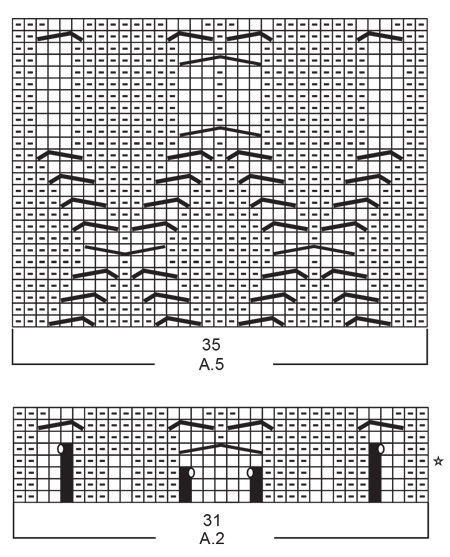
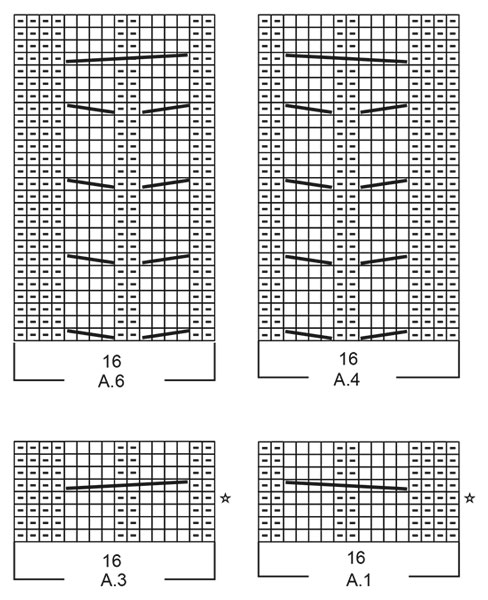
The actual diagrams are correct in all the cables. I am referring to the diagram instructions. If you look at the instructions next to each diagram, the 4 cable (small one) instructions are opposite to the direction the cable should go. Eg in A.4 the first cable is to the right, but the instructions say to place the 2 sts on the cable needle at front which would result in left cable. Hope this helps explains better. Thank you for your awesome patterns.
02.10.2023 - 10:49DROPS Design answered:
Dear Mrs Steyn, thanks for your feedback, I understand now - our design team will check. Happy knitting!
02.10.2023 - 16:05
![]() Ann Steyn wrote:
Ann Steyn wrote:
The diagram instructions for the 4 st cable in A.4 and A.5 are incorrect They have been switched so the first cable in A.4 would go left, when it should go right etc....
27.09.2023 - 14:25DROPS Design answered:
Dear Mrs Steyn, in the large cable in A.4 you will cross the stitches to the right (slip stitches in front of piece) and in the large cable in A.5 they will be crossed to the left (slip sts behind piece) just as shown in diagram and in the last picture. Except if I'm misunderstanding your question.
02.10.2023 - 07:57
![]() Renée Fijlstra wrote:
Renée Fijlstra wrote:
Beste meneer /mevrouw, Ik wil graag het patroon DROPS 216-10 breien. Ik weet niet goed welke maat ik moet nemen. Ik heb mijn trui opgemeten. Die is 55 cm breed. Nu zou ik maat L moeten nemen. Maar mijn kledingmaat is maat XL. Ik hoop dat u mij kan helpen. Met vriendelijke groeten, Renée Fijlstra
31.08.2023 - 20:41DROPS Design answered:
Dag Renée,
Dan zou je inderdaad maat L aan kunnen houden. Als je van oversized houdt, kun je maat XL aanhouden.
31.08.2023 - 21:35
![]() Gerd Ingrid Olsen wrote:
Gerd Ingrid Olsen wrote:
Jeg skjønner ikke mønster fra * står at det skal felles 5 masker på hver side. Jeg får ikke A1, A2 og A3 til å gå opp. Hvordan kan 10 masker felt bli 101 når diagrammet er ferdig? Jeg startet jo med 107..
30.01.2023 - 21:29DROPS Design answered:
Hej Gerd, i diagram A.2 tog du 4 masker ud, har du talt dem med?
31.01.2023 - 11:47
![]() Marcela wrote:
Marcela wrote:
Se deben tejer en puntada ensortijada (revés) todas las vueltas del lado revés? O es sólo 1 fila al comenzar?
16.12.2022 - 17:16DROPS Design answered:
Hola Marcela, de revés solo se trabaja la primera fila; el resto de las filas se trabajan según el patrón.
18.12.2022 - 17:59
![]() Marcela wrote:
Marcela wrote:
Si la primera fila de la espalda por el derecho se trabaja de revés, la vuelta de esa fila se trabaja de derecho o también de revés?
15.12.2022 - 23:06DROPS Design answered:
Hola Marcela, trabajas la primera fila de revés, que cuenta como si fuera una fila por el lado revés. En la fila de vuelta, trabajas el elástico, tal y como se explica en el patrón y cuenta como si fuera una fila por el lado derecho.
18.12.2022 - 17:41
![]() Paula Barbosa wrote:
Paula Barbosa wrote:
Penso que há um erro na legenda dos torcidos dos diagramas A4 e A6, os torcidos são feitos para dentro mas na imagem estão feitos para fora
11.12.2022 - 19:43
![]() Evarose wrote:
Evarose wrote:
Hallo ich habe eine Frage und zwar kann ich nicht finden was das Bedeutet : Rundnadel Nr. 4,5 mit Air. 1 Reihe links stricken (= Rück-Reihe). Es geht mir um das "Air " was heißt das bitte !!! Mit freundlichen Grüßen , Evarose
04.10.2022 - 11:47DROPS Design answered:
Liebe Evarose, Air ist die Wolle, mit der wie diesen Pullover gestrickt haben - siehe Kopfzeilen mit Größen, Material und Maschenprobe sowie Nadeln - mehr über diese Wolle lesen Sie hier. Viel Spaß beim stricken!
04.10.2022 - 13:25
|
||||||||||||||||||||||||||||||||||||||||
Seafarers Heart#seafarersheartsweater |
||||||||||||||||||||||||||||||||||||||||
 |
 |
|||||||||||||||||||||||||||||||||||||||
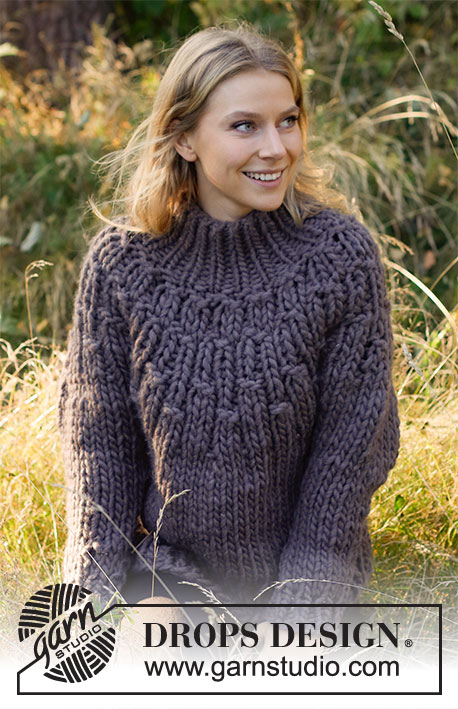
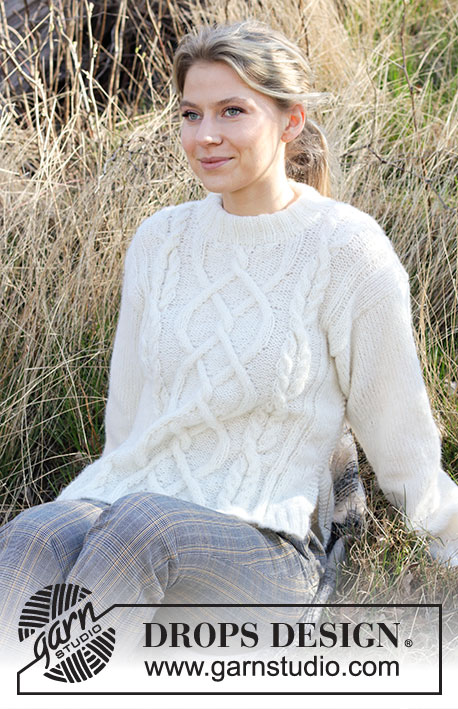
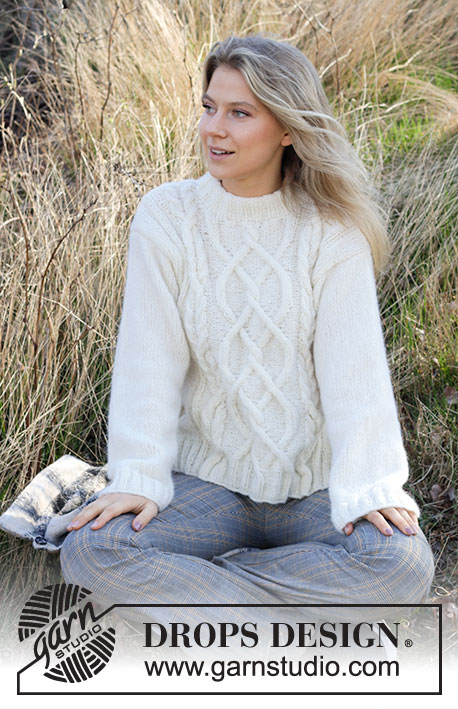
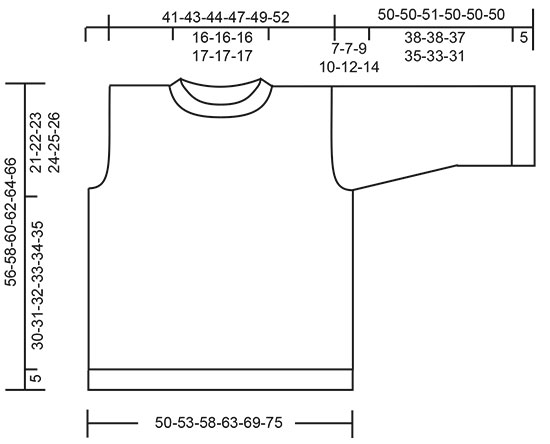
Knitted sweater in DROPS Air. The piece is worked with cables. Sizes S - XXXL.
DROPS 216-10 |
||||||||||||||||||||||||||||||||||||||||
|
------------------------------------------------------- EXPLANATIONS FOR THE PATTERN: ------------------------------------------------------- RIDGE/GARTER STITCH (worked back and forth): Knit all rows. 1 ridge in height = Knit 2 rows. PATTERN: See diagrams A.1 to A.6. DECREASE TIP-1 (evenly spaced): To work out how to decrease evenly, count the total number of stitches on needle (e.g. 10 stitches) and divide by number of decreases to be made (e.g. 4) = 2.5. In this example decrease by alternately knitting together each 1st and 2nd stitch and each 2nd and 3rd stitch. DECREASE TIP-2: Decrease evenly – read DECREASE TIP-1 by purling 2 stitches together where you have purled or knitting 2 stitches together where you have knitted. INCREASE TIP: Work until there are 2 stitches left before the marker thread, 1 yarn over, knit 4 (marker thread sits between these 4 stitches), 1 yarn over. On the next round knit the yarn overs twisted to avoid holes. Then work the new stitches in stockinette stitch. ------------------------------------------------------- START THE PIECE HERE: ------------------------------------------------------- SWEATER – SHORT OVERVIEW OF THE PIECE: The front and back pieces are worked separately, back and forth on the needle. The sleeves are worked with double pointed needles/short circular needle as far as the armholes. The sleeve cap is then finished back and forth. The neck is worked back and forth from top of shoulder. BACK PIECE: Cast on 99-107-115-123-139-147 stitches (including 4 edge stitches on each side) with circular needle size 4.5 mm = US 7 and Air. Purl 1 row (= wrong side). Now work rib as follows: 4 stitches in GARTER STITCH – read description above, rib (= knit 2, purl 2) over the next 12-16-20-24-32-36 stitches, knit 2, work A.1 over the next 16 stitches, A.2 over the next 31 stitches, A.3 over the next 16 stitches, rib (= knit 2, purl 2) over the next 12-16-20-24-32-36 stitches, knit 2 and 4 stitches in garter stitch. Continue back and forth like this and repeat the first 2 rows in the diagrams until the rib measures 5 cm = 2" – adjust so the next row is from the right side. Now continue with the next 2 rows in A.1, A.2 and A.3, working as before over the other stitches. When you have finished the row with the star, change to circular needle size 5.5 mm = US 9 and work pattern as follows from the right side: 4 stitches in garter stitch, stockinette stitch over the next 10-14-18-18-26-30 stitches, decreasing at the same time 4-5-5-5-8-8 stitches evenly spaced – read DECREASE TIP-1 (= 6-9-13-13-18-22 stitches in stockinette stitch), purl over purl and knit over knit over the next 4-4-4-8-8-8 stitches, continue with A.1, A.2 and A.3, knit over knit and purl over purl over the next 4-4-4-8-8-8 stitches, stockinette stitch over the next 10-14-18-18-26-30 stitches, decreasing at the same time 4-5-5-5-8-8 stitches evenly spaced (= 6-9-13-13-18-22 stitches in stockinette stitch) and 4 stitches in garter stitch. Continue this pattern. When the diagrams have been completed in height there are 95-101-109-117-127-135 stitches on the needle. Now work A.4 over A.1, A.5 over A.2 and A.6 over A.3. The other stitches are worked as before. REMEMBER THE KNITTING GAUGE! When the diagrams have been completed, repeat the pattern in height. When the piece measures 35-36-37-38-39-40 cm = 13¾"-14¼"-14½"-15"-15¼"-15¾", bind off stitches for the armholes on each side as follows: Bind off 3-4-5-6-6-7 stitches 1 time, 2 stitches 1-1-2-2-3-3 times and 1 stitch 1-1-1-2-3-4 times = 83-87-89-93-97-101 stitches. Continue the pattern with 1 edge stitch in garter stitch on each side. When the piece measures 52-54-56-58-60-62 cm = 20½"-21¼"-22"-22¾"-23⅝"-24⅜", work the next row from the right side as follows: Work as before over the first 26-28-29-30-32-34 stitches, knit over knit and purl over purl over the next 31-31-31-33-33-33 stitches, AT THE SAME TIME as you decrease to 23-23-23-25-25-25 stitches – read DECREASE TIP-2 (= 8 stitches decreased), work as before over the next 26-28-29-30-32-34 stitches = 75-79-81-85-89-93 stitches. On the next row bind off the middle 23-23-23-25-25-25 stitches for the neck and each shoulder is finished separately. On the next row from the neck bind off 1 stitch for neck = 25-27-28-29-31-33 stitches. Continue working until the whole piece measures 56-58-60-62-64-66 cm = 22"-22¾"-23⅝"-24⅜"-25¼"-26" (the armhole measures 21-22-23-24-25-26 cm = 8¼"-8¾"-9"-9½"-9¾"-10¼"). Knit 1 row from the right side where you decrease 4 stitches evenly spaced = 21-23-24-25-27-29 stitches. Bind off. Work the other shoulder in the same way. FRONT PIECE: Cast on and work in the same way as the back piece. When the piece measures 35-36-37-38-39-40 cm = 13¾"-14¼"-14½"-15"-15¼"-15¾", bind off stitches for the armholes on each side in the same way as the back piece. Continue with pattern as before and 1 edge stitch in garter stitch on each side. When the piece measures 48-50-51-53-54-56 cm = 19"-19¾"-20"-21"-21¼"-22", work the next row from the right side as follows: Work the first 31-33-34-35-37-39 stitches as before, work the next 21-21-21-23-23-23 stitches as before AT THE SAME TIME as these stitches are decreased evenly to 13-13-13-15-15-15 stitches – remember DECREASE TIP-2 (= 8 stitches decreased), place these 13-13-13-15-15-15 stitches on a thread for the neck and work the last 31-33-34-35-37-39 stitches as before. Each shoulder is finished separately. Continue the pattern and bind off stitches as follows on each row from the neck: Bind off 2 stitches 2 times and 1 stitch 2 times = 25-27-28-29-31-33 stitches. Continue working until the whole piece measures 56-58-60-62-64-66 cm = 22"-22¾"-23⅝"-24⅜"-25¼"-26" (the armhole measures approx. 21-22-23-24-25-26 cm = 8¼"-8¾"-9"-9½"-9¾"-10¼"). Knit 1 row from the right side where you decrease 4 stitches evenly spaced = 21-23-24-25-27-29 stitches. Bind off. Work the other shoulder in the same way. SLEEVE: Cast on 60-60-64-64-68-72 stitches with double pointed needles/short circular needle size 4.5 mm = US 7 and Air. Knit 1 round, then work rib (= knit 2, purl 2) in the round for 5 cm = 2". Knit 1 round where you decrease 10-9-11-10-12-14 stitches evenly spaced = 50-51-53-54-56-58 stitches. Change to double pointed needles/short circular needle size 5.5 mm = US 9. Insert 1 marker at the beginning of the round and work stockinette stitch. When the piece measures 9-9-9-9-8-8 cm = 3½"-3½"-3½"-3½"-3⅛"-3⅛", increase 2 stitches under the sleeve – read INCREASE TIP. Increase like this every 5-4½-3½3-3-2½ cm = 2"-1⅝"-1 2/8"-1⅛"-1⅛"-1" a total of 7-8-9-10-10-11 times = 64-67-71-74-76-80 stitches. Continue working until the sleeve measures 43-43-42-40-38-36 cm = 17"-17"-16½"-15¾"-15"-14¼". Now continue back and forth with stockinette stitch and 1 edge stitch in garter stitch on each side, AT THE SAME TIME as you bind off stitches for the sleeve cap on each side as follows: Bind off 4-4-5-6-6-7 stitches 1 time, 2 stitches 2-2-2-2-1-1 times, 1 stitch 0-0-3-4-7-9 times, 2 stitches 3-3-2-2-2-2 times and 4-4-4-3-3-2 stitches 1 time = 28-31-31-32-32-32 stitches. Bind off the remaining stitches. The sleeve measures approx. 50-50-51-50-50-50 cm = 19¾"-19¾"-20"-19¾"-19¾"-19¾". Work the other sleeve in the same way. ASSEMBLY: Sew the shoulder seams inside the bind-off edge. Sew the sleeves to the body inside the 1 edge stitch on the body and the bind-off edge on the sleeves. Sew the side seams in the outermost loop of the outermost stitch so the seams are flat – start under the sleeve and work downwards until there is approx. 17 cm = 6¾" left (= split). NECK: Start mid-top of the shoulder with short circular needle size 4.5 mm = US 7 and Air and knit up 72-80 stitches from the right side around the neck (the number of stitches must be divisible by 4). Work rib (= knit 2, purl 2) in the round for 11 cm = 4⅜". Bind off with knit over knit and purl over purl. Fold the rib at the top of the neck to the wrong side and sew down to give a folded edge. To avoid the neck-edge being tight and rolling down, the seam must be elastic. |
||||||||||||||||||||||||||||||||||||||||
Diagram explanations |
||||||||||||||||||||||||||||||||||||||||
|
||||||||||||||||||||||||||||||||||||||||
 |
||||||||||||||||||||||||||||||||||||||||
 |
||||||||||||||||||||||||||||||||||||||||
 |
||||||||||||||||||||||||||||||||||||||||
Have you finished this pattern?Tag your pictures with #dropspattern #seafarersheartsweater or submit them to the #dropsfan gallery. Do you need help with this pattern?You'll find 30 tutorial videos, a Comments/Questions area and more by visiting the pattern on garnstudio.com. © 1982-2026 DROPS Design A/S. We reserve all rights. This document, including all its sub-sections, has copyrights. Read more about what you can do with our patterns at the bottom of each pattern on our site. |
||||||||||||||||||||||||||||||||||||||||


With over 40 years in knitting and crochet design, DROPS Design offers one of the most extensive collections of free patterns on the internet - translated to 17 languages. As of today we count 324 catalogs and 12290 patterns - 12280 of which are translated into English (US/in).
We work hard to bring you the best knitting and crochet have to offer, inspiration and advice as well as great quality yarns at incredible prices! Would you like to use our patterns for other than personal use? You can read what you are allowed to do in the Copyright text at the bottom of all our patterns. Happy crafting!
Post a comment to pattern DROPS 216-10
We would love to hear what you have to say about this pattern!
If you want to leave a question, please make sure you select the correct category in the form below, to speed up the answering process. Required fields are marked *.