
Popular categories
Looking for a yarn?


Comments / Questions (20)
![]() Kati wrote:
Kati wrote:
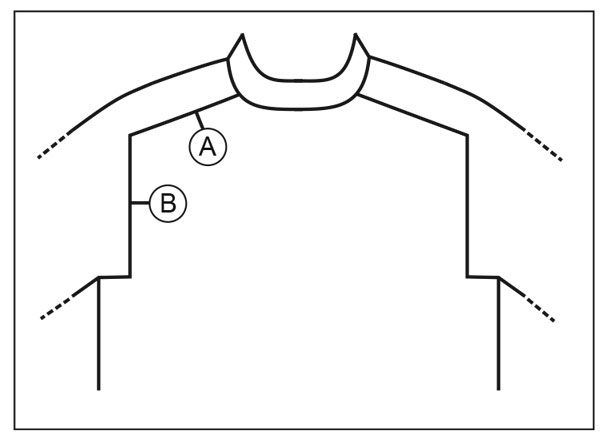
Ich verstehe nicht genau, wie bei der Ärmelzunahme weitergestrickt werden soll. Ich stricke den Pullover in M. Ich habe die 4 Markier versetzt. Müsste ich jetzt zwischen den zwei Markieren, zwischen den nur die 18 Maschen sind (also was mein Ärmel wird) das Muster von A1 fortsetzen? Aber dann würde ich ja das Muster total versetzen und für das Muster in A1 braucht es ja 36 Maschen... Bzw. wo sitzt der 1. Markierer? Vielen Dank für eine Erklärung!
18.12.2020 - 09:26DROPS Design answered:
Liebe Kati, die Markierer sollen jetzt nach der 9. Masche und vor der 9. Masche eingesetzt werden (= es sind jezt 18 Maschen zwischen den Markierungen.). Jetzt nehmen Sie nach der 1. Markierung in beiden A.1 (= 1. + 3.) und vor der 2. Markierung in A.1 (= 2. + 4.), dh jetzt haben Sie für die Raglanlinen nur die 9 ersten und die 9 letzten Maschen von A.1 und dazwischen nimmt die Maschen für die Ärmel zu. Hoffentlich wird es Ihnen helfen. Viel Spaß beim stricken!
18.12.2020 - 13:06
![]() Marit wrote:
Marit wrote:
Jeg strever med å forstå oppskriften under "Ermeøkning". Skal A1 strikkes over de 18 maskene mellom 1. og 2. merke slik at hullmønsteret forskyves? Det ser ikke sånn ut på bildet.
05.12.2020 - 09:46DROPS Design answered:
Hej Marit, du flytte mærkerne til pilene i A.1 og øger ved mærkerne på hver side af skuldermaskerne i hver side, så hulmønsteret forskydes som på billedet. God fornøjelse!
15.12.2020 - 14:00
![]() Janine wrote:
Janine wrote:
Er staat een fout in het Nederlandse patroon onder MOUW MEERDER: 'Meerder zo iedere andere naald 16-18-20-20-20-22 keer in totaal', dit moet *om de andere naald* zijn. Zo staat het ook in het Engels patroon, anders komt de stekenverhouding niet uit :)
03.12.2020 - 18:20
![]() Anke wrote:
Anke wrote:
Ik begrijp het meerderen-3 niet, na de omslag 6 steken recht , maar dan ben ik al bij de zadelschouder, waar ik averechts moet breien
14.11.2020 - 17:25DROPS Design answered:
Dag Anke,
tip 3 voor het meerderen geldt voor het lijf, waar je de hele tijd tricotsteek in de rondte breit.
18.11.2020 - 12:38
![]() Inki wrote:
Inki wrote:
Hei. En löytänyt ohjeesta piirroksia.
13.11.2020 - 20:37
![]() Riitta wrote:
Riitta wrote:
Missä on ruutupiirros A.1.? Minäkään en löydä. En kaaviota enkä tekstiä. Kiitos tiedosta jo ennalta!
28.10.2020 - 05:52DROPS Design answered:
Nyt piirrokset aukeavat.
17.11.2020 - 16:26
![]() Anne wrote:
Anne wrote:
Hei ohjeesta puuttuu ruutupiirros A1. Mistä löydän tuon oleellisen kohdan?
14.09.2020 - 12:17
![]() Ann-Kristin Andersson wrote:
Ann-Kristin Andersson wrote:
Var i mönstret finns texten till "Diagram A.1. ?
13.09.2020 - 19:09DROPS Design answered:
Hej Ann-Kristin. Nu finns diagramtexten precis över diagrammet. Mvh DROPS design
14.09.2020 - 09:04
![]() Yuli wrote:
Yuli wrote:
Hi, it there a way to add elevation to this pattern? If yes, where should I add it, under the neckband or in the middle of the back? Thank you!
13.09.2020 - 00:21DROPS Design answered:
Dear Yuli, this is a saddle shoulder piece, the construction is different than the regular raglan, it will not be easy to add elevation, as it would distort the shape of the sweater.
13.09.2020 - 23:11
![]() Kathy Somers wrote:
Kathy Somers wrote:
It is frustrating to see patterns I am interested that are ‘Coming Soon’.
05.08.2020 - 22:06
|
||||||||||||||||||||||||||||
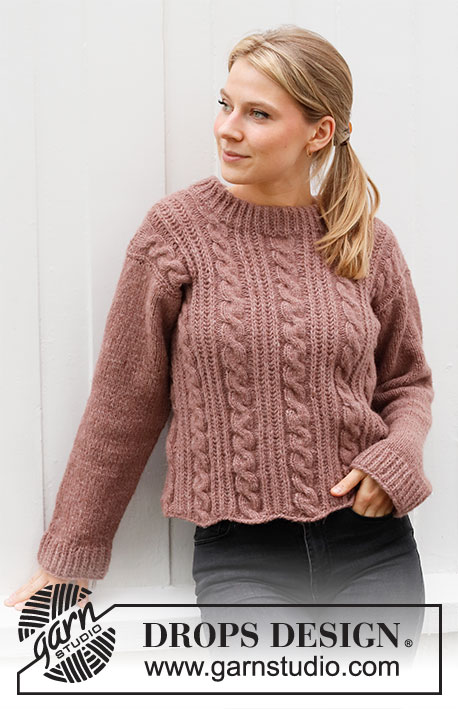
Alpenglow Sweater#alpenglowsweater |
||||||||||||||||||||||||||||
 |
 |
|||||||||||||||||||||||||||
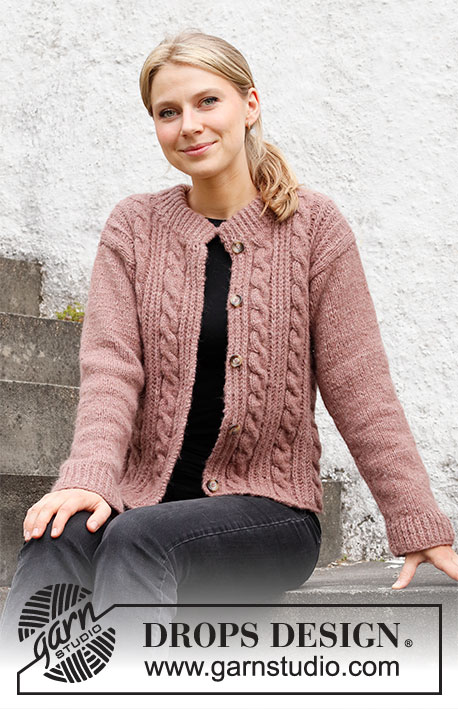
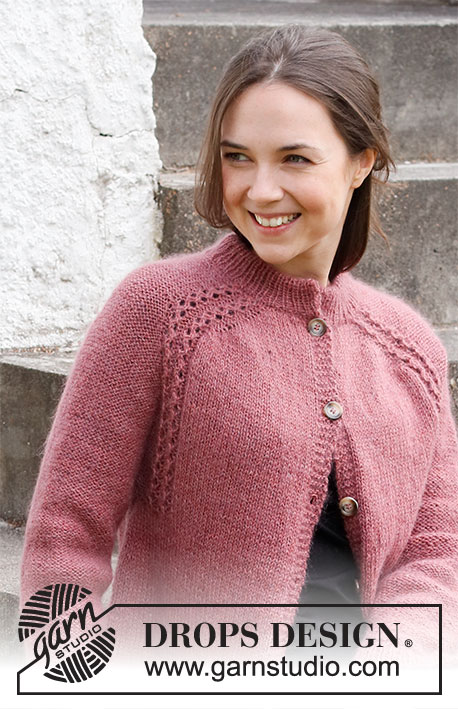
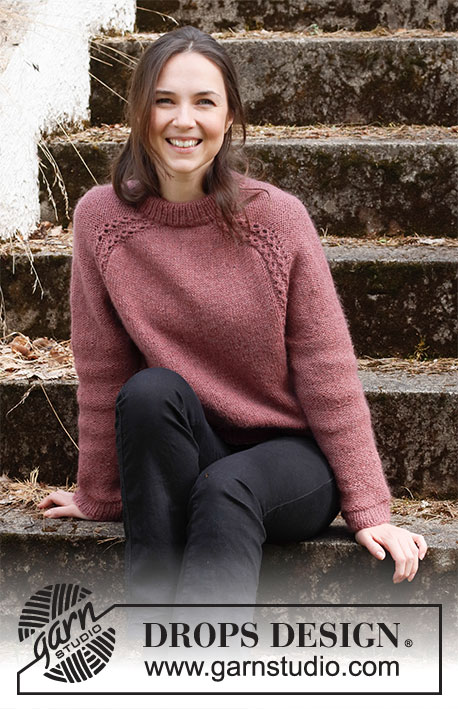
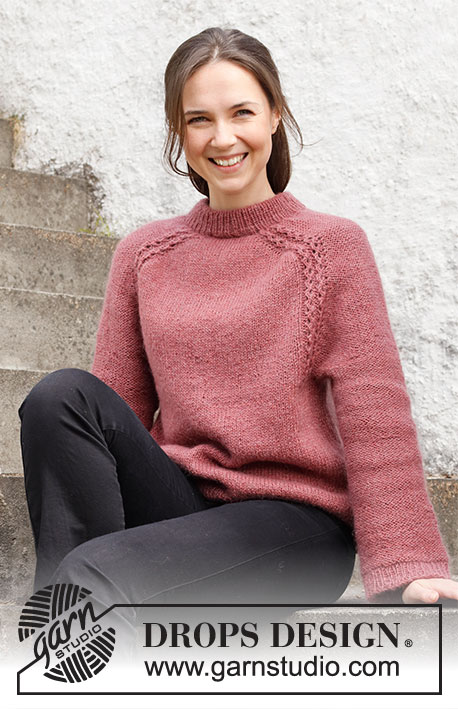
Knitted sweater in DROPS Alpaca and DROPS Kid-Silk. Piece is knitted top down with double neck edge and saddle shoulder. Size: S - XXXL
DROPS 218-11 |
||||||||||||||||||||||||||||
|
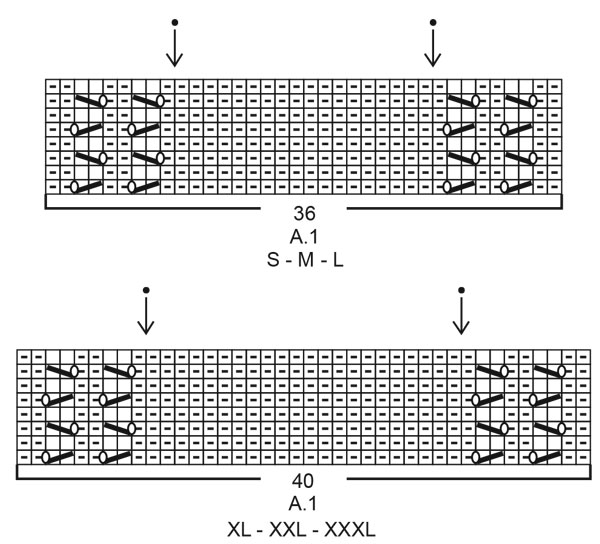
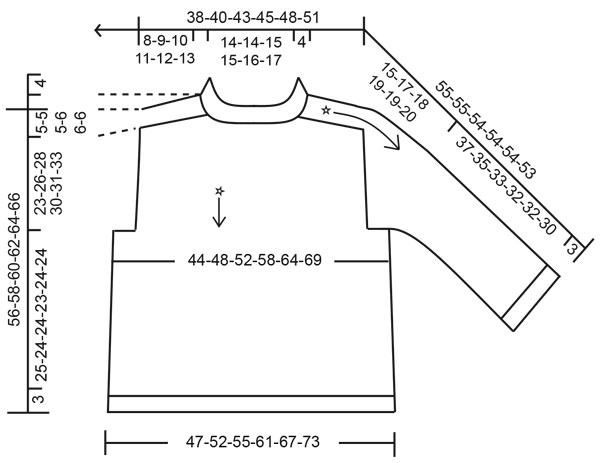
------------------------------------------------------- EXPLANATION FOR THE PATTERN: ------------------------------------------------------- PATTERN: See diagram A.1. Choose diagram for your size. INCREASE TIP-1 (evenly spaced): To calculate how to increase evenly, use the total number of stitches on row (e.g. 80 stitches) and divide stitches by number of increases to be done (e.g. 20) = 4. In this example increase evenly by making 1 yarn over after every 4th stitch. On next round work yarn overs twisted to avoid holes. INCREASE TIP-2 (applies to increase for saddle shoulder and sleeves): INCREASE BEFORE MARKER AS FOLLOWS: The new stitch will be twisted, leaning towards the right. Work until marker, use left needle to pick up strand between 2 stitches from the row below, pick up strand from behind and knit stitch in front loop when increasing for saddle shoulder/purl stitch in front loop when increasing for sleeve, move marker on to right needle. INCREASE AFTER MARKER AS FOLLOWS: The new stitch will be twisted, leaning towards the left. Work until marker, move marker on to right needle, use left needle to pick up strand between 2 stitches from the row below, pick up strand from the front and knit stitch in back loop when increasing for saddle shoulders/purl stitch in back loop when increasing for sleeve. INCREASE TIP-3 (applies to sides of body): Work until 3 stitches remain before marker thread, make 1 yarn over, knit 6 (marker thread is in the middle of these 6 stitches), make 1 yarn over (= 2 stitches increased at marker thread). On next round knit yarns over twisted to avoid holes. Then work the new stitches in stockinette stitch. DECREASE TIP (applies to mid under sleeves): Begin 3 stitches before marker thread, purl 2 together, purl 2 (marker thread is in the middle of these 2 stitches), purl 2 twisted together (= 2 stitches decreased). BIND-OFF TIP: To avoid a tight bind-off edge you may use a larger needle size. If this also is too tight, work a 1 yarn over after approx. every 6th stitch while binding off (bind off yarn overs as regular stitches). ------------------------------------------------------- START THE PIECE HERE: ------------------------------------------------------- SWEATER - SHORT OVERVIEW OF THE PIECE: Double neck edge and yoke are worked in the round on circular needle, top down. Increase stitches for saddle shoulder, then increase stitches for sleeves. Now divide yoke for body and sleeves. Body is worked in the round on circular needle, top down. Work sleeves in the round on double pointed needles/short circular needle, top down. DOUBLE NECK EDGE: Cast on 80-82-86-90-94-100 stitches on a short circular needle size 4 mm = US 6 with 1 strand of each quality (= 2 strands). Knit 1 round. Work rib in the round = knit 1/purl 1 for 9 cm = 3½". When rib is done, knit 1 round while increasing 20-26-22-34-38-44 stitches evenly - read INCREASE TIP-1 = 100-108-108-124-132-144 stitches. Knit 1 round (knit yarn overs twisted). Switch to circular needle size 5 mm = US 8. Insert 1 marker in the middle of round (= mid front). Work yoke as explained below – measure yoke from this marker! YOKE: Insert 4 new markers in piece as explained below – this is done without working the stitches. Use these markers when increasing for saddle shoulder and sleeve, and markers should have another color than marker at the neck (to separate them). Begin mid back, count 7-9-9-11-13-16 stitches (= ½ back piece), insert 1st marker before next stitch, count 36-36-36-40-40-40 stitches (= sleeve), insert 2nd marker before next stitch, count 14-18-18-22-26-32 stitches (= front piece), insert 3rd marker before next stitch, count 36-36-36-40-40-40 stitches (= sleeve), insert 4th marker before next stitch. 7-9-9-11-13-16 stitches remain on back piece after last marker. Move these 4 markers upwards when working; increase at each of these markers. SADDLE SHOULDER INCREASE: Read the whole section before continuing! Work piece in stockinette stitch on back piece and front piece, and A.1 over the 36-36-36-40-40-40 stitches on each sleeve (between 1st and 2nd marker, and between 3rd and 4th marker). AT THE SAME TIME on first round increase for saddle shoulder as follows: Increase 1 stitch BEFORE 1st and 3rd marker (i.e. before A.1), and increase 1 stitch AFTER 2nd and 4th marker (i.e. after A.1) – read INCREASE TIP-2 (= 4 stitches increased). Remember there are only increases on front piece and back piece and number of shoulder stitches remains the same. Continue pattern like this, and increase the same way every round 18-20-22-24-26-28 times in total = 172-188-196-220-236-256 stitches. REMEMBER THE KNITTING GAUGE! After last increase piece measures approx. 8-9-10-11-12-13 cm = 3⅛"-3½"-4"-4⅜"-4¾"-5⅛" from marker by the neck. Then increase for sleeves as explained below. SLEEVE INCREASE: Move the 4 markers from increase for saddle shoulder so that they are on each side of the middle 18-18-18-22-22-22 stitches in A.1 on each shoulder – see arrows in A.1. Continue with stockinette stitch, and A.1 between 1st and 2nd marker and between 3rd and 4th marker. AT THE SAME TIME on next round increase for sleeves as follows: Increase 1 stitch AFTER 1st and 3rd marker, and increase 1 stitch BEFORE 2nd and 4th marker (= 4 stitches increased). Remember there are only increases on sleeves and A.1 is increasing, but number of stitches on front piece and back piece remains the same. Increase like this every other round 16-18-20-20-20-22 times in total = 236-260-276-300-316-344 stitches. Piece measures approx. 15-16-18-18-18-20 cm = 6"-6¼"-7"-7"-7"-8" from where increase for sleeve began. Work as before but without increases until piece measures 15-17-18-19-19-20 cm = 6"-6¾"-7"-7½"-7½"-8" from where increase for sleeves began. Piece measures now approx. 23-26-28-30-31-33 cm = 9"-10¼"-11"-11¾"-12¼"-13" from marker by the neck. On next round divide piece for body and sleeves as follows: Work the first 34-38-40-44-48-53 stitches as before (= ½ back piece), slip the next 50-54-58-62-62-66 stitches on 1 stitch holder for sleeve, cast on 6-6-8-10-12-12 new stitches on row (= in the side under sleeve), work 68-76-80-88-96-106 stitches as before (= front piece), slip the next 50-54-58-62-62-66 stitches on 1 stitch holder for sleeve, cast on 6-6-8-10-12-12 new stitches on row (= in the side under sleeve) and work the last 34-38-40-44-48-53 stitches as before (= ½ back piece). Finish body and sleeves separately. NOW MEASURE PIECE FROM HERE! BODY: = 148-164-176-196-216-236 stitches. Insert 1 marker thread in each side on body – in the middle of the 6-6-8-10-12-12 stitches cast on under each sleeve. Move the marker threads upwards when working; they should be used for increase later in the sides on body. Work in stockinette stitch in the round. When piece measures 5 cm = 2" from division, increase 1 stitch on each side of both marker threads - read INCREASE TIP-3 (= 4 stitches increased). Increase like this every 6 cm = 2⅜" 3 times in total vertically = 160-176-188-208-228-248 stitches. Work until piece measures 25-24-24-23-24-24 cm = 9¾"-9½"-9½"-9"-9½"-9½" from division. Approx. 3 cm = 1⅛" remain until finished measurements, try the sweater on and work until desired length. Knit 1 round while increasing 32-36-38-42-46-50 stitches evenly - remember INCREASE TIP-1 = 192-212-226-250-274-298 stitches. NOTE! Increase stitches to avoid the rib to be worked, from contracting the piece. Switch to circular needle size 4 mm = US 6. Work rib in the round = knit 1/purl 1 for 3 cm = 1⅛". Bind off with knit over knit and purl over purl - read BIND-OFF TIP. Sweater measures approx. 56-58-60-62-64-66 cm = 22"-22¾"-23⅝"-24⅜"-25¼"-26" from shoulder and down. SLEEVES: Slip the 50-54-58-62-62-66 stitches from stitch holder in one side of piece on double pointed needles or a short circular needle size 5 mm = US 8 and pick in addition up 1 stitch in each of the 6-6-8-10-12-12 new stitches cast on under sleeve = 56-60-66-72-74-78 stitches. Insert 1 marker thread mid under sleeve, in the middle of the 6-6-8-10-12-12 stitches that were cast on under sleeves. Begin round at the marker thread and purl in the round. When sleeve measures 3-3-3-2-2-2 cm = 1⅛"-1⅛"-1⅛"-¾"-¾"-¾" from division, decrease 2 stitches mid under sleeve - read DECREASE TIP. Decrease like this every 3-3-2-2-2-2 cm = 1⅛"-1⅛"-¾"-¾"-¾" 3-4-6-7-7-7 times in total vertically = 50-52-54-58-60-64 stitches remain. Work without decreases until sleeve measures 37-35-33-32-32-30 cm = 14½"-13¾"-13"-12½"-12½"-11¾" from division. Approx. 3 cm = 1⅛" remains until finished measurements. Try the sweater and work to desired length. NOTE! Shorter measurements in the larger sizes because of wider shoulder and longer sleeve cap. Knit 2 rounds and increase at the same time 10-10-10-12-12-12 stitches evenly on last round = 60-62-64-70-72-76 stitches. Switch to double pointed needles size 4 mm = US 6. Work rib in the round = knit 1/purl 1 for 3 cm = 1⅛". Bind off with knit over knit and purl over purl - remember BIND-OFF TIP! Sleeve measures approx. 40-38-36-35-35-33 cm = 15¾"-15"-14¼"-13¾"-13¾"-13" from division. Work the other sleeve the same way. ASSEMBLY: Fold rib at the top of neck double in towards wrong side of garment. Fasten rib but to avoid a tight neck edge and avoiding the edge to tip outwards, it is important to make the seam elastic. |
||||||||||||||||||||||||||||
Diagram explanations |
||||||||||||||||||||||||||||
|
||||||||||||||||||||||||||||
 |
||||||||||||||||||||||||||||
 |
||||||||||||||||||||||||||||
 |
||||||||||||||||||||||||||||
Have you finished this pattern?Tag your pictures with #dropspattern #alpenglowsweater or submit them to the #dropsfan gallery. Do you need help with this pattern?You'll find 32 tutorial videos, a Comments/Questions area and more by visiting the pattern on garnstudio.com. © 1982-2026 DROPS Design A/S. We reserve all rights. This document, including all its sub-sections, has copyrights. Read more about what you can do with our patterns at the bottom of each pattern on our site. |
||||||||||||||||||||||||||||


With over 40 years in knitting and crochet design, DROPS Design offers one of the most extensive collections of free patterns on the internet - translated to 17 languages. As of today we count 324 catalogs and 12290 patterns - 12280 of which are translated into English (US/in).
We work hard to bring you the best knitting and crochet have to offer, inspiration and advice as well as great quality yarns at incredible prices! Would you like to use our patterns for other than personal use? You can read what you are allowed to do in the Copyright text at the bottom of all our patterns. Happy crafting!
Post a comment to pattern DROPS 218-11
We would love to hear what you have to say about this pattern!
If you want to leave a question, please make sure you select the correct category in the form below, to speed up the answering process. Required fields are marked *.