
Popular categories
Looking for a yarn?


|
||||||||||||||||||||||||||||
Alpenglow Sweater |
||||||||||||||||||||||||||||
 |
 |
|||||||||||||||||||||||||||
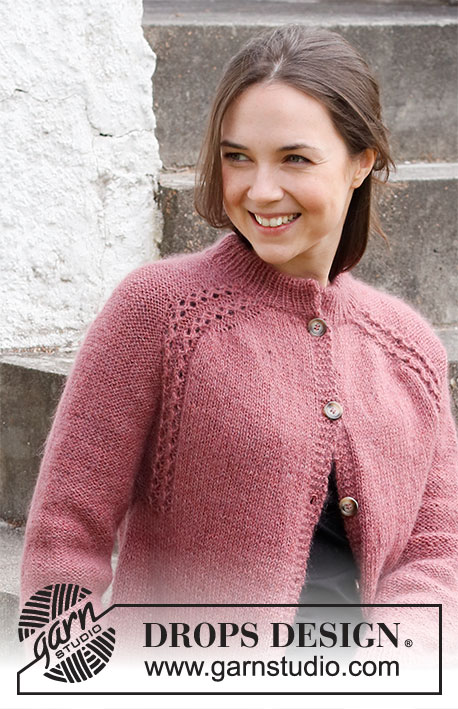
Knitted jumper in DROPS Alpaca and DROPS Kid-Silk. Piece is knitted top down with double neck edge and saddle shoulder. Size: S - XXXL
DROPS 218-11 |
||||||||||||||||||||||||||||
|
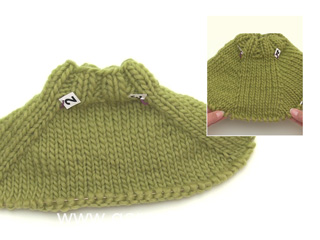
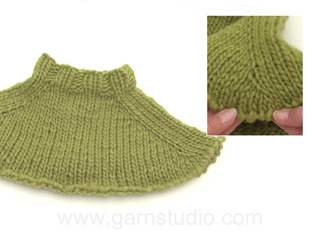
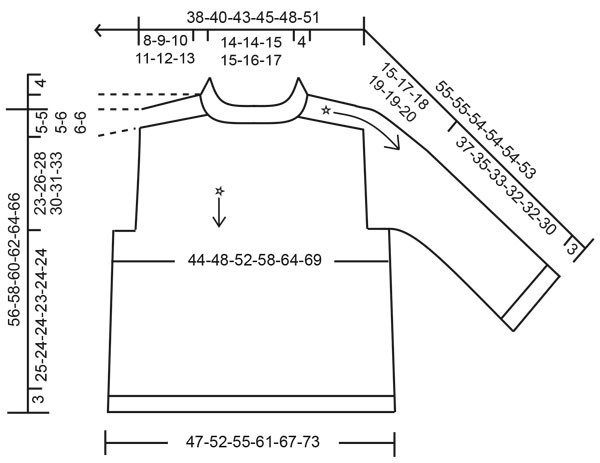
------------------------------------------------------- EXPLANATION FOR THE PATTERN: ------------------------------------------------------- PATTERN: See diagram A.1. Choose diagram for your size. INCREASE TIP-1 (evenly spaced): To calculate how to increase evenly, use the total number of stitches on row (e.g. 80 stitches) and divide stitches by number of increases to be done (e.g. 20) = 4. In this example increase evenly by making 1 yarn over after every 4th stitch. On next round work yarn overs twisted to avoid holes. INCREASE TIP-2 (applies to increase for saddle shoulder and sleeves): INCREASE 1 STITCH BEFORE MARKER AS FOLLOWS: Work until marker, use right needle to pick up strand between stitch worked and next stitch on to left needle so that left side of loop is on the right side of piece, knit loop when increasing for saddle shoulder/purl when increasing for sleeve (loop will now be twisted to avoid holes, and stitch will be leaning towards the right), move marker on to right needle. INCREASE 1 STITCH AFTER MARKER AS FOLLOWS: Work until marker, move marker on to right needle, use right needle to pick up strand between stitch worked and next stitch on to left needle so that right side of loop is on the right side of piece, knit loop in back loop when increasing for saddle shoulder/purl in back loop when increasing for sleeve (loop will now be twisted to avoid holes, and stitch will be leaning towards the left). INCREASE TIP-3 (applies to sides of body): Work until 3 stitches remain before marker thread, make 1 yarn over, knit 6 (marker thread is in the middle of these 6 stitches), make 1 yarn over (= 2 stitches increased at marker thread). On next round knit yarns over twisted to avoid holes. Then work the new stitches in stocking stitch. DECREASE TIP (applies to mid under sleeves): Begin 3 stitches before marker thread, purl 2 together, purl 2 (marker thread is in the middle of these 2 stitches), purl 2 twisted together (= 2 stitches decreased). CAST-OFF TIP: To avoid a tight cast-off edge you may use a larger needle size. If this also is too tight, work a 1 yarn over after approx. every 6th stitch while casting off (cast off yarn overs as regular stitches). ------------------------------------------------------- START THE PIECE HERE: ------------------------------------------------------- JUMPER - SHORT OVERVIEW OF THE PIECE: Double neck edge and yoke are worked in the round on circular needle, top down. Increase stitches for saddle shoulder, then increase stitches for sleeves. Now divide yoke for body and sleeves. Body is worked in the round on circular needle, top down. Work sleeves in the round on double pointed needles/short circular needle, top down. DOUBLE NECK EDGE: Cast on 80-82-86-90-94-100 stitches on a short circular needle size 4 mm with 1 strand of each quality (= 2 strands). Knit 1 round. Work rib in the round = knit 1/purl 1 for 9 cm. When rib is done, knit 1 round while increasing 20-26-22-34-38-44 stitches evenly - read INCREASE TIP-1 = 100-108-108-124-132-144 stitches. Knit 1 round (knit yarn overs twisted). Switch to circular needle size 5 mm. Insert 1 marker in the middle of round (= mid front). Work yoke as explained below – measure yoke from this marker! YOKE: Insert 4 new markers in piece as explained below – this is done without working the stitches. Use these markers when increasing for saddle shoulder and sleeve, and markers should have another colour than marker at the neck (to separate them). Begin mid back, count 7-9-9-11-13-16 stitches (= ½ back piece), insert 1st marker before next stitch, count 36-36-36-40-40-40 stitches (= sleeve), insert 2nd marker before next stitch, count 14-18-18-22-26-32 stitches (= front piece), insert 3rd marker before next stitch, count 36-36-36-40-40-40 stitches (= sleeve), insert 4th marker before next stitch. 7-9-9-11-13-16 stitches remain on back piece after last marker. Move these 4 markers upwards when working; increase at each of these markers. SADDLE SHOULDER - INCREASE: Read the whole section before continuing! Work piece in stocking stitch on back piece and front piece, and A.1 over the 36-36-36-40-40-40 stitches on each sleeve (between 1st and 2nd marker, and between 3rd and 4th marker). AT THE SAME TIME on first round increase for saddle shoulder as follows: Increase 1 stitch before 1st and 3rd marker (i.e. before A.1), and increase 1 stitch after 2nd and 4th marker (i.e. after A.1)– read INCREASE TIP-2 (= 4 stitches increased). I.e. number of shoulder stitches remains the same. Continue pattern like this, and increase the same way every round 18-20-22-24-26-28 times in total = 172-188-196-220-236-256 stitches. REMEMBER THE KNITTING TENSION! After last increase piece measures approx. 8-9-10-11-12-13 cm from marker by the neck. Then increase for sleeves as explained below. SLEEVE INCREASE: Move the 4 markers from increase for saddle shoulder so that they are on each side of the middle 18-18-18-22-22-22 stitches in A.1 on each shoulder – see arrows in A.1. Continue with stocking stitch, and A.1 between 1st and 2nd marker and between 3rd and 4th marker. AT THE SAME TIME on next round increase for sleeves as follows: Increase 1 stitch after 1st and 3rd marker, and increase 1 stitch before 2nd and 4th marker (= 4 stitches increased). I.e. increase in shoulder stitches. Increase like this every other round 16-18-20-20-20-22 times in total = 236-260-276-300-316-344 stitches. Piece measures approx. 15-16-18-18-18-20 cm from where increase for sleeve began. Work as before but without increases until piece measures 15-17-18-19-19-20 cm from where increase for sleeves began. Piece measures now approx. 23-26-28-30-31-33 cm from marker by the neck. On next round divide piece for body and sleeves as follows: Work the first 34-38-40-44-48-53 stitches as before (= ½ back piece), slip the next 50-54-58-62-62-66 stitches on 1 stitch holder for sleeve, cast on 6-6-8-10-12-12 new stitches on row (= in the side under sleeve), work 68-76-80-88-96-106 stitches as before (= front piece), slip the next 50-54-58-62-62-66 stitches on 1 stitch holder for sleeve, cast on 6-6-8-10-12-12 new stitches on row (= in the side under sleeve) and work the last 34-38-40-44-48-53 stitches as before (= ½ back piece). Finish body and sleeves separately. NOW MEASURE PIECE FROM HERE! BODY: = 148-164-176-196-216-236 stitches. Insert 1 marker thread in each side on body – in the middle of the 6-6-8-10-12-12 stitches cast on under each sleeve. Move the marker threads upwards when working; they should be used for increase later in the sides on body. Work in stocking stitch in the round. When piece measures 5 cm from division, increase 1 stitch on each side of both marker threads - read INCREASE TIP-3 (= 4 stitches increased). Increase like this every 6 cm 3 times in total vertically = 160-176-188-208-228-248 stitches. Work until piece measures 25-24-24-23-24-24 cm from division. Approx. 3 cm remain until finished measurements, try the jumper on and work until desired length. Knit 1 round while increasing 32-36-38-42-46-50 stitches evenly - remember INCREASE TIP-1 = 192-212-226-250-274-298 stitches. NOTE! Increase stitches to avoid the rib to be worked, from contracting the piece. Switch to circular needle size 4 mm. Work rib in the round = knit 1/purl 1 for 3 cm. Cast off with knit over knit and purl over purl - read CAST-OFF TIP. Jumper measures approx. 56-58-60-62-64-66 cm from shoulder and down. SLEEVES: Slip the 50-54-58-62-62-66 stitches from stitch holder in one side of piece on double pointed needles or a short circular needle size 5 mm and pick in addition up 1 stitch in each of the 6-6-8-10-12-12 new stitches cast on under sleeve = 56-60-66-72-74-78 stitches. Insert 1 marker thread mid under sleeve, in the middle of the 6-6-8-10-12-12 stitches that were cast on under sleeves. Begin round at the marker thread and purl in the round. When sleeve measures 3-3-3-2-2-2 cm from division, decrease 2 stitches mid under sleeve - read DECREASE TIP. Decrease like this every 3-3-2-2-2-2 cm 3-4-6-7-7-7 times in total vertically = 50-52-54-58-60-64 stitches remain. Work without decreases until sleeve measures 37-35-33-32-32-30 cm from division. Approx. 3 cm remains until finished measurements. Try the jumper and work to desired length. NOTE! Shorter measurements in the larger sizes because of wider shoulder and longer sleeve cap. Knit 2 rounds and increase at the same time 10-10-10-12-12-12 stitches evenly on last round = 60-62-64-70-72-76 stitches. Switch to double pointed needles size 4 mm. Work rib in the round = knit 1/purl 1 for 3 cm. Cast off with knit over knit and purl over purl - remember CAST-OFF TIP! Sleeve measures approx. 40-38-36-35-35-33 cm from division. Work the other sleeve the same way. ASSEMBLY: Fold rib at the top of neck double in towards wrong side of garment. Fasten rib but to avoid a tight neck edge and avoiding the edge to tip outwards, it is important to make the seam elastic. |
||||||||||||||||||||||||||||
Diagram explanations |
||||||||||||||||||||||||||||
|
||||||||||||||||||||||||||||

|
||||||||||||||||||||||||||||
|
||||||||||||||||||||||||||||
|
||||||||||||||||||||||||||||
|
Have you made this or any other of our designs? Tag your pictures in social media with #dropsdesign so we can see them! Do you need help with this pattern?You'll find tutorial videos, a Comments/Questions area and more by visiting the pattern on garnstudio.com. © 1982-2024 DROPS Design A/S. We reserve all rights. This document, including all its sub-sections, has copyrights. Read more about what you can do with our patterns at the bottom of each pattern on our site. |
||||||||||||||||||||||||||||


With over 40 years in knitting and crochet design, DROPS Design offers one of the most extensive collections of free patterns on the internet - translated to 17 languages. As of today we count 304 catalogues and 11422 patterns - 11422 of which are translated into English (UK/cm).
We work hard to bring you the best knitting and crochet have to offer, inspiration and advice as well as great quality yarns at incredible prices! Would you like to use our patterns for other than personal use? You can read what you are allowed to do in the Copyright text at the bottom of all our patterns. Happy crafting!
Comments / Questions (20)
Voisiko hihat neuloa oikein? Mitä pitää huomioida?
01.12.2023 - 10:50DROPS Design answered:
Voit neuloa hihat oikein. Mitat säilyvät samoina, eli mitään erityistä ei tarvitse ottaa huomioon.
01.12.2023 - 14:30Skończyłam właśnie dodawać oczka na rękawy i mam 15 cm od rozpoczęcia dodawania i 23 cm od markera na wykończeniu dekoltu (robię rozmiar S). Nie rozumiem czy mam już teraz rozdzielić na przód + tył i rękawy czy robić najpierw przez 5 cm bez dodawania oczek. Bardzo proszę o wyjaśnienie. Napisane jest że ma być 15 cm od rozpoczęcia dodawania oczek na rękawy i 28 cm od ramienia.
28.11.2022 - 23:36DROPS Design answered:
Witaj Olu, przerabiaj dalej nie dodając już oczek, aż długość swetra od ramienia w dół wynosi 28 cm (czyli od ramienia do podkroju rękawa, zobacz szkic na dole strony). Dopiero teraz będziesz dzieliła robótkę. Pozdrawiamy!
29.11.2022 - 09:51Comment faire une encolure en rangs raccourcis pour avoir le dos plus haut que le devant. Merci
17.11.2022 - 11:24DROPS Design answered:
Bonjour Mme Montoya, avec ce type de modèle (manches marteau, tricoté de haut en bas), il n'est pas simple d'ajouter des rangs raccourcis - mais peut-être que cette vidéo pourra vous inspirer pour faire les adaptations nécessaires à ce modèle. Bon tricot!
17.11.2022 - 16:05Jag undrar vilka mönster är lätta eller svåra , vilka är för nybörjare,. Vad betyder markeringar vid varje bild av mönster ( tex klocka eller diamant?)
26.09.2021 - 11:23DROPS Design answered:
Hej. Vi har en kategori som heter ”Basmönster” där vi har samlat våra mönster som passar för nybörjare. Diamanten betyder att mönster ligger på förstasidan och klockan betyder att det är de senast publicerade mönstren. Sen har vi även symboler för om plagget är stickat eller virkat (om du håller pilen över symbolen så kommer det upp en text vad de betyder). Mvh DROPS Design
27.09.2021 - 09:12Y a-t-il une raison technique pour laquelle les manches sont tricotées en jersey envers ou est-ce uniquement le design ? Je préfèrerais tricoter ce modèle avec les manches en jersey endroit comme le reste du pull mais je redoute de me trouver devant une difficulté technique si je le fais.
30.03.2021 - 13:35DROPS Design answered:
Bonjour Marie, il n'y a aucune raison, c'est uniquement le design. Vous pouvez tricoter les manches en jersey endroit. Bon tricot!
30.03.2021 - 16:20Hello, I am working on A1 for saddle (currently on row 12 of 22) and the increase stitch after the marker looks a little different to the increase stitch before the marker (both using increase tip 2). Before the marker has more definition and an edge visible from right side than after the marker. Is this as per the pattern? It is difficult to see from the photos. Is it possible to include a photo of the front left side of the piece for reference?
21.03.2021 - 20:53DROPS Design answered:
Dear Shelly, this video below shows how to increase to saddle shoulder, maybe it can help you?
22.03.2021 - 09:14Bonjour, si je tricote ce pull uniquement en Alpaca, sans kid silk, combien dois-je acheter de pelotes en taille L ou XL ? Bonne journée !
05.03.2021 - 10:41DROPS Design answered:
Bonjour Sophie, utilisez notre convertisseur pour calculer la nouvelle quantité en Alpaca et tricotez bien avec 2 fils Alpaca pour avoir le bon échantillon et donc les bonnes mesures. Retrouvez plus d'infos sur les alternatives ici. Bon tricot!
05.03.2021 - 13:08Bonjour, je rencontre un problème : dans le paragraphe "augmentations épaules" il est indiqué de tricoter dos et devant en jersey (ok) et diagramme A1 au-dessus des 36 mailles de chaque manche (entre 1er et 2ème marqueur et entre 3ème et 4ème marqueur). Or les 36 mailles correspondent au dos et au devant (et non pas aux manches qui à ce niveau là du pull ont 14 mailles). Help... Bien cordialement. Corinne
22.01.2021 - 18:56DROPS Design answered:
Bonjour Corinne Z, les 36 mailles correspondent aux manches, comme l'indique la répartition des mailles détaillée juste avant: vous devez avoir 7-9-9 m pour le 1/2 dos au début du tour, 36 m pour les manches et 14-18-18 m pour le devant. Vous allez donc augmenter avant chaque A.1 (= fin du dos et du devant) et après chaque A.1 (= début du devant et du dos). Bon tricot!
25.01.2021 - 08:16Fra avsnittet 'bærestykket' er 1/2 bakstykke 7 masker (minste str) = 14 masker. Iflg økningsbeskr. økes det 4 masker til bærestykkene 18 ganger. 18 x 2 = 36 masker + 14 masker opprinnelig = 50 masker i bærestykkene. Hvordan kan det da bli 68 masker i hvert bærestykke? har spurt før også, men det ble ikke mer forståelig. Er det et tlf nr jeg kan ringe eller få en mailaddr som kan besvares?
28.12.2020 - 09:09DROPS Design answered:
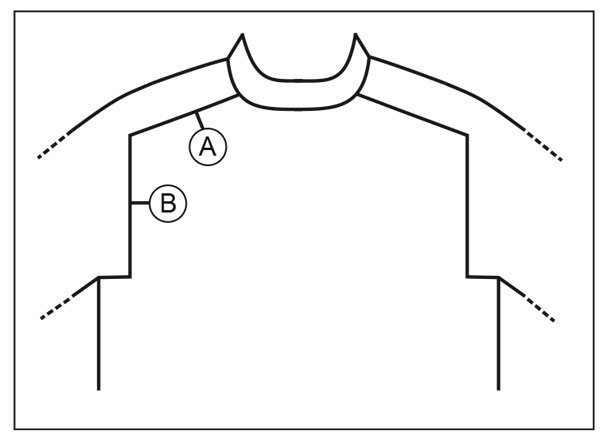
Hei Monica. Når du har økt de første 18 gangene har du 50 masker på forstykket, 50 masker på bakstykket og 36 masker over hver skuldrene = 172 masker. Du er nå ferdig med sadelskulderøkningne, se A på målskissen. Så flytter du merkene og øker nå til ermene (se B) 16 ganger x 4 steder = 64 økte masker + 172 masker du hadde = 236 masker på pinnen. Av disse 236 maskene skal 68 maske tilhøre forstykket, 68 masker tilhører bakstykket og 50 masker til hver av ermene. Håper dette var mer forståelig, om ikke kan du fint ta kontakt med din lokale butikk og høre om de kan hjelpe deg over f.eks telefon. Vi har ingen hjelpe telefon/mail. mvh DROPS design
13.01.2021 - 11:42Hei! Jeg har kommet fram til 'ermeøkning'. Har 236 masker, strikker minste str. På slutten av avsnittet står det at halve bakstykket nå skal være 34 masker. Jeg har 50 masker totalt, så halve bakstykket blir 25 masker. Er det en feil i oppskriften?
27.12.2020 - 18:16DROPS Design answered:
Hei Monica, Bakstykket og forstykket skal være 68 masker og ermene/skuldrene 50 masker, som gir deg 236 masker totalt. God fornøyelse!
28.12.2020 - 07:46