
Popular categories
Looking for a yarn?


Comments / Questions (53)
![]() Tanja wrote:
Tanja wrote:
Wenn ich zum Schluss des Armels vor dem Rapport 52 Maschen bei Gr. S auf der Nadel habe, dann kann ich diese nicht durch die Maschenzahl des Rapports, der mit 12 Maschen angegeben ist, teilen um das Muster gleichmäßig laufen zu lassen. Es dürften nur 48 Maschen sein. Oder es müsste einen Rapport mit 13 Maschen geben. Wie haben Sie sich das genau vorgestellt?
27.01.2022 - 17:12DROPS Design answered:
Liebe Tanja, A.2 soll in der Mitte platziert werden (siehe diese Lektion). Der Markierer an der oberen Ärmelmitte benutzen Sie, um abzuhählen, wo und wie A.2 beginnen wird. Viel Spaß beim stricken!
27.01.2022 - 17:44
![]() Anne White wrote:
Anne White wrote:
I have successfully knitted the yoke and divided for the sleeves. The pattern says to increase every 5 and 6 cm going towards the bottom. The body seems plenty wide enough already and would be too wide if I do the increases. Will it be ok if I don't do the increases? P. S. The yoke patterns are really lovely!
08.01.2022 - 13:11DROPS Design answered:
Dear Mrs White, compare all measurements in the chart to a similar garment you have and like the shape, and if you think you rather keep sides "straight", whithout increasing, then just do as you like it to be. Happy knitting!
10.01.2022 - 07:47
![]() Laura Beatriz Langle García wrote:
Laura Beatriz Langle García wrote:
Es correcta la cantidad de lana indicada para la talla L?
01.12.2021 - 14:36DROPS Design answered:
Hola Laura, las cantidades de lana son correctas en principio, pero pueden variar si trabajas con una tensión diferente a la especificada en la labor, quedando una labor más floja o prieta y requiriendo más o menos lana.
01.12.2021 - 16:34
![]() Aristide wrote:
Aristide wrote:
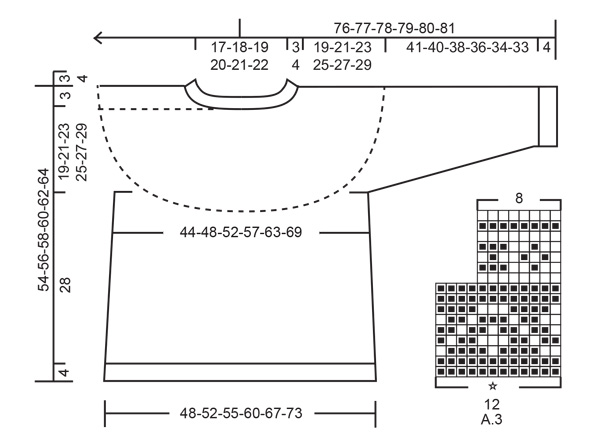
Concernant la manche et le diagramme A3 comment peut on faire la partie avec 8 mailles si l’on a 60 mailles?
05.11.2021 - 09:21DROPS Design answered:
Bonjour Aristide, vous devez centrer A.3 au milieu au-dessus de la manche, autrement dit, le motif ne tombera pas juste au milieu sous la manche - retrouvez dans cette leçon comment centrer un diagramme. Bon tricot!
05.11.2021 - 09:42
![]() Debbie wrote:
Debbie wrote:
I’m knitting pattern 215-8 scent of pine and I don’t understand chart A-3 I’m working on size large and I have 58 stitches and I’m ready to start the chart and it says to start at the star but I’m confused , where do I start, I just have my beginning of round marker underneath the arm in between the 8 stitches I cast on for the sleeve. Where do I start chart A.3 for size Large? I have 58 stitches?
24.10.2021 - 20:00DROPS Design answered:
Hello Debbie! The middle stitch on top of the sleeve is a stitch with a star on the diagram. If you have 58 stitches then a stitch with a star on top of the sleeve should be the 29th stitch on the row. If you count back from the star over pattern repeats then you have to start with 3rd stitch on diagram A.3. Happy knitting!
24.10.2021 - 22:08
![]() Marie-Louise Reinhold wrote:
Marie-Louise Reinhold wrote:
Förstår inte hur jag skall kunna få ihop A3 med storlek S det är 52 maskor när det är dags att sticka A3 mönstret är beräknat på 12 maskor vilket blir 48 eller 60 maskor. Skall jag minska 4 eller öka 8 maskor för att få med hela mönstret. Vänligen Marie Louise Reinhold
12.09.2021 - 11:02DROPS Design answered:
Hej Marie-Louise. Mönstret kommer inte att stämma hela vägen runt, se till att centrera diagrammet genom att passa in maskan med stjärna mitt på ärmen. Mvh DROPS Design
14.09.2021 - 08:46
![]() Debbie wrote:
Debbie wrote:
I am having issues with chart A2 size Large, it doesn’t line up properly but my stitch count is correct and so is row 18, I can’t figure out what I am doing wrong, I’ve frogged it twice ( ??
07.09.2021 - 17:00DROPS Design answered:
Dear Debbie, due to the increases worked on row 3 in A.2 the pattern will not lined up as on the diagram, but the number of stitches (376 sts in L) is divisible by 8, the new number of sts of repeats, this means you will now repeat these 8 sts 47 times in the round. On row 4 you will increase 20 sts evenly to get 396 and repeat the 12 sts a total of 33 times. Hope this will help. Happy knitting!
08.09.2021 - 07:13
![]() Anna wrote:
Anna wrote:
Tröjan är väldigt liten i storlekarna. Har normalt sett small/ medium i storlek och stickade en medium. Blev dock alldeles för liten över bröst och armhåla.
25.08.2021 - 16:56
![]() Eleonora Petzäll wrote:
Eleonora Petzäll wrote:
Hej Jag hitta inte Mönsterbeskrivningen A.3 som ska stickas i ärmslutet
11.07.2021 - 09:48DROPS Design answered:
Hej Eleonora. Du hittar diagram A.3 till höger om måttskissen. Mvh DROPS Design
13.07.2021 - 08:31
![]() Anna wrote:
Anna wrote:
A.3 doesn’t divide equal with the 54 masks on the sleeve (size M)…. What have I misunderstood?
15.06.2021 - 10:38DROPS Design answered:
Dear Anna, you have to center A.3 mid on top of sleeve, ie the middle stitch on sleeve should be the stitch with a star in the diagram, then count outwards to know where you should start, pattern will not fit mid under sleeve. Read how to center a diagram here. Happy knitting!
15.06.2021 - 13:26
|
|||||||||||||
Scent of Pine#scentofpinesweater |
|||||||||||||
 |
 |
||||||||||||
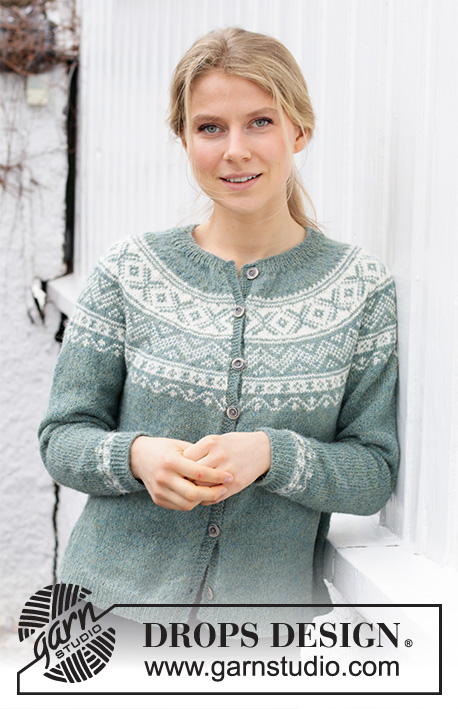
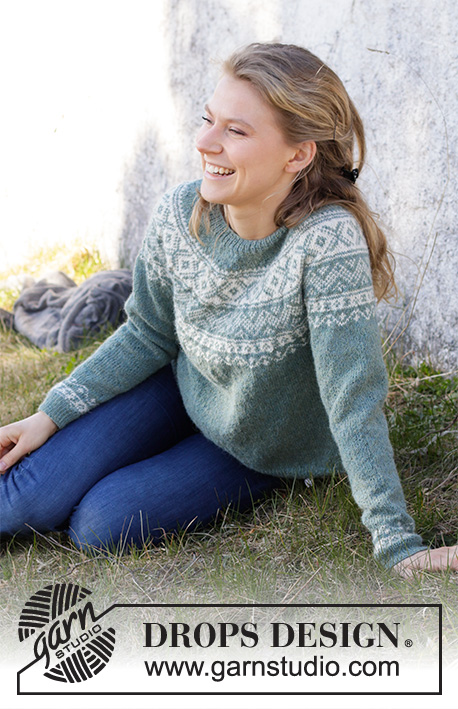
Knitted sweater in DROPS Alpaca. The piece is worked top down with round yoke and Nordic pattern on the yoke and on the bottom of the sleeves. Sizes S - XXXL.
DROPS 215-8 |
|||||||||||||
|
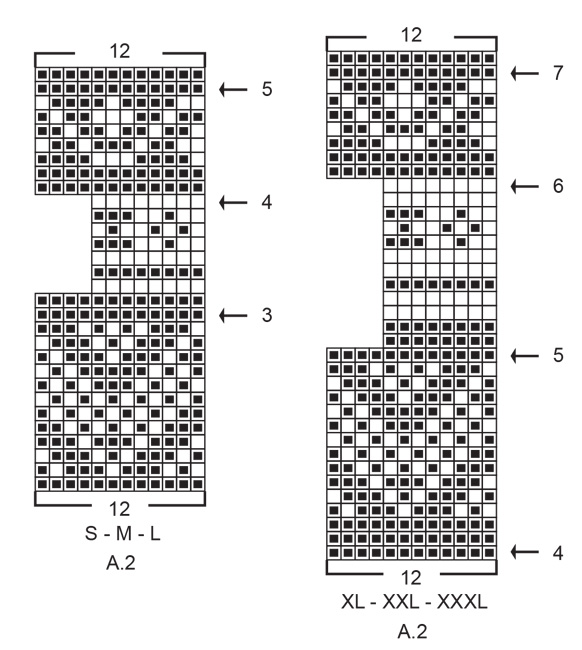
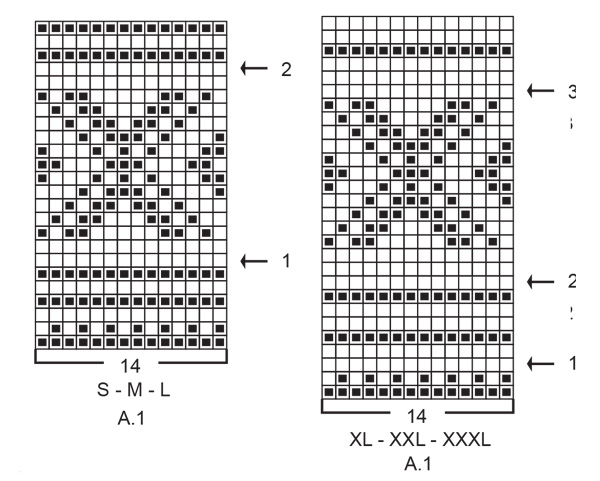
------------------------------------------------------- EXPLANATIONS FOR THE PATTERN: ------------------------------------------------------- INCREASE TIP-1 (evenly spaced): To work out how to increase evenly, count the total number of stitches on the needle (e.g. 110 stitches) divide by the number of increases to be made (e.g. 36) = 3. In this example, increase by making 1 yarn over after each 3rd stitch. On the next round knit the yarn overs twisted to avoid holes. PATTERN: See diagrams A.1 to A.3. Choose diagram for your size (applies to A.1 and A.2). The whole pattern is worked in stockinette stitch. KNITTING TIP: To avoid the knitting gauge becoming tighter when working pattern it is important that the strands at the back are not tight. Use a size larger needle when working pattern if this is a problem. ELEVATION (back of neck): So the sweater is slightly higher at the back of the neck when working the yoke, you can work an elevation as described here. Skip this section if you do not want an elevation. Insert a marker at the beginning of the round (mid-back). Start from the right side with sea fog and knit 14-15-16-16-17-18 stitches past the marker, turn, tighten strand and purl 28-30-32-32-34-36 stitches back. Turn, tighten the strand and knit 42-45-48-48-51-54 stitches, turn, tighten strand and purl 56-60-64-64-68-72 stitches back. Turn, tighten the strand and knit 70-75-80-80-85-90 stitches, turn, tighten strand and purl 84-90-96-96-102-108 stitches back. Turn, tighten the strand and knit to mid-back. Then work YOKE as described in the text. INCREASE TIP-2 (for sides of body): Increase 1 stitch on each side of the marker thread as follows: Work until there are 2 stitches left before the marker thread, make 1 yarn over, knit 4 (marker thread sits between these 4 stitches) make 1 yarn over (= 2 stitches increased at each marker thread). On the next round knit the yarn overs twisted to avoid holes. Then work the new stitches in stockinette stitch. DECREASE TIP (for mid under sleeve): Decrease 1 stitch on either side of the stitch with the marker as follows: Work until there are 2 stitches left before the stitch with the marker, knit 2 together, knit the stitch with the marker, slip 1 stitch as if to knit, knit 1 and pass the slipped stitch over the knitted stitch (= 2 stitches decreased). BINDING-OFF TIP: To avoid the bind-off edge being tight you can bind off with a larger size needle. If the edge is still tight, make 1 yarn over after approx. each 6th stitch at the same time as binding off; the yarn overs are bind off as normal stitches. ------------------------------------------------------- START THE PIECE HERE: ------------------------------------------------------- SWEATER – SHORT OVERVIEW OF THE PIECE: The neck and yoke are worked in the round with circular needle, top down from mid back. The yoke is divided for the body and sleeves and the body continued in the round with circular needle. The sleeves are worked in the round with short circular needle/double pointed needles, top down. NECK: Cast on 110-114-120-124-128-134 stitches with short circular needle size 2.5 mm = US 1,5 and sea fog. Knit 1 round. Then work rib in the round (= knit 1, purl 1) for 3-3-3-4-4-4 cm = 1⅛"-1⅛"-1⅛"-1½"-1½"-1½". Knit 1 round where you increase 36-38-40-42-42-44 stitches evenly spaced – read INCREASE TIP-1 = 146-152-160-166-170-178 stitches on the needle. Change to circular needle size 3 mm = US 2,5 and knit 1 round (yarn overs knitted twisted). Insert 1 marker in the middle of the round (= mid-front); the yoke is measured from this marker! Now you can work an ELEVATION in the back of the neck – read description above. If you do not want an elevation, go straight to YOKE. YOKE: Read the whole of this section before continuing! Work stockinette stitch in the round with sea fog. When the piece measures 1½-2-2-3-3-3 cm = ½"-¾"-¾"-1⅛"-1⅛"-1⅛" from the marker on the neck, increase 50-52-54-56-58-60 stitches evenly spaced = 196-204-214-222-228-238 stitches. When the piece measures 2-3-3-4-4-5 cm = ¾"-1⅛"-1⅛"-1½"-1½"-2" from the marker on the neck start the pattern by working A.1 in the round, AT THE SAME TIME as you increase stitches on each round marked with an arrow as described below. Remember INCREASE TIP-1 and be aware that the 14 stitches in the pattern do not fit until after increasing on the row with arrow-1 (S, M, and L) and arrow-2 (XL, XXL and XXXL). Read KNITTING TIP and work A.2 when A.1 has been completed in height. S, M and L: Arrow-1: Increase 42-48-52 stitches evenly spaced = 238-252-266 stitches (there is now room for 17-18-19 repeats of A.1 with 14 stitches). Arrow-2: Increase 50-48-58 stitches evenly spaced = 288-300-324 stitches (there is now room for 24-25-27 repeats of A.1 with 12 stitches). Arrow-3: Increase 40-44-52 stitches evenly spaced = 328-344-376 stitches (there is now room for 41-43-47 repeats of A.2 with 8 stitches). Arrow-4: Increase 8-16-20 stitches evenly spaced = 336-360-396 stitches (there is now room for 28-30-33 repeats of A.2 with 12 stitches). Arrow-5: Increase 4-12-4 stitches evenly spaced = 340-372-400 stitches. Finish A.2. XL, XXL and XXXL: Arrow-1: Increase 30-40-50 stitches evenly spaced = 252-268-288 stitches. Arrow-2: Increase 28-40-48 stitches evenly spaced = 280-308-336 stitches (there is now room for 20-22-24 repeats of A.1 with 14 stitches). Arrow-3: Increase 28-32-36 stitches evenly spaced = 308-340-372 stitches. Arrow-4: Increase 28-32-36 stitches evenly spaced = 336-372-408 stitches (there is now room for 28-31-34 repeats of A.2 with 12 stitches). Arrow-5: Increase 56-60-64 stitches evenly spaced = 392-432-472 stitches (there is now room for 49-54-59 repeats of A.2 with 8 stitches, Arrow-6: Increase 40-36-32 stitches evenly spaced = 432-468-504 stitches (there is now room for 36-39-42 repeats of A.2 with 12 stitches). Arrow-7: Increase 8-8-8 stitches evenly spaced = 440-476-512 stitches. Finish A.2. ALL SIZES: When A.2 has been completed the piece measures approx. 19-20-20-24-24-25 cm = 7½"-8"-8"-9½"-9½"-9¾" from the marker on the neck. Continue with stockinette stitch and sea fog (size S: only continue working if the piece measures less than 19 cm = 7½" when A.2 has been completed). When the piece measures 19-21-23-25-27-29 cm = 7½"-8¾"-9"-9¾"-10⅝"-11⅜" from the marker on the neck, divide the yoke for the body and sleeves as follows from mid back: Work 50-55-58-64-71-78 stitches in stockinette stitch (= ½ back piece), place the next 70-76-84-92-96-100 stitches on 1 thread for the sleeve, cast on 6-6-8-8-10-10 new stitches on the needle (= in side under sleeve), work 100-110-116-128-142-156 stitches in stockinette stitch (= front piece), place the next 70-76-84-92-96-100 stitches on 1 thread for the sleeve, cast on 6-6-8-8-10-10 new stitches on the needle (= in side under sleeve) and work the remaining 50-55-58-64-71-78 stitches in stockinette stitch (= ½ back piece). Body and sleeves are finished separately. THE PIECE IS NOW MEASURED FROM HERE! BODY: = 212-232-248-272-304-332 stitches. Insert 1 marker thread in each side of the body, in the middle of the 6-6-8-8-10-10 stitches cast on under each sleeve; allow the threads to follow your work onwards, they will be used when increasing in the sides. Work stockinette stitch over the back piece as far as the first marker thread. This is now the beginning of the round. Continue in the round with stockinette stitch and sea fog. When the piece measures 5 cm = 2" from the division, increase 1 stitch on each side of both marker threads – read INCREASE TIP-2 (= 4 stitches increased). Increase like this every 6 cm = 2⅜" a total of 4 times in height = 228-248-264-288-320-348 stitches. Continue working until the piece measures 28 cm = 11" from the division. There is approx. 4 cm = 1½" to finished length; you can try the sweater on and work to desired length. Knit 1 round where you increase 56-60-64-70-78-86 stitches evenly spaced = 284-308-328-358-398-434 stitches (this is done to avoid the rib being tight). Change to circular needle size 2.5 mm = US 1,5 and work rib (= knit 1, purl 1) for 4 cm = 1½". Bind off with knit over knit and purl over purl – read BINDING-OFF TIP! The sweater measures approx. 54-56-58-60-62-64 cm = -21¼"-22"-22¾"-23⅝"-24⅜"-25¼" from the shoulder down. SLEEVE: Place the 70-76-84-92-96-100 stitches from the thread on the one side of the piece on double pointed needles/short circular needle size 3 mm = US 2,5 and knit up 1 stitch in each of the 6-6-8-8-10-10 stitches cast on under the sleeve = 76-82-92-100-106-110 stitches. Now insert 2 markers in the piece (without working the stitches). Start mid under the sleeve in the middle of the 6-6-8-8-10-10 stitches and insert 1 marker in the first stitch after the middle, count 37-40-45-49-52-54 stitches, insert 1 marker in the next stitch = 37-40-45-49-52-54 left on the round after the marker. The marker under the sleeve is used when decreasing, the one on top of the sleeve is used to find the beginning of the pattern. Allow the markers to follow your work onwards. Start under the sleeve with the stitch with the marker and work stockinette stitch in the round with sea fog. When the piece measures 3-3-3-3-2-2 cm = 1⅛"-1⅛"-1⅛"-1⅛"-¾"-¾" from the division, decrease 2 stitches under the sleeve – read DECREASE TIP. Decrease like this every 3-2½-2-1½-1½-1 cm = 1⅛"-⅞"-¾"-½"-½"-⅜" a total of 12-14-17-20-22-23 times = 52-54-58-60-62-64 stitches. Work until the sleeve measures 36-35-33-31-29-28 cm = 14¼"-13¾"-13"-12¼"-11⅜"-11" from the division. There is approx. 9 cm = 3½" to finished length; you can try the sweater on and work to desired length; be aware that in some sizes, the decreases under the sleeve are not yet finished. NOTE: Shorter measurements in larger sizes due to wider neck and longer yoke. Now work A.3 (count out from the marker on top of the sleeve to where the pattern starts – the stitch marked with a star in A.3 matches the stitch with the marker). When A.3 has been completed, the sleeve measures approx. 41-40-38-36-34-33 cm = 16⅛"-15¾"-15"-14¼"-13⅜"-13" from the division. The rest of the sleeve is worked with sea fog. Knit 1 round where you increase 12-12-14-14-16-16 stitches evenly spaced = 64-66-72-74-78-80 stitches. Change to double pointed needles size 2.5 mm = US 1,5 and work rib (= knit 1, purl 1) for 4 cm = 1½". Bind off with knit over knit and purl over purl – remember BINDING-OFF TIP. The sleeve measures approx. 45-44-42-40-38-37 cm = 17¾"-17¼"-16½"-15¾"-15"-14½" from the division. Work the other sleeve in the same way. |
|||||||||||||
Diagram explanations |
|||||||||||||
|
|||||||||||||
 |
|||||||||||||
 |
|||||||||||||
 |
|||||||||||||
Have you finished this pattern?Tag your pictures with #dropspattern #scentofpinesweater or submit them to the #dropsfan gallery. Do you need help with this pattern?You'll find 28 tutorial videos, a Comments/Questions area and more by visiting the pattern on garnstudio.com. © 1982-2026 DROPS Design A/S. We reserve all rights. This document, including all its sub-sections, has copyrights. Read more about what you can do with our patterns at the bottom of each pattern on our site. |
|||||||||||||


With over 40 years in knitting and crochet design, DROPS Design offers one of the most extensive collections of free patterns on the internet - translated to 17 languages. As of today we count 324 catalogs and 12290 patterns - 12280 of which are translated into English (US/in).
We work hard to bring you the best knitting and crochet have to offer, inspiration and advice as well as great quality yarns at incredible prices! Would you like to use our patterns for other than personal use? You can read what you are allowed to do in the Copyright text at the bottom of all our patterns. Happy crafting!
Post a comment to pattern DROPS 215-8
We would love to hear what you have to say about this pattern!
If you want to leave a question, please make sure you select the correct category in the form below, to speed up the answering process. Required fields are marked *.