
Popular categories
Looking for a yarn?


Comments / Questions (111)
![]() Diana wrote:
Diana wrote:
How will pattern A1, A2 and A4 be more with two stiches from the second round? What is the explanation for it? Is it because increasing the stiches before and after each A1? If so, please confirm, also in the pattern (in Hungarian too). If not, please explain because I can't figure it out.
16.04.2021 - 15:36DROPS Design answered:
Dear Diana, please see the symbols' description, especially the black triangle, that tells xou to knit 3 stitch into that stitch, thus increasing 2 stitches. Kedves Diana, kérem olvassa el figyelmesen a jelek magyarázatát. A kis fekete háromszög azt mutatja, abban a szembe 3 szemet kell kötnie, így 2 szemet szaporít. Happy Knitting!
17.04.2021 - 00:47
![]() Piera wrote:
Piera wrote:
Buongiorno in questo modello ci sono delle modifiche agli schemi ma io non riesco a trovarli.grazie
08.04.2021 - 17:20DROPS Design answered:
Buonasera Piera, le spiegazioni online sono già quelle aggiornate. Buon lavoro!
08.04.2021 - 17:28
![]() Charlotte Bertelsen wrote:
Charlotte Bertelsen wrote:
Jeg er ved at strikke Spring Surrender Drops 212-40. Mønster: når man har strikket A2 og A4 skal man så strikke A2a og A4a ?Og hvad så? Hvad med A2b og A4b hvornår strikkes de så? Starter man så forfra med A2 og A4? A1 som strikkes på for og bagstykkerne: hvornår strikkes A1b?
19.03.2021 - 10:04DROPS Design answered:
Hei Charlotte. På 1. omgang til bærestykkes strikkes A.1, A.2, A.3a og A.4. Når de første 3 omgangene i mønster A.1, A.2 og A.4 er strikket, repeteres A.1a, A.2a og A.4a videre i høyden (A.1a over A.1, A.2a over A.2 og A.4a over A.4). Når A.3a er strikket 1 gang i høyden, strikkes A.3b over A.3a. Når siste repetisjon av A.1a fra bærestykket er strikket ferdig i høyden, strikkes A.1b over hver A.1a. A.2b strikkes over A.2a og A.4b over A.4a når du strikker ermene. mvh DROPS design
22.03.2021 - 13:21
![]() Claude wrote:
Claude wrote:
Bonjour, En ce qui concerne les augmentations de chaque côté du diagramme A1, pourriez-vous me confirmer ce que je crois comprendre, à savoir : les deux premiers jetés d'augmentations se font en A1a, tout de suite avant la première maille endroit et après la dernière maille endroit et ceci à chaque premier et troisième rang puisque A1a est répété x fois.. Merci d'avance
20.02.2021 - 16:40DROPS Design answered:
Bonjour Claude, on augmente pour le raglan de chaque côté de chaque A.1 autrement dit, tricotez jusqu'aux mailles de A.1, faites 1 jeté, tricotez les mailles de A.1, et faites 1 jeté (= on a augmenté 2 mailles), répétez à chaque A.1 (= on augmente 8 mailles au total). Comme A.1 commence et se termine par 1 m end, vous allez effectivement faire le jeté avant la 1ère maille endroit de A.1 et 1 autre jeté après la dernière maille endroit de A.1. Notez bien qu'au tout premier rang de A.1, vous augmentez en plus 2 mailles au milieu de chaque A.1. Bon tricot!
22.02.2021 - 08:08
![]() Norma wrote:
Norma wrote:
I am not experienced in using double pointed needles. Can this pattern be knit using magic loop method?
18.02.2021 - 16:33DROPS Design answered:
Dear Norma, double pointed needles are here used when working each sleeve, you can then work with a circular needle and magic loop method. Happy knitting!
19.02.2021 - 08:14
![]() Rossana wrote:
Rossana wrote:
Bonjour, qu'est ce que signifie : "Tricoter 1 tour comme avant" ? Merci
16.02.2021 - 13:50DROPS Design answered:
Bonjour Rossana, tricotez ce tour comme le précédent = les mailles endroit à l'endroit et tricotez le rang suivant du diagramme correspondant. Bon tricot!
16.02.2021 - 14:21
![]() Tim wrote:
Tim wrote:
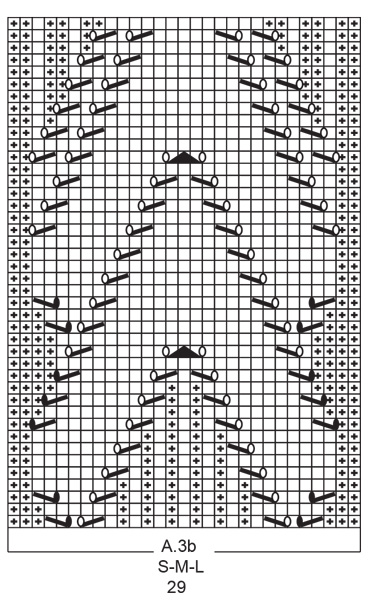
In chart A.3b S-M-L, shouldn't the chart read P2, K1, P2, K1, P2..., instead of P2, K1, P2, K1, P1...
13.02.2021 - 16:48DROPS Design answered:
Dear Tim, correct, thanks for the info, diagram will be updated. Happy knitting!
25.02.2021 - 11:12
![]() Lilian wrote:
Lilian wrote:
Hallo liebes Drops Team, ich hätte eine Frage bezüglich der Abnahme beim Rumpfteil. Ich habe das so verstanden, dass ich beidseitig jedes Markierungsfadens eine Masche abnehme, also 8 Maschen pro Runde. Um von 210 M auf 194 M zu kommen, müsste ich das also 2x machen. Allerdings steht in der Anleitung „in dieser Weise alle 2 cm insgesamt 4x abnehmen. Ich bin jetzt unsicher wie ich genau abnehmen soll.
23.01.2021 - 13:15DROPS Design answered:
Liebe Lilian, am Anfang vom Rumpfteil haben Sie 194 M (in S), aber nach A.1b haben Sie 190 M (= 1 M in jedem Diagram wird abgenommen), dann nehmen Sie 1 M beidseitig jeder Markierung auf beiden Seiten vom Pullover = 4 Abnahmen/Runde x 4 = 16 Abnahmen; 190-16=174 Maschen. Viel Spaß beim stricken!
25.01.2021 - 08:39
![]() Manon wrote:
Manon wrote:
Qui peut me dire comment on fait le rang 2 ? Tout en maille endroit ou reprend-on toutes les successions d’explications ? Ça me parait bizarre...
27.12.2020 - 22:39DROPS Design answered:
Bonjour Manon! De quel diagram parlez-vous?
28.12.2020 - 09:15
![]() Genevieve wrote:
Genevieve wrote:
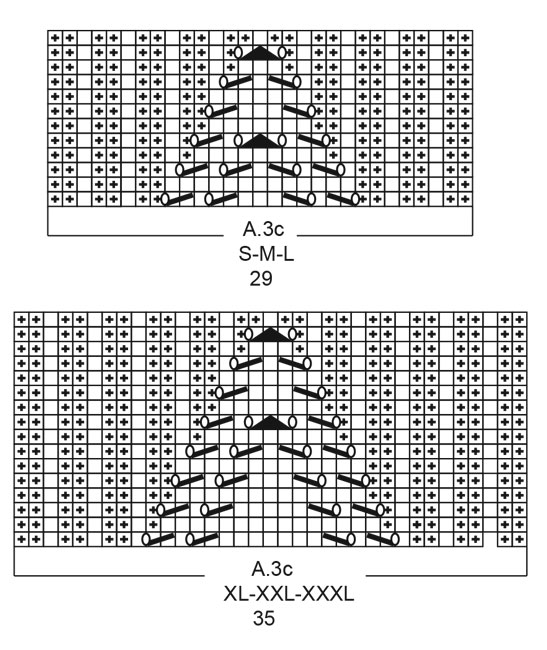
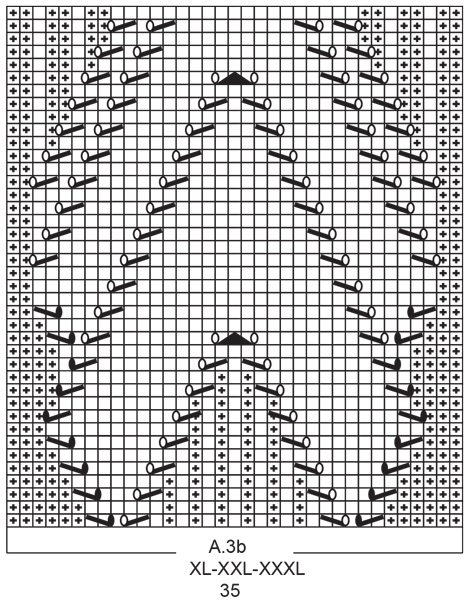
Hi. I am knitting the yoke now. Wanted to check if I were to work A3.b 1 time in height and haven't reached the required length before sleeves division, do I repeat A3.b?
07.12.2020 - 14:24DROPS Design answered:
Dear Genevieve, yes after A.3b has been worked one time in height, repeat diagram from first row. Happy knitting!
07.12.2020 - 16:00
|
|||||||||||||||||||||||||||||||
Spring Surrender#springsurrendersweater |
|||||||||||||||||||||||||||||||
 |
 |
||||||||||||||||||||||||||||||
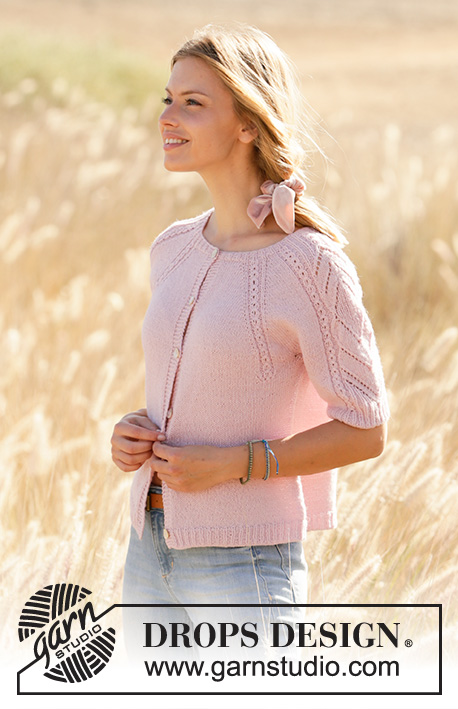
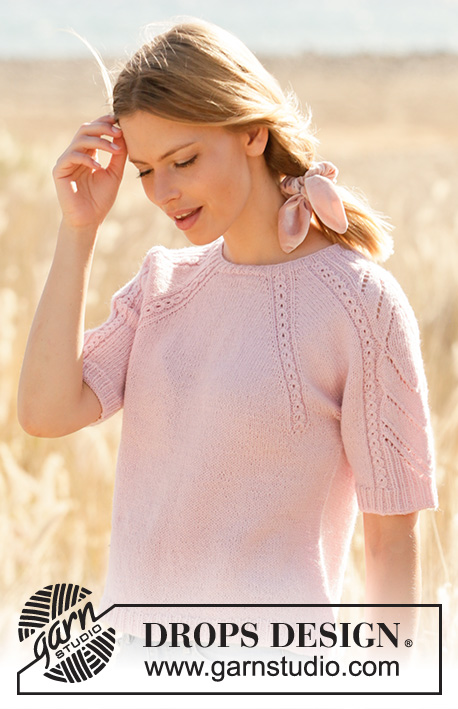
Knitted sweater with raglan in DROPS Alpaca. Piece is knitted top down with lace pattern and short sleeves. Size: S - XXXL
DROPS 212-40 |
|||||||||||||||||||||||||||||||
|
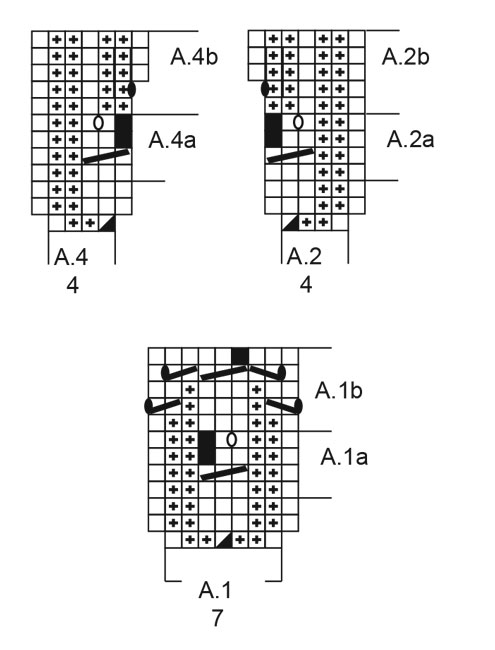
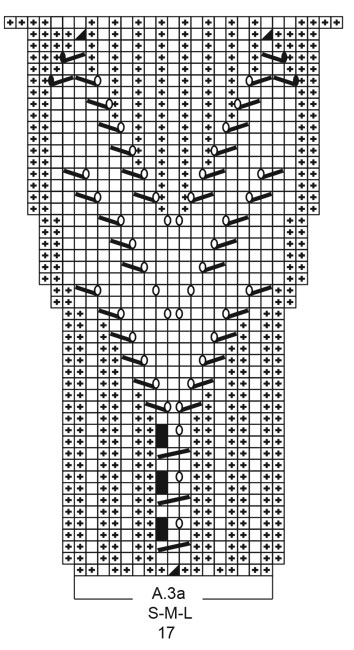
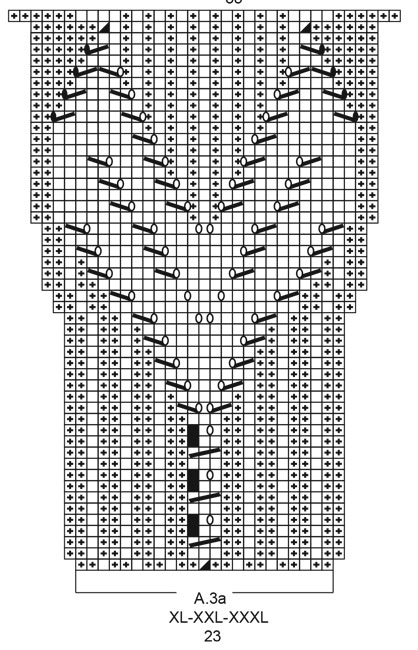
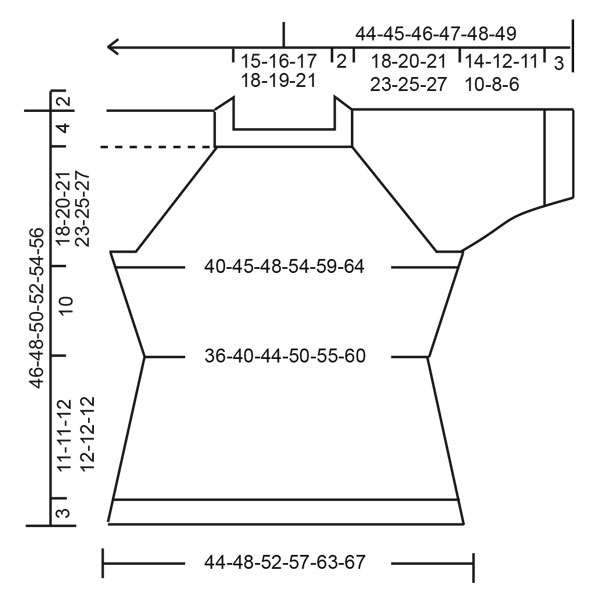
---------------------------------------------------------- EXPLANATION FOR THE PATTERN: ---------------------------------------------------------- PATTERN: See diagrams A.1 to A.4. Choose diagram for your size. INCREASE TIP-1 (applies to raglan): Increase 1 stitch by making 1 yarn over between 2 stitches. On next round knit yarn over twisted to avoid holes. Then work the new stitches in stockinette stitch. INCREASE TIP-2 (applies to sides of body): Work until 2 stitches remain before marker thread, 1 yarn over, knit 4 (marker thread is in the middle of these stitches), 1 yarn over. On next round knit yarn overs twisted to avoid holes. Then work the new stitches in stockinette stitch. DECREASE TIP (applies to side on body and sleeves): Decrease 1 stitch on each side of marker thread as follows: Work until 3 stitches remain before marker thread and knit 2 together, knit 2 (marker thread is between these stitches), slip 1 stitch knitwise, knit 1, pass slipped stitch over stitch worked. NUMBER OF STITCHES: As both increases and decreases are done in A.1a, A.2a, A.3a and A.4a, number of stitches vary according to which round it is counted on (depending on you are increasing/decreasing in pattern). BIND-OFF TIP: To avoid a tight bind-off edge you may use a larger needle. If this also is too tight, make 1 yarn over after approx. every 4th stitch and bind off these as regular stitches. ---------------------------------------------------------- START THE PIECE HERE: ---------------------------------------------------------- SWEATER - SHORT OVERVIEW OF THE PIECE: Work neck edge and yoke in the round on circular needle from mid back, top down. Now divide yoke for body and sleeves. Body is worked in the round on circular needle, top down. Work sleeves in the round on double pointed needles, top down. NECK EDGE: Cast on 108-120-126-132-135-144 stitches on circular needle size 2.5 mm = US 1,5 with Alpaca. Knit 1 round. Work rib (= knit 1/purl 2). Continue rib like this for 2 cm = ¾". Switch to circular needle size 3 mm = US 2,5. Insert 1 marker at the beginning of round mid back, measure yoke from this marker! YOKE: Half back piece: Knit 6-9-9-9-9-12, A.1 (= 7 stitches). Right sleeve: Knit 2, A.2 (= 4 stitches), A.3a (= 17-17-17-23-23-23 stitches), A.4 (= 4 stitches), knit 2. Front piece: Work A.1 over 7 stitches, knit 11-17-22-17-19-23, A.1 over 7 stitches. Left sleeve: Knit 2, A.2 over 4 stitches, A.3a over 17-17-17-23-23-23 stitches, A.4 over 4 stitches, knit 2. Half back piece: Work A.1 over 7 stitches, knit 5-8-9-8-9-11. Work 1 round with the established pattern. On next round increase for raglan on each side of every A.1 – read INCREASE TIP-1 (= 8 stitches increased). REMEMBER THE KNITTING GAUGE! Increase like this every other round 22-24-28-33-37-40 times in total. When the first 3 rows in pattern A.1, A.2 and A.4 has been worked, repeat A.1a, A.2a and A.4a in height. When A.3a has been worked 1 time vertically, work A.3b (= 29-29-29-35-35-35 stitches) over A.3a. When increase for raglan is done, there are 324-352-390-436-471-504 stitches on needle – read NUMBER OF STITCHES. Work in the established pattern until piece measures 18-20-21-23-25-27 cm = 7"-8"-8¼"-9"-9¾"-10⅝" from marker. Adjust so that next round is a round with total number of stitches (i.e. 324-352-390-436-471-504 stitches), this because number of stitches can vary because of decreases/increases in diagrams. On next round divide piece for body and sleeves as follows: Work over the first 45-50-54-61-68-73 stitches as before, slip the next 73-77-87-97-101-107 stitches on a stitch holder for sleeve and cast on 8 stitches under sleeve, work over the next 89-99-108-121-134-145 stitches, slip the next 73-77-87-97-101-107 stitches on a stitch holder for sleeve and cast on 8 stitches under sleeve and work the last 44-49-54-60-67-72 stitches. BODY: = 194-214-232-258-285-306 stitches. Insert 1 marker thread in the middle of the 8 stitches under over each sleeve (= in the sides of body). There are 97-107-116-129-142-153 stitches between marker threads on front piece and 97-107-116-129-143-153 stitches between marker threads on back piece. Move the marker threads upwards when working; they should be used for increase and decrease later in the sides. When last repetition of A.1a from the yoke has been worked vertically, work A.1b over every A.1a. When A.1b has been worked 1 time vertically, there are 190-210-228-254-281-302 stitches on needle. Continue in the round in stockinette stitch. When piece measures 2 cm = ¾" from division, decrease 1 stitch on each side of the marker thread in each side - read DECREASE TIP (= 4 stitches decreased). Decrease like this every 2 cm = ¾" 4 times in total = 174-194-212-238-265-286 stitches. When piece measures 10 cm = 4" from division, increase 1 stitch on each side of marker threads in the sides - read INCREASE TIP-2(= 4 stitches increased). Increase like this every cm = ⅜" 9 times in total = 210-230-248-274-301-322 stitches. When piece measures 21-21-22-22-22-22 cm = 8¼"-8¼"-8¾"-8¾"-8¾"-8¾" from division, increase 12-13-13-14-14-14 stitches evenly = 222-243-261-288-315-336 stitches. Switch to circular needle size 2.5 mm = US 1,5 and work rib (= knit 1/purl 2). When piece measures 24-24-25-25-25-25 cm = 9½"-9½"-9¾"-9¾"-9¾"-9¾" from division, bind off all stitches by knitting- read BIND-OFF TIP. SLEEVES: Slip the 73-77-87-97-101-107 stitches from stitch holder in one side of piece on double pointed needles size 3 mm = US 2,5 and pick up 1 new stitch in each of the 8 stitches cast on under sleeve = 81-85-95-105-109-115 stitches – remember number of stitches. Insert 1 marker thread in the middle of the 8 new stitches. Move the marker thread upwards when working; it should be used for decrease mid under sleeve. READ ALL OF THE FOLLOWING SECTION BEFORE CONTINUING! Work pattern and decrease stitches mid under sleeve as follows: Work A.2a, A.3b and A.4a over the middle stitches, knit the remaining stitches. When A.3b has been worked, work A.3c over A.3b. When sleeve measures 1 cm = ⅜" from division, decrease 1 stitch on each side of marker thread (= 2 stitches decreased). Decrease like this every cm = ⅜" 3-3-3-3-5-5 times in total, then decrease every other cm = ⅜" 2-2-2-2-0-0 times in total = 71-75-85-95-99-105 stitches. On last round in A.3c increase 0-1-2-0-1-1 stitches before pattern, and 2-0-1-2-0-0 stitches after the pattern = 73-76-88-97-100-106 stitches. When A.3c has been worked 1 time vertically, piece measures approx. 14-12-11-10-8-6 cm = 5½"-4¾"-4⅜"-4"-3⅛"-2⅜" from division. Switch to double pointed needles size 2.5 mm = US 1,5. Work next round as follows: * Knit 1, purl 2 *, work from *-* over the first 15-18-24-24-27-30 stitches, A.2b over A.2a, continue with knit over knit and purl over purl over stitches in A.3c, A.4b over A.4a, * purl 2, knit 1 *, work from *-* over 15-15-21-24-24-27 stitches and finish with purl 2 = 75-78-90-99-102-108 stitches. Continue with knit over knit and purl over purl until piece measures 17-15-14-13-11-9 cm = 6¾"-6"-5½"-5⅛"-4⅜"-3½" from division, then bind off by knitting. Work the other sleeve the same way. |
|||||||||||||||||||||||||||||||
Diagram explanations |
|||||||||||||||||||||||||||||||
|
|||||||||||||||||||||||||||||||
 |
|||||||||||||||||||||||||||||||
 |
|||||||||||||||||||||||||||||||
 |
|||||||||||||||||||||||||||||||
 |
|||||||||||||||||||||||||||||||
 |
|||||||||||||||||||||||||||||||
 |
|||||||||||||||||||||||||||||||
 |
|||||||||||||||||||||||||||||||
Have you finished this pattern?Tag your pictures with #dropspattern #springsurrendersweater or submit them to the #dropsfan gallery. Do you need help with this pattern?You'll find 26 tutorial videos, a Comments/Questions area and more by visiting the pattern on garnstudio.com. © 1982-2026 DROPS Design A/S. We reserve all rights. This document, including all its sub-sections, has copyrights. Read more about what you can do with our patterns at the bottom of each pattern on our site. |
|||||||||||||||||||||||||||||||


With over 40 years in knitting and crochet design, DROPS Design offers one of the most extensive collections of free patterns on the internet - translated to 17 languages. As of today we count 324 catalogs and 12245 patterns - 12235 of which are translated into English (US/in).
We work hard to bring you the best knitting and crochet have to offer, inspiration and advice as well as great quality yarns at incredible prices! Would you like to use our patterns for other than personal use? You can read what you are allowed to do in the Copyright text at the bottom of all our patterns. Happy crafting!
Post a comment to pattern DROPS 212-40
We would love to hear what you have to say about this pattern!
If you want to leave a question, please make sure you select the correct category in the form below, to speed up the answering process. Required fields are marked *.