
Popular categories
Looking for a yarn?


Comments / Questions (94)
![]() Anika wrote:
Anika wrote:
Hallo, ich verzweifle gerade etwas daran die beiden Beinchen zusammenzustricken. Ich habe das Tutorial-Video dazu gesehen aber das klappt bei mir nicht, da der Durchmesser des einzelnen Beins zu klein ist und ich sie mir regelrecht aufreiße bei dem Versuch die auf die Rundnadel zu legen oder drauf zu stricken. Gibt es hierbei noch etwas zu beachten bzw. helfen wie im Video kurze Nadeln? Meine sind normal lang.... vielen Dank für die Hilfe.
19.01.2021 - 17:52DROPS Design answered:
Liebe Anika, Sie können mit dem Nadelspiel weiterstricken, oder mit der sog. Technik Magic Loop stricken. Viel Spaß beim stricken!
20.01.2021 - 07:26
![]() Jana wrote:
Jana wrote:
Am Ende der Hose schreiben Sie "1 Masche KRAUS RECHTS – siehe oben- stricken". Gleiches gilt für das Rückenteil und die Schulterträger. Was bedeutet "eine Masche Kraus rechts?" Vielen Dank!
10.01.2021 - 22:03DROPS Design answered:
Liebe Jana, am Anfang der Anleitung wird es erklärt, wie man 1 Masche kraus rechts strickt, deshalb ist es so erklärt. Sie werden jetzt in Reihen mit Rippenmuster stricken -die Randmaschen werden beidsetig krausrechts gestrickt - bei der 1. Reihe (wenn Sie abketten) stricken Sie diese Maschen rechts. Viel Spaß beim stricken!
11.01.2021 - 10:23
![]() Susan R wrote:
Susan R wrote:
I was gifted Air wool and would like to knit this jumper. Would that be suitable? How can I convert the stitch number to gain the same size?
30.12.2020 - 23:48DROPS Design answered:
Dear Susan! Please comment under the pattern you would like to knit. For best result choose pattern within the same yarn group. Hope it helps!
31.12.2020 - 01:31
![]() Kimberly wrote:
Kimberly wrote:
I’ve finished the top ribbing and will begin to bind off to separate the front and back. I read ahead to the strap section and I’m confused about how to work the rib stitch on each side; then bind off and repeat for other side. Does this mean each left and right straps have 2 sides? I don’t understand how to work one strap double sided like this (double knitting has slipped stitches) - or is each strap a small tube? If so, I still don’t understand how to start it. Thank you! :)
17.12.2020 - 03:30DROPS Design answered:
Dear Kimberly, after you have cast off on back piece, there are 10 sts remaining on needle for the first strap, you then work the strap over these 10 sts; and after you cast off the 10 sts first strap, join the yarn to work the remaining 10 sts for 2nd strap on the other side of back piece (that's what is meant with "other side" = other strap). Hope this will help. Happy knitting!
17.12.2020 - 09:00
![]() Stine Svendsen wrote:
Stine Svendsen wrote:
Strikker bukse str 2år. Forstår ikke hva jeg skal gjøre her; 4cm vrangbord også felles det slik; 2 vrang, 3 rett, 2 vrang, 3 rett, 1 maske RILLE ?? .. fell av de neste osv.. Skjønner ikke den RILLE inni der . Vet va rillestrikk er, men forstår ikke dette inni her, og hvor langt skal det strikkes rille, før de fellingene kommer?
03.12.2020 - 08:24DROPS Design answered:
Hej Stine. När vi skriver RILLE så menar vi att det ska stickas rett både fra vrangsiden og retsiden. 1 maske RILLE betyder alltså 1 m rett. Mvh DROPS Design
03.12.2020 - 12:00
![]() Kim wrote:
Kim wrote:
Bonjour, Je voudrais faire le modèle en 6/9 mois, je mais je n'ai pas d'aiguille double pointe. Comment je peux faire ? On doit commencer les jambes en tricotant en aller-retour ou en rond ? Merci d'avance
18.11.2020 - 18:58DROPS Design answered:
Bonjour Kim, chaque jambe se tricote en rond avec les aiguilles doubles pointes. Vous pouver aussi utiliser les aiguilles circulaires courtes, l'effet sera le meme. Bon tricot!
18.11.2020 - 19:44
![]() Marga wrote:
Marga wrote:
Bij het minderen kom ik niet uit met het aantal cm; ik kom op meer cm dan dat het stuk moet worden (bijv. bij 3 cm meerderen maal 5 kom ik op 15 cm uit, terwijl het totaal maar 14 cm mag worden vanaf het samenvoegen van de pijpen. Klopt dit wel?
18.11.2020 - 00:27DROPS Design answered:
Dag Marga,
Als je in jouw maat na 2 cm de eerste mindering maakt en 3 cm later weer, dan zit je bij de 5e mindering precies op 14 cm, vanaf waar de pijpen zijn samengevoegd.
18.11.2020 - 10:27
![]() Daniela Schmidt wrote:
Daniela Schmidt wrote:
Danke ja jetzt hat es mir geholfen und ich weiß warum ich die Mitte verloren habe. Nach der Erhöhung hinten soll man eine Runde rechts Stricken und Maschen anpassen. Die Runde beginnt nicht in der Mitte aber nach dem Punkt hab ich mich gerichtet und 4 cm im Rippenmuster gemacht. Jetzt muss ich es halt abzählen danke für die Hilfe
12.11.2020 - 14:36
![]() Daniela Schmidt wrote:
Daniela Schmidt wrote:
Hallo nein mir hilft die Antwort leider nicht weiter. Ich verstehe schon die Aufteilung der Maschen. Mir ist der Start Punkt für die nächste Runde nicht klar. Man hat nur zwei Markierung an den Seiten. Wo beginnt die Nächste Runde????
11.11.2020 - 20:34DROPS Design answered:
Liebe Frau Schmidt, die Runden beginnen mitte in dem Rückenteil (wie von Anfang teil "HOSE") die 34 abgekettene Maschen sind beide auf jeder Seite (= 17 M beidseitig jeder Markierung) - die ersten 11 Maschen bei dieser Runde sind für das halbe Rückenteil und die letzten 14 Maschen der Runde sind das 2. Teil vom Rückentei, so daß Rückenteil ist insgesamt 25 Maschen. Hilft es Ihnen schon weiter?
12.11.2020 - 09:08
![]() Daniela Schmidt wrote:
Daniela Schmidt wrote:
Hallo ich habe 145 Maschen auch der Nadel und bereits 4 cm im Rippenmuster gestrickt. Jetzt soll ich Maschen anketten! Maschen wie folgt abketten: 2 Maschen links, 3 Maschen rechts, 2 Maschen links, 3 Maschen rechts, 1 Masche KRAUS RECHTS – siehe oben - stricken, die nächsten (19) 24-24-34-34 (39-39) Maschen abketten!!!! An welcher Stelle fang ich denn mit 2 Maschen links ,3 rechts an ??? Wo ist der Startpunkt für diesen Schritt???
11.11.2020 - 14:18DROPS Design answered:
Liebe Frau Schmidt, die nächste Runde stricken Sie wie folgt: 2 M links + 3 M rechts + 2 M links + 3 M rechts + 1 M krausrechts stricken (= 11 M für halbes Rückenteil), dann ketten Sie die nächsten 34 M ab (= Seite), stricken Sie jetzt 2 M kraus rechts + 48 M im Rippenmuster + 2 M kraus rechts (= Vorderteil = diese Maschen stricken Sie später weiter ), jetzt ketten Sie die nächsten 34 M ab (= 2. Seite) und stricken die letzten M für den 2. Träger so: 1 Masche kraus rechts + 13 Maschen im Rippenmuster = es sind 11 M + 14 M = 25 M übrig für das Rückenteil. Hoffentlich hilft es Ihnen weiter. Viel Spaß beim stricken!
11.11.2020 - 14:52
|
||||
Afternoon Playdate#afternoonplaydatejumpsuit |
||||
 |
 |
|||
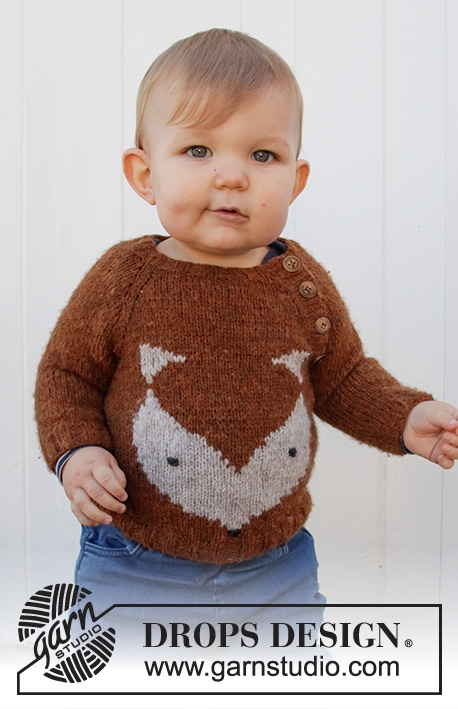
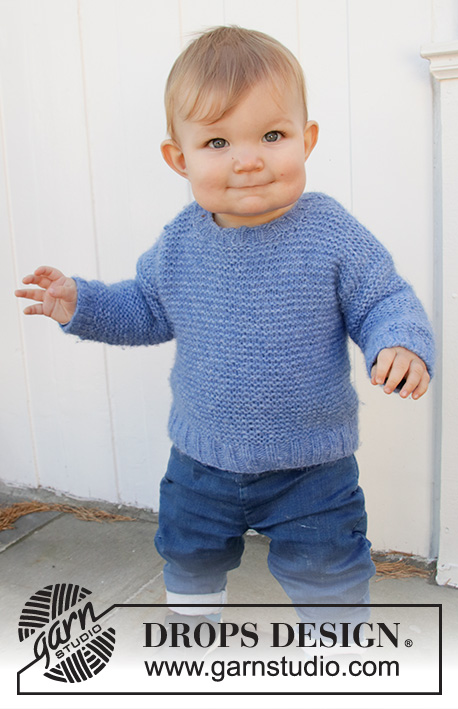
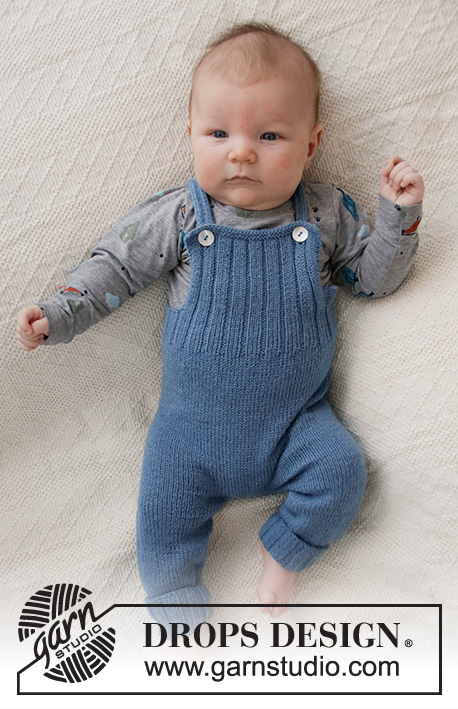
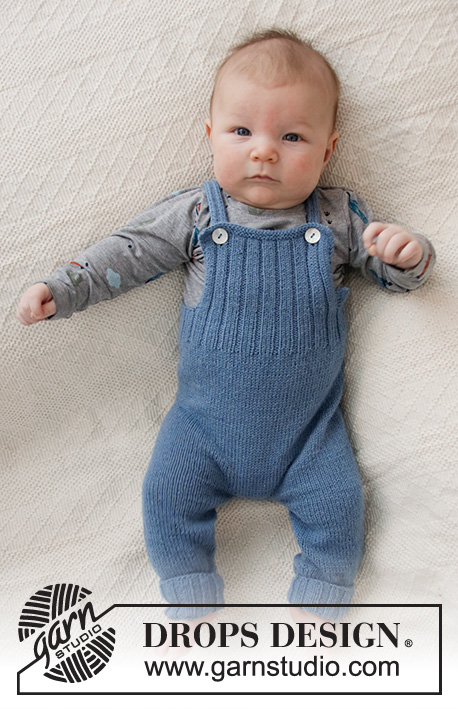
Knitted jumpsuit for babies in DROPS Flora. The piece is worked with rib and stockinette stitch. Sizes: Premature – 4 years.
DROPS Baby 36-4 |
||||
|
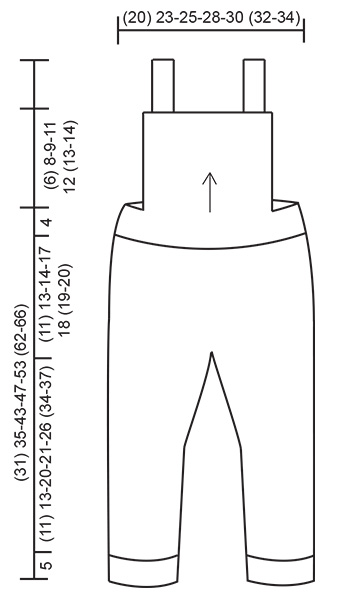
------------------------------------------------------- EXPLANATIONS FOR THE PATTERN: ------------------------------------------------------- RIDGE/GARTER STITCH (worked back and forth): 1 ridge in height = Knit 2 rows. INCREASE TIP (for sides of legs): Work until there is 1 stitch left before the marker, 1 yarn over, knit 2 (marker sits between these 2 stitches), 1 yarn over. On the next round knit the yarn overs twisted to avoid holes. Then work the new stitches in stockinette stitch. DECREASE TIP: Decrease 1 stitch on each side of the marker as follows: Work until there are 3 stitches left before the marker, knit 2 together, knit 2 (marker sits between these 2 stitches), slip 1 stitch as if to knit, knit 1, pass the slipped stitch over the knitted stitch. Decrease like this at both markers. ------------------------------------------------------- START THE PIECE HERE: ------------------------------------------------------- TROUSERS – SHORT OVERVIEW OF THE PIECE: Each leg is worked separately with double pointed needles before putting them together and casting on stitches for the crutch. The piece is continued in the round with short circular needle. Front and back pieces are worked back and forth. LEG: Cast on (40) 44-48-48-56 (60-64) stitches with double pointed needles size 2.5 MM = US 1.5 and Flora. Knit 1 round. Then work rib (= knit 2, purl 2). When the piece measures 5 cm, change to double pointed needles size 3 MM = US 2.5 and continue with stockinette stitch. Insert 1 marker at the beginning of the round. Allow the marker to follow your work onwards; it marks the inside of the leg and will be used when increasing later. REMEMBER THE KNITTING GAUGE! When the piece measures (8) 7-7-7-6 (8-10) cm = (3⅛") 2¾"-2¾"-2¾"-2⅜" (3⅛"-4") , increase 1 stitch on each side of the marker – read INCREASE TIP (= 2 stitches increased). Increase like this every (5) 2-2-2-3 (4-5) cm = (2")¾"-¾"-¾"-1⅛" (1½"-2") a total of (2) 6-9-10-9 (8-7) times = (44) 56-66-68-74 (76-78) stitches. Work stockinette stitch until the piece measures (16) 18-25-26-31 (39-42) cm. Move the marker (22) 28-33-34-37 (38-39)) stitches (= outside of leg). Allow the marker to follow your work onwards; it marks the outside of the leg and will be used when decreasing later. Cut the strand. Work the other leg in the same way. JUMP SUIT: Now place both legs on circular needle size 3 MM = US 2.5 and continue in the round as follows: Cast on (4) 4-4-6-6 (8-8) stitches, work the stitches from the one leg, cast on (4) 4-4-6-6 (8-8) stitches and work the stitches from the other leg = (96) 120-140-148-160 (168-172) stitches. The round starts mid-back, between the first (4) 4-4-6-6 (8-8) stitches. The round starts mid-back. Continue in the round with stockinette stitch. When the piece measures 2 cm = ¾" from where the legs were joined, decrease (0) 1-1-1-1 (1-1) stitch on each side of both markers – read DECREASE TIP. Decrease like this every (0) 8-3-6-4 (8-10) cm = (0) 3⅛"-1⅛"-2⅜"-1½" (3⅛"-4") a total of (0) 2-5-3-4 (3-2) times = (96) 112-120-136-144 (156-164) stitches. Work stockinette stitch until the piece measures (11) 13-14-17-18 (19-20) cm = (4⅜") 5⅛"-5½"-6¾"-7" (7½"-8") from the join. Now work an elevation at the back as follows: Knit (7) 7-9-9-9 (9-9), turn, tighten the strand and purl (14) 14-18-18-18 (18-18) stitches, turn, tighten the strand and knit (20) 20-26-26-26 (26-26) stitches, turn, tighten the strand and purl (26) 26-34-34-34 (34-34) stitches back. Continue like this, working (6) 6-8-8-8 (8-8) more stitches each time you turn and until you have worked over a total of (50) 50-66-66-82 (82-82) stitches. Turn, work to beginning of the round (= mid back). Knit 1 round and adjust the number of stitches to (95) 115-120-140-145 (160-165) stitches (i.e. increase (0) 3-0-4-1 (4-1) stitches and decrease (1) 0-0-0-0 (0-0) stitch). To make sure the front piece and back piece are placed correctly, the start of the round is now displaced as follows: Move size premature: Knit until 1 stitch remains on round, now round starts here. Move size 0/1 - 1/3 - 6/9 - 12/18 months (2 - 3/4) years: Knit 1, now round starts here. Change to short circular needle size 2.5 mm = US 1.5. Work as follows in all sizes: Work rib (= purl 2, knit 3) over all stitches. When the rib measures 4 cm = 1½", bind offf stitches as follows: Purl 2, knit 3, purl 2, knit 3, work 1 stitch in GARTER STITCH – read description above, bind off the next (19) 24-24-34-34 (39-39) stitches, work 2 stitches in garter stitch, continue with rib over the next (33) 38-43-43-48 (53-58) stitches, work 2 stitches in garter stitch (= front piece), bind offf the next (19) 24-24-34-34 (39-39) stitches, work 1 stitch in garter stitch and work rib over the remaining (8) 13-13-13-13 (13-13) stitches. BACK PIECE: = (20) 25-25-25-25 (25-25) stitches. Continue back and forth with rib and 2 edge stitches in garter stitch on each side until the piece measures (2) 3-3-4-4 (5-5) cm = (¾") 1⅛"-1⅛"-1½"-1½" (2"-2") from the division. The next row is worked as follows: Work 1 stitch in garter stitch, knit 3, purl 2, knit 3, 1 stitch in garter stitch, bind offf the next (0) 5-5-5-5 (5-5) stitches, work 1 stitch in garter stitch, knit 3, purl 2, knit 3 and 1 stitch in garter stitch = 10 stitches left for each shoulder strap. SHOULDER STRAP: Continue with rib and 1 edge stitch in garter stitch on each side, back and forth until the strap measures approx. 18-24 cm = 7"-9½" (or to desired length). Bind off and repeat on the other side. FRONT PIECE: = (37) 42-47-47-52 (57-62) stitches. Continue back and forth with rib and 2 edge stitches in garter stitch on each side until the piece measures (4) 6-7-9-10 (11-12) cm = (1½") 2⅜"-2¾"-3½"-4" (4⅜"-4¾"), work 2 buttonholes from the right side as follows: Work 2 stitches in garter stitch, knit 3, purl 2, knit 2 together, 1 yarn over, work as before until there are 10 stitches left, knit 2 together, 1 yarn over, knit 1, purl 2, knit 3, 2 stitches in garter stitch. When the piece measures (5) 7-8-10-11 (12-13) cm = (2") 2¾"-3⅛"-4" (4⅜"-5⅛"), work 2 ridges over all stitches. Bind off. ASSEMBLY: Sew together the stitches in the crutch. Sew 1 button on each strap. |
||||
Diagram explanations |
||||
|
||||
 |
||||
Have you finished this pattern?Tag your pictures with #dropspattern #afternoonplaydatejumpsuit or submit them to the #dropsfan gallery. Do you need help with this pattern?You'll find 25 tutorial videos, a Comments/Questions area and more by visiting the pattern on garnstudio.com. © 1982-2026 DROPS Design A/S. We reserve all rights. This document, including all its sub-sections, has copyrights. Read more about what you can do with our patterns at the bottom of each pattern on our site. |
||||


With over 40 years in knitting and crochet design, DROPS Design offers one of the most extensive collections of free patterns on the internet - translated to 17 languages. As of today we count 324 catalogs and 12291 patterns - 12281 of which are translated into English (US/in).
We work hard to bring you the best knitting and crochet have to offer, inspiration and advice as well as great quality yarns at incredible prices! Would you like to use our patterns for other than personal use? You can read what you are allowed to do in the Copyright text at the bottom of all our patterns. Happy crafting!
Post a comment to pattern DROPS Baby 36-4
We would love to hear what you have to say about this pattern!
If you want to leave a question, please make sure you select the correct category in the form below, to speed up the answering process. Required fields are marked *.